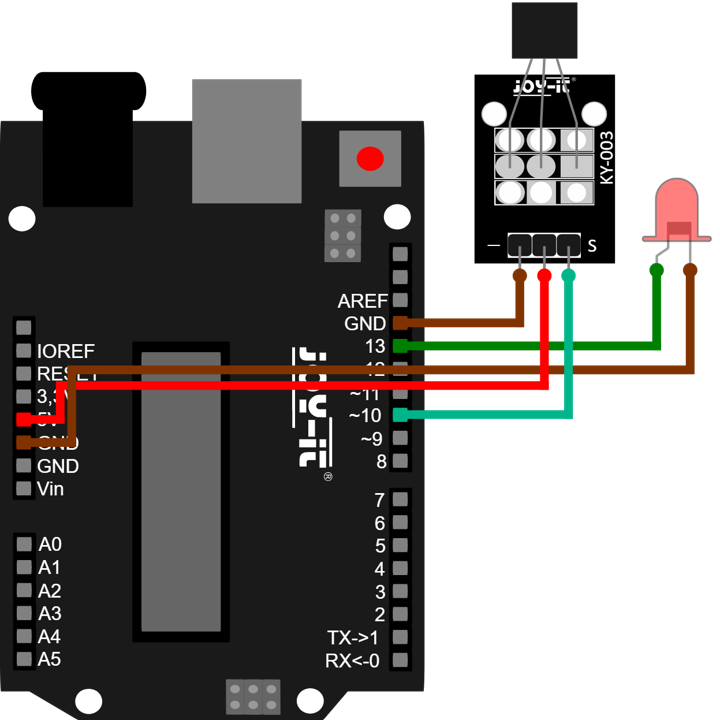
INPUT & OUTPUT


This week we were introduced to multiple types of input and outputs.


What are input and output devices?


Input devices: input devices are devices we connect to to the microcontroller to read and process different kind of data fields from the real world.


Output devices: output devices are devices we connect to to the microcontroller to represnt data and make specific actions in the real world.

Input and Output


First, I started by testing a RGB light where the input was the code and the output was the color of light as a test. I decided to go with the light because I wanted to experment with it for my final project.

1- Testing the RGB light, I started by searching about the connections required for the Rgb light I was using.


I connected the GRND and the other wires, each wire represents a RGB value, which later on translates to a specific color created from these values.


Down below you can find the code I used for the RGB light. The code is just a display of different colors that you can change in a specific order and time that are changable too.

int redpin = 11; // select the pin for the red LED
int bluepin =10; // select the pin for the  blue LED
int greenpin =9; // select the pin for the green LED
int val;
void setup() {
  pinMode(redpin, OUTPUT);
  pinMode(bluepin, OUTPUT);
  pinMode(greenpin, OUTPUT);
  Serial.begin(9600);
}
void loop() {
  for(val = 255; val > 0; val--)
  {
    analogWrite(11, val);
    analogWrite(10, 255 - val);
    analogWrite(9, 128 - val);
    Serial.println(val, DEC);
    delay(5);
  }
  for(val = 0; val < 255; val++)
  {
    analogWrite(11, val);
    analogWrite(10, 255 - val);
    analogWrite(9, 128 - val);

    Serial.println(val, DEC);
    delay(5);
  }
}

Down below you can find a video displaying the code.


2- Testing the RGB SMD light, next, I wanted to test another light because I wanted very specific colors and the previous one did not give me the exact shade of color I wanted therefore, I experminted with the RGB SMD. Down below you can see the connections.

This light required using resistors connecting the light to the microcontroller, the tutorial mentioned the values for each resistor as follows: Rf (5V) [Green] = 100Ω Rf (5V) [Red] = 180Ω Rf (5V) [Blue] = 100Ω . After making sure the light was working, I entered the same values for a specific shade of blue, and it was displayed perefectly by the ligth as you can see down below.


This is the code I used.

    // RGB LED KY-009 Module

int Led_Green = 9;
int Led_Blue = 10;
int Led_Red = 11;

int val;

void setup () {
  //Output pin initialization for the LEDs
  pinMode (Led_Red, OUTPUT);
  pinMode (Led_Green, OUTPUT);
  pinMode (Led_Blue, OUTPUT);
}
void loop () {
   // In this for-loop, the 3 LEDs will get different PWM-values
   // Via mixing the brightness of the different LEDs, you will get different colors.
   for (val = 255; val> 0; val--)
      {
       analogWrite (Led_Blue, val);
       analogWrite (Led_Green, 255-val);
       analogWrite (Led_Red, 128-val);
       delay (1);
   }
   // You will go backwards through the color range in this second for loop.
   for (val = 0; val <255; val++)
      {
      analogWrite (Led_Blue, val);
      analogWrite (Led_Green, 255-val);
      analogWrite (Led_Red, 128-val);
      delay (1);
   }
}
    

3- Magnet sensor, after testing the lights, I tried adding an input which was a magnet sensor.

we followed the connections shown donw below, and because we had a different microcontroller than shown here we changed the numbers in the code according to what we have. you can find the code down below.


    //library to read values from sensor DS18B20
#include <SPI.h>


 void setup()
 {
  Serial.begin(9600);   // sensor buart rate
  pinMode(9,OUTPUT);   // LED connect D9 Pin
  pinMode(10,OUTPUT);
  pinMode(11,OUTPUT);
  pinMode(A0,INPUT);

 }
 void loop()
 {
  int s1=analogRead(A0); //Hall Effect Sensor Connect A0 pin
  Serial.println(s1);
  delay(500);
  if( s1 > 500 )
  {
    digitalWrite(9,HIGH); // LED ON
    digitalWrite(10,LOW); // LED ON
    Serial.println(" Magnet IS Detected ");
  }
  else if ( s1 < 500 )
  {
   digitalWrite(9,LOW);  // LED OFF
   digitalWrite(10,HIGH); // LED ON
   Serial.println(" Magnet IS not Detected ");
  }
 }