Week 3: Computer Controlled Cutting
This week I worked on defining my final project idea and started to getting used to the documentation process.
This Week’s Tasks
Objective
Complete the assignments focusing on laser cutting and design, which include both individual and group tasks:
-
Group Assignment: Understanding Laser Cutting and the Suitable Speed and Power.
-
Individual Assignment: Think of a Design for Press Fit and Laser Cut it.
-
Individual Assignment: Download Silhouette Studio and Design a Sticker to Print it.
Group Assignment: Laser Cutting Basics


Laser cutting is a precise method of cutting or engraving materials using a high-powered laser beam. It is widely used in various industries, including manufacturing, engineering, and art. The laser beam burns and vaporizes the material, resulting in a clean and accurate cut.
Type of Laser Cutter:
-
CO2 Lasers: Best for cutting non-metal materials like wood, acrylic, and plastic.
-
Fiber Lasers: Known for their efficiency and precision, is suitable for cutting metals such as steel, aluminum, and brass.
-
Nd Lasers: Primarily used for engraving and marking metals and plastics.
Suitable Speed and Power Settings:
The speed and power settings of a laser cutter are crucial for achieving the best results. These settings vary depending on the material and the desired outcome.
-
Speed: Refers to how quickly the laser head moves. Higher speeds are suitable for engraving, while lower speeds are better for cutting.
-
Power: Indicates the laser’s intensity. Higher power is required for thicker materials, while lower power is sufficient for thinner materials or engraving.
Key Considerations:
-
Material Type: Different materials require different settings. For example, cutting acrylic requires different settings than cutting wood.
-
Material Thickness: Thicker materials need more power and slower speeds.
-
Desired Finish: Engraving typically uses higher speeds and lower power, while cutting uses lower speeds and higher power.
-
Focal Point: Adjusting the focal point of the laser is essential for achieving clean and precise cuts. The focal point refers to the position where the laser beam is most concentrated and powerful. Ensuring the correct focal point improves cutting efficiency and quality.
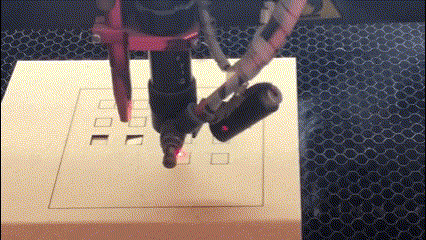
Experimentation with Plywood
Objective: Determine the optimal speed and power settings for cutting 2.45mm thick plywood.
Process
-
Designing Squares:
- We used design ‘RDWorks’ software to draw multiple 1cm x 1cm squares on the computer.

- The designs were then sent to the laser-cutting machine.
-
Setting Up the Machine:
- We placed the plywood on the machine’s bed.

-
Adjusted the machine settings, including the frame and origin point, to ensure precise cuts.
-
The frame button is used to determine the space that will be utilized on the plywood.
-
The origin button is used to identify the starting point of the experiment.
-

- A Lego piece was utilized to consistently determine the correct height adjustment by putting a finger at its backside, pinpointing the laser’s focal point. With a height of about 7mm, the Lego piece aligned perfectly with the optimal focal point for the laser cutting machine, making it a handy tool for swift adjustments.
-
Testing Different Settings:
-
In the software, we experimented with various speed and power combinations by changing the color of the squares:
-
Speed: 15, 20, 30, 40
-
Power: 15, 27, 40, 52, 65

- The laser cutting machine cannot undergo beyond 70% because the probability of the machine being burned is high.
-
The goal was to see which settings allowed the squares to be cut fully without requiring a physical push to remove them.
-
Results
-
The squares that fell out cleanly were cut at the following settings:
-
Speed 15, Power 40
-
Speed 20, Power 30
-
Speed 10, Power 52
-
Speed 20, Power 52
-
Speed 30, Power 52
-
Speed 15, Power 65
-
Speed 20, Power 65
-
Speed 30, Power 65
-
Speed 40, Power 65

-
Analysis
-
The results indicated that higher power settings (52 and 65) were more effective in cutting through the plywood at various speeds.
-
Lower speeds combined with higher power resulted in clean cuts, meaning the laser had enough time and intensity to penetrate the material.
Final Thoughts
From this experiment, we understood that for cutting 2.45mm thick plywood, higher power settings with moderate to low speeds produce the best results. This knowledge is crucial for optimizing future projects involving similar materials.
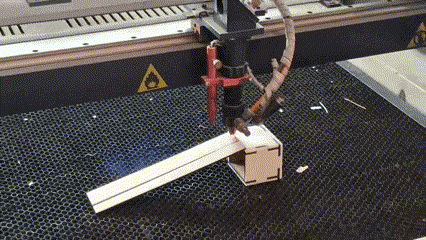
Experimentation with Focal Point
Another group in our class conducted an experiment to determine the optimal focal point for laser cutting:
Objective:
To understand how the height (z-axis) affect the depth of the laser’s cutting.
Process
-
Setting Up:
-
The group placed a rectangular-shaped wood plate at a slanted position on the laser cutting base.
-
Adjusting Heights:
-
They adjusted the height (z-axis) of the laser cutting base to start at the top of the inclined wooden plate. This allowed the laser to move along the plate and cut it at various levels.

-
Testing the Cuts:
-
The laser was used to cut the wood at different heights. Which allowed the group to observe the quality of the cuts at each height to determine the optimal focal point.
Final Thoughts

Through this experiment, we discovered the significant impact of the laser’s focal point on the quality of cuts in plywood. When the focal point is too far from the material, the laser beam spreads out, resulting in a wider cut that can burn the edges. Conversely, when the focal point is too close, the beam is more concentrated, but it may not cut through the material evenly. Therefore, finding the optimal height (z-axis) ensures that the laser cuts evenly and precisely, producing the best results.
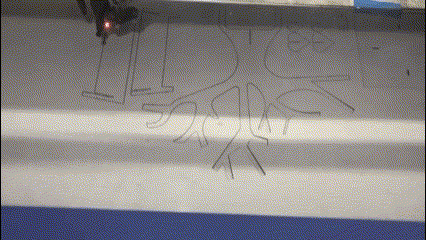
Individual Assignment: Press Fit Design
The assignment was to create a creative press fit shape that could be assembled into various configurations. However, I initially misunderstood the brief and started designing a tree, leaves, and a stand base using ‘SolidWorks’ software.
Designing the Shape
-
Conceptualizing the Design:
-
I envisioned a tree with detachable leaves and a sturdy base, this idea was solely inspired by this website [1].
-
The design had to be in 2D and saved as a DXF file for the laser cutter to accept.
-
-
Creating the Design in SolidWorks:
- I started designing the tree and the base. Due to time constraints, I made the design under-defined and focused on adding parametric measurements for easy adjustments.

- Parametric measurements are crucial because they allow for quick changes to dimensions without altering the entire design, which became essential when we had to change the press fit cuts from 2mm to 1.6mm.


Encountering and Overcoming Challenges
-
File Format Issues:
-
After completing my design, I realized ‘SolidWorks’ software did not directly support exporting 2D designs to DXF format. This caused a moment of panic. 🙁
-
A classmate suggested extruding the 2D shapes into 3D shapes and then scaling the 3D bodies to half the size. I then uploaded the STL file into Fusion 360, arranged and converted the bodies to 2D drawings, and finally exported the designs as DXF files. 🤩
-


-
Scaling Problems:
-
My initial design was too large for the laser cutter. Scaling the design down helped fit it within the machine’s cutting area.
-
However, even after scaling, the design was still relatively large but manageable thanks to the flexibility of the tutors. 😌
-
The parametric measurements did not work as intended. When I tried to change the hole from 1.9mm to 1.6mm, the entire shape of the tree became disfigured. However, this issue was resolved through scaling.
-
Cutting and Assembling the Parts
-
Laser Cutting:
-
I used a speed of 80 and a power of 55 for cutting, following the advice of experienced users.
-
The machine precisely cut some parts, but some such as one of the trees needed some physical push to fall which slightly bent the cardboard.
-
-
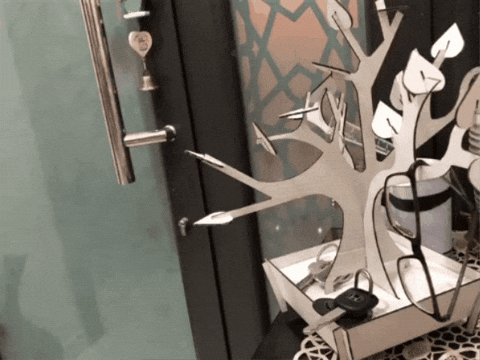
Assembling the Tree:
-
Assembling the tree and leaves was a delightful experience. The parts fit together well, thanks to the parametric design adjustments.


-
The final assembly process attracted the attention of my classmates, who joined in to place the leaves on the tree, making it a collaborative and enjoyable activity.


-
Creative Discovery
-
Despite my initial design being intended to create a single shape, I discovered that one of my design parts could become a simple design by itself.


-
Also it could be integrated with other classmates’ designs. This is the beauty of press fit, it allows for endless possibilities and creativity. Anything can be joined together to make something new and innovative. All it takes is a spark of creativity, and when multiple individuals combine their ideas, the results can be truly amazing. Enjoy some of my classmates’ creativity as they incorporate my leaf parts into their designs.


Final Thoughts

Completing this assignment was incredibly satisfying. Despite the initial setbacks and challenges, the process taught me valuable lessons about design flexibility, problem-solving, and the importance of peer support. Seeing the final product—a beautifully assembled tree was a rewarding experience that underscored the joy of creating something tangible and collaborative.
Individual Assignment: Sticker Design in Silhouette Studio
-
Download and Install Silhouette Studio:
-
Visit the Silhouette Studio website [2] and download the software.
-
Create Your Sticker Design:
-
Open Silhouette Studio and start a new project.
-
Open the file within the application and import the image of the design. In my case, the image was generated by A.I. (Copilot).

- Open the trace panel, select the trace area, then trace it and delete the image.


- Align the traced image to the corner of the canvas.

- Click on ‘Send’ and adjust the ‘Blade Depth’ to either 3 or 4, depending on which setting makes the sticker easily cuttable.

-
Ensure the Silhouette cutting machine is connected to the laptop via USB.
-
Prepare for Printing:
-
Ensure the design is set up correctly for printing, with appropriate cut lines and settings.
-
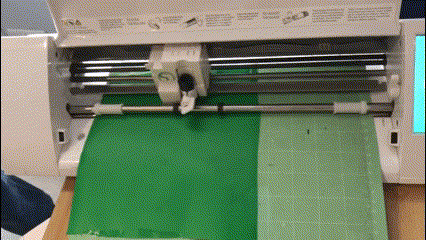
Place the sticker sheet above the cut matt. To prevent any unintended movements that could affect the precision of the cuts, secure it with tape.

-
Make sure the sticker sheet is properly inserted into the machine. Double-check that it’s aligned correctly and ready for the cutting process

-
Print and Cut the Sticker:
-
Use the Silhouette cutting machine to print and cut your sticker design.
-
Apply the Sticker:
-
Once cut, apply your sticker to a desired surface.

Reference
[2] - Silhouette Studio Website