3D Printing
What is it?
The method of creating three-dimensional items from a digital file is known as additive manufacturing, or 3D printing. Additive methods are used to create objects that are 3D printed. An object is made by adding layers of material one after the other until the product is formed in an additive process. You can think of each of these levels as a finely sliced cross-section of the thing. However, there is one exception, which is known as volumetric 3D printing. It is not necessary to fabricate structures layer by layer when using volumetric printing to create whole structures all at once. It is important to remember, nevertheless, that volumetric technology is still mostly in the research stage at this time.
Subtractive manufacturing, which involves, for example, hollowing out or cutting out a block of material using a milling machine, is the reverse of 3D printing.
With 3D printing, you may create intricate shapes with less material than you would with conventional manufacturing techniques.
printing a design requires a 3D file format such as STL file or OBj which could be made in various softwares such as SolidWorks, Fusion360, AutoCad and more, but those softwares might be a little more advanced so it is recommended to use something simpler and easier such as TinkerCad which is a website where you can create 3D designs using simple shapes and adjusting them to your liking and we went over it in week 2.
The final step before printing the design is slicing.
Using a slicing software, slicing is essentially the process of dividing a 3D model into hundreds or thousands of layers.
Your file is prepared for your 3D printer once it has been sliced. You have three options for feeding a file to your printer: USB, SD, or WiFi. You can now begin layer-by-layer 3D printing of your sliced file.
The information was taken from 3Dprinting.com visit the website to learn more.

Printers Available
This is the most advanced 3D Printer available here the Creality K1 which is 12 times faster than the normal printer
Check all the specs of the printer in the [official website](https://www.creality.com/products/creality-k1-3d-printer)
This is the UltiMaker S5 which we used to have the test to compare between the performance of the two printers
Check out the printer details in the [official website](https://ultimaker.com/3d-printers/s-series/ultimaker-s5/)
The experiment
To test the two printers available we are going through a test by printing two designs with the default settings and with no additional supports to the print to see how good can the print be maintained.
The group was divided into two teams and each team chose a design to print from the website that our instructor gave us click here
Software work
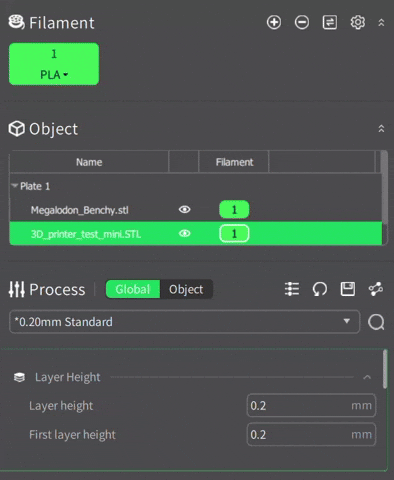
We will be using two softwares that are compatible with the printers one is called Creality Print 5.1 and the second application is called UltiMaker Cura 5.8.0
UltiMaker
The first step after downloading the software is to choose the printer version

Clicking the file and choosing the "from desk" option to import files from the laptop and you can see the option of the "From digital library"

that is how the projects going to look after importing and in this step it is possible to add the supports or adjust the different settings

selecting the material type so the printer can decide the heat and speed

selecting the infill density and and the resolution

after finishing the steps of preparing the project design you can click on slice as the printer prints the object in layers so it needs to read the file as a sliced object to know the paths it needs to follow

Finally save the file into the SD card which then could be inserted in the printer to be printed note the time needed to print the objectsThe time needed for the print is almost five hours

Creality
After setting up the program and choosing the printer you want to print on you go to devices and scan for printers"note hat you have to use the same wifi connection as the printer"

Importing the STL file from the files

The slicing button

This is where you can go to be able to change the filament material
After selecting the material and finishing the slicing we click the "Lan Printing" option to begin the process of printing the pieces

It is possible to start the print from the laptop immediately but it is best to send the Gcode to the printer to start the print from the printer itself to avoid any contradictions with any other prints you can see how the time needed for the print is 1 hour and 45 minutes which is significantly less than Ultimaker

We can place the filament and we can see the name of the material on the roll

After sending the Gcode this is how we can open the file of the project
finally we press print to start the process

this is a picture of the printer in the middle of the process where you can see the infill that is used to support the object from the inside

Results
Creality print

Ultimaker print

you can see the comparison between both printers clearly here

this is the difference in smoothness at the bottom you can see an imperfection in the Creality one which is because of some damage in the bed, but it is clearly smoother than the UltiMaker print

both printers are really good and could achieve even better results with some additional adjustments but the difference in performance is very clear the Creality printer is way ahead with the grain visibility and and smoothness of the print it is also significantly faster as it needed 1hour 45 minutes to finish the print while Ultimaker needed 4hours and 50minutes.
Moreover, there was some strings that bridged between the two pieces which is normal as both of them had them but Creality’s print had thinner and finer strings which could be removed very easily. On the other hand, UltiMaker had thicker strings which need further cutting and sanding the piece to make it smoother.
| The parameter to compare | Creality | Ultimaker |
|---|---|---|
| Version | newer | older |
| Speed | faster(took 1hr 45 mins) | slower(took 4hrs 50 mins) |
| Software | both were easy to use | |
| Quality | the layers were more uniform and well structured | the levels were good but there was strings of filament bridging between parts |
| How to communicate with the printer | Uses wifi | Uses an SD card |
| The printer bed | Quick heating aluminum bed with a flexible magnetic build plate | Glass |
| Weight | Gross weight around 16kg | About 29kg |