Pill Dispensing Mechanism
To be able to dispense a single pill at a time, we research for about many different dispensing mechanisms until we landed on the video below.
We watched the video many time to understand how the mechanism works and we added our own “spin” on it.
Mechanism Components
Cylinder
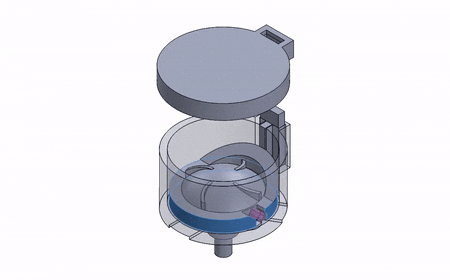
The cylinder contains all of the mechanism components including the pills. It has a hole to allow the pill to be dispensed.

Cylinder Cap
The cylinder cap serves to enclose the cylinder and protects the pills from any debris.

Rotating Disk
The rotating disk rotates to move the pills to the dispensing hole. Every rotating disk has a hole specifically made for each pill.

Sweeper Arm
The sweeper arm “sweeps” away the pills to allow a single pill into the dispensing hole.

Motor Coupling (Male)
The male motor coupling goes into the rotating disk to rotate it.

Motor Coupling (Female)
The female motor coupling connects to the motor from one side and the male coupling from the other to transfer the rotations.

Design Iterations
The first Iterations of the dispensing mechanism were created by Ali Aljishi. Then, he moved on to work on the electronics and I took over designing the mechanism.
Cylinder
Iteration 1
The first iteration of the cylinder was very tall and had a thread on the top so that the cylinder cap can thread onto it.


Iteration 2
The second iteration was much shorter and had the sweeper arm mating surface on the outside of the cylinder. Furthermore, the thread design was discarded and the cap was designed to be press fit. The pill dispensing hole was made bigger.


Cylinder Cap
Iteration 1
The first cap design was too long, wide and connected to the cylinder with a thread.


Iteration 2
The second design was thinner and connected to the cylinder without threads. It did not have a hole for the sweeper arm to go through it (the hole was made after printing).


Iteration 3
The third design was shorter and included a hole for the sweeper arm to go through it.

Rotating Disk
Iteration 1
the first iteration had the rotating disk in two pieces. This is because we were following the design we saw in the reference video. The printing failed because it was printed in the Ultimaker.

Iteration 2
In the second design, we combined the two designs but the printing failed again.

Iteration 3
The third printing attempt had the same design as the previous one but this time it was successful. the main issue with it was that the outer diameter of the disk was exactly the same as the inner diameter of the cylinder which created a lot of friction. furthermore, the disk’s sweepers were too flat.

Iteration 4
The fourth design had the disk’s sweeper platform a bit raised up. However, this caused the pills to get stuck on it. furthermore, the pills were getting stuck to the wall and the hole was “straight” and not concentric to the diameter.

Iteration 5
In the fifth design, the hole was made concentric and its width was increased up to the sweeper platform. The sweeper platform was made “rounder” using a hand file. The issue with this design is that due to increasing the hole size, sometimes two pills will drop from the hole. Furthermore, the pills were getting stuck between the sweeper arm and the disk.

Iteration 6
In this design, the sweeper platform was rounded to reduces the likelyhood that the pills will get stuck between the sweeper arm and the disk. However, this did not help with that problem.

Iteration 7
In this iteration, a slight distance was place between the hole and the sweeper platform and the pill hole width was reduced. This helped to solve all the issue we previously had and results in an almost smooth operation. Three iterations of this design were made (one for each pill type). Each disk has a different hole size and disk height depending on the pill size.


Sweeper Arm
Iteration 1
The first design of the sweeper arm was too thin and the handle by which you remove and insert the arm broke easily.


Iteration 2
The second design was much bigger and sturdier. Many iterations were created because most of the iterations of the rotating disk required a change in the sweeper arm.

The final sweeper arms created had different heights due to the height change in each rotating disk.


Male Motor Coupling
Iteration 1
The first design utilized threads to connect to the rotating disk. Furthermore, the blades of the coupling’s design did not allow it to connect with the female coupling.


Iteration 2
The second design utilized a “key” to connect with the rotating disk instead of threads. Furthermore, the blades design was changed.


Iteration 3
The third design is the same as the previous one with the exception of its length. This is to allow all the components to connect together correctly while assembling them together. This iteration was created by Saeed Makhlooq.


Female Motor Coupling
Iteration 1
The coupling’s blades did not allow it to connect to its male counterpart.

Iteration 2
The blades design was fixed.


3D Printing

Assembly
Part Files
SLDPRT
1- Cylinder
2- Cylinder cap
3- Male coupling
4- Female coupling
5- Rotating disk (Tictac)
6- Sweeper arm (Tictac)
7- Rotating disk (Nexium)
8- Sweeper arm (Nexium)
9- Rotating disk (Cipralex)
10- Sweeper arm (Cipralex)
STL
1- Cylinder
2- Cylinder cap
3- Male coupling
4- Female coupling
5- Rotating disk (Tictac)
6- Sweeper arm (Tictac)
7- Rotating disk (Nexium)
8- Sweeper arm (Nexium)
9- Rotating disk (Cipralex)
10- Sweeper arm (Cipralex)