Week 7: Moulding and Casting Group Assignment
This week’s groups assignment consisted of reviewing data sheets of 4 different moulding and casting materials as well as creating test casts using each material and comparing the results.
Material 1
Material name: RTV2 Silicone Rubber

Safety: non-toxic and skin safe.
Process steps:
1) Surface (Model) that silicone will be poured on must be clean.
2) Release agent for the surface is advised.
3) Silicone must be mixed for at least 30 seconds before adding the curing agent.
4) All preliminary work should be done before casting and casting should be completed without wasting time.
5) Silicone must be mixed well after adding the curing agent.
6) Removing the air bubbles after the mixing process is essential.
7) Silicone must not be touched after the molding process until the vulcanizing (curing) is completed.
Mix ratio (if applicable):
the base (component A) and hardener (component B) carefully with a scale in the mixing ratio 1:1 (by weight)
Work time: 30 - 40 mins.
Cure time: 24 hrs.
Cured material state: white flexible material
Datasheet and sources:
1) RTV2 liquid silicone rubber datasheet
2) Steps to Apply RTV2 Moulding Silicone
Process pictures and comments:
1) Start the scale, and make it zero

2) Pour the “A” 10 gram Ratio is 1:1

3) Pour the “B” 10 gram Ratio is 1:1

4) Pour them

5) Mix them for 2 minutes

6) Pour them to the second glass and mix them for 2 minutes

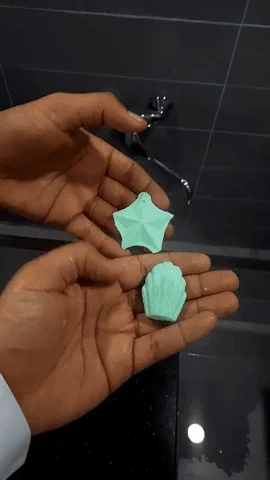
7) Since the silicon is u need a solid mould to pour, because at the end we want a silicon cast

8) Picture after pouring

Result pictures:

Material 2
Material name: “Oatmeal” melt & pour soap base.

Safety: keep it away from your eyes.
Process steps:
1) Choose soap materials: Clear and White Melt and Pour Soup Base.
2) Melt soap at 60-71°C.
3) Add colors and fragrances.
4) Pour it in silicone and plastic molds.
Work time: 20 sec - 1 min in microwave.
Cure time: 4 hours.
Cured material state: Solid
Datasheet and sources:
1) Free Beginner’s Guide to Soapmaking: Melt and Pour - Soap Queen
Process pictures and comments:
1) Choose material and cut desired portion

2) Put the soap inside the microwave in a microwaveable cup.

3) Heat it for 10 seconds then take it out and stir with wood stick

4) Repeat the previous step until the soap becomes liquid.

5) Remember you have 2 minutes before the material hardens.
6) Add fragments or color.

7) pour it in your desired mold.

8) Wait 4 hours to cure it. You can join two soaps with water or lighter or small pieces of soap.
Result pictures:

Material 3
Material name: Mada PLASTER (STANDARD PLASTER)

Safety:
1) Wear gloves to protect your hands.
2) Keep it away from your eyes and mouth.
3) Keep it away from children.
4) Follow the manufacturer’s instruction for mixing.
Process steps:
1) Add 32 liters of cool, clean water and 40 kg of meta plaster together.
2) Stop dosing one powder is exceeding the water level.
3) After one minute of soaking - properly mix by hand or by mixer.
Mix ratio:
1) 32 liters water.
2) 40 Kg mada plaster.
Work time: 5 mins.
Cure time: 15 mins.
Cured material state: Solid - white
Datasheet and sources Links:
1) MADA STANDARD PLASTER Technical Data Sheet
Process pictures and comments:
1) Find out the ratio:
The instruction 32 liters of water and 40 kg of powder.
Note that [1 liters = 1 kg ]

I went with 30 g of powder; therefore, Indeed 24 g of water also.

X = 24
2) Scale the powder and water then add them together.
a- Put the empty glass on the scale and set it to zero, this way the scale can ignore the glass wight once you fill it with water or powder.
b- Put 30 g of powder in a glass and 24 g of water in the another.

c- Pour the water over the powder and start mixing with a spoon.

3) After mixing them together, Pour the mixture in the mold.


4) Wait for it to dry. It says 15 minutes on the pleater but it is beeter to let dry for few hours (1 to 3) to make sure that it dries completely.
Result pictures:

Material 4
Material name: Graffiti Resin Multi Use

Safety:
1) Keep out of children’s reach.
2) Store product in a dry place, preferably in the sealed original container, at temperatures between 20c & 25c.
3) Do not swallow. If you swallow the resin, call a doctor immediately.
4) A face mask should be used for pregnant women while using the product.
5) Wear protective gloves when you use the product.
6) In case the product comes in contact with eyes: rinse cautiously with water for several minutes.
7) Caution: contact with contents may cause an allergic skin reaction.
Process steps:
1) Prepare Tools: Wear gloves and make sure the safety equipment is available.

2) Weighing: Put your measuring cup on the scale to measure the quantities.

3) Amounts: Open bottle A and B then pour equal amounts (1 Resin: 1 Hardener) ex: 100 grams of resin mixed with 100 grams of hardener If you’re using Fast Cure Resin or (1 Resin: 0.6 Hardener) ex: 1 kg of resin mixed with 600 grams of hardener) if you’re using Multi Use Resin.

4) Mixing: Stir well for 3 mins until both blend.

5) Add Colors: Add a little bit of color as you wish and stir very well, Graffiti Resin offers a wide range of alcohol inks, metallic and liquid colors.

6) Pouring: Pour your mix inside a silicone mold of a choice, you can choose one of Graffiti Resin silicone molds.

7) Curing: leave the artwork to cure for 8 to 12 hours until it hardens completely.

8) Hardening: Although your mix might be ready before 24 hours, wait to make sure everything is herded and ready.

9) Remove and Enjoy: Remove your artwork carefully from the silicone mold and share it with us on hashtag #GraffitiResin.

Mix ratio: 10 resin : 6 hardner
Work time: 45 minutes of work time at room temperature .
Cure time: 8 to 12 Hours.
Cured material state: Solid.
Datasheet and sources:
1) Graffiti Resin Multi Use
Process pictures and comments:
1- Placing the plastic cup on the scale and zeroing it.

2- Adding 10 grams of resin in the cup.

3-Adding 6 grams of hardener in a different cup.

4-Mixing the hardener and resin together

5- Adding color to the mixture

6-Pouring the mixture into the molds


7- Waiting for it do dry and cure for 24 hours
Result pictures:
