5. Week 5: Input & Output Devices
This week I learned how to use different types input and output devices with microcontroller boards.
KidsIOT
Buzzer

This code uses the KidsIOT microcontroller board to turn on a piezo buzzer alarm. To know which pin should be used in the code for the buzzer, I used the picture below.

Since I connected the buzzer to port #8, the pin number I should use in the code is 5. This was determined by looking at the color of the buzzer casing (red) and finding the pin number written in the same color in the diagram.
Code used:
from machine import Pin # Imports the pin class from the machine module
import time # Imports the time class

Buzzer = Pin(5, Pin.OUT)  #initialize digital pin 5 as an output.

while True:
    Buzzer.value(1)   # Turning the Buzzer on
    time.sleep(1)     #Buzzer Stays on for 0.5 second
    Buzzer.value(0)   # Turning the Buzzer off
    time.sleep(1)     #Buzzer Stays off for 0.5 second

    Buzzer.value(1)   # Turning the Buzzer on
    time.sleep(1)     #Buzzer Stays on for 0.5 second
    Buzzer.value(0)   # Turning the Buzzer off
    time.sleep(1)     #Buzzer Stays off for 0.5 second
Code output:
Elegoo UNO R3
LEDs and a Button

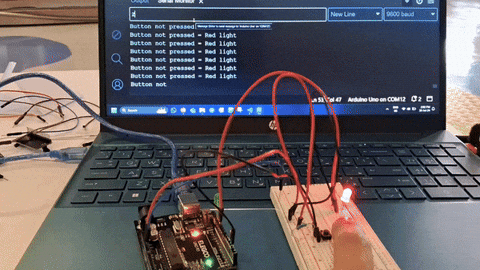
This code is based on an existing example code in Arduino IDE. To access the code, go to File -> Examples -> 0.2Digital -> Button.

The code basically uses the status of a button to turn on 2 LEDs: 1-Off Status: A red LED is turned on and a message is written in the serial monitor to indicate that the button is not pressed. 2-On Status: A green LED is turned on and a message is written in the serial monitor to indicate that the button is pressed.
Circuit connections

Code used
/*
  Button

  Turns on and off a light emitting diode(LED) connected to digital pin 13,
  when pressing a pushbutton attached to pin 2.

  The circuit:
  - LED attached from pin 13 to ground through 220 ohm resistor
  - pushbutton attached to pin 2 from +5V
  - 10K resistor attached to pin 2 from ground

  - Note: on most Arduinos there is already an LED on the board
    attached to pin 13.

  created 2005
  by DojoDave <http://www.0j0.org>
  modified 30 Aug 2011
  by Tom Igoe

  This example code is in the public domain.

  https://www.arduino.cc/en/Tutorial/BuiltInExamples/Button
*/

// constants won't change. They're used here to set pin numbers:
const int buttonPin = 2;  // the number of the pushbutton pin
const int ledPin = 13;    // the number of the LED pin green
const int ledPin2 = 11;    // the number of the LED pin red
// variables will change:
int buttonState = 0;  // variable for reading the pushbutton status

void setup() {
  pinMode(ledPin, OUTPUT);    // initialize the LED pin as an output:
  pinMode(ledPin2, OUTPUT);    // initialize the LED pin as an output:
  pinMode(buttonPin, INPUT);  // initialize the pushbutton pin as an input:
  Serial.begin(9600);         // initialize the serial monitor
}

void loop() {
  buttonState = digitalRead(buttonPin);   // read the state of the pushbutton value:

  // checks if the pushbutton is pressed. If it is, the buttonState is HIGH:
  if (buttonState == HIGH) {
    digitalWrite(ledPin, HIGH); // turn green led on
    digitalWrite(ledPin2, LOW); // turn red led off
    Serial.println("Button pressed = Green light"); // write the sentence in the serial monitor
  } else {
    digitalWrite(ledPin, LOW); // turn green led off
    digitalWrite(ledPin2, HIGH); // turn red led on
    Serial.println("Button not pressed = Red light"); // write the sentence in the serial monitor
  }
}
Code output
Reference video
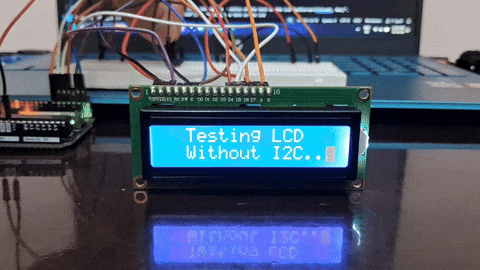
LCD

This code is used to display text on a Liquid Crystal Display (LCD). Furthermore, it uses a potentiometer to adjust the brightness of the LCD. LCDs have 16 pins on them as seen in the image below. However, you do not need to use them all to switch the LCD on. This type of LCD has two operating modes:
4 bits: uses 4 data pins which reduces the number of wires on the circuit and the speed of data transfer (requires twice the time compared to the 8 bit mode) and allows for the unused pins to be used for other electronics.
8 bits: uses 8 data pins which increases the number of wires in the circuit and takes up many digital pins in the microcontroller that could be used for other electronics. On the the hand, it transfers data twice as fast compared to the 4-bit mode.

In this code example, I utilized the LCD screen using the 4-bit mode.
Circuit connections


Installing a Library
Before starting the coding process, I needed to download the LiquidCrystal library. A library is a file written in C or C++ which provides the arduino sketch (code file) with extra function to be able to control varies electronic components such as LCDs. To install the library, I went to the library manager and search for the library I needed (LiquidCrystal) and pressed the install button to install it.

To include the library in the sketch, go to Sketch -> Include Library -> LiquidCrystal.


Alternately, you can simply write #include

Columns and Rows

To specify which column and row the start displaying from, I used the image above and the following code function:
setCursor(column,row)
Code used
#include <LiquidCrystal.h> //adding the lcd library

LiquidCrystal lcd(1, 2, 4, 5, 6, 7);
// creating a variable of type LiquidCrystal. Basically, letting the arduino know which pin is connected to which pin.
// lcd pins (RS, Rw, E, D4, D5, D6, D7).

void setup() {
  lcd.begin(16, 2); // setting the dimension of the lcd.

}

void loop() {

  lcd.setCursor(2,0); //determining the location of the text on the lcd "setCursor(Coloumn, Row)".
  lcd.print("Testing LCD"); // Printing the text on the lcd

  lcd.setCursor(2,1); //determining the location of the text on the lcd.
  lcd.print("Without I2C.."); // Printing the text on the lcd

  lcd.setCursor(15,1); //determining the location of the text on the lcd.
  lcd.blink(); //printing a blinking character
  delay(3000); // determining the duration it stays on

  lcd.clear(); //clears the display

  lcd.setCursor(3,0); //determining the location of the text on the lcd.
  lcd.print("It works!"); // Printing the text on the lcd
  lcd.setCursor(12,0); //determining the location of the text on the lcd.
  lcd.blink(); //printing a blinking character
  delay(3000); // determining the duration it stays on

  lcd.clear(); //clears the display

}
Code output
The potentiometer is being used to adjust the brightness of the LCD.
Reference video
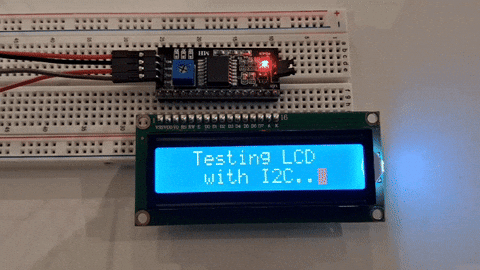
LCD with I2C

Wiring an LCD takes up many pins on the microcontroller as well as many wire which increases the likelihood of wrong connections. To solve all of these issues, an I2C board can be used.
I2C
I2C (Inter-Integrated Circuit) is a two-wire communication protocol used in electronics for connecting low-speed devices like sensors and microcontrollers. It uses a serial data line (SDA) and a serial clock line (SCL) to transfer data between multiple master and slave devices. Each device has a unique address, and data is sent in bytes. I2C supports different speed modes and is valued for its simplicity and low pin count, making it ideal for embedded systems and on-board communications.
Using I2C with an LCD will reduce the number of pins from 16 pins to 4 pins, which means that number of wires will be reduced to 1/4th. Before starting coding the I2C LCD screen, I needed to download and install the LiquidCrystal I2C library.

To install the library in the Arduino IDE, go to Sketch ->Include Library-> Add .ZIP Library and select the downloaded zip file.


Circuit connections

Code used
#include <Wire.h>  //library to communicate with I2C devices
#include <LiquidCrystal_I2C.h> //Adding the library of the LCD I2C

LiquidCrystal_I2C lcd(0x27, 16, 2); //stating the address and size of the lcd

void setup() {
  lcd.init();  //Initializing the lcd
  lcd.backlight(); //starting the backlight of the lcd
}

void loop() {
  lcd.setCursor(2,0); //determining the location of the text on the lcd "setCursor(Coloumn, Row)".
  lcd.print("Testing LCD"); // Printing the text on the lcd

  lcd.setCursor(3,1); //determining the location of the text on the lcd.
  lcd.print("with I2C.."); // Printing the text on the lcd

  lcd.setCursor(13,1); //determining the location of the text on the lcd.
  lcd.blink(); //printing a blinking character
  delay(3000); // determining the duration it stays on

  lcd.clear(); //clears the display

  lcd.setCursor(3,0); //determining the location of the text on the lcd.
  lcd.print("It works!"); // Printing the text on the lcd
  lcd.setCursor(1,1);  //determining the location of the text on the lcd.
  lcd.print("Much easier! :)"); // Printing the text on the lcd
  delay(3000); // determining the duration it stays on

  lcd.clear(); //clears the display

}
Adjusting brightness
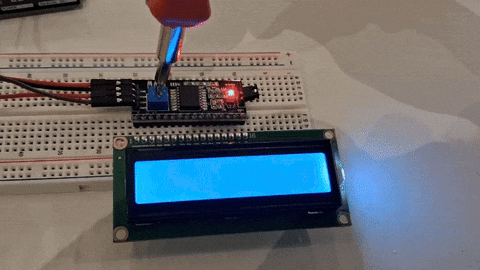
One of the useful features of the I2C boards is that it includes a built-in potentiometer to adjust the brightness of the screen.
Code output
Reference video
Ultrasonic Sensor

An ultrasonic sensor is a device that uses ultrasonic sound waves to measure distance to an object. It works by emitting a high-frequency sound wave (usually beyond the range of human hearing, typically above 20 kHz) and then listening for the echo that bounces back from the object. By measuring the time it takes for the sound wave to return, the sensor can calculate the distance to the object.
The ultrasonic sensor has 4 pins:
1-VCC: input voltage (5V).
2-GND: ground.
3-Trigger: used to trigger the ultrasonic sound pulses.
4-Echo: produces a pulse when the reflected signal is received. The length of the pulse is proportional to the time it took for the transmitted signal to be detected.
The code used is based on the ELEGOO Super Starter Kit for UNO Tutorial. I had to install the SR04 in the Arduino IDE for the code to work (The libary is included in the ELEGOO kit tutorial files).
Circuit connections

Code used
//www.elegoo.com
//2016.12.08

#include "SR04.h"
#include <LiquidCrystal_I2C.h>
#include <Wire.h>

LiquidCrystal_I2C lcd(0x27, 16, 2); //stating the address and size of the lcd

#define TRIG_PIN 9
#define ECHO_PIN 10
SR04 sr04 = SR04(ECHO_PIN,TRIG_PIN);

long a;

void setup() {
  lcd.init();  //Initializing the lcd
  lcd.backlight(); //starting the backlight of the lcd

}

void loop() {
   a=sr04.Distance();
   lcd.clear();
   lcd.print("Distance (cm):");
   lcd.setCursor(0,1);
   lcd.print(a);
   delay(500);

}
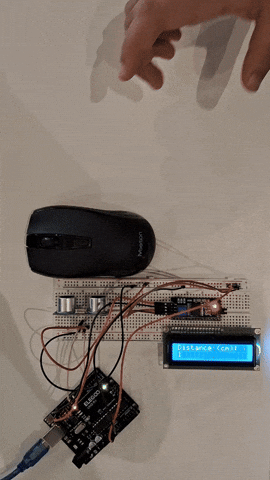
Code output
Rotary Encoder

A rotary encoder is an electromechanical device that converts the angular position or motion of a shaft or axle into a digital or analog signal. It is used to measure rotation, speed, and direction, providing feedback in systems that require precise control of position and movement.
The rotary encoder has five pins:
1- +: Power supply (5V).
2-GND: Ground connection.
3-CLK(Channel A): Outputs a signal corresponding to the angular position or change in position.
4-DT(Channel B):Used in conjunction with Output A to determine the direction of rotation. (For incremental encoders).
5-SW button/switch.
I have used the rotary encoder alongside with a LCD to create a menu for my group’s final project (automatic pill dispenser). My teammembers Saeed and Ali helped me with the coding process.
Rotary encoder working
#include <LiquidCrystal_I2C.h>
#include  <Wire.h>

#define outputA 2
#define outputB 3

int counter = 0;
int aState, bState;
int aLastState;
String Medicine1 = "Panadol";
String Medicine2 = "Accutane";
String Medicine3 = "strepsils";
String Medicine4 = "Vicks";
String Medicine5 = "Vitamin C";

LiquidCrystal_I2C lcd(0x27,  16, 2);

 void setup() {
   pinMode (outputA,INPUT_PULLUP);
   pinMode (outputB,INPUT_PULLUP);

   Serial.begin (9600);
   // Reads the initial state of the outputA
   aLastState = digitalRead(outputA);


  //initialize lcd screen. screen messes up without this
  lcd.init();
  // turn on the backlight
  lcd.backlight();

 }

 void loop() {
   aState = digitalRead(outputA); // Reads the "current" state of the outputA
   // If the previous and the current state of the outputA are different, that means a Pulse has occured
   if (aState != aLastState){
     // If the outputB state is different to the outputA state, that means the encoder is rotating clockwise
     if (digitalRead(outputB) != aState) {
       counter ++;
       if ( counter > 30)  counter = 0;

     } else {
       counter --;
       if ( counter < 0)  counter = 30;
     }
     lcd.setCursor(0, 0);
     lcd.print("Med: ");
     if (counter >= 0 && counter < 7){
     lcd.clear();
     lcd.print("Medicine #1");
     lcd.setCursor(0,1);
     lcd.print(Medicine1);
     }

     if (counter > 6 && counter < 13){
     lcd.clear();
     lcd.print("Medicine #2");
     lcd.setCursor(0,1);
     lcd.print(Medicine2);
     }

    if (counter > 12 && counter < 19){
     lcd.clear();
     lcd.print("Medicine #3");
     lcd.setCursor(0,1);
     lcd.print(Medicine3);
     }

    if (counter > 18 && counter < 25){
     lcd.clear();
     lcd.print("Medicine #4");
     lcd.setCursor(0,1);
     lcd.print(Medicine4);
     }

    if (counter > 24 && counter < 31){
     lcd.clear();
     lcd.print("Medicine #5");
     lcd.setCursor(0,1);
     lcd.print(Medicine5);
     }

     }
   aLastState = aState; // Updates the previous state of the outputA with the current state
 }
Code output

Reference video