Week 2 Computer 3D & 2D Design
This week, I will present a selection of four designs: two in 2D and two in 3D. Each design will be crafted using different software tools to highlight the strengths and capabilities of each platform. I will begin with the 2D designs, where I will discuss the software used, the key features that facilitated the design process, and the techniques employed to bring the concepts to life. Following that, I will delve into the 3D designs, explaining the software choices and how they allowed for intricate modeling and rendering. For each design, I will also provide a detailed stepbystep overview of the construction process, including initial sketches, digital modeling, and any adjustments made along the way. This comprehensive presentation aims to not only showcase the final outputs but also to give insight into the creative and technical journey behind each design.
Important requirements for this week
1. Cuttle

Cuttle is a valuable software for creating simple 2D designs using vector graphics. This approach ensures that the quality of the design remains intact, even when zoomed in or scaled. It will be utilized to craft decorative shapes commonly seen during various occasions, such as Eid.
Step 1 First, you must register to enter and use the site.

Step 2
After logging in I went to New Blank Project:

Step 3
To add elements, I used the left side that contains readytouse templates:

Step 4
How do I use the tools on the site and the functions of each one ?
1. Mirror Repeat: Duplicates and mirrors an object, creating symmetrical patterns.

2. Linear Repeat: Repeats an object in a straight line, allowing for adjustments in spacing and number of repetitions.

3. Rotational Repeat: Repeats an object around a central point, forming circular patterns.

4. Tile Repeat: Creates a gridlike pattern by repeating an object both horizontally and vertically.

5. Transform Repeat: Repeats an object while applying transformations like scaling, rotating, or translating.
![]()
6. Round Corners: Rounds the sharp corners of an object to create smoother edges.

7. Dashed Lines: Converts solid lines into dashed ones, with customizable dash patterns.

8. Text Along Path: Aligns text to follow the contour of a path or shape.

9. Text Within Box: Constrains text within a defined box, allowing for text wrapping and alignment.

10. Merge Paths: Combines multiple paths into a single path.

11. Outline Stroke: Converts the stroke of an object into a standalone path.

12. Expand (Offset): Increases the size of an object by expanding its edges outward.

13. Contract (Inset): Decreases the size of an object by pulling its edges inward.

14. Boolean Union (Weld): Combines two or more shapes into a single shape, merging overlapping areas.
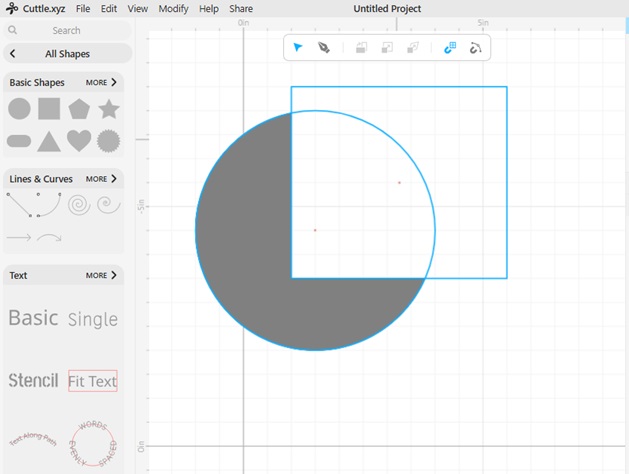
15. Boolean Difference: Subtracts one shape from another, removing overlapping areas.
16. Boolean Intersect: Creates a new shape from the overlapping area of two or more shapes.

17. Mask: Uses one shape to hide or reveal parts of another shape.

18. Fit Within: Resizes an object to fit within a specified boundary or shape.

19. Flatten: Combines layers or objects into a single layer or object, simplifying the design.

20. Layered Stack: Arranges objects in layers, typically for creating depth or organizing elements.

21. Remove Holes: Fills in or removes interior gaps or holes within a shape.

22. Remove Overlaps: Eliminates overlapping areas between objects, simplifying the design.

23. Weld and Score (BETA): Combines shapes by welding them together and creating score lines for cutting or folding.

These tools are typically used in vector graphic design to manipulate and organize shapes and paths efficiently.
Also In 2D design software, tools for changing font type and color typically include: 1. Font Selector: o Allows you to choose from a variety of font styles for your text.
-
Font Size: o Adjusts the size of the text to fit your design needs.
-
Font Color: o Lets you change the color of the text, often through a color picker or palette.
-
Bold, Italic, Underline: o Provides options to style the text with bold, italic, or underline effects.
-
Alignment: o Aligns text to the left, right, center, or justified.
-
Line Spacing: o Adjusts the space between lines of text.
-
Letter Spacing: o Modifies the space between individual characters.
-
Text Effects: o Adds shadows, outlines, or other effects to enhance the appearance of the text.

Some Design I make it

Click here to download all design
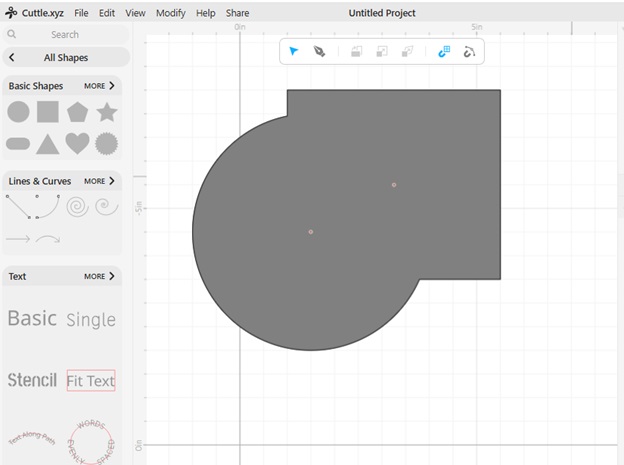
This design I make it by use rectange and star and I cut it using modify then Boolean tools
2. Adobe Illustrator

Adobe Illustrator is a powerful vector graphics design software developed by Adobe Inc. It is widely used by graphic designers, artists, and illustrators for creating scalable artwork, such as logos, illustrations, typography, and other visuals. Introduced in 1987, Adobe Illustrator has become one of the most popular tools in the creative industry due to its versatility, precision, and wide array of features.
Key Features of Adobe Illustrator:
1. VectorBased Design: Unlike rasterbased software (e.g., Photoshop), Illustrator uses vector graphics, which are made up of mathematical paths rather than pixels. This allows designs to be scaled infinitely without losing quality, making it ideal for creating everything from small icons to large billboards.
2. Precision and Control: Illustrator provides advanced tools, such as the Pen Tool, for precise drawing and editing. Designers can create intricate shapes, curves, and lines with incredible accuracy.
3. Wide Range of Tools: Illustrator includes tools for working with shapes, text, gradients, patterns, and more. It also supports advanced features like perspective grids, 3D effects, and blending.
4. Typography: It offers powerful text handling and font management features, allowing designers to create custom typography and manipulate text for logos, posters, and other graphic designs.
5. Integration with Adobe Creative Cloud: Illustrator integrates seamlessly with other Adobe apps (such as Photoshop, InDesign, and After Effects), enabling efficient workflows for complex projects.
Common Uses of Adobe Illustrator
. Logo Design: Create professional, scalable logos for businesses or brands.
.Illustrations: Draw detailed illustrations, cartoons, and vector art.
.Typography and Lettering: Design custom fonts, typefaces, and stylized text.
.Infographics: Build visually appealing charts, diagrams, and infographics.
.Print Design: Develop designs for posters, flyers, business cards, and packaging.
.Web and UI Design: Create icons, wireframes, and graphics for digital platforms.
Some designs I have done
I have done several designs where I used the color base in the designs so that I could put appropriate colors using a tool called the eye dropper. I also used an image to help you put each color and what is appropriate for it as in the picture.

First Design
In the first design, I used the Freepick website, where I downloaded a design from the website and also modified the colors so that they were consistent with each other:

Second Design
In the second design, I used some tools, including drawing a rectangle from the tools menu, then using a tool called twirl. After that, I added the logo and cut it using pathfinder and selected minus front. Likewise, with the name I put, I used the same tool, and in the end I chose the color:

Third design
In the third design, I used the same principle as the first design, making the colors harmonious and downloading the penguin logo from this iconfinder website, noting that I drew two squares in the design:

Click here to download all design
3. Autodesk Fusion 360

Fusion 360 is a cloud-based 3D computer-aided design (CAD), computer-aided engineering (CAE), and computer-aided manufacturing (CAM) software developed by Autodesk. It is an all-in-one platform designed for creating, simulating, and manufacturing 3D models. Fusion 360 is widely used by engineers, product designers, and manufacturers for tasks ranging from concept design to final production.
Unlike traditional CAD software, Fusion 360 integrates design, engineering, and manufacturing workflows in a single interface, making it a powerful tool for modern product development.
Key Features of Fusion 360
1. Comprehensive CAD Functionality Fusion 360 allows users to create precise 2D sketches and 3D models with tools for parametric, freeform, and direct modeling. This flexibility accommodates various design needs, from mechanical parts to complex organic shapes.
2. Cloud-Based Collaboration Being cloud-based, Fusion 360 enables real-time collaboration. Teams can share projects, work together on models, and access designs from anywhere.
3. Simulation and Analysis The software includes simulation tools to test designs under real-world conditions, such as stress, thermal, and motion analysis. This helps identify potential issues early in the development process.
4. CAM and Manufacturing Tools Fusion 360 supports advanced manufacturing workflows, including 2.5-axis, 3-axis, and 5-axis CNC machining, additive manufacturing (3D printing), and sheet metal fabrication.
5. Rendering and Visualization The platform includes rendering tools to create photorealistic images of designs, making it easy to communicate ideas to stakeholders or clients.
6. Extensibility Fusion 360 supports third-party add-ons and scripting, enabling users to customize the software for specific workflows or industries.
Common Uses of Fusion 360
. Product Design: Create functional prototypes and consumer products.
.Mechanical Engineering: Design complex mechanical assemblies and test them virtually.
.3D Printing: Prepare models for additive manufacturing with built-in slicing tools.
.CNC Machining: Generate toolpaths for precision manufacturing workflows.
.Industrial Design: Develop aesthetically pleasing and ergonomic designs for physical products.
.Sheet Metal Design: Design and unfold sheet metal parts for fabrication.
During our learning on Fusion 360
During this week, specifically on the Fusion program, we learned how to use the program, and the first design we made was a small table:

In the tutorial we made a Lego cube to make sure we could use Fusion 360:

My work in Fusion 360
While learning how to use the program, I worked on making a drinking cup with certain angles and decided to put my logo in the middle of this cup:

What tools did I use to draw these designs ?
Tools in Fusion 360: A Comprehensive Overview:
Fusion 360 provides a wide range of tools to support design, engineering, simulation, and manufacturing workflows. These tools are organized into workspaces, each tailored for specific tasks. Below is a categorized explanation of the most commonly used tools in Fusion 360, along with their functions.
1. Design Tools (CAD Tools)
The Design Workspace is used for 3D modeling and sketching. It includes tools for creating, editing, and modifying 3D models.
Sketching Tools

Line, Circle, Rectangle, Arc, and Polygon: Basic tools to create 2D shapes.
Spline: Create smooth, freeform curves.
Constraints: Apply geometric relationships (e.g., perpendicular, parallel, tangent) between sketch elements.
Dimensions: Define specific sizes and distances for sketch entities. Project/Include: Project edges or faces from existing geometry into a sketch for reference.

Solid Modeling Tools
Extrude: Create 3D geometry by extending a 2D sketch along a straight path.
Revolve: Create a 3D object by rotating a 2D sketch around an axis.
Sweep: Create a shape by sweeping a 2D sketch along a predefined path.
Loft: Generate a smooth transition between two or more profiles.
Shell: Hollow out a solid body to create thin walls.
Fillet/Chamfer: Add rounded edges (fillet) or beveled edges (chamfer) to geometry.
Combine: Boolean operations like join, cut, or intersect multiple bodies.
Mirror: Duplicate and reflect geometry across a plane.

Surface Modeling Tools
Patch: Create surfaces from 2D sketches.
Trim/Extend: Modify or extend surface edges.
Thicken: Turn a surface into a solid by adding thickness.

Freeform (T-Spline) Modeling Tools

Create Form: Enter the freeform modeling environment for organic shapes.
Edit Form: Push, pull, and sculpt T-spline surfaces.
Bridge: Connect two T-spline bodies with smooth geometry.

2. Assembly Tools

Fusion 360 allows multi-component assemblies with tools to define relationships between parts.
Joints: Define how components move relative to each other (e.g., rigid, revolute, slider, or ball joints).
As-Built Joint: Create a joint between already positioned components.
Motion Links: Synchronize the motion of multiple joints.
Contact Sets: Enable realistic interaction between components that touch.

3. Simulation Tools
The Simulation Workspace provides tools to test designs under real-world conditions.
Static Stress: Analyze how a part or assembly reacts to forces and stresses.
Thermal Analysis: Study the heat distribution and thermal stresses in a design.
Modal Analysis: Evaluate natural frequencies and vibration modes of a design.
Buckling: Test a structure’s resistance to collapse under compressive forces.
Shape Optimization: Suggest material removal for lightweighting while maintaining strength.

Fusion 360 wide array of tools makes it a versatile platform for product development. Whether you’re sketching initial concepts, performing simulations, or preparing designs for manufacturing, Fusion 360 offers a unified environment to streamline workflows and bring ideas to life efficiently. Its integration of design, engineering, and manufacturing tools into one platform is what sets it apart from traditional CAD software.
4. TinkerCad

TinkerCAD is an intuitive, browser-based 3D design and modeling tool that enables users to create digital designs easily. Developed by Autodesk, TinkerCAD is widely used for educational purposes, hobbyist projects, and even professional applications.
Key Features:
.User-Friendly Interface: TinkerCAD features a drag-and-drop interface, making it accessible for beginners and experienced users alike.
.3D Design and Modeling: Users can create intricate 3D models, which can be exported for 3D printing or further editing in more advanced software.
.Circuit Design: TinkerCAD also includes a circuit simulator that allows users to design and test electronic circuits virtually.
.Code Blocks: For those interested in programming, TinkerCAD offers a Code Blocks feature that lets users create 3D models through code, making it a great educational tool for learning programming concepts.
.Community and Resources: The platform hosts a vibrant community where users can share projects, access tutorials, and participate in challenges.
The work I have done by use this website:
While using this site, I noticed that it is designed in a way that makes it easy for the user to design, as all the tools are available on the right side and some tools are located at the top of the workspace, and this is what made it easy for me to design on it.
I used the cube tool and placed it on the surface of the work site. Then I made it smaller and placed another cube on top of it. Then I wrote on it using a ready-made template. This enabled me to make two cubes on top of each other. I chose a cylindrical shape to cut the last part. Then I changed the colors. Finally, I succeeded in making a small medal.

5. Twinmotion

The Twinmotion program is for 3D Design all what we know about it just a small introduction and we still didn’t use it very will