Week 6: Large format CNC (computer controlled Machining)
This week, I was put in the CNC group where we designed and cut our work. Each student was given one sheet of MDF wood (1220 mm x 2440 mm x 12 mm). The requirements are:
-
Whatever the design is, it should eventually fit in the sheet (1220 mm x 2440 mm x 12 mm).
-
The design must be “Press fit” meaning it can be assembled without and external material such as (screws, bolts, glue, etc.)
-
The Thickness is 12 mm; therefore, make sure that you make the slot thickness 12 mm as well to create a tight fit.

The week’s tasks:
-
Preforming a test and learn how the machine operates.
-
Creating a design using a CAD software.
-
Model 1
-
Model 2
-
Model 3
-
Model 4
-
Model 5
-
-
Cutting the parts using the CNC machine.
-
Assembling the parts together.
Testing the CNC
Here is the documentation of the group assignment done by Faisal Fathi
Reflection:
In various ways the CNC milling machine is similar to the laser cutting machine, both operate in (x, y, z) axis, both work with DXF files or vectors designs, and both are subtractive manufacturing process. However, there are also key differences, as the name suggests, the laser machine uses laser beam to cut or scan the workpiece while the CNC milling uses a drill bit. Moreover, where the laser machine has limitations material wise, the CNC is capable of cutting harder and thicker materials. Furthermore, the engraving in CNC is more accurate since you can define the depth of the engrave whereas in the laser the only variable you can define are speed and power. On of the most important things we learned is safety, the CNC machine could be dangerous if not operated cautiously, thus, the safety procedures should not be taken lightly and must followed precisely.
Creating the design
Before creating the design, I had to decide what I wanted to do. So I decided to create a bookshelf, however, I didn’t want it to a regular bookshelf, I wanted to make it unique. Therefore, I started searching in the internet for bookshelves and I found a design that Inspired me.

This design give a concept what I wanted to do. Hence, I went to SolidWorks and started to crate designs. It took me five design to settle on the final design.
Model 1
This is the first model, simple, straightforward, and efficient. However, I wanted something more creative and unique. Therefore, I discarded it and started doing another design.
You can download this here. Click here to download
Model 2
Click here to download the file as DXF.
Click here to download the file as STL.

This is the second design that I made. This design looked Good and was a creative way to create a bookshelf, However it had a major flaw that I overlooked. I connected two joints through the same slot, the wood sheet thickness is 12 mm, and so the slot will connect 6 mm of the upper joint and 6mm of the lower joint. This wouldn’t create a firm grip. Therefore, the structure will be loose.
As you can see above, the slots has two joints entering it one from above and one from below. For this issue, I had to discard this design and create another.
Model 3
Click here to download the file as DXF.
Click here to download the file as STL.

Note that this model is missing few parts and slots. Therefore, make sure to not downloaded and cut it directly!
I created this model in order to solve the the issue with that I faced with the Model 2 (Having two joints in one slot). As you can see I solved the problem by making the walls of the shelve in the middle not aligned with the ones below and above it, this will allows me to create different slots which will give each joins in the wall a slot for it self. Although this design solve the issue and has no apparent defects or problems, I decided to discarded it also; because I didn’t found it as visually appealing.
Model 4
Click here to download the file as DXF.
Click here to download the file as STL.

Not that this design has major issue. Therefore, do not download it and cut it directly without making adjustments!!!
I was in difficult position at this time, because I had a concept of making the 360 bookshelf but the ways either didn’t work or didn’t fit the picture in my mind. Therefore, I resorted to the instructors for advice. I showed Abd Alghafoor my design and presented him with the concept and he give me an idea; the idea was to make the walls between the shelves as long one wall.

As you can see, the old design had separate walls for each shelve, however, the new design idea had to long walls that press-fitted together. This idea, was perfect, However, it created a slight issue to be solved:
- Issue 1: As the two long walls are fitted together, the shelves must entered from above one by one, and there is nothing to stop them from sliding all the way down. An idea were given to me by Faisal Alhammadi to create small slots where each shelf position and insert small pieces in them as locks for the shelves.

- Issue 2: I wanted to use the entire space of each shelve, however, with this design where the shelves are inserted from above, I Have to leave margin between the slot and the edge of the shelf.

consequently, the stand that holds the book in place (Which is assembled as the edge of the wall) will be nearer which will narrow the space available on the shelf. Therefore, I created ear-looking slots that hangs on the sides of the piece.

By solving those two issues, I realized that one of the solution is an issue if you look at it from different angle; the hanging ear-looking slots will prevent the shelves from going down when inserted, which is major flaw that ruin the entire design.
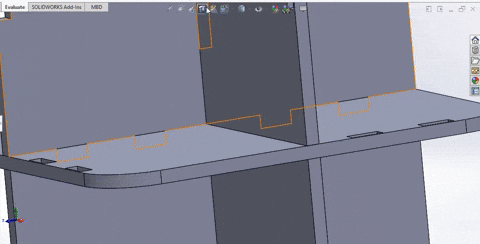
Model 5
This is the final design and the one I will be cutting in the CNC machine!
Click here to download the file as DXF.
Click here to download the file as STL.

In this design, I didn’t discarded the entirety of the previous model, I just changed few things:
-
I changed the the shape of the selves from rectangular to circular because it’s more visually pleasing.
-
I increased the shelves shapes and the width of the walls.
-
I removed the hanging ear-looking slots; since I increased the dimensions of the shelves I could spare few milometers for the sake of the aesthetics.
By making these adjusting the design is finally ready to be cut in the CNC machine.
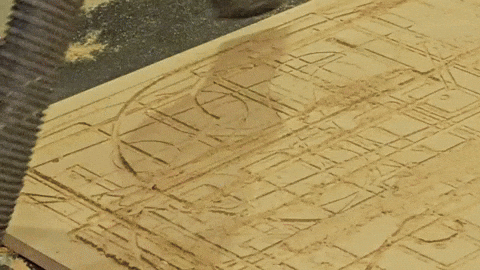
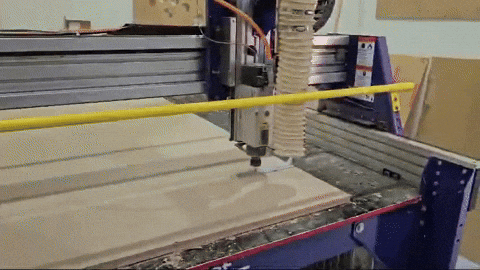
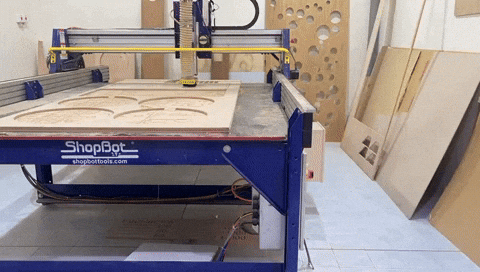
Cutting the parts using the CNC machine
The first thing to is to remove the old piece of wood from the machine, and then clean the wood dust that resulted from the cutting of the old piece.
Next, is to put the new sheet and fasten it with bolts at the edges. it has to be at least a 2 inches from the edge in this manner:


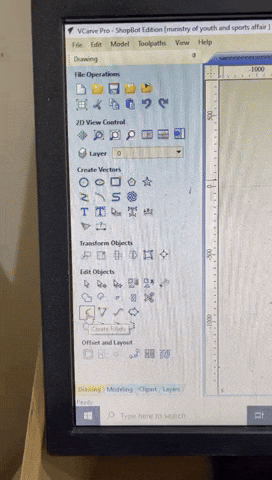
After exporting the files as DXF, we opened the files from the computer attached to the machine in the software called VCarve, in this software we can edit on the design set the frame, add fillet and arrange the pieces.

This this software, we add 20 mm offset from the edges to account for the bolts.

After that, we have to add a fillet type that called Dog-bone:
The radius if the fillet depends on the drill bit size. For example, if you are using a 3 mm drill bit use a radius that half the size of it which is 1.5, then you can add a small allowance and go for 1.6. For my design, I used a 6 mm drill bit, therefore, I went with a 3.1 mm radius.

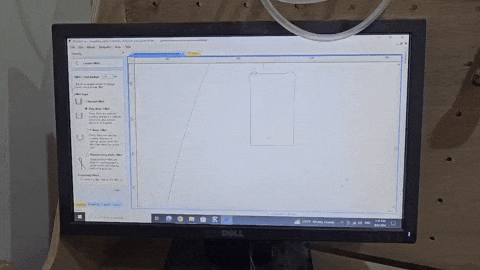
Next is creating the path that the machine will follow:

First select all the pieces, then enter Toolpaths > 2-D path.

-
The starting depth will be “0” and the cut depth will be “13”. The cut depth will be “13” because the Wood sheet depth is 12 mm so we can go 13 mm as allowance to make sure that cut really go through. This will be safe if you are using a “sacrifice sheet” below to make sure you don’t damage the drill bit or the bed of the machine.
-
Here you can edit the machine vectors or basically where the drill bit will cut. As you can see there are three options (Outside/Right - Inside/Left - on). This is customizable based on your design, but it preferred to be “Outside/Right” to make sure that the drill bit doesn’t remove any material from the set dimensions.
The next part is to define the drill bit, spindle speed, feed rate, and plunge rate.

-
Here define the diameter of the drill bit.
-
Here adjust the spindle speed, feed rate, and plunge rate. those values were obtained from the test we made in the group task, were we experimented on different speeds and feed rate to see which one is the smoothest.
Then click “Calculate”

This is will allow the machine to calculate the path that it will go through.

This warning will appear, here the software tells us that we define the piece of wood to have 12 mm thickness, however, we are telling the the machine to drill 13 mm. Click okay, and that is okay since we have a sheet under the our workpiece that called “Sacrifice sheet”. Therefore, no damage to the drill bit or tha bed will occur.

Click on this to save the toolpaths.

Here we have one file that save the new files on it every time and replace the old one to save space in the computer since this computer goal solely to operate the machine. Therefore, there is no need to save all the designs on it especially that dozen of students with different design will use it to cut their designs.
And with this, we are done with the VCarve software. Now we move to the second software which controls the machine ShopBot 3.

With this software we can adust the alignment of the drill bit (x, y, z) and start/stop the operation of the machine.

As you can see, it shows you the coordinates of the drill bit in terms of (x, y, z). Therefore, we need to set those up. By the arrow buttons you can move the drill to your desired location to se an origin point, so move the it towards one of the corners then set the x and y to 0 from the computer. Now the z-axis must be st also, the z-axis is set manually:

As you can see those two tools help set the z-axis, put the clip on the bolt as demonestrated int picture above and the metal below the drill bit. If the drill bit touched the metal plate the circuit will be closed and this means the z-axis is set.
You can see here the machine automatically touches the plate to se the z-axis. After this step, take the clipper and the plate and return them to their place. And now the machine is ready for operation.
Assembly
Here are few photos of the Assembly process:


In the assembly process, Ali Aljeshi and Ahmed Alaali helped me.
Results
Here are the final results:

