8. Moulding and casting
In the final week of our FabAcademy our group had the molding and casting. We were required to create a 2.5D design to be engraved in a mold made from a wax and plastic mix using a fine milling machine.
This is a representation of the difference between 2D 2.5D and 3D objects

The group work assignment PDF link
I specifically chose to do the silicone part in the group assignment as I knew we are definitely going to be using it XD
doing the group assignment helped me understand the safety measures to be taken while dealing with the material, the mixing ratios, mixing time, the curing time and the working time (the time you can work on the material mixing, coloring and placing it in molds) in addition to how to mix the materials in a way to make the ratios as close as possible to what we measured (mixing in both measuring containers).
Group cast test
Our group did not do a cast test unfortunately but our friends from different groups did so check out my friends’ websites for the tests of different materials:
Ali Aljishi’s website for the cast
Hassan Mandeel’s website for different materials
Software part
The first thing to do was to create the design in any 3D design software. I used Fusion360 because I got used to it I made this simple half dumbbell design aiming to do two of them and being able to glue them together

Adding the joint file of the designs after putting them together using TinkerCad this is done to reduce the work time so each two designs are made together at once

We select the designs and assign the size of the mold as the design is going to be in the middle of the mold we will not be putting the exact dimensions of the mold we would make it less to reduce the work time

Creating a tool path

Preview of the design

Settings of the drill bit where we can choose the size and its type

Those are the drill bits that we will use

After making sure everything is ready from the design side we have to set the origin of the CNC machine which is done by lowering the bit until it barely touches the wax that we are going to engrave

After finishing the engraving we can see that the mold is filled with dust so it has to be cleaned I used water to clean most of it but there is still some fine wax stuck in the details

I used this stick to clean the fine details of the mold

The next step is to estimate how much materials are we going to use and this is done by placing the mold on a scale and zeroing it and then pouring water to have an approximate amount of materials to be used

The weight came to be around 29 grams so we will add more than that to make sure that we don't go lower than the requirement with the waste that could happen in the process

Measuring in the needed material and since this is silicon we will be using two substances with a 1 to 1 ratio

20 grams of part A

20 grams of part B

Mixing both parts together

Making sure to mix in both containers to make sure to use all the material and have the ratio as close as possible

Pouring the silicon mix in the mold

This is how the silicon looks after finishing all the steps

The dried off material
The silicon mold final result

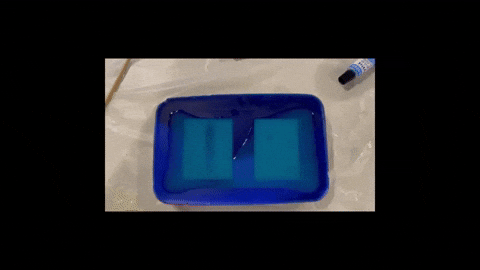
Pouring the resin different parts

mixing them with colorings

Pouring the first colored mix

Pouring the second colored mix to have a mixed color finish result

using the stick to spread the material into the small details

using the heat gun to reduce the bubbles

after waiting for 24 hours these are the final results


the results looked really good and the two color mix looks amazing but the design was really weak and breaking is a very possible outcome as the piece in the middle was too thin.
Overall, this week was very light in work and fun to do and there is a lot of possibilities and room for improvement
Overall
The week was super light and fun and simple I did not face any issues except for one problem with some server issues when it comes to the designing software (Fusion360) so I got some help from my friend Hassan Mandeel so thank you man.