Final Project

The idea originated from a recent (2023) household explosion due to an un-forseen leak from the gas system of a house in Saar, Bahrain late at night. Hence, the idea of this gas valve is to be equipped with a gas sensor and a mechanism to shut off the valve once a gas leak is detected. Additionally, the sensor will continuously monitor the air surrounding the gas tank and the oven, and notify the user of the realtime status of the air quality.

The way this will work is with the use of a microcontroller, which will connect the gas sensor to a motor, and will send a signal to it so rotate as soon as gas of a minimum level is detected. Moreover, the microcontroller will send a signal to the user through their phone to inform them of the emergency.
A full presentation of the final device can be found here.
Research
General Ideas
This week I worked on defining my final project idea and started to getting used to the documentation process.
Links (Smart Mailbox): “Resource 1” “Resource 2” “Resource 3”
Links (Smart Gas Module): “Resource 1” “Resource 2” “Resource 3”
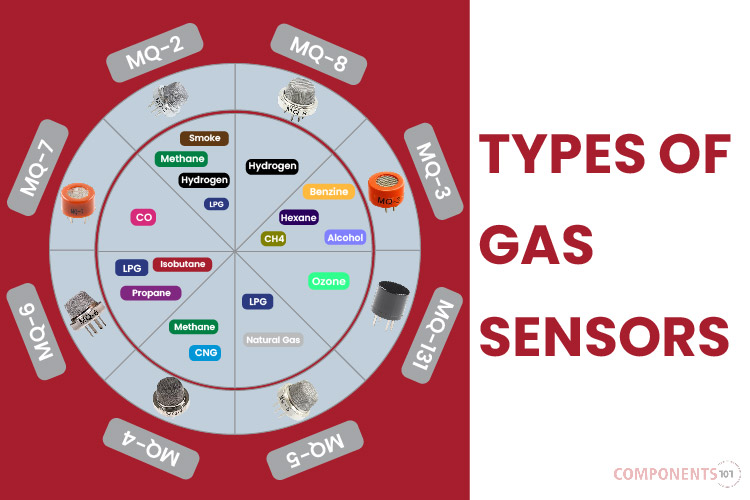
Gas Sensors:
Grove - Gas Sensor(MQ5) for LPG, Natural Gas, Town Gas
“Types of Gas Sensors”

Flow Measurement
The pressure of the cylinder gas varies between 2 and 3 bars depending on the ambient temperature; however, the operating pressure of the cylinders is designed to be 17.5 bars. If the pressure inside the cylinder exceeds 26.5 bars, the safety valve on the cylinder opens and the high-pressure gas is released, preventing the pressure in the gas cylinder from increasing further and the bottled gas from exploding.
For bottled gas to explode, the pressure inside the cylinder has to increase to very high levels (50 bars and above), the cylinder has to remain in fire for a certain period of time, or the safety valve has to fail to open. What is in fact meant in most of the news stories about “bottled gas explosions” in the media is the explosion of gas that is released into the environment and comes into contact.


The MPX10DP is a low-pressure differential sensor, typically used for medical applications. It is not designed for the high pressures and potentially explosive environments associated with household gas.
Arduino Possible Connections:


Addressable RGB Connection
“How to connect Addressable RGB LED”
MQ2 Sensor (Gas Sensor)
HW-508 (Buzzer)
“How to connect Buzzer to Nano”
1602A QAPASS (Screen/Panel)
“How to connect I2C with 1602A QAPASS”
“How to connect I2C with 1602A QAPASS for Nano”
jf-0530b Solenoid
2D and 3D Modeling


Click here to download the ball design.
Click here to download the valve cover design.
Click here to download the stem design.
Click here to download the case design.
Electronics

Testing RGB LED

Testing MQ2 Sensor

Testing LCD Monitor

Code
The code used is below and is based on the research conducted previously mentioned in the page.
// Definitions from First Code
#define MQ_PIN (0)
#define RL_VALUE (5)
#define RO_CLEAN_AIR_FACTOR (9.83)

#define LED_PIN 6
#define NUM_LEDS 4

/* Fill in information from Blynk Device Info here */
#define BLYNK_TEMPLATE_ID "TMPL6tOtbd46W"
#define BLYNK_TEMPLATE_NAME "GAS LEAKAGE"
#define BLYNK_AUTH_TOKEN "H_zIKDv5a2IjOMraXBjVlO-kTXOJJiOL"

#define CALIBARAION_SAMPLE_TIMES (50)
#define CALIBRATION_SAMPLE_INTERVAL (500)
#define READ_SAMPLE_INTERVAL (50)
#define READ_SAMPLE_TIMES (5)

#include <LiquidCrystal.h>
#include <LiquidCrystal_I2C.h>
#include <FastLED.h>
#include <BlynkSimpleWiFiNINA.h>
#include <Servo.h>
#include <SPI.h>
#include <Wire.h>
#include <WiFiNINA.h>

LiquidCrystal_I2C lcd(0x27, 16, 2);
CRGB leds[NUM_LEDS];

float LPGCurve[3] = {2.3, 0.21, -0.47};
float Ro = 10;

const int buzzer = 2;

float MQResistanceCalculation(int raw_adc) {
  return (((float)RL_VALUE * (1023 - raw_adc) / raw_adc));
}

float MQCalibration(int mq_pin) {
  int i;
  float val = 0;

  for (i = 0; i < CALIBARAION_SAMPLE_TIMES; i++) {
    val += MQResistanceCalculation(analogRead(mq_pin));
    delay(CALIBRATION_SAMPLE_INTERVAL);
  }
  val = val / CALIBARAION_SAMPLE_TIMES;
  val = val / RO_CLEAN_AIR_FACTOR;
  return val;
}

float MQRead(int mq_pin) {
  int i;
  float rs = 0;

  for (i = 0; i < READ_SAMPLE_TIMES; i++) {
    rs += MQResistanceCalculation(analogRead(mq_pin));
    delay(READ_SAMPLE_INTERVAL);
  }
  rs = rs / READ_SAMPLE_TIMES;
  return rs;
}

int MQGetGasPercentage(float rs_ro_ratio, int gas_id) {
  return MQGetPercentage(rs_ro_ratio, LPGCurve);
}

int MQGetPercentage(float rs_ro_ratio, float *pcurve) {
  return (pow(10, (((log(rs_ro_ratio) - pcurve[1]) / pcurve[2]) + pcurve[0])));
}

// Definitions from Second Code
#define BLYNK_PRINT Serial

char ssid[] = "BSC-F2";
char pass[] = "bsc@2030";
char auth[] = BLYNK_AUTH_TOKEN;

BlynkTimer timer;
Servo servo;

int lastPosition = 0;
int onnPos = 750;  // clockwise direction
int offPos = 2000;  // counter-clockwise direction

void sendSensor() {
  int data = MQGetGasPercentage(MQRead(MQ_PIN) / Ro, 0); // Using LPG as the target gas
  Blynk.virtualWrite(V0, data);
  Serial.print("LPG: ");
  Serial.println(data);
}

void setup() {
  Serial.begin(115200);
  lcd.init();
  lcd.backlight();
  Serial.println("Calibrating...");
  Ro = MQCalibration(MQ_PIN);
  Serial.println("Calibration is done...");
  Serial.print("Ro=");
  Serial.print(Ro);
  Serial.println(" kohm");

  lcd.begin(16, 2);
  lcd.clear();
  lcd.print("Ro=");
  lcd.print(Ro);
  lcd.print(" kohm");

  FastLED.addLeds<WS2812, LED_PIN, GRB>(leds, NUM_LEDS);
  pinMode(buzzer, OUTPUT);

  Blynk.begin(auth, ssid, pass);
  timer.setInterval(2500L, sendSensor);
}

void loop() {
  Blynk.run();
  timer.run();

  int LPGValue = MQGetGasPercentage(MQRead(MQ_PIN) / Ro, 0);
  lcd.setCursor(0, 0);
  lcd.print("LPG:");
  lcd.print(LPGValue);
  lcd.print("ppm    ");

  if (LPGValue >= 500 && LPGValue < 700) {
    fill_solid(leds, NUM_LEDS, CRGB::Orange);
    tone(buzzer, 1000);
  } else if (LPGValue >= 700) {
    fill_solid(leds, NUM_LEDS, CRGB::Red);
    Blynk.logEvent("gas_alert", "Gas Leakage Detected");
    tone(buzzer, 3000);
  } else {
    fill_solid(leds, NUM_LEDS, CRGB::Green);
    noTone(buzzer);
  }

  FastLED.show();
}

BLYNK_WRITE(V1) {
  int value = param.asInt();
  Serial.println(value);

  if (value == 1 && lastPosition != onnPos) {
    servo.attach(16);
    servo.writeMicroseconds(onnPos);
    delay(500);
    servo.detach();
    lastPosition = onnPos;
  } else if (value == 0 && lastPosition != offPos) {
    servo.attach(16);
    servo.writeMicroseconds(offPos);
    delay(500);
    servo.detach();
    lastPosition = offPos;
  }
}