FINAL PROJECT


Welcome to our documentation of the final project (LENIO LIGHT). Me and my colleague Roaya worked on this project together, my documentation will be about the form of the light and hers is about the coding part.

Check out her page to see the coding process! ROAYA ALSAFFAF.


What is LENIO LIGHT?


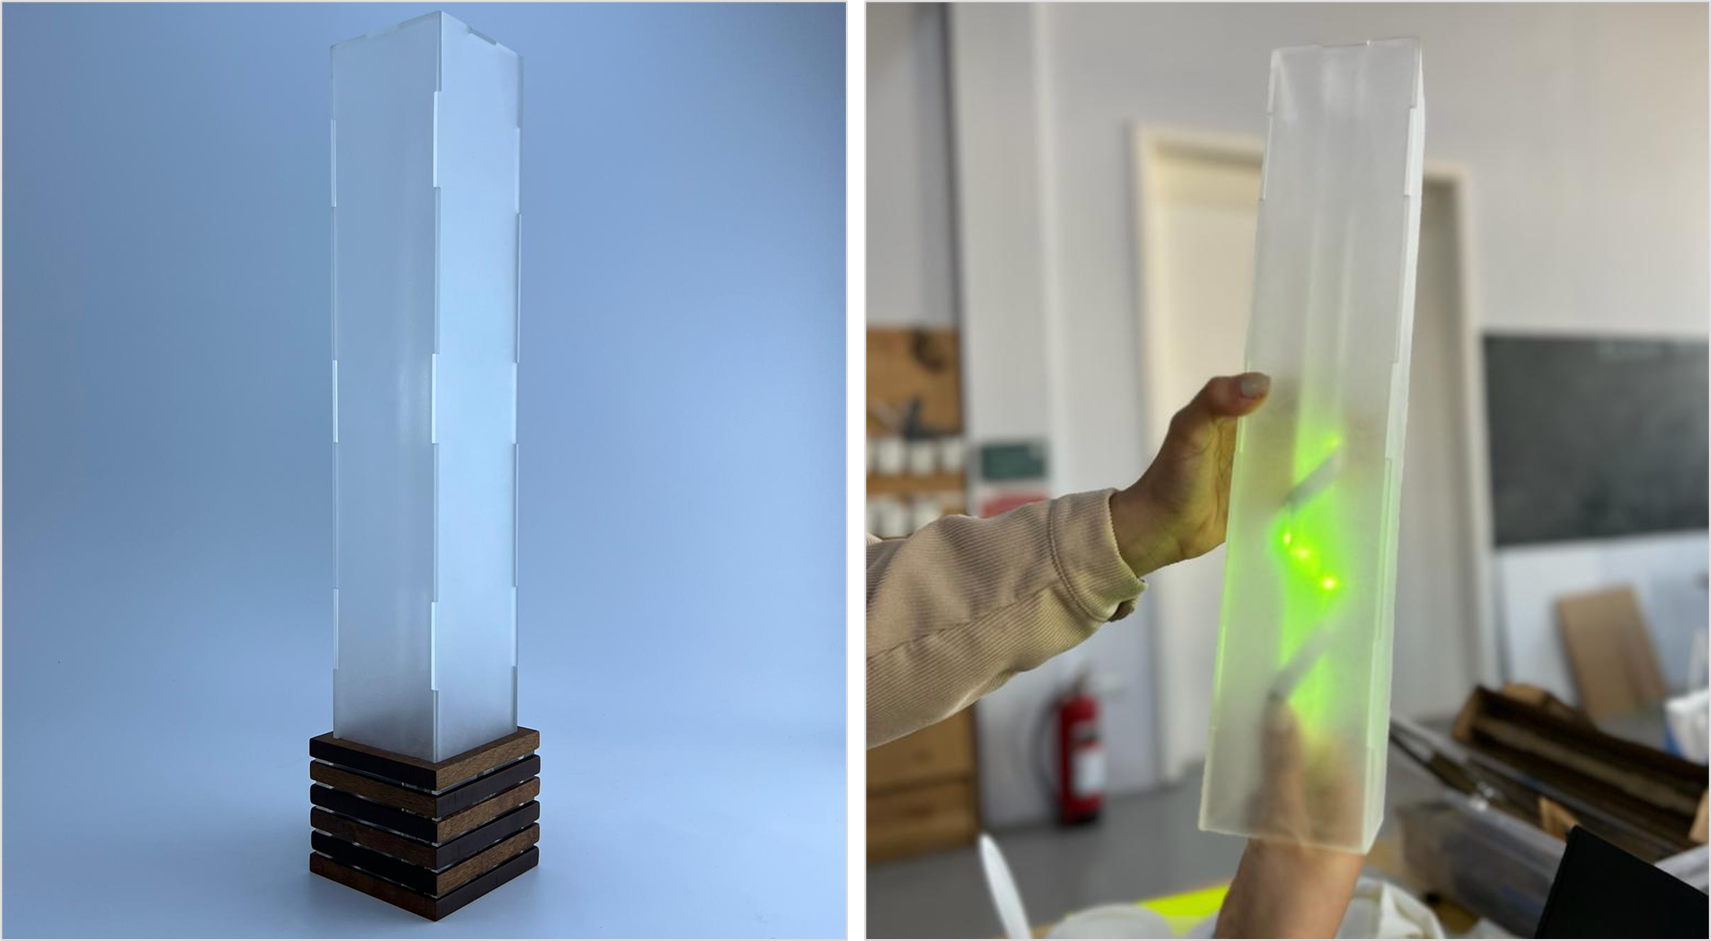
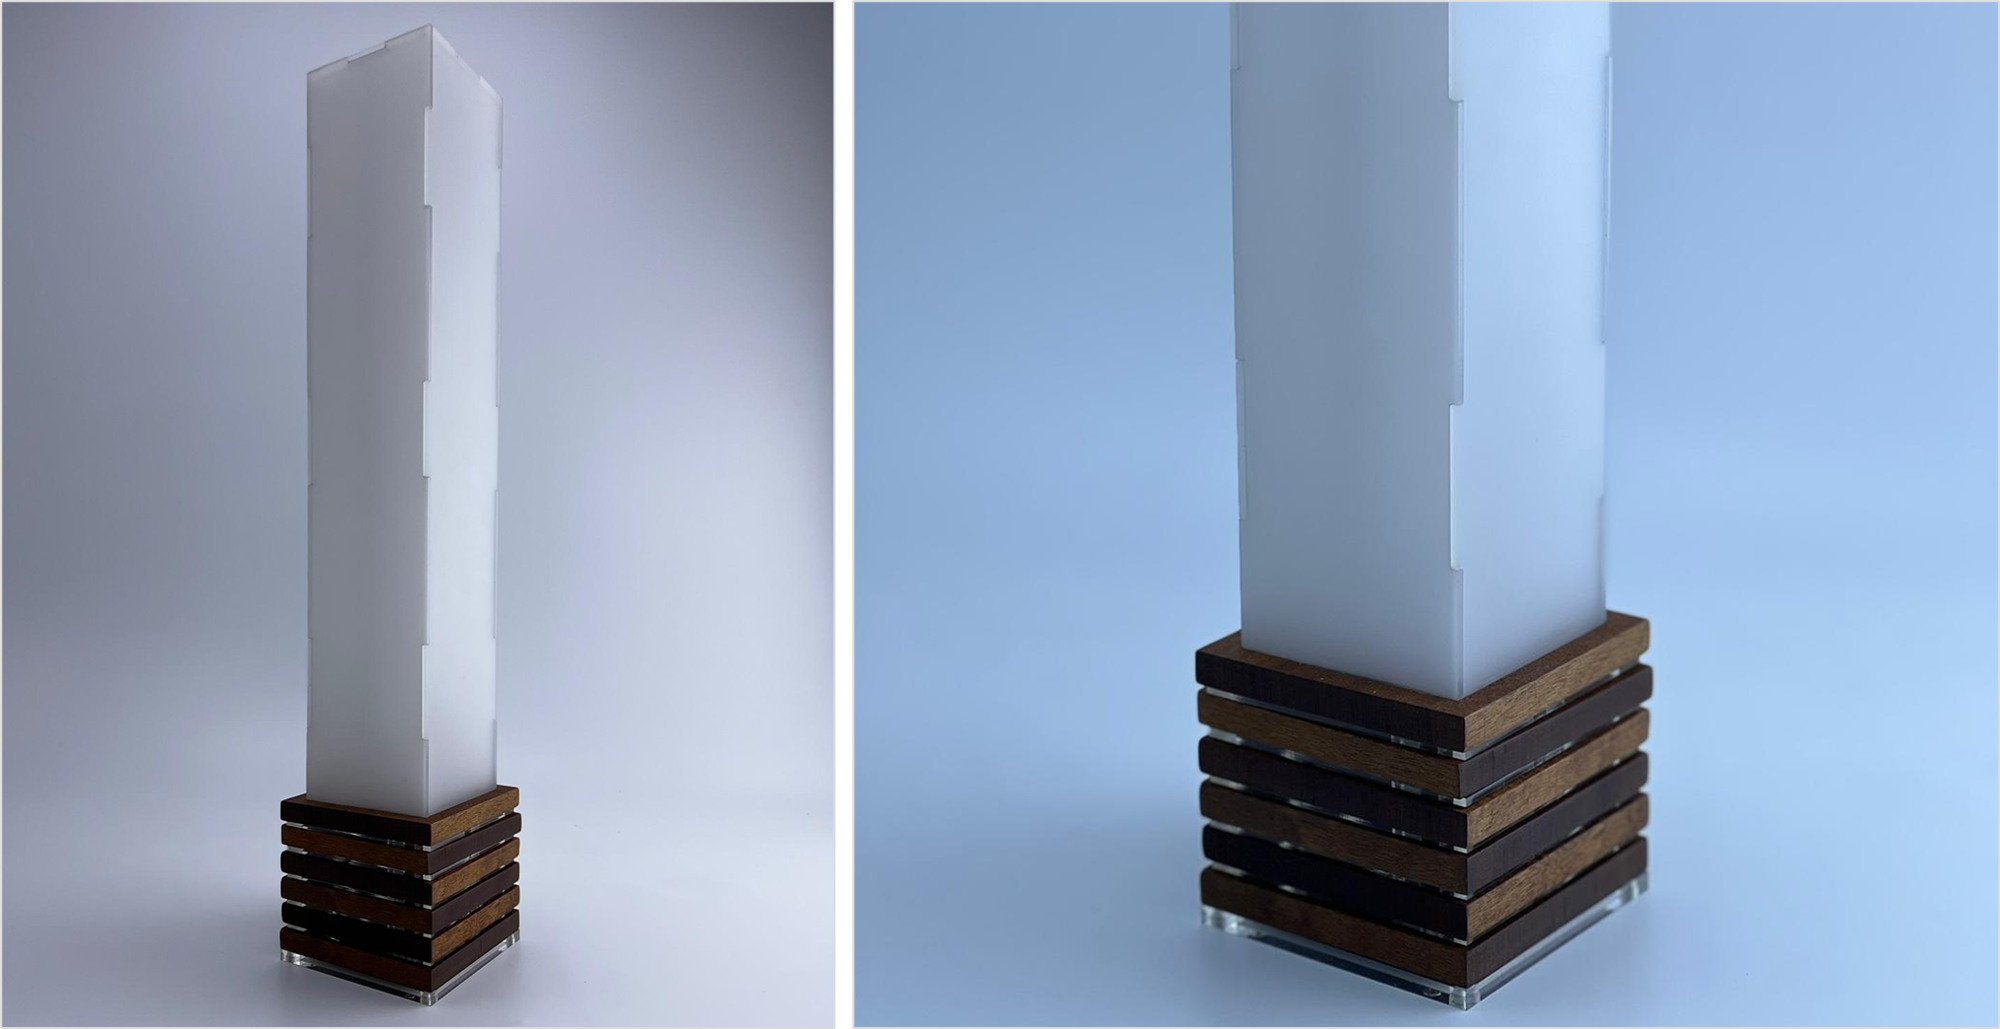
LENIO LIGHT is a smart and versatile lighting solution that combines convenience and innovation. It's a portable light that runs on batteries, making it easy to move around and use in different settings. The device is connected to an app, which allows users to access pre-programmed mood settings for activities such as sleep, relaxation, focus, screentime and migraines. Each mood setting has a specific RGB color and lighting level, which can help to improve one's mood and overall well-being. To save energy, Serenity Glow can be programmed to turn off and on at specific times, and it can even serve as an alarm clock. Its elegant design and advanced features make it a must-have for anyone looking to enhance their daily life.
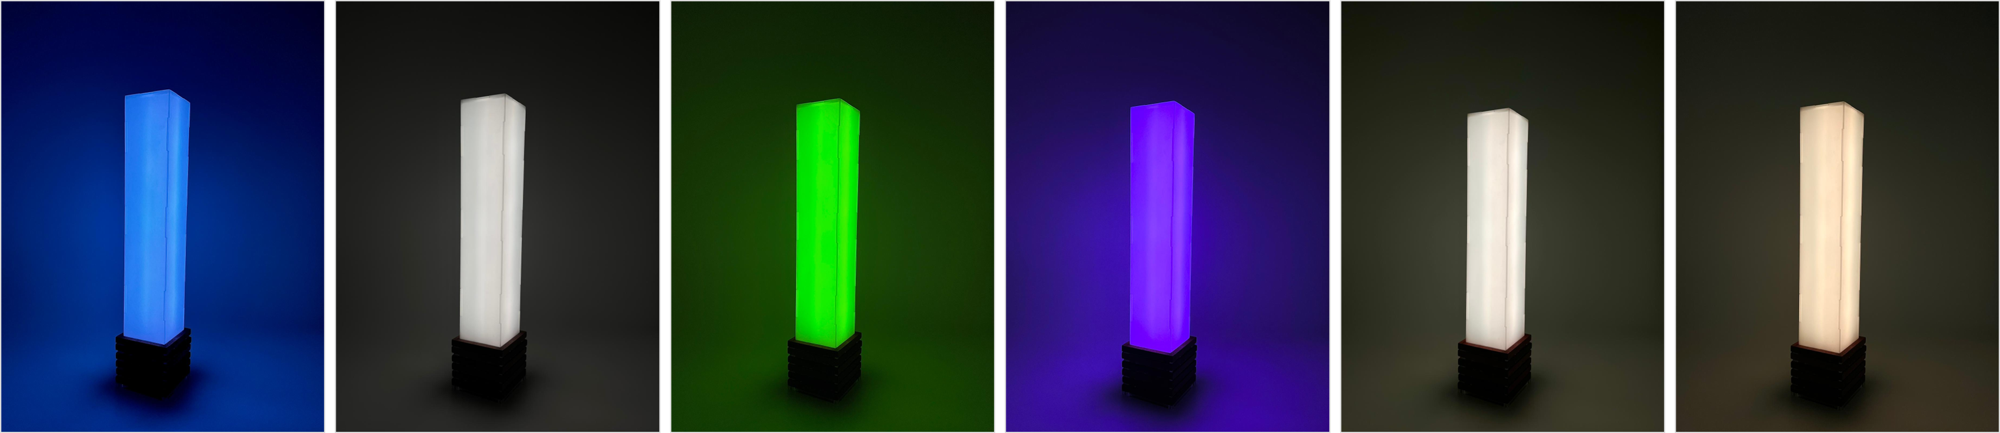
 

Colors and modes:


1- SLEEP MODE Blue light suppresses the body’s release of melatonin, a hormone that makes us feel drowsy and sleepy.


2- FOCUS MODE Warm white light has a yellow-orange hue thar is believed to reduce eye strain and improve focus by creating a calming and conducive environment.


3- MIGRAINE MODE Green light of a specific wavelength and intensity reduces the frequency and intensity of migraine headaches as it has zero blue light.


4- RELAX MODE Purple light can help in reducing emotional and mental stress. The nervous system and eyes are linked with this secondary colour.


5- SCREEN MODE The yellow light helps in reducing the amount of blue light exposure and can make screen time more comfortable for the eyes.


6- READING MODE Amber light is a type of warm-toned light that is often used for reading, as it is believed to be easier on the eyes compared to cool-toned white light.


LENIO LIGHT


1- Coming up with the form, we started by creating our first prototype as shown below. We wanted to see the connections and what exactly we need for the electronics part (battery and microcontroller), so we can design the light accordingly. We wanted the electronics to be at the bottom of the light, connected to the LED strip that will go along a tube in a loop.


2- Creating the joints, We started experimenting with cardboard to see how the joints would look light, at first we went with the 6mm cardboard, but as you can see down below it looked very bulky. We designed the pieces and cut them using the lazer machine. To check the joints, we cut three joints with different dimensions to see which One has the best fit, because we wanted the light to be glue free, with only the joints connecting the pieces.


3- Experimenting with acrylic, Next we wanted to chack the fitting of the joints with acrylic to see if it possible to achieve it using 3mm acrylic board. We cut three pieces only to check the stability of the design with joints, we experimented with each piece as shown in the photo on the right side, we compared between using the clear acrylic, the sanded acrylic and the white-stained acrylic. You can see which one we went with in the end!


4- Finalizing the size, The next step was making sure of the size, the electronics at the bottom required at least 7.5cm in width which required some adjustments to the lighting piece as we wanted the light to look like a one whole piece with the same width. So we created another cardboard prototype to see how it would look like as a final piece, also in this stage we developed the idea of adding wood to the design, as shown below we created multiple pieces of wood and layered them on top of eachother to cover the electronics part at the bottom, we used MDF and we cut it using the CNC machine.

In the first photo down below you can see a thinner tube in the inside, we created this tube that goes all the way to the top to hold the LED strips lights so the whole piece can glow .


5- Cutting the final pieces, After making sure of the final prototype, we moved on to the next step which was creating the final form. We started by cutting the final acrylic pieces as shown below. Then we sanded each piece by itself to create the diffusing effect. TIP: try sanding the acrylic piece before cutting it, to prevent any damages that might happen to the pieces while sanding.


We started the sanding journey with 100 using the sanding machine, then to make it smoother we uesd 1000 manually.


6- Putting the LED strip light, Next, it was time to test if the diffusion works or no, our initial thought was to put the LED strips in a loop manner where it would wrap around the tube, but we discarded that idea as soon as tried it because the effect of the light strips was too much, so we went with sticking the LED strips back to back as shown below and putting it INSIDE the tube instead of around it.


7- Cutting the final wooden pieces, After approving the MDF, we cut the final pieces of the "fancy" wood we had in the workshop using the CNC machine, after that we sanded them and put the wax.

You can see how the sanding and the wax made a huge difference in the outcome. We started sanding with the number 60 and then 100 and to smooth it we went with 1000, all of them done manually.


8- Adding the acrylic joints Next, it was time to connect the wooden pieces, we wanted to seperate the wooden pieces to avoid the bulkiness, so we came up with the idea of adding clear 3mm acrylic layers in between the wooden layers, this way it can give the floating effect. We added the joining piece in the acrylic layers, the joining pieces was an extra piece coming out of the shape to interlock with the (acrylic comb) we created to hlod the pieces together, that way the layers can be seperated if needed.

The diagram down below illustrates how the acrylic comb connects and locks the acrylic pieces together, along with the wooden layers that are trapped in-between the acrylic pieces. .


9- Fixing the tube in-place After adding the lights inside the thinner tube, it was time to glue it shut using the acrylic glue. WARNING: the acrylic glue is very dangerous and safety Precautions are a must! After that we glued the tube to the wood using silcon.


10- Fixing the electronics After making sure that the light is working, it was time to fix the electronics in place, we started by measuring exactly the the size we need for the battery, the on-off button and the USB. After experimenting with MDF, we cut the final wooden piece and we secured the battery with a 3mm black acrylic piece screwed in-place.

The awesome part about having joints is that you can speretae them whenever you want! we wanted to fix the position of the microcontroller as shown below and we were able to access them thanks to the joints, we wanted the microcontroller to be in a vertical position so it would be aligned to the USB port we created, so the light can be reprogrammed whenever needed. So we created an acrylic piece that can hold the microcontroller. As shown below, we bent the acrylic (using the machine in the first photo) into a L SHAPE so it would be steady inside, then we screwed it in-place.

Problems encountered: Out of nowhere the light stopped working, and after searching for the reason, it was because the wires were not connected properely, so we solidered them and covered them with tape as shown below.


Problems encountered: When we put everything together, we were not happy with the way the LED strips show, as they were not diffused well enough. As you can see down below this is the sanded acrylic, so we went back and substituted it with the white-stained acrylic.

And this is th white-stained acrylic and you can see how nicer and cleaner it looks, scroll down to see how it diffuese the light!.


THE FINAL RESULT! As you can see donw below, this is the final product, we were happy with the way the LED strip light was diffused, and each color shows exactly as we wanted it to!

And this concludes our journey with LENIO LIGHT!


click here to downland the main lamp (dxf file).


click here to downland the acrylic base layers (dxf file).


click here to downland the wooden base layers (dxf file).


click here to downland extra pieces to complete the lamp (dxf file).