The shell project
In this project we made a shelf with enclosed sensors to collect and send data using MQTT protocol
What are monitoring systems?
Its the systems that regularly review records of any activity’s progress by systematically gathering and analysing data and information and keeping a certain parameter equal or close to a required set point and appraising the process.
The Shelf Design
The Idea in designing the shelf was to create Two enclosed layers of MDF material with a thin stripe of silicon in between. The shelf was made to secure the electronic peices in place.
Acrylic design
The silicon stripe has a rectangular shape with two holes at the two ends for the sensors interface.
First insert a 471.62x10mm rectangle
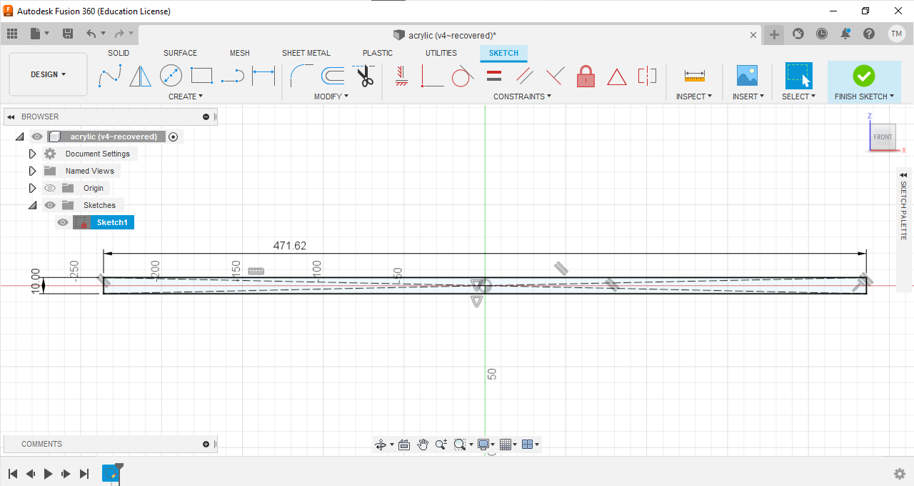
Create a 4.5mm diameter circle


Use mirror to make the circle at the other end

Click here to download the design DXF file
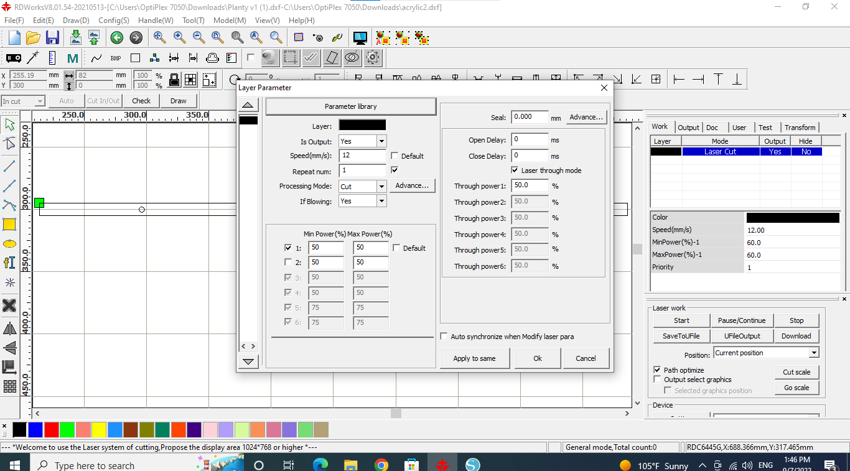
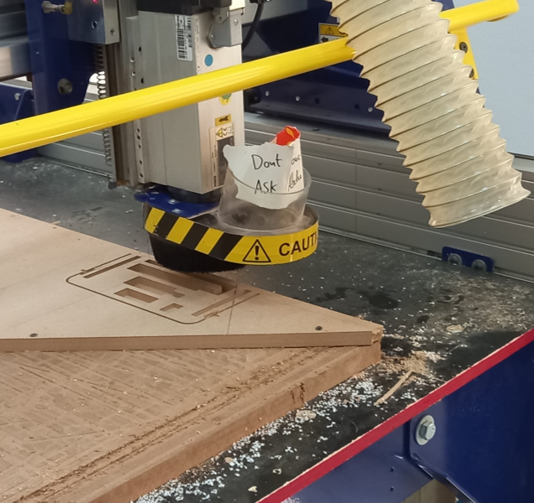
Laser cutting
Import the Acrylic design to the laser cutter

Use the speed and power for the 3mm acrylic found in the parameter library

Load the settings and download the file to the machine for cutting
The laser machine cutting
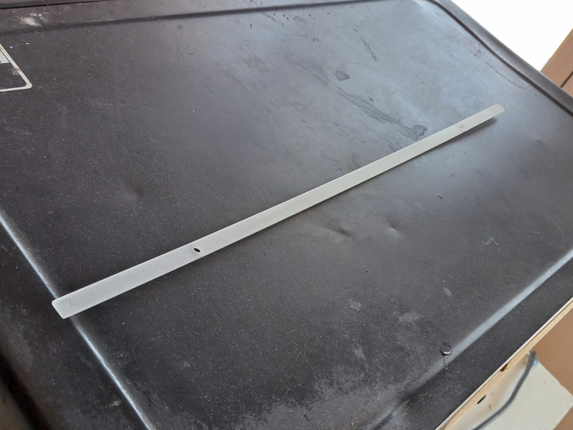
The acrylic after getting cut
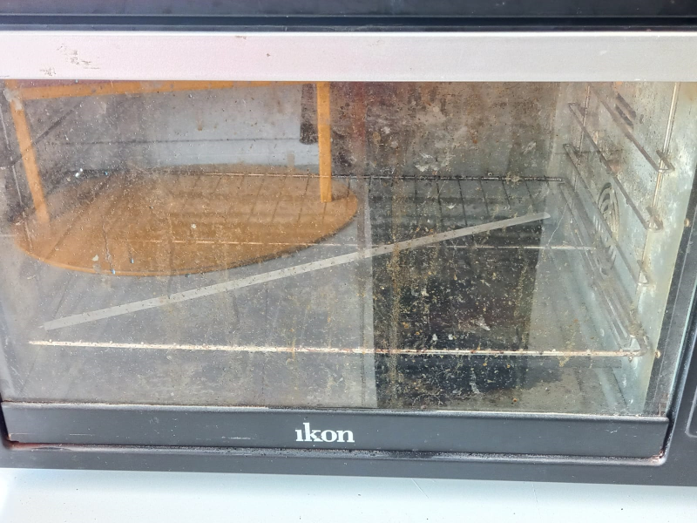
we heated the acrylic in the oven so we can bend it afterwards
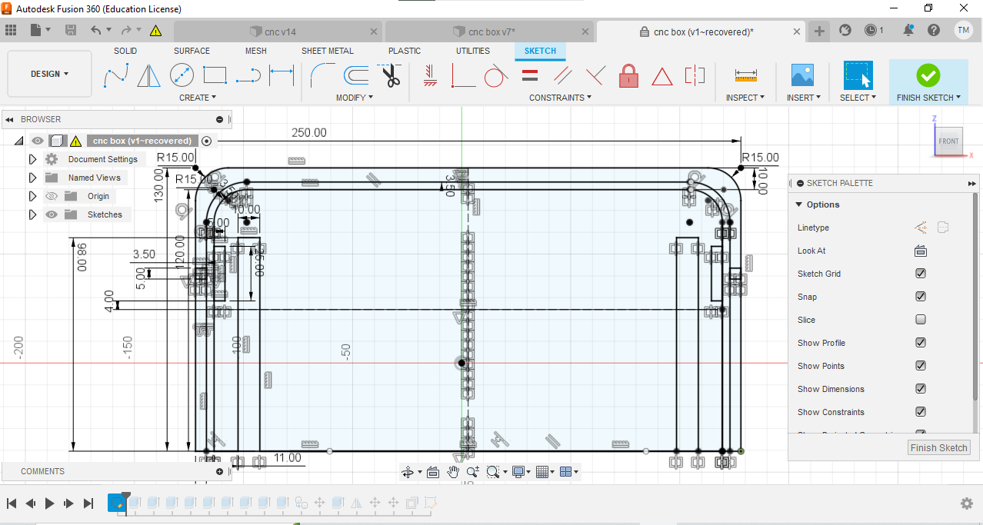
The shelf design
The base for the two layers 18mm of MDF material with 250x130mm size
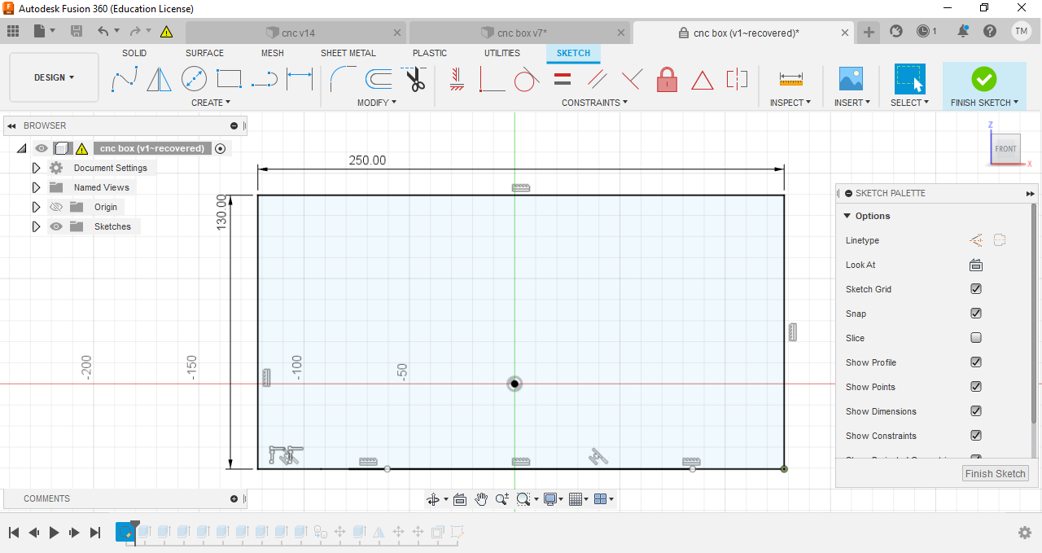
Fillet the corners
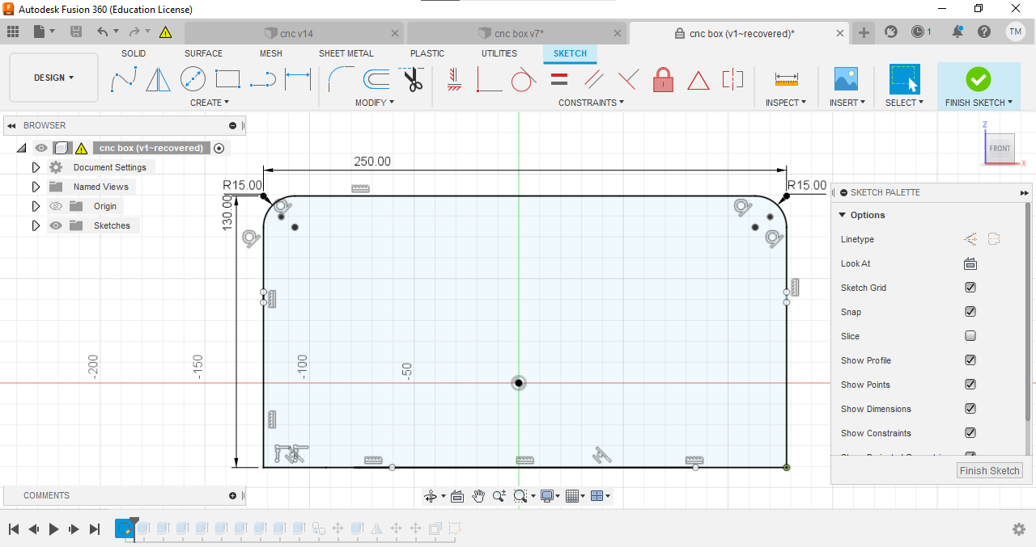
Add the groof of 3.5mm width for inserting the silicon
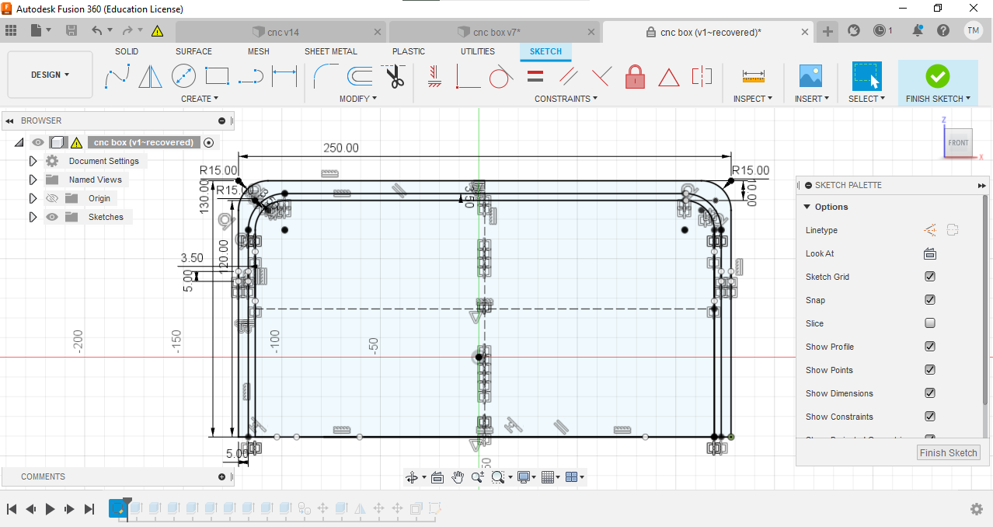
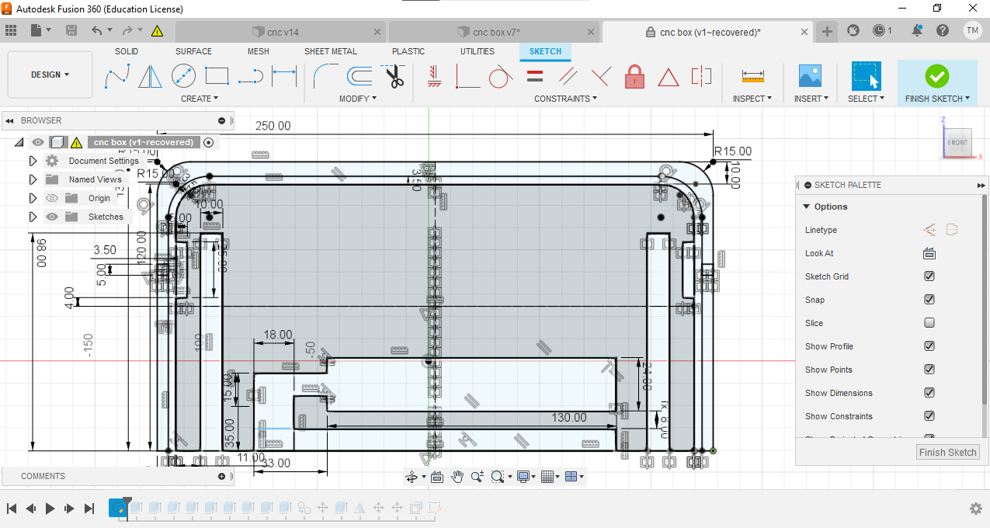
The sensors place and the stands for one side
Create mirror image around the y axis
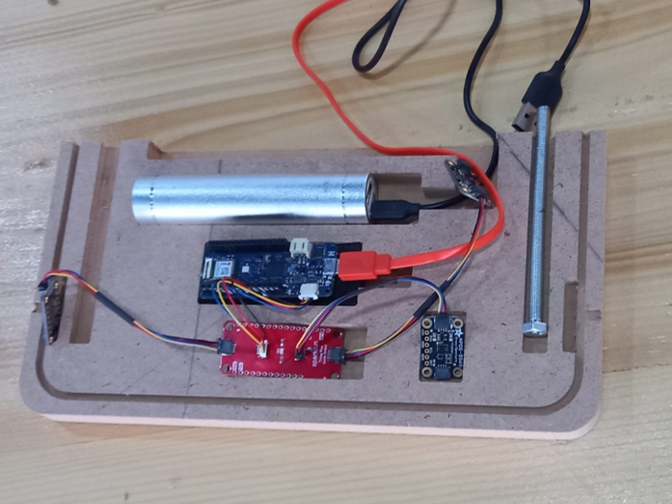
Add the power bank space


Followed by the microcontroller

And the accelerometer sensor
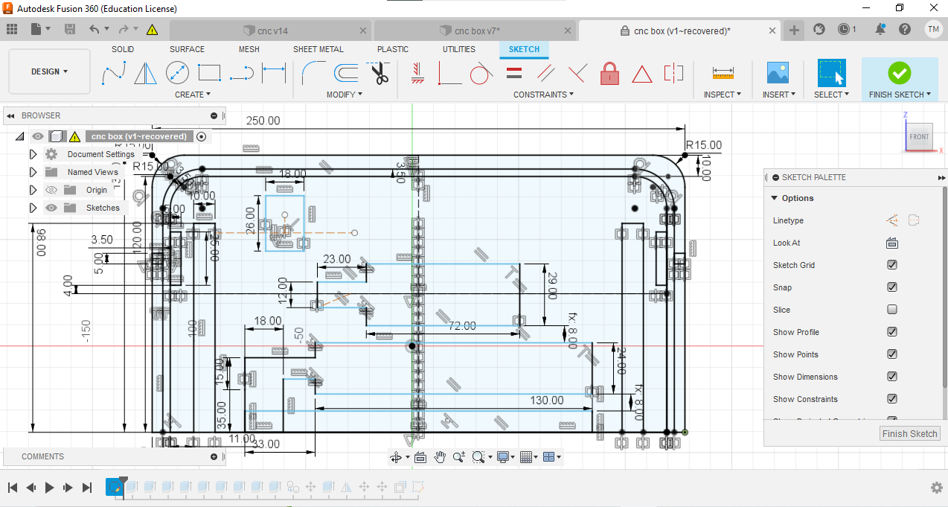
Lastly the I2C board place
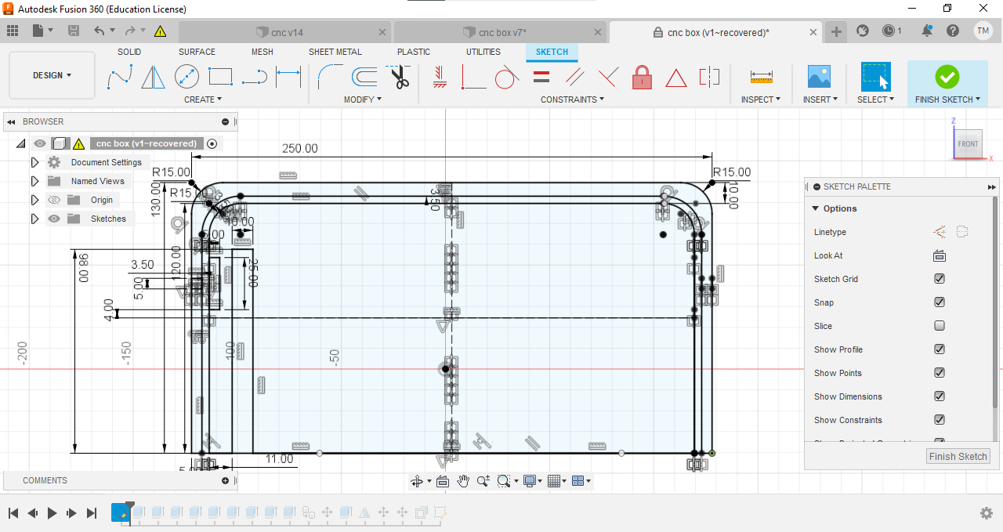
Extrude the Places with the proper heights

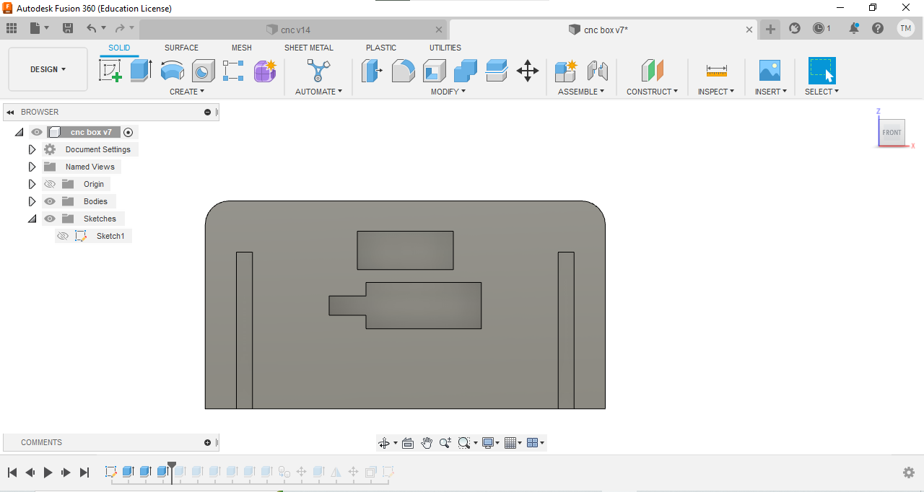
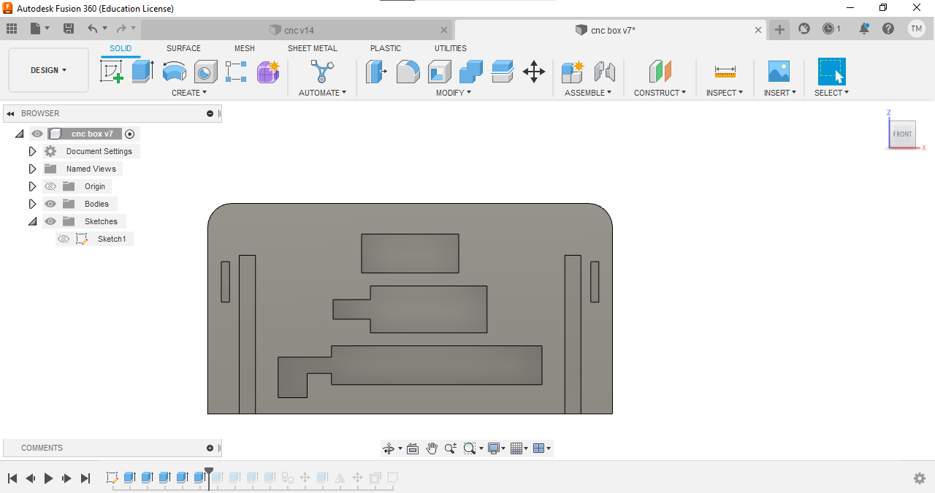

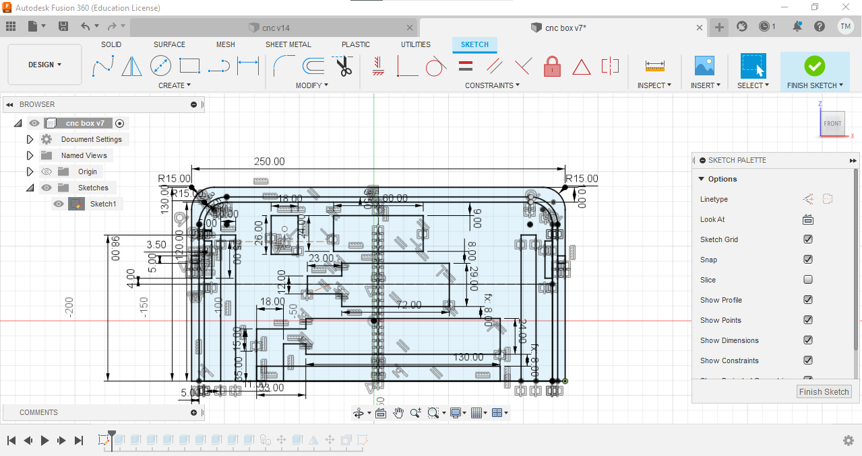
Duplicate the model
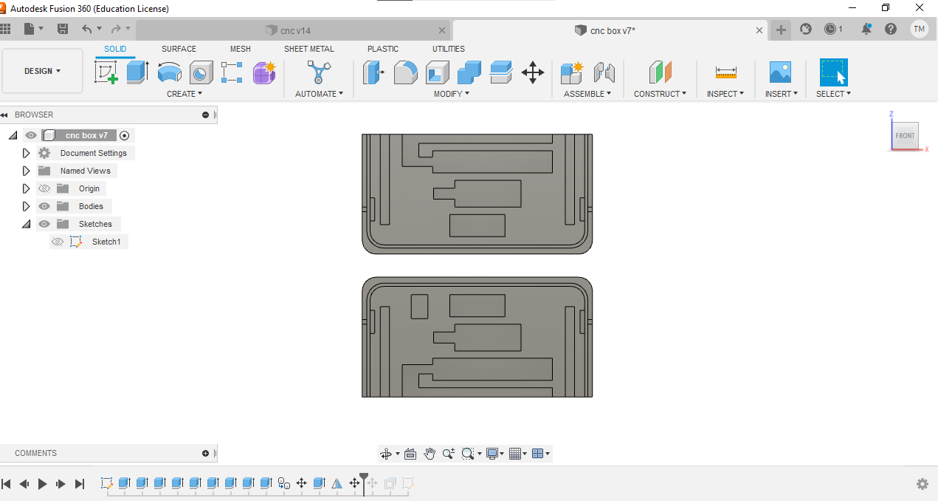
The design CAD and STL files are found in the links below
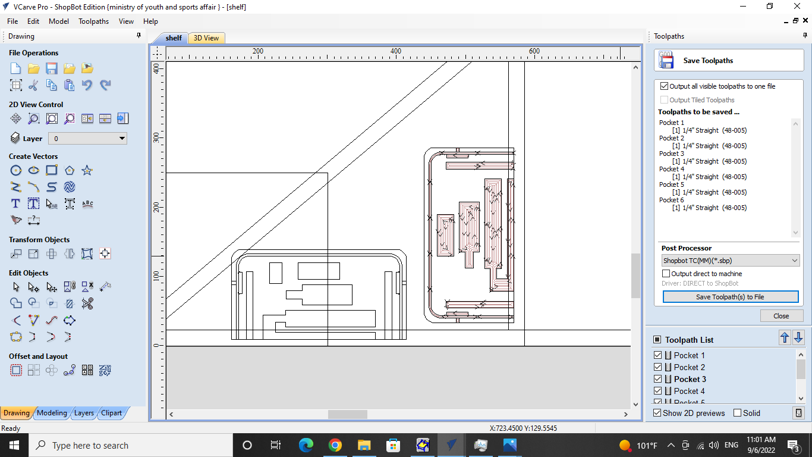
Shelf cutting and assymbling
The shelf was cut using the CNC machine, from the toolpath operations tools choose: * Pocket to ingrave the electronics places * Profile to cut the shelf
After cutting one side of the shelf
Testing the places for the electronics

Scraping the shelf with sand paper

The shelf after getting cut by the CNC machine


Putting the devices in the correct place
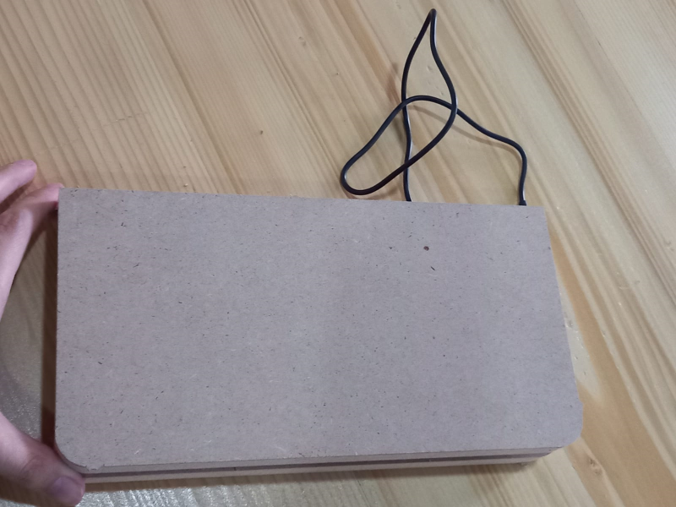
The shelf when closed
Materials
| Qty | Description | Price |
|---|---|---|
| 1 | MKR1010 microcontroller | 45.53 $ |
| 1 | STEMMA QT Qwiic JST | 5.99 $ |
| 1 | Adafruit SHT40 sensor | 5.95 $ |
| 1 | Adafruit MPU-6050 sensor | 6.59 $ |
| 1 | Adafruit APDS-9960 sensor | 14.01 $ |
| 1 | powerbank | 17.99 $ |
| 2 | USB wire to micro B | 7.45 $ |
| 4 | JST SH 4-pin cable | 4.99 $ |
The full code
#include <Adafruit_MPU6050.h>
#include <Adafruit_Sensor.h>
#include <Wire.h>
#include <ArduinoMqttClient.h>
#include <WiFiNINA.h>
#define INT_PIN 3

bool light;
Adafruit_MPU6050 mpu;

#include "Adafruit_APDS9960.h"
//create the APDS9960 object
Adafruit_APDS9960 apds;

#include "Adafruit_SHT4x.h"

Adafruit_SHT4x sht4 = Adafruit_SHT4x();

char ssid[] = "FABLAB";        // your network SSID (name)
char pass[] = "fablab@2021";    // your network password (use for WPA, or use as key for WEP)

WiFiClient wifiClient;
MqttClient mqttClient(wifiClient);

const char broker[] = "192.168.8.10";
int        port     = 1883;

const char topic[]  = "accelerationx";
const char topic2[]  = "accelerationy";
const char topic3[]  = "accelerationz";
const char topic4[]  = "gyrox";
const char topic5[]  = "gyroy";
const char topic6[]  = "gyroz";
const char topic7[]  = "r";
const char topic8[]  = "g";
const char topic9[]  = "b";
const char topic10[]  = "tempr";
const char topic11[]  = "humd";
const char topic12[]  = "x";
const char topic13[]  = "light";


//set interval for sending messages (milliseconds)
const long interval = 8000;
unsigned long previousMillis = 0;

int count = 0;

void setup() {
  //Initialize serial and wait for port to open:
  Serial.begin(115200);
  pinMode(INT_PIN, INPUT_PULLUP);

  if(!apds.begin()){
    Serial.println("failed to initialize device! Please check your wiring.");
  }
  else Serial.println("Device initialized!");

  //enable proximity mode
  apds.enableProximity(true);

  //set the interrupt threshold to fire when proximity reading goes above 175
  apds.setProximityInterruptThreshold(0, 175);

  //enable the proximity interrupt
  apds.enableProximityInterrupt();
 // while (!Serial) {
   // ; // wait for serial port to connect. Needed for native USB port only
  //}

  // attempt to connect to Wifi network:
  Serial.print("Attempting to connect to WPA SSID: ");
  Serial.println(ssid);
  while (WiFi.begin(ssid, pass) != WL_CONNECTED) {
    // failed, retry
    Serial.print(".");
    delay(5000);
  }

  Serial.println("You're connected to the network");
  Serial.println();

  Serial.print("Attempting to connect to the MQTT broker: ");
  Serial.println(broker);

  if (!mqttClient.connect(broker, port)) {
    Serial.print("MQTT connection failed! Error code = ");
    Serial.println(mqttClient.connectError());

    while (1);
  }

  Serial.println("You're connected to the MQTT broker!");
  Serial.println();


//while (!Serial)
  //  delay(10); // will pause Zero, Leonardo, etc until serial console opens

  Serial.println("Adafruit MPU6050 test!");

  // Try to initialize!
  if (!mpu.begin()) {
    Serial.println("Failed to find MPU6050 chip");
    while (1) {
      delay(10);
    }
  }
  Serial.println("MPU6050 Found!");

  mpu.setAccelerometerRange(MPU6050_RANGE_8_G);
  Serial.print("Accelerometer range set to: ");
  switch (mpu.getAccelerometerRange()) {
  case MPU6050_RANGE_2_G:
    Serial.println("+-2G");
    break;
  case MPU6050_RANGE_4_G:
    Serial.println("+-4G");
    break;
  case MPU6050_RANGE_8_G:
    Serial.println("+-8G");
    break;
  case MPU6050_RANGE_16_G:
    Serial.println("+-16G");
    break;
  }
  mpu.setGyroRange(MPU6050_RANGE_500_DEG);
  Serial.print("Gyro range set to: ");
  switch (mpu.getGyroRange()) {
  case MPU6050_RANGE_250_DEG:
    Serial.println("+- 250 deg/s");
    break;
  case MPU6050_RANGE_500_DEG:
    Serial.println("+- 500 deg/s");
    break;
  case MPU6050_RANGE_1000_DEG:
    Serial.println("+- 1000 deg/s");
    break;
  case MPU6050_RANGE_2000_DEG:
    Serial.println("+- 2000 deg/s");
    break;
  }

  mpu.setFilterBandwidth(MPU6050_BAND_21_HZ);
  Serial.print("Filter bandwidth set to: ");
  switch (mpu.getFilterBandwidth()) {
  case MPU6050_BAND_260_HZ:
    Serial.println("260 Hz");
    break;
  case MPU6050_BAND_184_HZ:
    Serial.println("184 Hz");
    break;
  case MPU6050_BAND_94_HZ:
    Serial.println("94 Hz");
    break;
  case MPU6050_BAND_44_HZ:
    Serial.println("44 Hz");
    break;
  case MPU6050_BAND_21_HZ:
    Serial.println("21 Hz");
    break;
  case MPU6050_BAND_10_HZ:
    Serial.println("10 Hz");
    break;
  case MPU6050_BAND_5_HZ:
    Serial.println("5 Hz");
    break;
  }

  Serial.println("");
  delay(100);
 if(!apds.begin()){
    Serial.println("failed to initialize device! Please check your wiring.");
  }
  else Serial.println("Device initialized!");

  //enable color sensign mode
  apds.enableColor(true);
  //while (!Serial)
    //delay(10);     // will pause Zero, Leonardo, etc until serial console opens

  Serial.println("Adafruit SHT4x test");
  if (! sht4.begin()) {
    Serial.println("Couldn't find SHT4x");
    while (1) delay(1);
  }
  Serial.println("Found SHT4x sensor");
  Serial.print("Serial number 0x");
  Serial.println(sht4.readSerial(), HEX);

  // You can have 3 different precisions, higher precision takes longer
  sht4.setPrecision(SHT4X_HIGH_PRECISION);
  switch (sht4.getPrecision()) {
     case SHT4X_HIGH_PRECISION:
       Serial.println("High precision");
       break;
     case SHT4X_MED_PRECISION:
       Serial.println("Med precision");
       break;
     case SHT4X_LOW_PRECISION:
       Serial.println("Low precision");
       break;
  }

  // You can have 6 different heater settings
  // higher heat and longer times uses more power
  // and reads will take longer too!
  sht4.setHeater(SHT4X_NO_HEATER);
  switch (sht4.getHeater()) {
     case SHT4X_NO_HEATER:
       Serial.println("No heater");
       break;
     case SHT4X_HIGH_HEATER_1S:
       Serial.println("High heat for 1 second");
       break;
     case SHT4X_HIGH_HEATER_100MS:
       Serial.println("High heat for 0.1 second");
       break;
     case SHT4X_MED_HEATER_1S:
       Serial.println("Medium heat for 1 second");
       break;
     case SHT4X_MED_HEATER_100MS:
       Serial.println("Medium heat for 0.1 second");
       break;
     case SHT4X_LOW_HEATER_1S:
       Serial.println("Low heat for 1 second");
       break;
     case SHT4X_LOW_HEATER_100MS:
       Serial.println("Low heat for 0.1 second");
       break;
  }

}


void loop() {

  //print the proximity reading when the interrupt pin goes low
  int x=apds.readProximity();
    Serial.println(x);
    if(x<125)
    {light=true;}
    else
    {light=false;}
    Serial.println(light);
   delay(500);

    //clear the interrupt
    apds.clearInterrupt();

   /* Get new sensor events with the readings */
  sensors_event_t a, gg, temp;
  mpu.getEvent(&a, &gg, &temp);

  /* Print out the values */
  Serial.print("Acceleration X: ");
  Serial.print(a.acceleration.x);
  Serial.print(", Y: ");
  Serial.print(a.acceleration.y);
  Serial.print(", Z: ");
  Serial.print(a.acceleration.z);
  Serial.println(" m/s^2");

  Serial.print("Rotation X: ");
  Serial.print(gg.gyro.x);
  Serial.print(", Y: ");
  Serial.print(gg.gyro.y);
  Serial.print(", Z: ");
  Serial.print(gg.gyro.z);
  Serial.println(" rad/s");

  Serial.print("Temperature: ");
  Serial.print(temp.temperature);
  Serial.println(" degC");

  Serial.println("");
  delay(500);
  //create some variables to store the color data in
  uint16_t r, g, b, c;

  //wait for color data to be ready
  while(!apds.colorDataReady()){
    delay(5);
  }

  //get the data and print the different channels
  apds.getColorData(&r, &g, &b, &c);
  Serial.print("red: ");
  Serial.print(r);

  Serial.print(" green: ");
  Serial.print(g);

  Serial.print(" blue: ");
  Serial.print(b);

  Serial.print(" clear: ");
  Serial.println(c);
  Serial.println();

  delay(500);
  sensors_event_t humidity, tempr;

  uint32_t timestamp = millis();
  sht4.getEvent(&humidity, &tempr);// populate temp and humidity objects with fresh data
  timestamp = millis() - timestamp;

  Serial.print("Temperature: "); Serial.print(tempr.temperature); Serial.println(" degrees C");
  Serial.print("Humidity: "); Serial.print(humidity.relative_humidity); Serial.println("% rH");

  Serial.print("Read duration (ms): ");
  Serial.println(timestamp);

  delay(1000);
   // call poll() regularly to allow the library to send MQTT keep alive which
  // avoids being disconnected by the broker
  mqttClient.poll();

  unsigned long currentMillis = millis();

  if (currentMillis - previousMillis >= interval) {
    // save the last time a message was sent
    previousMillis = currentMillis;

    //record random value from A0, A1 and A2
    int Rvalue = a.acceleration.x;
    int Rvalue2 = a.acceleration.y;
    int Rvalue3 = a.acceleration.z;
    int Rvalue4 = gg.gyro.x;
    int Rvalue5 = gg.gyro.y;
    int Rvalue6 = gg.gyro.z;
    int Rvalue7 = r;
    int Rvalue8 = g;
    int Rvalue9 =b;
    int Rvalue10 = tempr.temperature;
    int Rvalue11= humidity.relative_humidity;
    int Rvalue12= x;
    int Rvalue13= light;

    Serial.print("Sending message to topic: ");
    Serial.println(topic);
    Serial.println(Rvalue);

    Serial.print("Sending message to topic: ");
    Serial.println(topic2);
    Serial.println(Rvalue2);

    Serial.print("Sending message to topic: ");
    Serial.println(topic3);
    Serial.println(Rvalue3);

    Serial.print("Sending message to topic: ");
    Serial.println(topic4);
    Serial.println(Rvalue4);

    Serial.print("Sending message to topic: ");
    Serial.println(topic5);
    Serial.println(Rvalue5);

    Serial.print("Sending message to topic: ");
    Serial.println(topic6);
    Serial.println(Rvalue6);

    Serial.print("Sending message to topic: ");
    Serial.println(topic7);
    Serial.println(Rvalue7);

    Serial.print("Sending message to topic: ");
    Serial.println(topic8);
    Serial.println(Rvalue8);

    Serial.print("Sending message to topic: ");
    Serial.println(topic9);
    Serial.println(Rvalue9);

    Serial.print("Sending message to topic: ");
    Serial.println(topic10);
    Serial.println(Rvalue10);

    Serial.print("Sending message to topic: ");
    Serial.println(topic11);
    Serial.println(Rvalue11);

     Serial.print("Sending message to topic: ");
    Serial.println(topic12);
    Serial.println(Rvalue12);

     Serial.print("Sending message to topic: ");
    Serial.println(topic13);
    Serial.println(Rvalue13);


    // send message, the Print interface can be used to set the message contents
    mqttClient.beginMessage(topic);
    mqttClient.print(Rvalue);
    mqttClient.endMessage();

    mqttClient.beginMessage(topic2);
    mqttClient.print(Rvalue2);
    mqttClient.endMessage();

    mqttClient.beginMessage(topic3);
    mqttClient.print(Rvalue3);
    mqttClient.endMessage();

    mqttClient.beginMessage(topic4);
    mqttClient.print(Rvalue4);
    mqttClient.endMessage();

        mqttClient.beginMessage(topic5);
    mqttClient.print(Rvalue5);
    mqttClient.endMessage();

    mqttClient.beginMessage(topic6);
    mqttClient.print(Rvalue6);
    mqttClient.endMessage();

        mqttClient.beginMessage(topic7);
    mqttClient.print(Rvalue7);
    mqttClient.endMessage();

        mqttClient.beginMessage(topic8);
    mqttClient.print(Rvalue8);
    mqttClient.endMessage();

        mqttClient.beginMessage(topic9);
    mqttClient.print(Rvalue9);
    mqttClient.endMessage();

        mqttClient.beginMessage(topic10);
    mqttClient.print(Rvalue10);
    mqttClient.endMessage();

        mqttClient.beginMessage(topic11);
    mqttClient.print(Rvalue11);
    mqttClient.endMessage();

   mqttClient.beginMessage(topic12);
    mqttClient.print(Rvalue12);
    mqttClient.endMessage();

       mqttClient.beginMessage(topic13);
    mqttClient.print(Rvalue13);
    mqttClient.endMessage();

    Serial.println();
  }
}
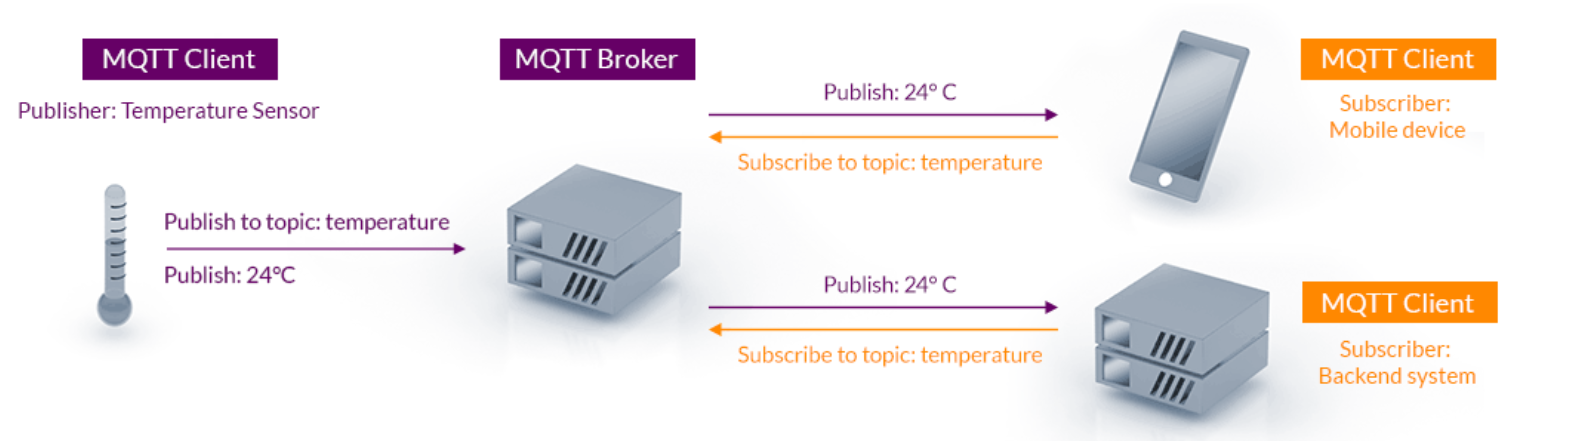
MQTT protocol
This week we tried sending data ovwer MQTT by the aid of MKR1010 board and Node red developement tool
What is MQTT ?
Message Queuing Telemetry Transport (MQTT) : MQTT is an OASIS standard messaging protocol for the Internet of Things (IoT). It is designed as an extremely lightweight publish/subscribe messaging transport that is ideal for connecting remote devices with a small code footprint and minimal network bandwidth. MQTT today is used in a wide variety of industries, such as automotive, manufacturing, telecommunications, oil and gas, etc.
Why MQTT?
1. Lightweight and Efficient : MQTT clients are very small, require minimal resources so can be used on small microcontrollers. MQTT message headers are small to optimize network bandwidth.
-
Bi-directional Communications : MQTT allows for messaging between device to cloud and cloud to device. This makes for easy broadcasting messages to groups of things.
-
Scale to Millions of Things : MQTT can scale to connect with millions of IoT devices.
-
Reliable Message Delivery : Reliability of message delivery is important for many IoT use cases. This is why MQTT has 3 defined quality of service levels: 0 - at most once, 1- at least once, 2 - exactly once .
-
Support for Unreliable Networks : Many IoT devices connect over unreliable cellular networks. MQTT’s support for persistent sessions reduces the time to reconnect the client with the broker.
-
Security Enabled : MQTT makes it easy to encrypt messages using TLS and authenticate clients using modern authentication protocols, such as OAuth.
MQTT Publish / Subscribe Architecture
Node-red
What Is Node-red ?
Node-RED allows you to create functionality by wiring together flows of data between nodes using a browser. And it has gained tremendous popularity in the IoT space, by modeling bits of application functionality between IoT devices like sensors, cameras, and wireless routers.
Download Node-red
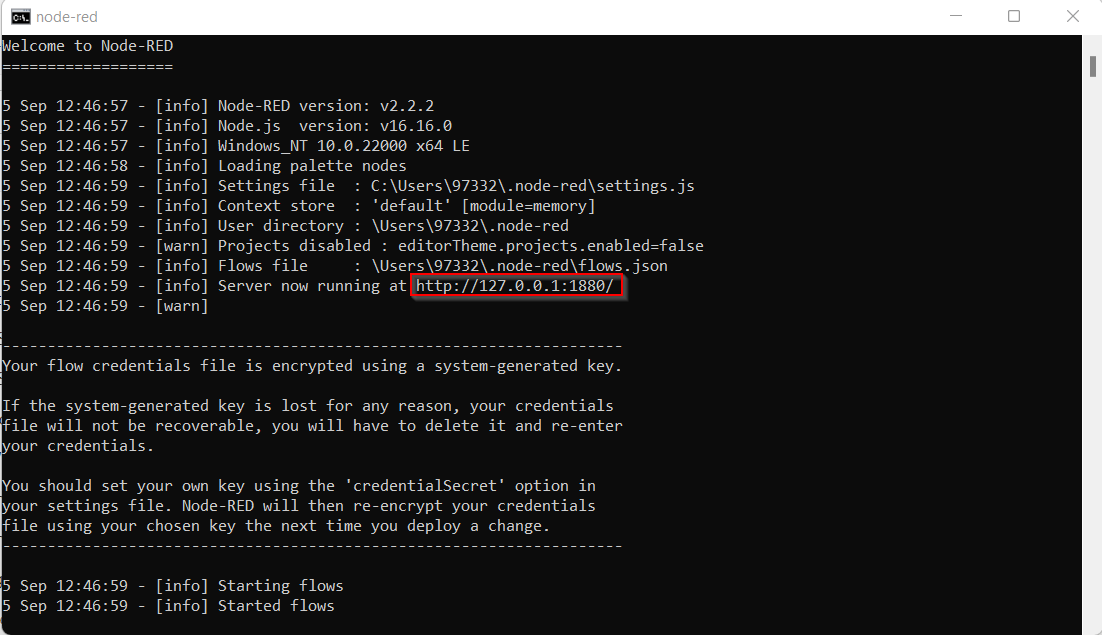
To downloaad node-red first we need to download Node.js since the Node-RED is built on Node.js.
then going to the ‘command prompt’ in the computer and writnig “node-red” then it will start downloading.

we can now open the node-red by rewriting “node-red” in the command prompt and it will show a link we can copy it and paste it in the browser.
after opening the link we swipe those two in the red block
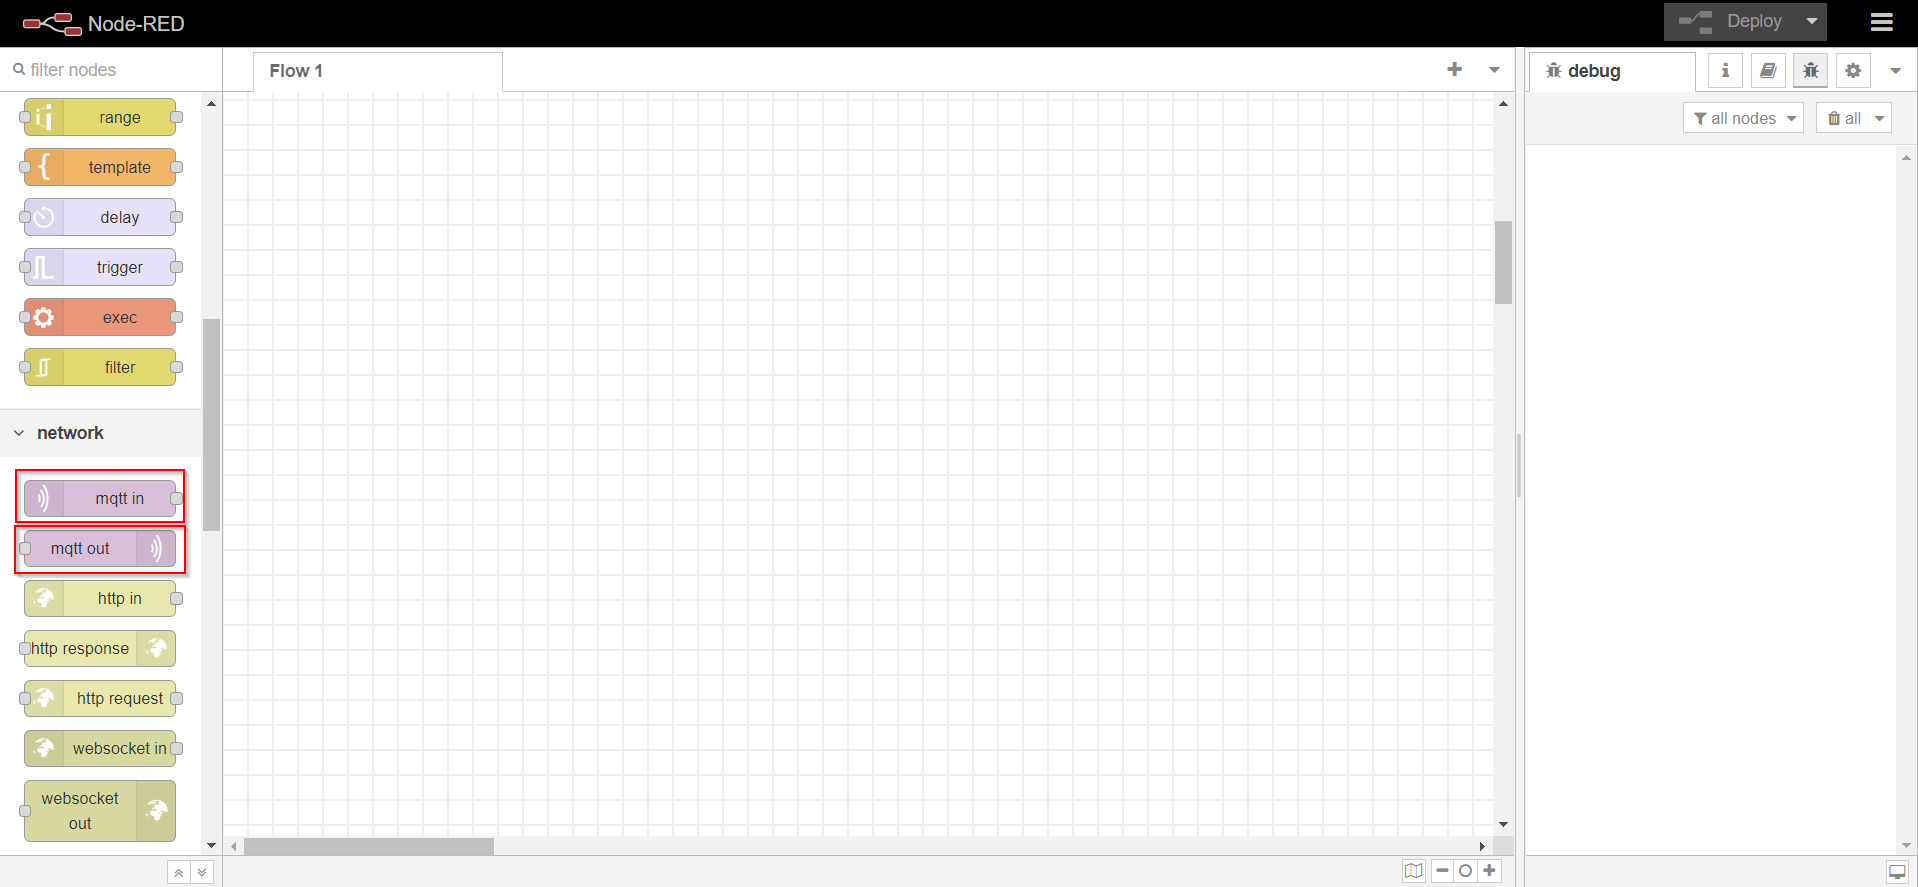
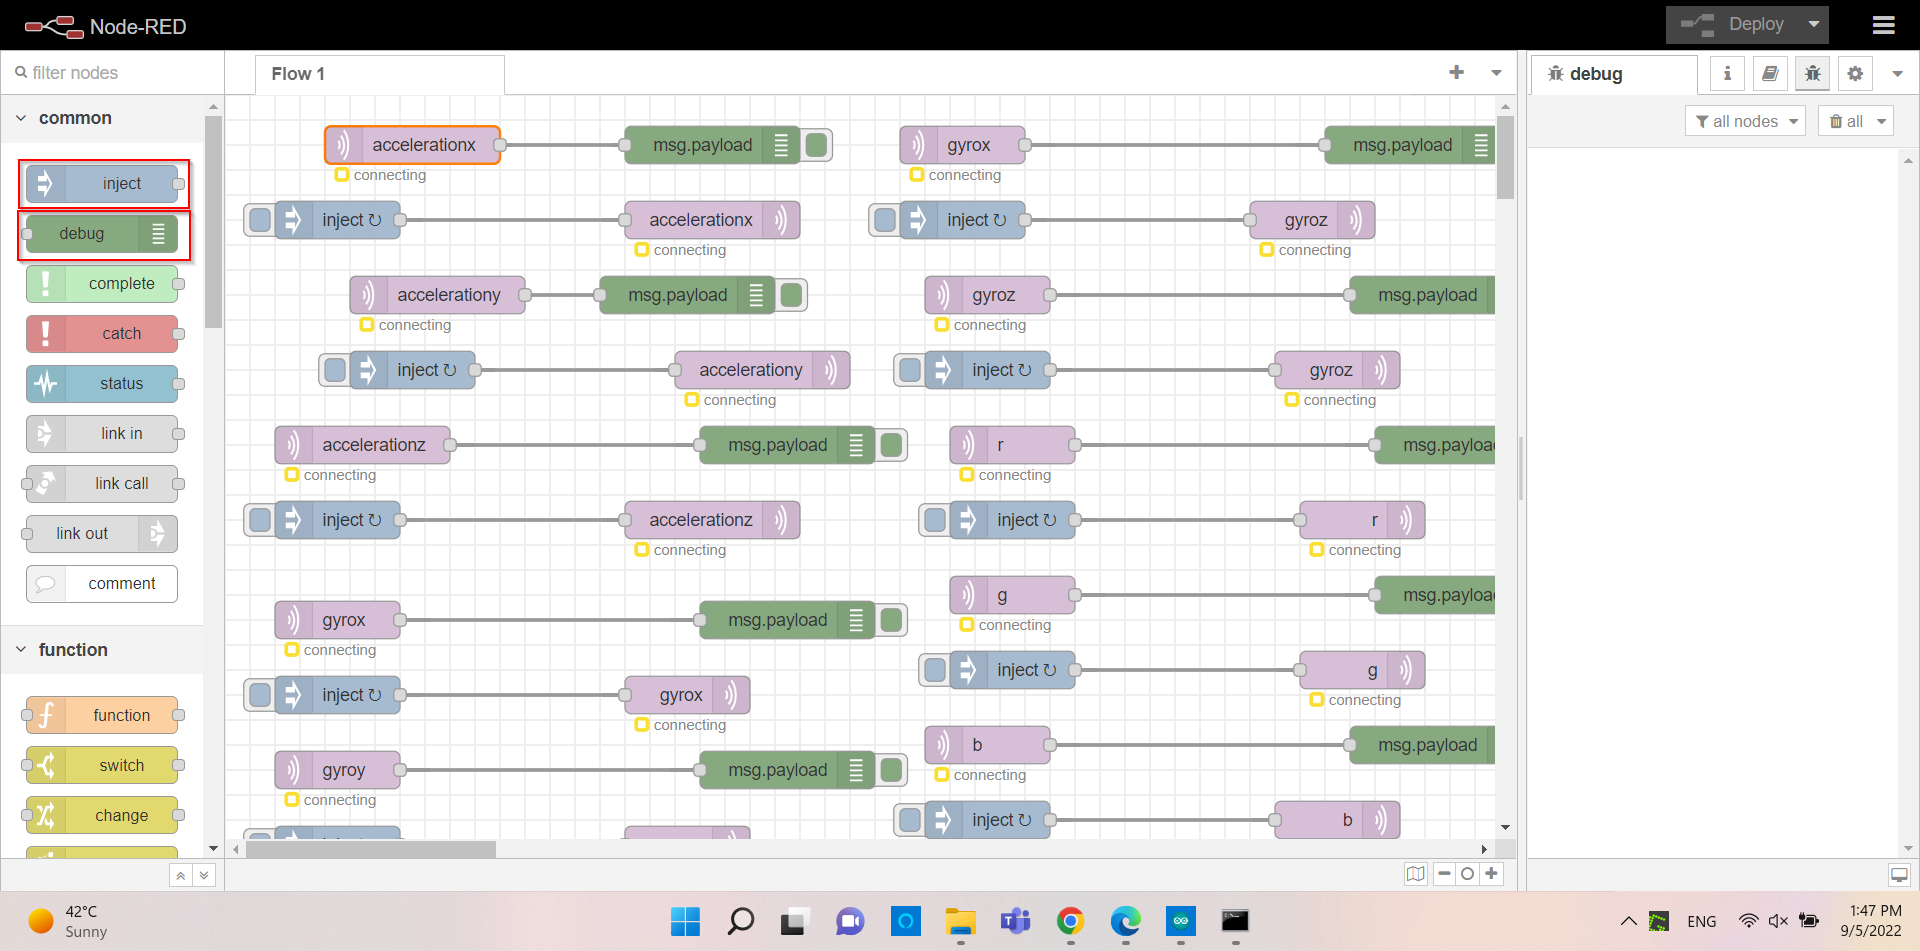
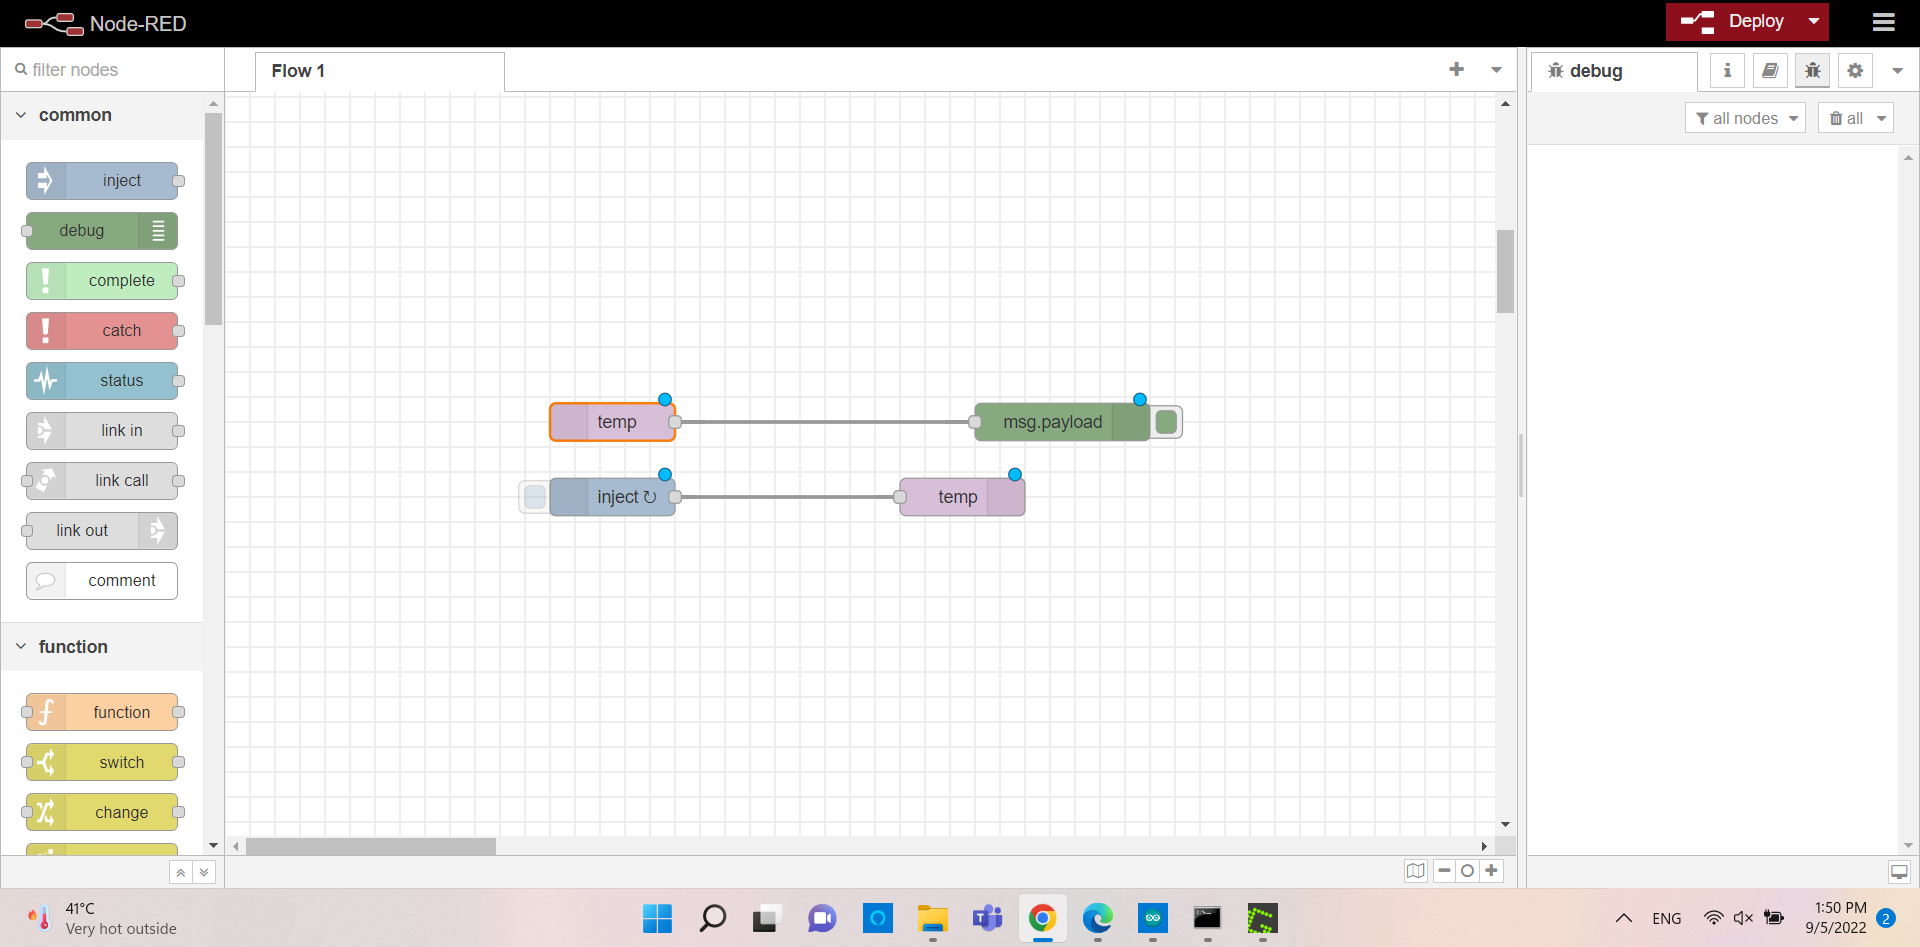
connecting the MQTT In in to the Debug and the MQTT Out to the Inject
Changing the port adress the server and the port

The final result
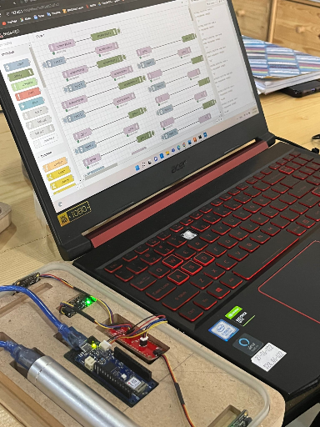
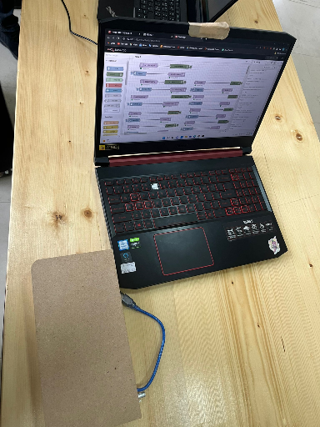
The shelf sending data to node-red