7. Input & Output device
This week I worked on the microcontroller with input and output devices.
Where I should first read data from some sensor then pass that data through the microcontroller where it should act on the data produced by the sensor (input) and produce a signal for the output device.
Individual Assignment
First I divided the work.
1- Control an output device.
2- Read data from sensor.
3- Use data from sensor to control the output device.
Control An Output Device
For the output device I used a servo motor, which is a motor that could turn 180 degrees to the precise angle wanted.
3v pin goes in the red wire in the servo (power)
GND pin goes n the black wire in the servo (ground)
pin 5 (depending on the program) goes in t he yellow wire in the servo
after wiring I and uploading the code I got the servo moving
here is the code I used
#include <Arduino.h>
#include <Adafruit_TinyUSB.h>
#include <Servo.h>

Servo myservo;  // create servo object to control a servo
// twelve servo objects can be created on most boards

int pos = 0;    // variable to store the servo position

void setup() {
  myservo.attach(5);  // attaches the servo on pin 9 to the servo object
}

void loop() {
  for (pos = 0; pos <= 180; pos += 80) { // goes from 0 degrees to 180 degrees
    // in steps of 1 degree
    myservo.write(pos);              // tell servo to go to position in variable 'pos'
    delay(15);                       // waits 15ms for the servo to reach the position
  }
  for (pos = 180; pos >= 0; pos -= 1) { // goes from 180 degrees to 0 degrees
    myservo.write(pos);              // tell servo to go to position in variable 'pos'
    delay(15);                       // waits 15ms for the servo to reach the position
  }
}
Read data from sensor
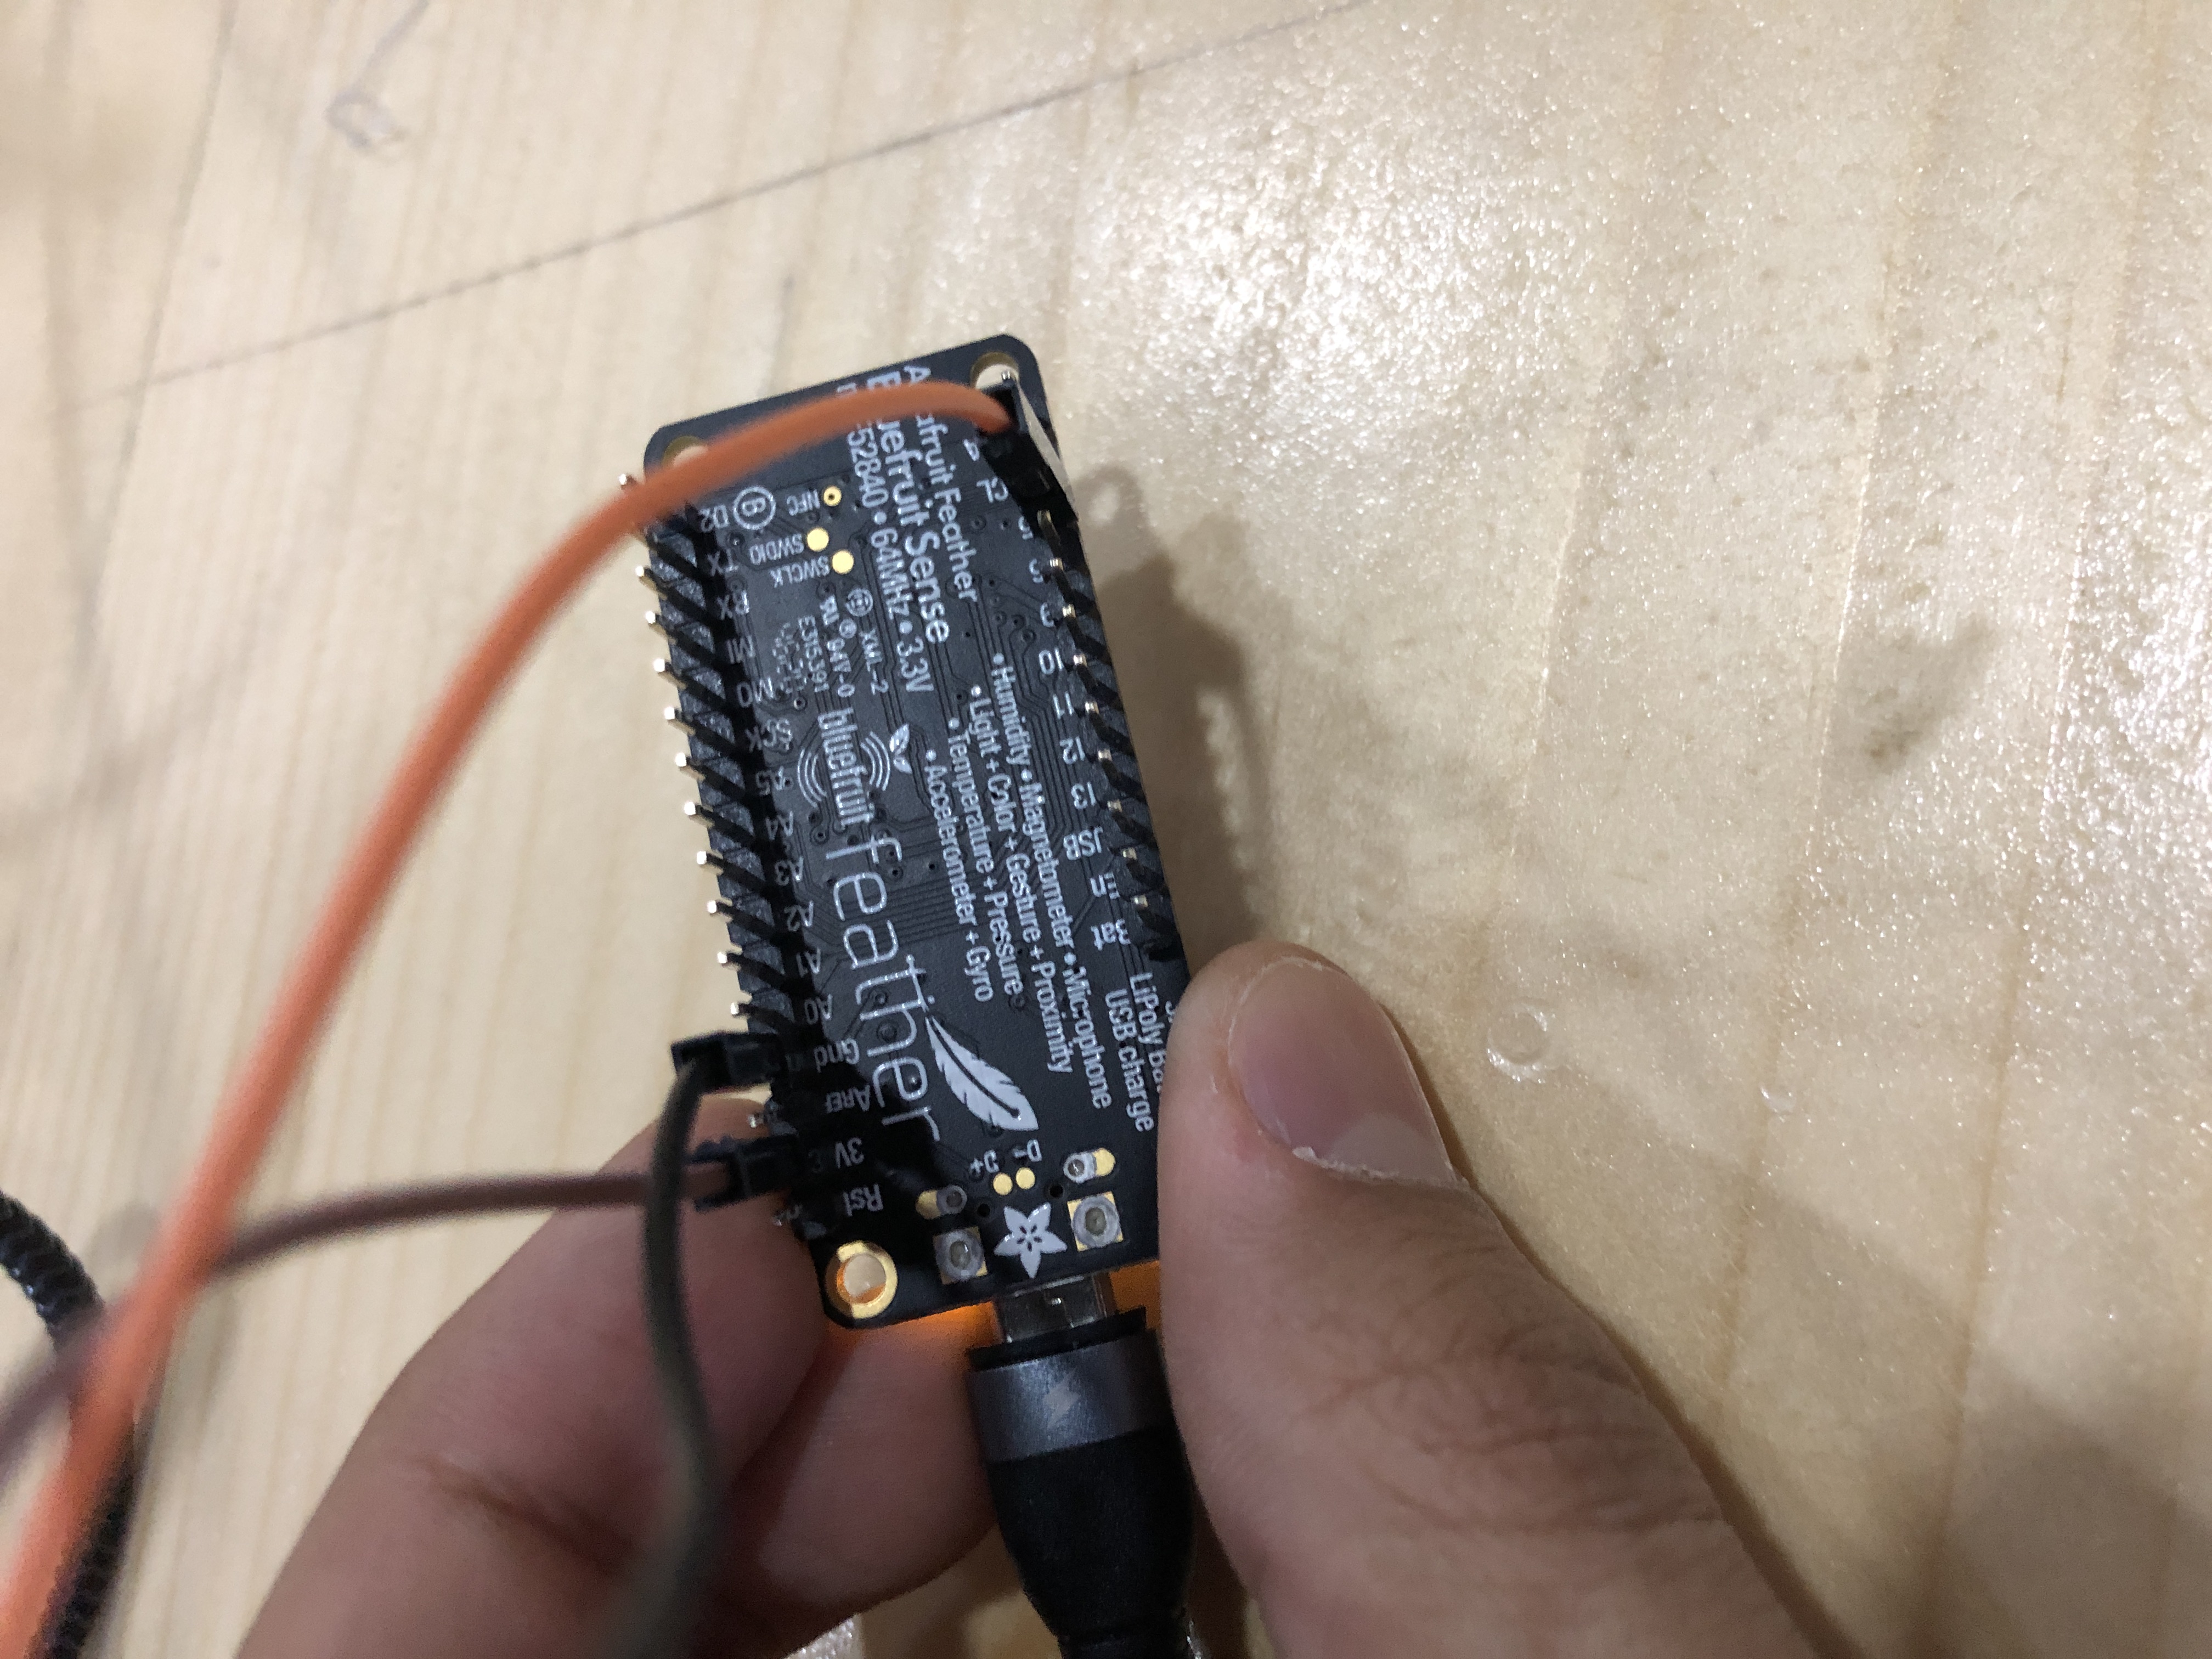
For this part I was using the Adafruit sense controller so I decided to use the sensors built in the controller it self.
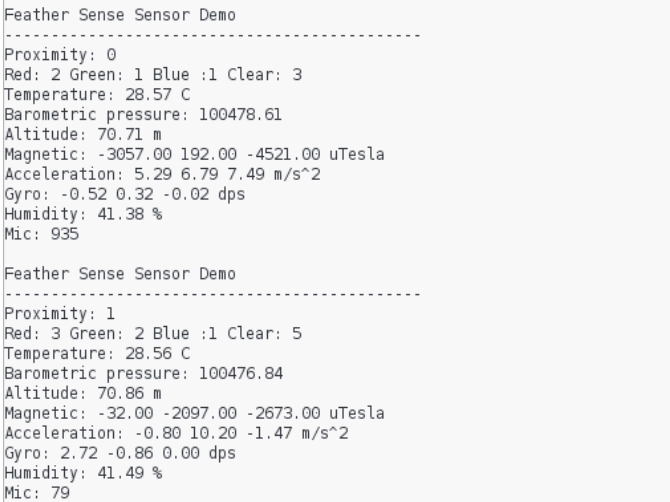
after uploading the code, I read data from all the sensors in the microcontroller.
here is the code I used
#include <Adafruit_APDS9960.h>
#include <Adafruit_BMP280.h>
#include <Adafruit_LIS3MDL.h>
#include <Adafruit_LSM6DS33.h>
#include <Adafruit_SHT31.h>
#include <Adafruit_Sensor.h>
#include <PDM.h>

Adafruit_APDS9960 apds9960; // proximity, light, color, gesture
Adafruit_BMP280 bmp280;     // temperautre, barometric pressure
Adafruit_LIS3MDL lis3mdl;   // magnetometer
Adafruit_LSM6DS33 lsm6ds33; // accelerometer, gyroscope
Adafruit_SHT31 sht30;       // humidity

uint8_t proximity;
uint16_t r, g, b, c;
float temperature, pressure, altitude;
float magnetic_x, magnetic_y, magnetic_z;
float accel_x, accel_y, accel_z;
float gyro_x, gyro_y, gyro_z;
float humidity;
int32_t mic;
int IN1 = 10;
int IN2 = 9;

extern PDMClass PDM;
short sampleBuffer[256];  // buffer to read samples into, each sample is 16-bits
volatile int samplesRead; // number of samples read

void setup(void) {
  pinMode(IN1, OUTPUT);
  pinMode(IN2, OUTPUT);
  Serial.begin(115200);
  // while (!Serial) delay(10);
  Serial.println("Feather Sense Sensor Demo");

  // initialize the sensors
  apds9960.begin();
  apds9960.enableProximity(true);
  apds9960.enableColor(true);
  bmp280.begin();
  lis3mdl.begin_I2C();
  lsm6ds33.begin_I2C();
  sht30.begin();
  //PDM.onReceive(onPDMdata);
  //PDM.begin(1, 16000);
}

void loop(void) {
  proximity = apds9960.readProximity();
  while (!apds9960.colorDataReady()) {
    delay(5);
  }
  apds9960.getColorData(&r, &g, &b, &c);

  temperature = bmp280.readTemperature();
  pressure = bmp280.readPressure();
  altitude = bmp280.readAltitude(1013.25);

  lis3mdl.read();
  magnetic_x = lis3mdl.x;
  magnetic_y = lis3mdl.y;
  magnetic_z = lis3mdl.z;

  sensors_event_t accel;
  sensors_event_t gyro;
  sensors_event_t temp;
  lsm6ds33.getEvent(&accel, &gyro, &temp);
  accel_x = accel.acceleration.x;
  accel_y = accel.acceleration.y;
  accel_z = accel.acceleration.z;
  gyro_x = gyro.gyro.x;
  gyro_y = gyro.gyro.y;
  gyro_z = gyro.gyro.z;

  humidity = sht30.readHumidity();

  samplesRead = 0;
  //mic = getPDMwave(4000);

  Serial.println("\nFeather Sense Sensor Demo");
  Serial.println("---------------------------------------------");
  Serial.print("Proximity: ");
  Serial.println(apds9960.readProximity());
  Serial.print("Red: ");
  Serial.print(r);
  Serial.print(" Green: ");
  Serial.print(g);
  Serial.print(" Blue :");
  Serial.print(b);
  Serial.print(" Clear: ");
  Serial.println(c);
  Serial.print("Temperature: ");
  Serial.print(temperature);
  Serial.println(" C");
  Serial.print("Barometric pressure: ");
  Serial.println(pressure);
  Serial.print("Altitude: ");
  Serial.print(altitude);
  Serial.println(" m");
  Serial.print("Magnetic: ");
  Serial.print(magnetic_x);
  Serial.print(" ");
  Serial.print(magnetic_y);
  Serial.print(" ");
  Serial.print(magnetic_z);
  Serial.println(" uTesla");
  Serial.print("Acceleration: ");
  Serial.print(accel_x);
  Serial.print(" ");
  Serial.print(accel_y);
  Serial.print(" ");
  Serial.print(accel_z);
  Serial.println(" m/s^2");
  Serial.print("Gyro: ");
  Serial.print(gyro_x);
  Serial.print(" ");
  Serial.print(gyro_y);
  Serial.print(" ");
  Serial.print(gyro_z);
  Serial.println(" dps");
  Serial.print("Humidity: ");
  Serial.print(humidity);
  Serial.println(" %");
  Serial.print("Mic: ");
  Serial.println(mic);
delay (100)
}
Control Output using input
1- Servo
For this part I decided to use the gyroscope data to control the servo, this decision was because I Knew my Final project which will utilize this skill.
so after I wrote the code I connected every thing as shown
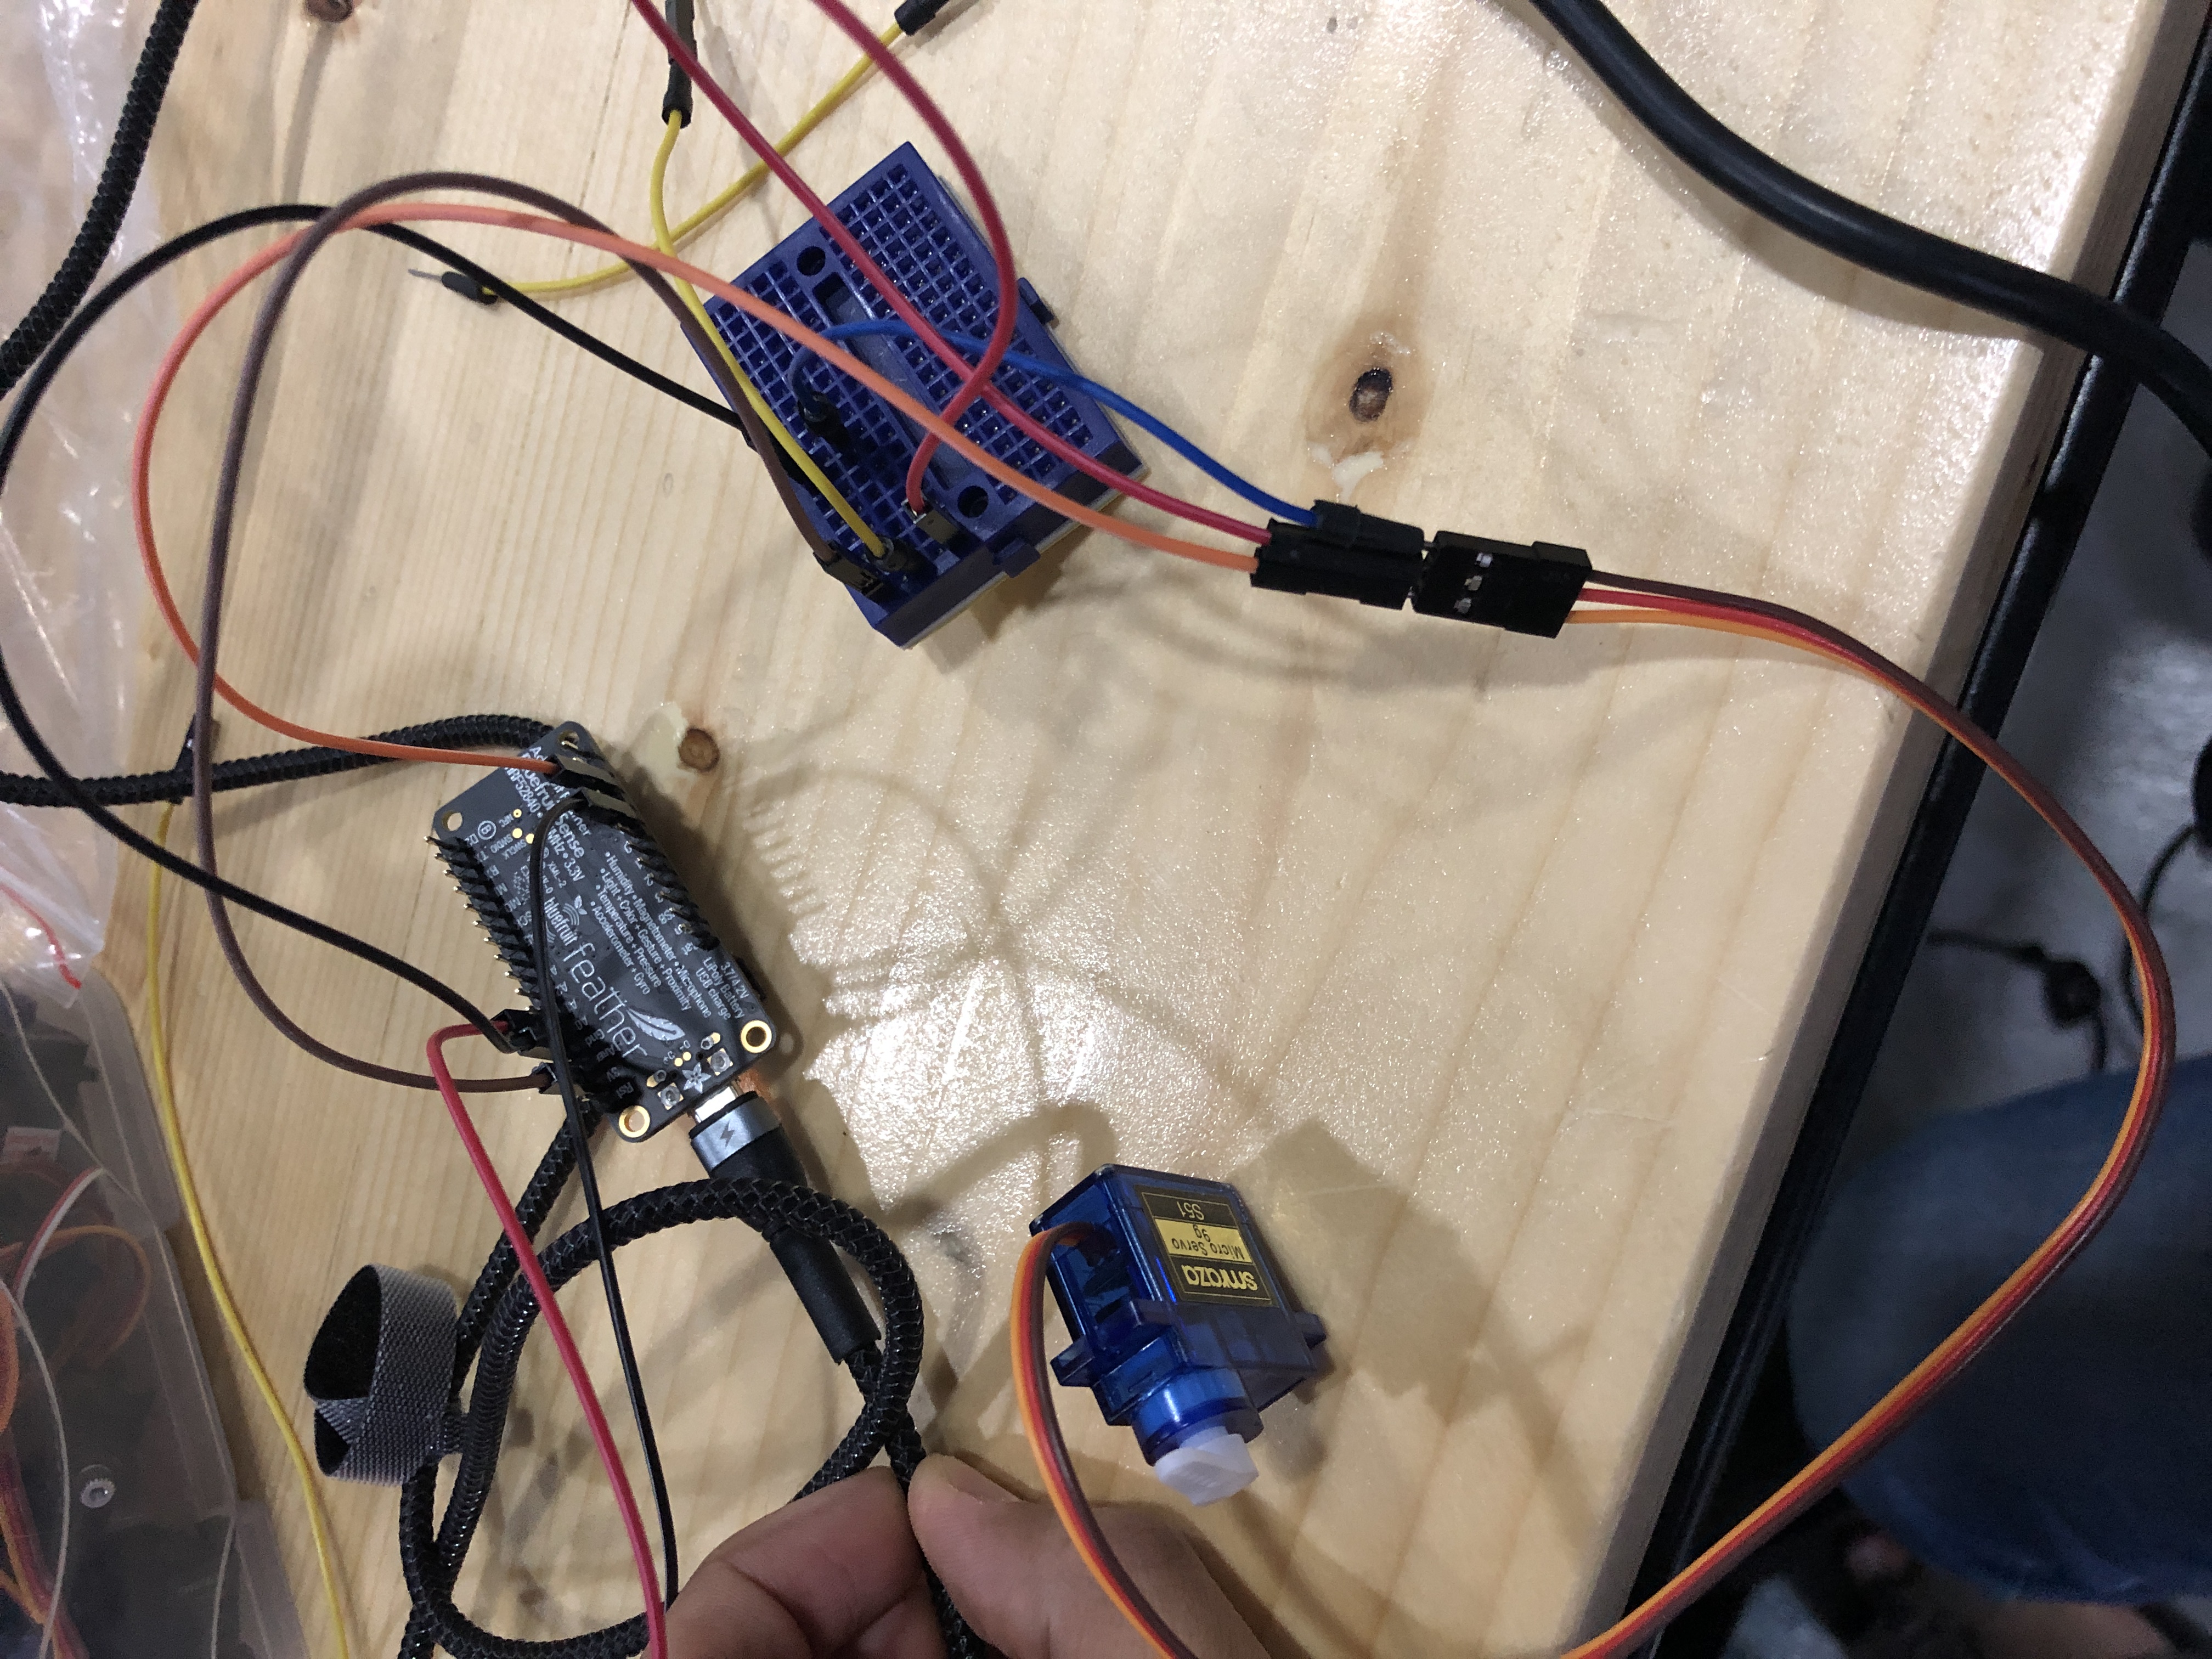
and now when ever I move the microcontroller the servo should move, and it did :)
here is the code
#include <Adafruit_APDS9960.h>
#include <Adafruit_BMP280.h>
#include <Adafruit_LIS3MDL.h>
#include <Adafruit_LSM6DS33.h>
#include <Adafruit_SHT31.h>
#include <Adafruit_Sensor.h>
#include <PDM.h>
#include <Arduino.h>
#include <Adafruit_TinyUSB.h>
#include <Servo.h>

Servo myservo;  // create servo object to control a servo
// twelve servo objects can be created on most boards

int pos = 0;    // variable to store the servo position


Adafruit_APDS9960 apds9960; // proximity, light, color, gesture
Adafruit_BMP280 bmp280;     // temperautre, barometric pressure
Adafruit_LIS3MDL lis3mdl;   // magnetometer
Adafruit_LSM6DS33 lsm6ds33; // accelerometer, gyroscope
Adafruit_SHT31 sht30;       // humidity

uint8_t proximity;
uint16_t r, g, b, c;
float temperature, pressure, altitude;
float magnetic_x, magnetic_y, magnetic_z;
float accel_x, accel_y, accel_z;
float gyro_x, gyro_y, gyro_z;
float humidity;
int32_t mic;

extern PDMClass PDM;
short sampleBuffer[256];  // buffer to read samples into, each sample is 16-bits
volatile int samplesRead; // number of samples read

void setup(void) {
  Serial.begin(9600);
  // while (!Serial) delay(10);
  Serial.println("Feather Sense Sensor Demo");
  myservo.attach(5);  // attaches the servo on pin 9 to the servo object

  // initialize the sensors
  apds9960.begin();
  apds9960.enableProximity(true);
  apds9960.enableColor(true);
  bmp280.begin();
  lis3mdl.begin_I2C();
  lsm6ds33.begin_I2C();
  sht30.begin();
  //PDM.onReceive(onPDMdata);
  //PDM.begin(1, 16000);
}

void loop(void) {
  proximity = apds9960.readProximity();
  while (!apds9960.colorDataReady()) {
    delay(5);
  }
  apds9960.getColorData(&r, &g, &b, &c);

  temperature = bmp280.readTemperature();
  pressure = bmp280.readPressure();
  altitude = bmp280.readAltitude(1013.25);

  lis3mdl.read();
  magnetic_x = lis3mdl.x;
  magnetic_y = lis3mdl.y;
  magnetic_z = lis3mdl.z;

  sensors_event_t accel;
  sensors_event_t gyro;
  sensors_event_t temp;
  lsm6ds33.getEvent(&accel, &gyro, &temp);
  accel_x = accel.acceleration.x;
  accel_y = accel.acceleration.y;
  accel_z = accel.acceleration.z;
  gyro_x = gyro.gyro.x;
  gyro_y = gyro.gyro.y;
  gyro_z = gyro.gyro.z;

  humidity = sht30.readHumidity();

  samplesRead = 0;
  //mic = getPDMwave(4000);

  Serial.print("Gyro: ");
  Serial.print(gyro_x);
  Serial.print(" ");
  Serial.print(gyro_y);
  Serial.print(" ");
  Serial.print(gyro_z);
  Serial.println(" dps");

  if (gyro_x>2){
     for (pos = 0; pos <= 180; pos += 10) { // goes from 0 degrees to 180 degrees
    // in steps of 1 degree
    myservo.write(pos);              // tell servo to go to position in variable 'pos'
    delay(15);                       // waits 15ms for the servo to reach the position
  }
    }
  delay(10);
}
when using the code note that the condition for the servo to activate is the angle speed to be more than 2 degrees per second.
2- Dc Motor
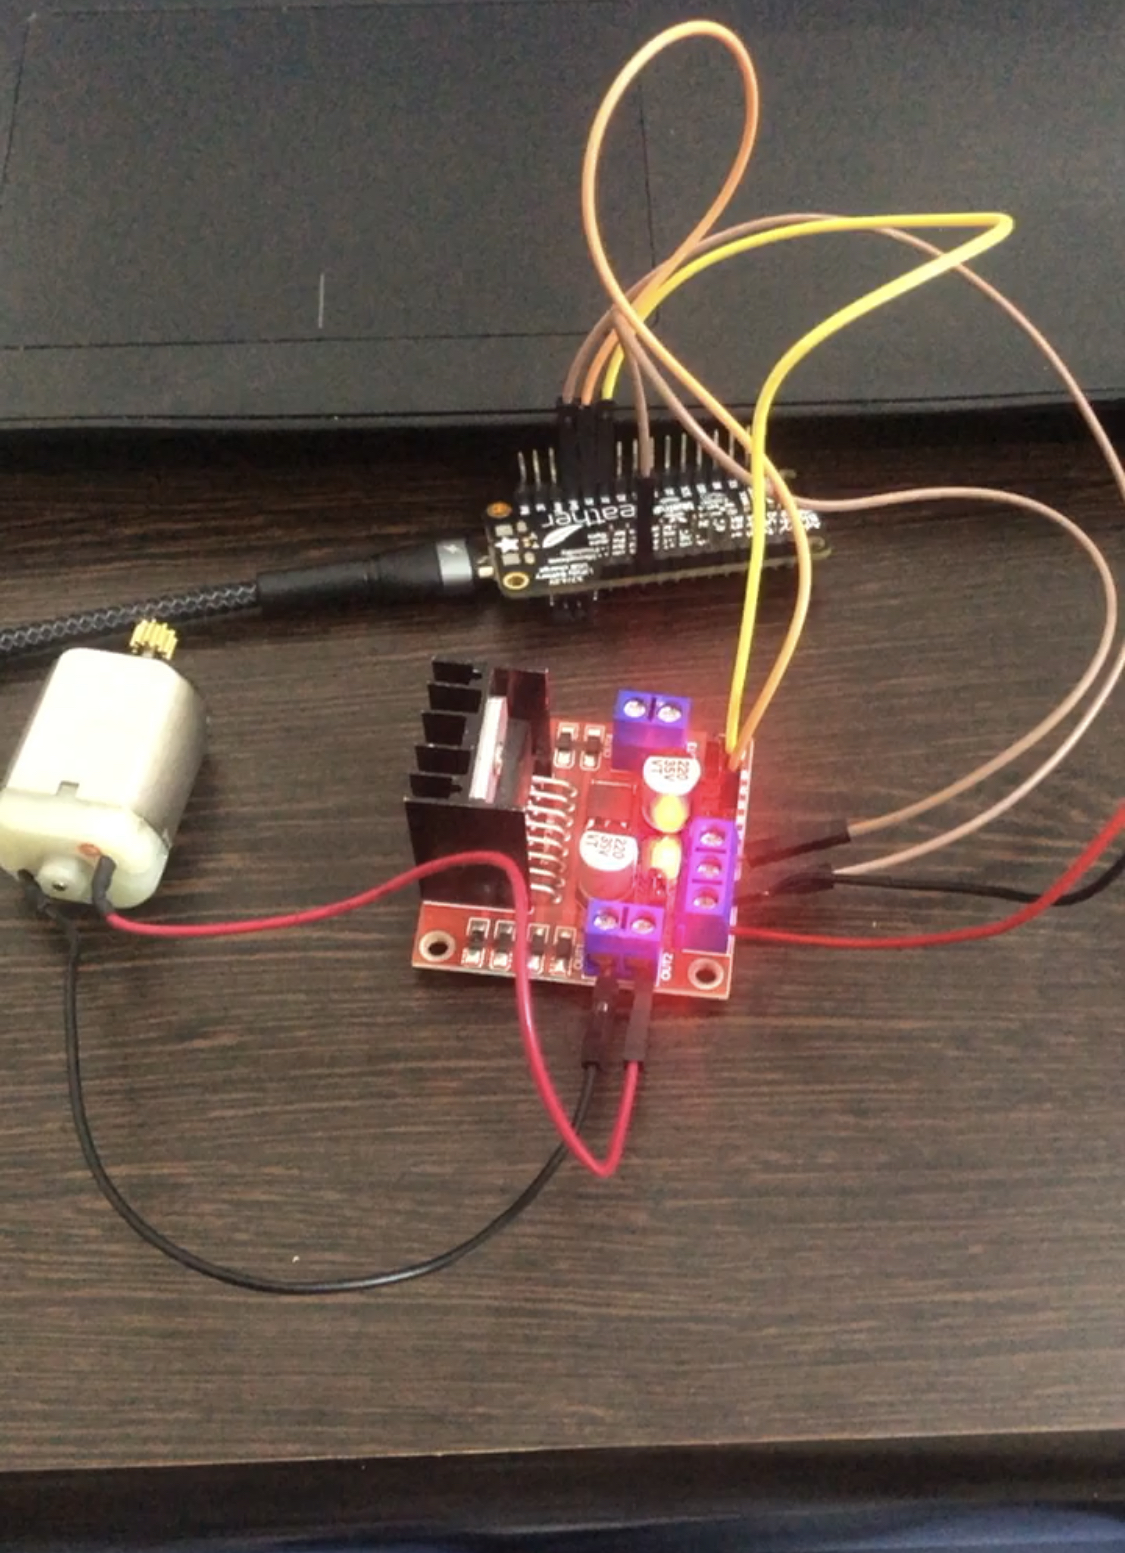
in here I used the angle that’s the micro controller at to control dc motor not the angle speed (dps).
when the roll of the microcontroller is >0 the motor spin one way and when the roll <0 the motor spins the other way. (note that in the code I put -+ 0.5 tolerance not exactly 0)
here is the code
// Full orientation sensing using NXP/Madgwick/Mahony and a range of 9-DoF
// sensor sets.
// You *must* perform a magnetic calibration before this code will work.
//
// To view this data, use the Arduino Serial Monitor to watch the
// scrolling angles, or run the OrientationVisualiser example in Processing.
// Based on  https://github.com/PaulStoffregen/NXPMotionSense with adjustments
// to Adafruit Unified Sensor interface

#include <Adafruit_Sensor_Calibration.h>
#include <Adafruit_AHRS.h>

Adafruit_Sensor *accelerometer, *gyroscope, *magnetometer;

// uncomment one combo 9-DoF!
#include "LSM6DS_LIS3MDL.h"  // can adjust to LSM6DS33, LSM6DS3U, LSM6DSOX...
//#include "LSM9DS.h"           // LSM9DS1 or LSM9DS0
//#include "NXP_FXOS_FXAS.h"  // NXP 9-DoF breakout

// pick your filter! slower == better quality output
Adafruit_NXPSensorFusion filter; // slowest
//Adafruit_Madgwick filter;  // faster than NXP
//Adafruit_Mahony filter;  // fastest/smalleset
#include <Adafruit_APDS9960.h>
#include <Adafruit_BMP280.h>
#include <Adafruit_LIS3MDL.h>
#include <Adafruit_LSM6DS33.h>
#include <Adafruit_SHT31.h>
#include <Adafruit_Sensor.h>
#include <PDM.h>

#if defined(ADAFRUIT_SENSOR_CALIBRATION_USE_EEPROM)
  Adafruit_Sensor_Calibration_EEPROM cal;
#else
  Adafruit_Sensor_Calibration_SDFat cal;
#endif

#define FILTER_UPDATE_RATE_HZ 100
#define PRINT_EVERY_N_UPDATES 10
//#define AHRS_DEBUG_OUTPUT

uint32_t timestamp;

int in1A = A0;
int in2A = A1;
int in1= 5;
int in2 = 6;
int spd;

void setup() {
  Serial.begin(9600);

  pinMode(in1A, OUTPUT);
  pinMode(in2A, OUTPUT);
  pinMode(in1, OUTPUT);
  pinMode(in2, OUTPUT);

  //while (!Serial) yield();

  if (!cal.begin()) {
    Serial.println("Failed to initialize calibration helper");
  } else if (! cal.loadCalibration()) {
    Serial.println("No calibration loaded/found");
  }

  if (!init_sensors()) {
    Serial.println("Failed to find sensors");
    while (1) delay(10);
  }

  accelerometer->printSensorDetails();
  gyroscope->printSensorDetails();
  magnetometer->printSensorDetails();

  setup_sensors();
  filter.begin(FILTER_UPDATE_RATE_HZ);
  timestamp = millis();

  Wire.setClock(400000); // 400KHz
}


void loop() {
  float roll, pitch, heading;
  float gx, gy, gz;
  static uint8_t counter = 0;

  if ((millis() - timestamp) < (1000 / FILTER_UPDATE_RATE_HZ)) {
    return;
  }
  timestamp = millis();
  // Read the motion sensors
  sensors_event_t accel, gyro, mag;
  accelerometer->getEvent(&accel);
  gyroscope->getEvent(&gyro);
  magnetometer->getEvent(&mag);
#if defined(AHRS_DEBUG_OUTPUT)
  Serial.print("I2C took "); Serial.print(millis()-timestamp); Serial.println(" ms");
#endif

  cal.calibrate(mag);
  cal.calibrate(accel);
  cal.calibrate(gyro);
  // Gyroscope needs to be converted from Rad/s to Degree/s
  // the rest are not unit-important
  gx = gyro.gyro.x * SENSORS_RADS_TO_DPS;
  gy = gyro.gyro.y * SENSORS_RADS_TO_DPS;
  gz = gyro.gyro.z * SENSORS_RADS_TO_DPS;

  // Update the SensorFusion filter
  filter.update(gx, gy, gz,
                accel.acceleration.x, accel.acceleration.y, accel.acceleration.z,
                mag.magnetic.x, mag.magnetic.y, mag.magnetic.z);
#if defined(AHRS_DEBUG_OUTPUT)
  Serial.print("Update took "); Serial.print(millis()-timestamp); Serial.println(" ms");
#endif

  // only print the calculated output once in a while
  if (counter++ <= PRINT_EVERY_N_UPDATES) {
    return;
  }
  // reset the counter
  counter = 0;

#if defined(AHRS_DEBUG_OUTPUT)
  Serial.print("Raw: ");
  Serial.print(accel.acceleration.x, 4); Serial.print(", ");
  Serial.print(accel.acceleration.y, 4); Serial.print(", ");
  Serial.print(accel.acceleration.z, 4); Serial.print(", ");
  Serial.print(gx, 4); Serial.print(", ");
  Serial.print(gy, 4); Serial.print(", ");
  Serial.print(gz, 4); Serial.print(", ");
  Serial.print(mag.magnetic.x, 4); Serial.print(", ");
  Serial.print(mag.magnetic.y, 4); Serial.print(", ");
  Serial.print(mag.magnetic.z, 4); Serial.println("");
#endif

  // print the heading, pitch and roll
  roll = filter.getRoll();
  pitch = filter.getPitch();
  heading = filter.getYaw();
  Serial.print("Orientation: ");
  Serial.print(heading);
  Serial.print(", ");
  Serial.print(pitch);
  Serial.print(", ");
  Serial.println(roll);

  float qw, qx, qy, qz;
  filter.getQuaternion(&qw, &qx, &qy, &qz);
  Serial.print("Quaternion: ");
  Serial.print(qw, 4);
  Serial.print(", ");
  Serial.print(qx, 4);
  Serial.print(", ");
  Serial.print(qy, 4);
  Serial.print(", ");
  Serial.println(qz, 4);

#if defined(AHRS_DEBUG_OUTPUT)
  Serial.print("Took "); Serial.print(millis()-timestamp); Serial.println(" ms");
#endif

spd= 100+ abs(roll)*2 ;

 if (roll>0.5){
  Forward();
  }
  else if (roll<-0.5){
    Reverse();
    }
    else{
      Stop();
      }

}

void Forward(){
  // analogWrite(in1A, spd);
  // analogWrite(in2A, 0);

  digitalWrite(in1, HIGH);
  digitalWrite(in2, LOW);

  }
  void Reverse(){
 // analogWrite(in1A, 0);
  //analogWrite(in2A, spd);

  digitalWrite(in1, LOW);
  digitalWrite(in2, HIGH);

    }
   void Stop(){
   //analogWrite(in1A, 0);
   //analogWrite(in2A, 0);

     digitalWrite(in1, LOW);
     digitalWrite(in2, LOW);

      }
please note for this code u would need filters so read the comments to choose the filter depending on your use (accuracy over speed or the other way around), one filter is already uncommented if you want to change the filter comment down the current one.
Also you would need to download external libraries for this code here are they
LSM6DS_LIS3MDL
LSM9DS
LSM9DS1
NXP_FXOS_FXAS
you have to keep them in the same file as the code, and you would only need one depending on the sensor you have, and make sure you uncomment the include command for your sensor.
3- Serial Input
here I wanted to show that there is no need for a sensor to demonstrate inputs, so I used the serial monitor to command the motor to move forward, backward or stop.
here is the connections, I used H-Bridge to reverse the motor movement, same connections was used in the previous part to control the dc motor with the gyroscope.
Enter 1 to move forward
Enter 2 to move backward
Enter 3 to stop
#include <Adafruit_APDS9960.h>
#include <Adafruit_BMP280.h>
#include <Adafruit_LIS3MDL.h>
#include <Adafruit_LSM6DS33.h>
#include <Adafruit_SHT31.h>
#include <Adafruit_Sensor.h>
#include <PDM.h>
int IN1 = 10;
int IN2 = 9;
int IN3 = 6;
int IN4 = 5;

char trash;

void setup()
{
  pinMode(IN1, OUTPUT);
  pinMode(IN2, OUTPUT);
  pinMode(IN3, OUTPUT);
  pinMode(IN4, OUTPUT);

  Serial.begin(9600);
  Serial.println("Enter number for control option:");
  Serial.println("1. FORWARD");
  Serial.println("2. REVERSE");
  Serial.println("3. STOP");
  Serial.println();
}

void loop()
{
  char user_input;

  while(Serial.available())
  {
    user_input = Serial.read();
    digitalWrite(IN1, LOW); //OFF
    digitalWrite(IN2, LOW);

    if (user_input =='1')
    {
       Forward();
       trash= Serial.read();
    }
    else if(user_input =='2')
    {
      Reverse();
      trash= Serial.read();
    }
    else if(user_input =='3')
    {
      Stop();
      trash= Serial.read();
    }
    else
    {
      Serial.println("Invalid option entered.");
      trash= Serial.read();
    }
  }
}


void Forward()
{
  digitalWrite(IN1, HIGH);
  digitalWrite(IN2, LOW);
  Serial.print("Motor 1 Forward");
  Serial.println();

  digitalWrite(IN3, HIGH);
  digitalWrite(IN4, LOW);
  Serial.println("Motor 2 Forward");
  Serial.println();
}

void Reverse()
{
  digitalWrite(IN1, LOW);
  digitalWrite(IN2, HIGH);
  Serial.print("Motor 2 Reverse");
  Serial.println();

  digitalWrite(IN3, LOW);
  digitalWrite(IN4, HIGH);
  Serial.println("Motor 2 Reverse");
  Serial.println();
}

void Stop()
{
    digitalWrite(IN1, LOW);
    digitalWrite(IN2, LOW);
    Serial.print("Motor 1 Stop");
    Serial.println();

    digitalWrite(IN3, LOW);
    digitalWrite(IN4, LOW);
    Serial.println("Motor 2 Stop");
    Serial.println();

}
How It works
Gyroscope
Gyroscopes, are devices that measure or maintain rotational motion, they are small, inexpensive sensors that measure angular velocity.
The gyroscope sensor within the microcontroller is tiny (between 1 to 100 micrometers, the size of a human hair). When the gyro is rotated, a small resonating mass is shifted as the angular velocity changes. This movement is converted into very low-current electrical signals that can be amplified and read by a host microcontroller.
for more details visit this website
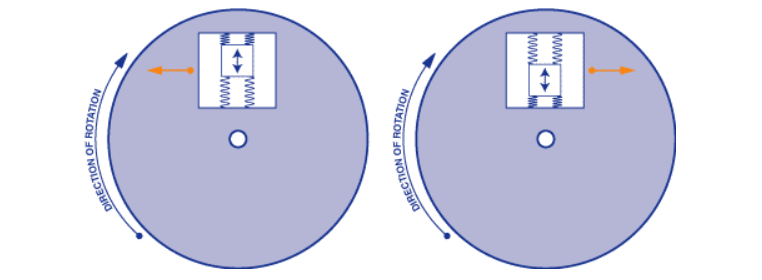
Servo
A servo motor is a rotary actuator that allows for precise control of angular position.
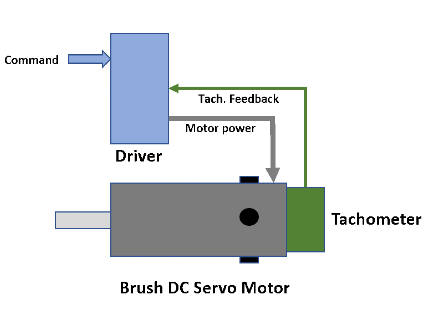
A simple industrial servo motor consists of a permanent magnet DC motor with an integral tachometer that provides an output voltage proportional to speed. The drive electronics delivers the necessary voltage and current to the motor based on the voltage fed back from the tachometer. In this example, a commanded speed (represented as a command reference voltage) is set in the driver, then the circuitry in the driver compares the tachometer feedback voltage and determines if the desired speed has been accomplished - known as a closed velocity loop
for more details visit this website
Dc motor
A direct current (DC) motor is a type of electric machine that converts electrical energy into mechanical energy.
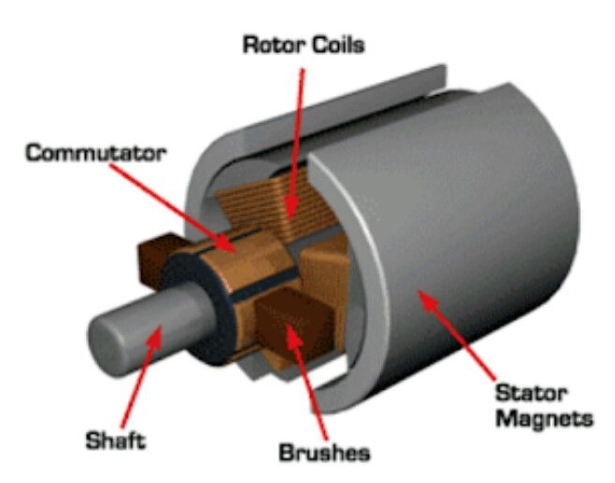
A simple DC motor uses a stationary set of magnets in the stator, and a coil of wire with a current running through it to generate an electromagnetic field aligned with the centre of the coil. One or more windings of insulated wire are wrapped around the core of the motor to concentrate the magnetic field.
for more details visit this website
Conclusion
From my light experience with the these specific input and output devises I learned some of their capabilities an limits.
Servo
- servo motors allows you to move it by the angle.
- servo motor restricts you to 180 degrees range of motion.
- each servo model have its own torque.
Gyro
- it allows you to measure the angle and dps (degree per second).
- its in accurate specially when trying to measure the orientation.
Dc motor
- its has many uses.
- One have to give the motor enough current to spin as fast as wanted and handle heavier load.