4. Embedded programming
In this week, it’s all about Arduino. So, what is Arduino?
Arduino is an open-source hardware and software company, project, and user community that designs and manufactures single-board microcontrollers and microcontroller kits for building digital devices.
Arduino Nano 33 BLE Sense
The microcontroller we used through this week. Here is the link where you can get all information here. Download the datasheet to get more information from here or you can see it here.
Why do we choose it?
Because it has many embedded sensors, look at the image below:
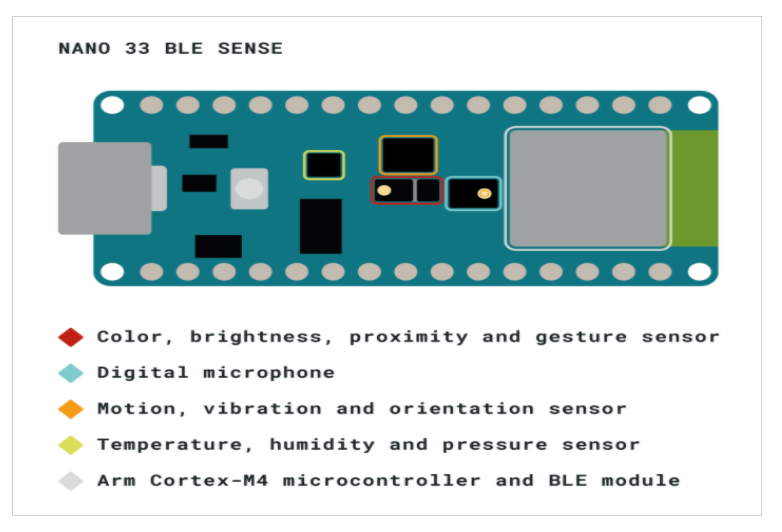
These sensors do many works for us, see the below list: * Barometer and temperature sensor. * Relative humidity sensor. * Digital proximity, Ambient light, RGB and Gesture sensors.
Also, it has other features: * 9 axis IMU. (Inertial Measurements Unit) * Digital microphones. * Crypto chip. * DC-DC regulator.
Pinouts
We have 3 types of pinouts:
-
USB
-
Headers In general, we have 2 types of headers pinouts: Analog and Digital. Here are some acronyms:
| Acronyms | Meaning |
|---|---|
| GPIO | General-Purpose Input/Output |
| PWM | Pulse Width Modulation |

- Debug
Getting started:
Download the Arduino IDE:

Then follow the tutorial, and these are the steps:
-
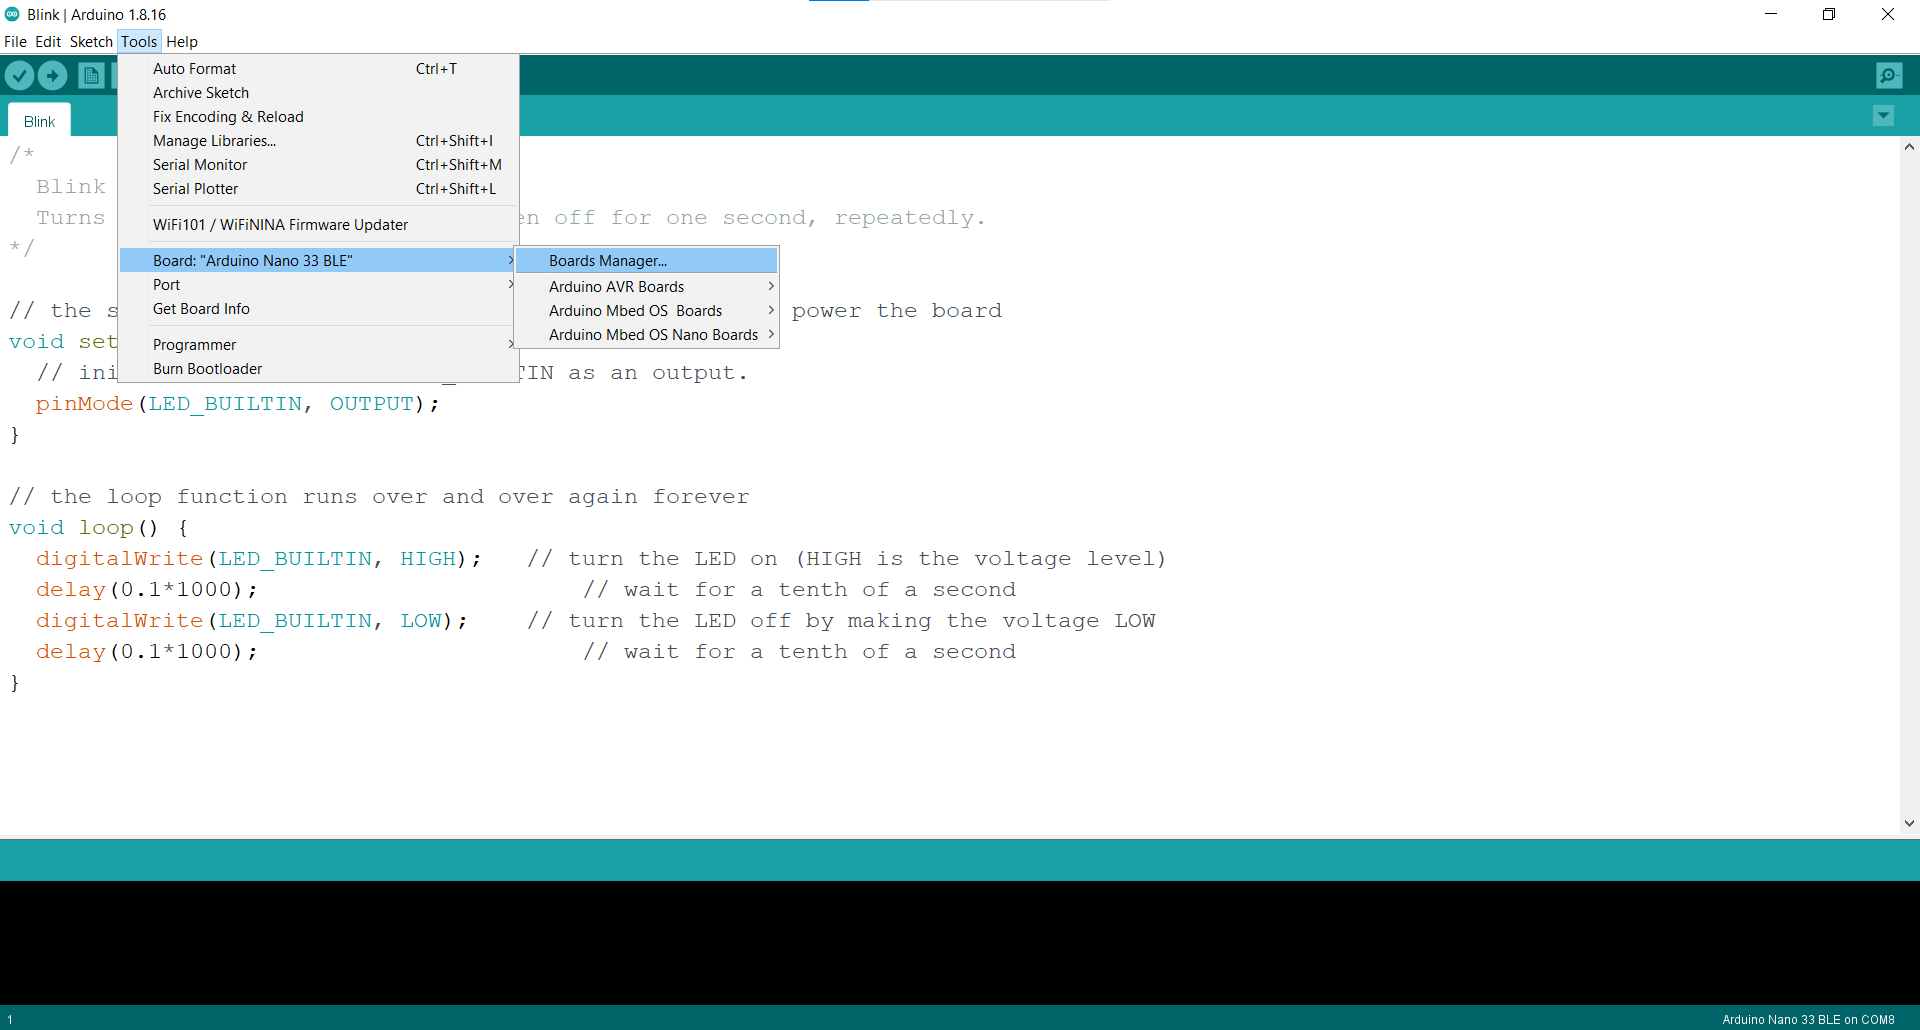
Open Arduino Desktop IDE, then open Board Manager:
-
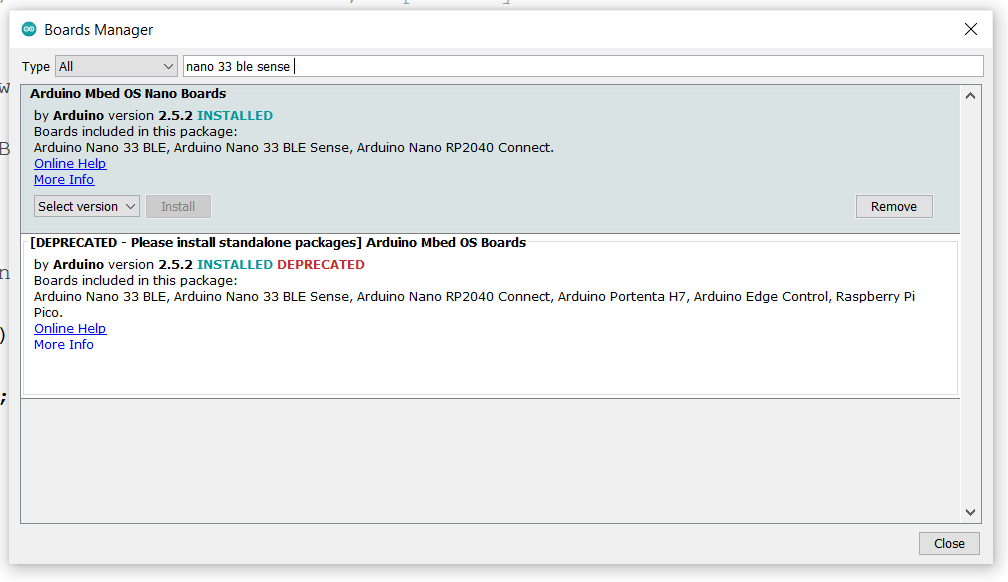
Download the software for our microcontroller, Arduino Nano 33 BLE Sense:
-
Then choose the microcontroller board:

-
Choose the port you connect the microcontroller board to:
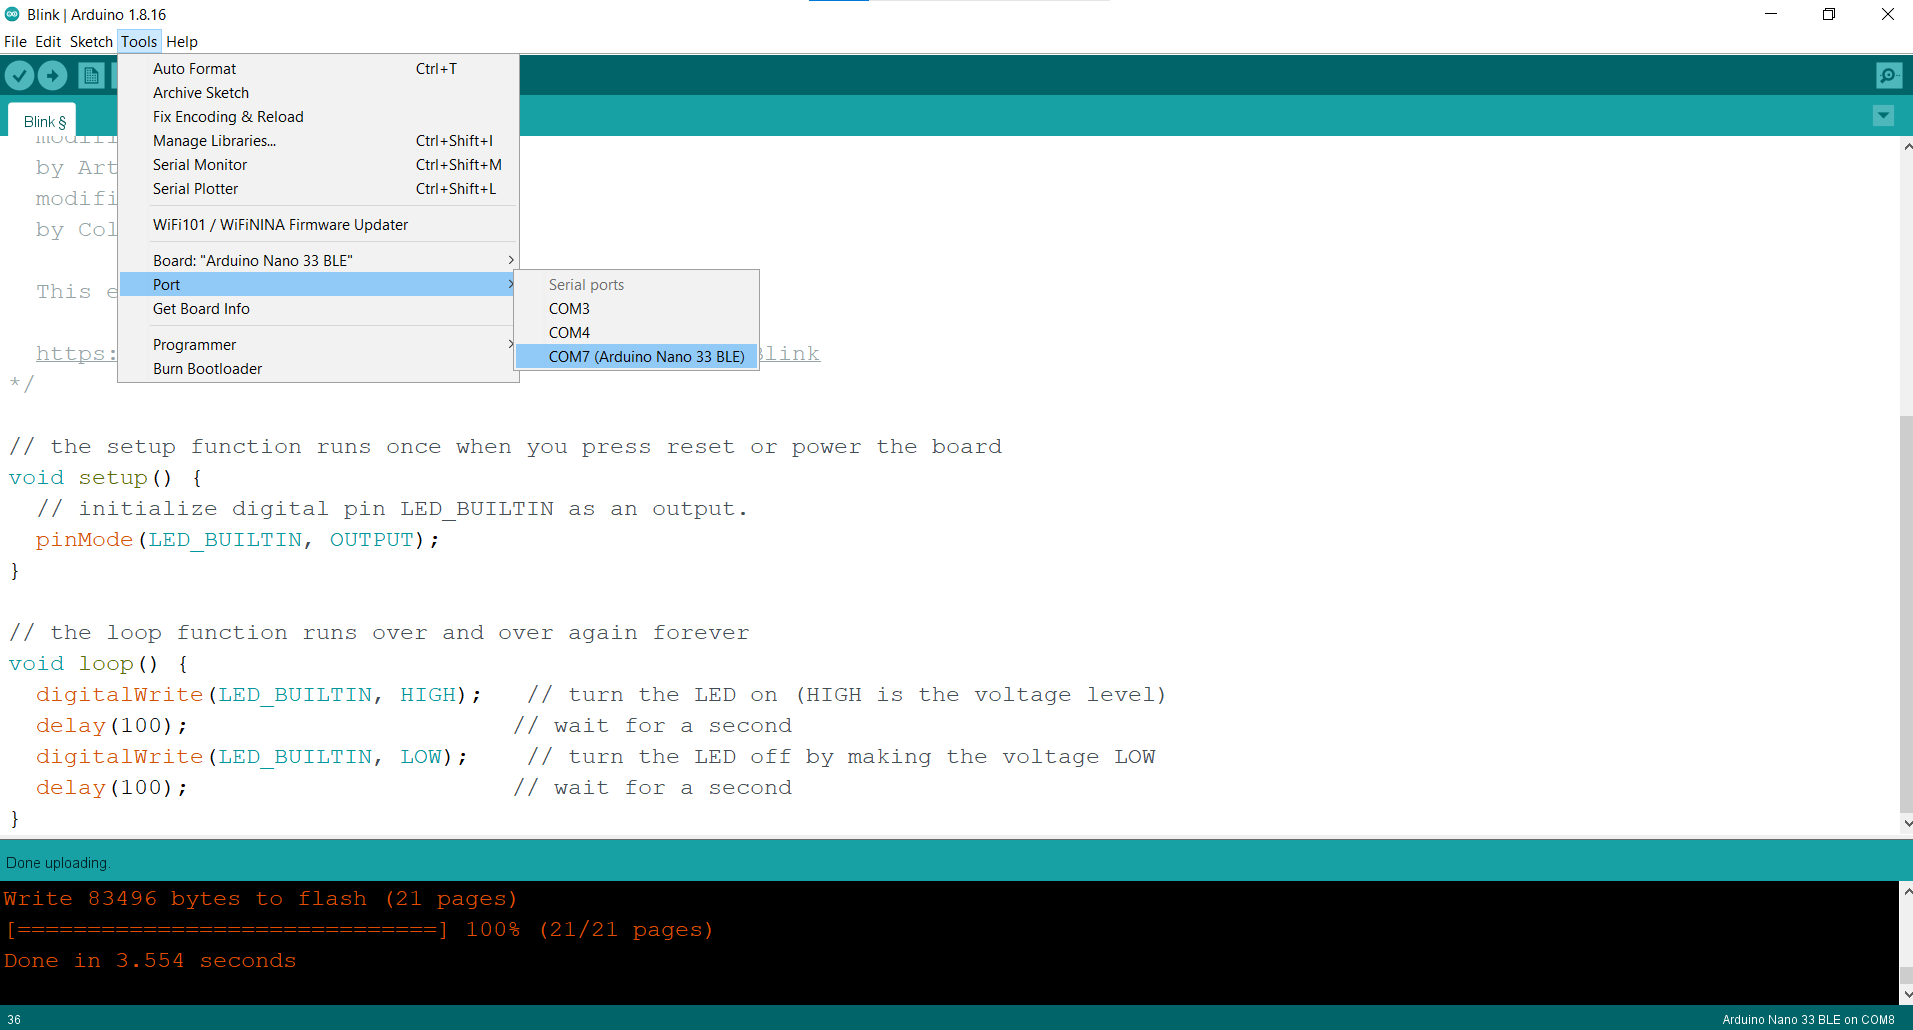
Note: There is an issue in choosing port, every time you want to upload the program to the board you have to choose the port again.
Challenges:
Some exercises are given to us in 3 different levels to do them in IDE:
Easy mode:
Blink your led but have your blink delay periods be randomized values between 1 second and 9 seconds.
// the setup function runs once when you press reset or power the board
void setup() {
  // initialize digital pin LED_BUILTIN as an output.
  pinMode(LED_BUILTIN, OUTPUT);
}

// the loop function runs over and over again forever
void loop() {
  digitalWrite(LED_BUILTIN, HIGH);   // turn the LED on (HIGH is the voltage level)
  delay((1 + (rand() % 9))*1000);    // wait for a random seconds
  digitalWrite(LED_BUILTIN, LOW);    // turn the LED off by making the voltage LOW
  delay((1 + (rand() % 9))*1000);    // wait for a random seconds
}
Results:
| # | Time |
|---|---|
| 1 | 03.91 |
| 2 | 02.88 |
| 3 | 06.94 |
| 4 | 06.13 |
| 5 | 04.01 |
| 6 | 03.80 |
Medium mode:
Pre code your microcontroller to send a Morse code 1 word message and challenge a friend, family member, your colleagues or your instructor to figure it out. dot = 0.5 second light on. dash=1 second light on. gap between dots and dashes=0.5 second light off. gap between letters=2 second light off.
Here I write my name in Morse code:
void setup() {
  // initialize digital pin LED_BUILTIN as an output.
  pinMode(LED_BUILTIN, OUTPUT);
}
void loop() {
  //Writing K:
    digitalWrite(LED_BUILTIN, HIGH);   // dot
    delay(0.5*1000);
    digitalWrite(LED_BUILTIN, LOW);    // gap
    delay(0.5*1000);
    digitalWrite(LED_BUILTIN, HIGH);   // dash
    delay(1*1000);
    digitalWrite(LED_BUILTIN, LOW);    // gap
    delay(0.5*1000);
    digitalWrite(LED_BUILTIN, HIGH);   // dot
    delay(0.5*1000);
    digitalWrite(LED_BUILTIN, LOW);    // letter gap
    delay(2*1000);
  //Writing U:
    digitalWrite(LED_BUILTIN, HIGH);   // dot
    delay(0.5*1000);
    digitalWrite(LED_BUILTIN, LOW);    // gap
    delay(0.5*1000);
    digitalWrite(LED_BUILTIN, HIGH);   // dot
    delay(0.5*1000);
    digitalWrite(LED_BUILTIN, LOW);    // gap
    delay(0.5*1000);
    digitalWrite(LED_BUILTIN, HIGH);   // dash
    delay(1*1000);
    digitalWrite(LED_BUILTIN, LOW);    // letter gap
    delay(2*1000);
  //Writing M:
    digitalWrite(LED_BUILTIN, HIGH);   // dash
    delay(1*1000);
    digitalWrite(LED_BUILTIN, LOW);    // gap
    delay(0.5*1000);
    digitalWrite(LED_BUILTIN, HIGH);   // dash
    delay(1*1000);
    digitalWrite(LED_BUILTIN, LOW);    // letter gap
    delay(2*1000);
  //Writing A:
    digitalWrite(LED_BUILTIN, HIGH);   // dot
    delay(0.5*1000);
    digitalWrite(LED_BUILTIN, LOW);    // gap
    delay(0.5*1000);
    digitalWrite(LED_BUILTIN, HIGH);   // dash
    delay(1*1000);
    digitalWrite(LED_BUILTIN, LOW);    // letter gap
    delay(2*1000);
  //Writing I:
    digitalWrite(LED_BUILTIN, HIGH);   // dot
    delay(0.5*1000);
    digitalWrite(LED_BUILTIN, LOW);    // gap
    delay(0.5*1000);
    digitalWrite(LED_BUILTIN, HIGH);   // dot
    delay(0.5*1000);
    digitalWrite(LED_BUILTIN, LOW);    // letter gap
    delay(2*1000);
  //Writing L:
    digitalWrite(LED_BUILTIN, HIGH);   // dot
    delay(0.5*1000);
    digitalWrite(LED_BUILTIN, LOW);    // gap
    delay(0.5*1000);
    digitalWrite(LED_BUILTIN, HIGH);   // dash
    delay(1*1000);
    digitalWrite(LED_BUILTIN, LOW);    // gap
    delay(0.5*1000);
    digitalWrite(LED_BUILTIN, HIGH);   // dot
    delay(0.5*1000);
    digitalWrite(LED_BUILTIN, LOW);    // gap
    delay(0.5*1000);
    digitalWrite(LED_BUILTIN, HIGH);   // dot
    delay(0.5*1000);
    digitalWrite(LED_BUILTIN, LOW);    // letter gap
    delay(2*1000);
}
But this is too long code. To do it faster, make the dots and dashes as functions:
void setup() {
  pinMode(LED_BUILTIN, OUTPUT);
}

void loop() {
  //Writing K:
    dash(); gap(); dot(); gap(); dash(); letterGap();
  //Writing U:
    dot(); gap(); dot(); gap(); dash(); letterGap();
  //Writing M:
    dash(); gap(); dash(); letterGap();
  //Writing A:
    dot(); gap(); dash(); letterGap();
  //Writing I:
    dot(); gap(); dot(); letterGap();
  //Writing L:
  dot(); gap(); dash(); gap(); dot(); gap(); dot(); letterGap();
}

//Define functions:
void dash(){digitalWrite(LED_BUILTIN, HIGH);delay(1*1000);}
void dot(){digitalWrite(LED_BUILTIN, HIGH);delay(0.5*1000);}
void gap(){digitalWrite(LED_BUILTIN, LOW);delay(0.5*1000);}
void letterGap(){digitalWrite(LED_BUILTIN, LOW);delay(2*1000);}
See here how it’s blinking my name in Morse code:
Tinkercad
Tinkercad is the second way we learned to program the microcontroller board. In Tinkercad, we use Blocks to program. This what Blocks mean:
In computer programming, a block or code block or block of code is a lexical structure of source code which is grouped together.
I make fading lights with Tinkercad blocks:
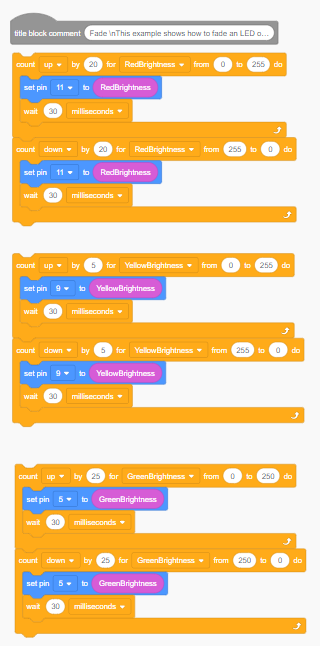
And this is the result:

Click here to open the circuit in Tinkercad.
int GreenBrightness = 0;
int RedBrightness = 0;
int YellowBrightness = 0;

void setup()
{
  pinMode(11, OUTPUT);
  pinMode(9, OUTPUT);
  pinMode(5, OUTPUT);
}

void loop()
{
  for (RedBrightness = 0; RedBrightness <= 255; RedBrightness += 20) {
    analogWrite(11, RedBrightness);
    delay(30); // Wait for 30 millisecond(s)
  }
  for (RedBrightness = 255; RedBrightness >= 0; RedBrightness -= 20) {
    analogWrite(11, RedBrightness);
    delay(30); // Wait for 30 millisecond(s)
  }

  for (YellowBrightness = 0; YellowBrightness <= 255; YellowBrightness += 5) {
    analogWrite(9, YellowBrightness);
    delay(30); // Wait for 30 millisecond(s)
  }
  for (YellowBrightness = 255; YellowBrightness >= 0; YellowBrightness -= 5) {
    analogWrite(9, YellowBrightness);
    delay(30); // Wait for 30 millisecond(s)
  }

  for (GreenBrightness = 0; GreenBrightness <= 250; GreenBrightness += 25) {
    analogWrite(5, GreenBrightness);
    delay(30); // Wait for 30 millisecond(s)
  }
  for (GreenBrightness = 250; GreenBrightness >= 0; GreenBrightness -= 25) {
    analogWrite(5, GreenBrightness);
    delay(30); // Wait for 30 millisecond(s)
  }
}
Useful Links
Arduino Workshop for Beginners:
This is a playlist of short lessons in Arduino for beginners, by Core Electronics channel.