Final Project
Finally this week comes, at this week I worked with my team Sayed Qassim and Mohammed Adel on defining my final project idea and started to apply all the things we just learned in the fablab program during the past 8 weeks. So as passion in instrumentation and how connect our world with the digital system and after thinking and studying several ideas, finally we choose to do SMART LOCK DOOR as project.
Project idea
Smart look door that can be control by phone or passcode to open/close the lock. Furthermore, the lock has a screen To Display the status of the person inside the room/house, status like(don’t disturb i’m working, don’t disturb i’m sleeping,…).
First to control our lock by our phone, we saw that the normal arduino we used to use is not the best choice to use it in our project, because of that we searched a little bit about the different types of the microcontrollers in earth. We used arduino mkr because this microcontroller board has nice property that the normal arduino don’t provide, which is that we can connect this microcontroller with Bluetooth or WiFi with the board it self without needing to bay a device to do this job. Other reason that we used to program the arduino boards so we tried to use one of arduino microcontroller family, so we excluded the esp32 microcontroller because we will need to learn how it can be programmed and may we have some difficulty in solving the problems that we may faced while building our project.
Project principle and splitting the work
We have selected our idea and what we will do, now we were need to now how the lock structure will be and what types of electronics we will use. This part which were we had to draw a plan of what we will go through for the upcoming days took from us two full days, we had several ideas best two of them where, first idea was like we will buy new lock then improve it with the electronics and apply our project idea in short time, also by taking a ready lock will be much better than when we do a new one which were our second idea, because we will need to think from the beginning about
-
1- How to is the opening/closing the lock works, what is the lock movement and structure must be inside and the out side .
-
2- which “electronic must be used”, how then it will be connected with phones then
-
3- How the “final design” will look like and the small lock parts design.
Finally, we decided to challenge ourselves and do the second idea which were building the lock starting from zero because we will apply all the things we learned in the fablab 10-weeks program, and we will learn how to engineer and build things from nothing.
Now we need to split the work according the 3 questions above, for the 2-second question Sayed Qassim handle the electronics part because his background in programing as an computer Engineer. then for the 3-third question Mohammed Adel handle it. So my part was to handle the 1-first question.
lock Structure
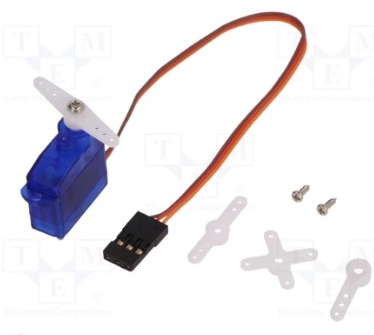
After searching and taking a look at different types of how the locks work, i saw that using servo motor is the right solution. Servo motor s a type of motor that can rotate with great precision. If you want to rotate an object at some specific angles or distance, then you use a servo motor. Here by this servo motor i think to use it to move a piece 90 ْ degree to lock the door, or move a piece 90 ْ degree in the opposite side to open the door.
2D and 3D Modeling
Add here your modeling and design.
The Final Project
Materials
| Qty | Description | Price | Link | Notes |
|---|---|---|---|---|
| 1 | Material one | 22.00 $ | http://amazon.com/test | Order many |
| 1 | Material two | 22.00 $ | http://amazon.com/test | |
| 1 | Material three | 22.00 $ | http://amazon.com/test | |
| 1 | Material five | 22.00 $ | http://amazon.com/test | |
| 1 | Material eight | 22.00 $ | http://amazon.com/test | |
| 1 | Material twelve | 22.00 $ | http://amazon.com/test | |
| 1 | Material eleven | 22.00 $ | http://amazon.com/test |
Code Example
// the setup function runs once when you press reset or power the board
void setup() {
  // initialize digital pin LED_BUILTIN as an output.
  pinMode(LED_BUILTIN, OUTPUT);
}

// the loop function runs over and over again forever
void loop() {
  digitalWrite(LED_BUILTIN, HIGH);   // turn the LED on (HIGH is the voltage level)
  delay(1000);                       // wait for a second
  digitalWrite(LED_BUILTIN, LOW);    // turn the LED off by making the voltage LOW
  delay(1000);                       // wait for a second
}
Gallery