Microcontroller Project Documentation
Group Assignment
Browse through the datasheet for your microcontroller. Compare the performance and development workflows for other architectures. Document your work to the group work page and reflect on your individual page on what you learned.
Individual Assignment
Write a program for a microcontroller development board to interact with local input and/or output devices and communicate with remote wired or wireless devices.
Arduino Sketch
Code Display
➡️ Code Display
                    #define LED_PIN 20                            //GPIO20 PIN Connection
                    #define LED2_PIN 7                            //GPIO7 PIN Connection
                    #define BUTTON_PIN 21                         //GPIO21 PIN Connection
                    #include <SPI.h>                              //Serial Monitor Library

                    void setup() {
                      pinMode(LED_PIN, OUTPUT);                   //Built in PCB LED OUTPUT
                      pinMode(LED2_PIN, OUTPUT);                  //OUTPUT PCB connection to another PCB
                      pinMode(BUTTON_PIN, INPUT);                 //Built in PCB Button INPUT
                      Serial.begin(9600);                         //Serial Baud 9600
                    }

                    void loop() {
                      int buttonState = digitalRead(BUTTON_PIN);  //To find the status of the button
                      if (digitalRead(BUTTON_PIN) == HIGH) {      //Condition when the button is pressed and its on
                        digitalWrite(LED_PIN, HIGH);              //LED condition is on when the button is on
                        digitalWrite(LED2_PIN, HIGH);             //The OUTPUT Pin is on when the button is on
                        Serial.println(buttonState);              //To present the status of the button when its on or off
                      }
                      else {
                        digitalWrite(LED_PIN, LOW);               //LED condition is off when the button is off
                        digitalWrite(LED2_PIN, LOW);              //The OUTPUT Pin is off when the button is off
                        Serial.println(buttonState);              //To present the status of the button when its on or off
                      }
                    }
Overview of the Programming Process
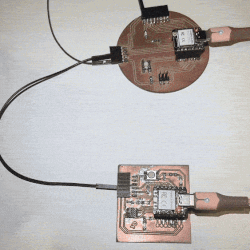
- Pin Assignments: I designated LED_PIN as 20 for controlling the built-in LED, LED2_PIN as 7 for an external LED, and BUTTON_PIN as 21 for the button input.
- Library Integration: I incorporated the SPI.h library, intending to use it for serial monitor functionalities, even though it remains inactive in the current code.
- Configuration Setup: Within the setup() function:
- I utilized pinMode() to define LED_PIN and LED2_PIN as outputs and BUTTON_PIN as an input.
- The serial communication was initialized at a baud rate of 9600 using Serial.begin().
- Main Loop Functionality: In the loop() function:
- The current state of the button is captured with digitalRead(BUTTON_PIN) and stored in buttonState.
- If the button is pressed (HIGH):
- Both LEDs (LED_PIN and LED2_PIN) are illuminated.
- The status of the button (buttonState) is displayed on the serial monitor.
- If the button is not pressed:
- Both LEDs are turned off.
- The button state is printed to the serial monitor.
- LED Operation: I control the LEDs (LED_PIN and LED2_PIN) using digitalWrite(), toggling them between on (HIGH) and off (LOW) states based on the button's status.
- Serial Communication: Serial.println() is employed to output the button's state (HIGH or LOW) to the serial monitor, aiding in debugging and monitoring the button's behavior.
- Execution Flow: The code continuously cycles through reading the button state, adjusting the LEDs accordingly, and displaying the button state via the serial monitor.
This program essentially orchestrates interactions between a button press and the behavior of two LEDs, with real-time feedback provided through the serial monitor for monitoring and debugging purposes.