Final Project
This week I worked on defining my final project idea and started to getting used to the documentation process, So here I researched about MQTT.
Introduction
Our project was to make a smart shelf that looks just like a normal peice of furniture, and inside it host multiple sensors that send information about the surrounding environment.
MPU6050 Accelerometer and Gyroscope Module, APDS9960 Proximity, Light, RGB, and Gesture Sensor and SHT40 temperature and humidity sensor are used to collect and send data by the aid of MQTT protocol to make use of the data.
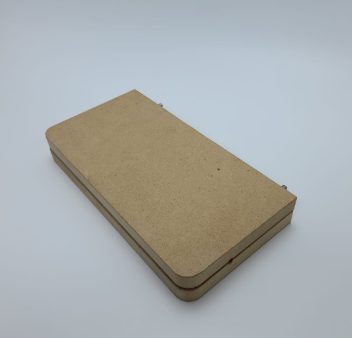
The Idea in designing the shelf was to create Two enclosed layers of MDF material with a thin stripe of silicon in between. The shelf was made to secure the electronic peices in place.
MQTT
What is MQTT ?
Message Queuing Telemetry Transport (MQTT) : MQTT is an OASIS standard messaging protocol for the Internet of Things (IoT). It is designed as an extremely lightweight publish/subscribe messaging transport that is ideal for connecting remote devices with a small code footprint and minimal network bandwidth. MQTT today is used in a wide variety of industries, such as automotive, manufacturing, telecommunications, oil and gas, etc.
Why MQTT?
1. Lightweight and Efficient : MQTT clients are very small, require minimal resources so can be used on small microcontrollers. MQTT message headers are small to optimize network bandwidth.
-
Bi-directional Communications : MQTT allows for messaging between device to cloud and cloud to device. This makes for easy broadcasting messages to groups of things.
-
Scale to Millions of Things : MQTT can scale to connect with millions of IoT devices.
-
Reliable Message Delivery : Reliability of message delivery is important for many IoT use cases. This is why MQTT has 3 defined quality of service levels: 0 - at most once, 1- at least once, 2 - exactly once .
-
Support for Unreliable Networks : Many IoT devices connect over unreliable cellular networks. MQTT’s support for persistent sessions reduces the time to reconnect the client with the broker.
-
Security Enabled : MQTT makes it easy to encrypt messages using TLS and authenticate clients using modern authentication protocols, such as OAuth.
MQTT Publish / Subscribe Architecture

MQTT Code
#include <Adafruit_MPU6050.h>
#include <Adafruit_Sensor.h>
#include <Wire.h>
#include <ArduinoMqttClient.h>
#include <WiFiNINA.h>
#define INT_PIN 3

bool light;
Adafruit_MPU6050 mpu;

#include "Adafruit_APDS9960.h"
//create the APDS9960 object
Adafruit_APDS9960 apds;

#include "Adafruit_SHT4x.h"

Adafruit_SHT4x sht4 = Adafruit_SHT4x();

char ssid[] = "FABLAB";        // your network SSID (name)
char pass[] = "fablab@2021";    // your network password (use for WPA, or use as key for WEP)

WiFiClient wifiClient;
MqttClient mqttClient(wifiClient);

const char broker[] = "192.168.8.10";
int        port     = 1883;

const char topic[]  = "accelerationx";
const char topic2[]  = "accelerationy";
const char topic3[]  = "accelerationz";
const char topic4[]  = "gyrox";
const char topic5[]  = "gyroy";
const char topic6[]  = "gyroz";
const char topic7[]  = "r";
const char topic8[]  = "g";
const char topic9[]  = "b";
const char topic10[]  = "tempr";
const char topic11[]  = "humd";
const char topic12[]  = "x";
const char topic13[]  = "light";


//set interval for sending messages (milliseconds)
const long interval = 8000;
unsigned long previousMillis = 0;

int count = 0;

void setup() {
  //Initialize serial and wait for port to open:
  Serial.begin(115200);
  pinMode(INT_PIN, INPUT_PULLUP);


  //enable proximity mode
  apds.enableProximity(true);

  //set the interrupt threshold to fire when proximity reading goes above 175
  apds.setProximityInterruptThreshold(0, 175);

  //enable the proximity interrupt
  apds.enableProximityInterrupt();

  // attempt to connect to Wifi network:


  mpu.setAccelerometerRange(MPU6050_RANGE_8_G);

  switch (mpu.getAccelerometerRange()) {
  case MPU6050_RANGE_2_G:

    break;
  case MPU6050_RANGE_4_G:

    break;
  case MPU6050_RANGE_8_G:

    break;
  case MPU6050_RANGE_16_G:

    break;
  }
  mpu.setGyroRange(MPU6050_RANGE_500_DEG);

  switch (mpu.getGyroRange()) {
  case MPU6050_RANGE_250_DEG:

    break;
  case MPU6050_RANGE_500_DEG:

    break;
  case MPU6050_RANGE_1000_DEG:

    break;
  case MPU6050_RANGE_2000_DEG:

    break;
  }

  mpu.setFilterBandwidth(MPU6050_BAND_21_HZ);

  switch (mpu.getFilterBandwidth()) {
  case MPU6050_BAND_260_HZ:

    break;
  case MPU6050_BAND_184_HZ:

    break;
  case MPU6050_BAND_94_HZ:

    break;
  case MPU6050_BAND_44_HZ:

    break;
  case MPU6050_BAND_21_HZ:

    break;
  case MPU6050_BAND_10_HZ:

    break;
  case MPU6050_BAND_5_HZ:

    break;
  }


  //enable color sensign mode
  apds.enableColor(true);


  // You can have 3 different precisions, higher precision takes longer
  sht4.setPrecision(SHT4X_HIGH_PRECISION);
  switch (sht4.getPrecision()) {
     case SHT4X_HIGH_PRECISION:

       break;
     case SHT4X_MED_PRECISION:

       break;
     case SHT4X_LOW_PRECISION:

       break;
  }

  // You can have 6 different heater settings
  // higher heat and longer times uses more power
  // and reads will take longer too!
  sht4.setHeater(SHT4X_NO_HEATER);
  switch (sht4.getHeater()) {
     case SHT4X_NO_HEATER:

       break;
     case SHT4X_HIGH_HEATER_1S:

       break;
     case SHT4X_HIGH_HEATER_100MS:

       break;
     case SHT4X_MED_HEATER_1S:

       break;
     case SHT4X_MED_HEATER_100MS:

       break;
     case SHT4X_LOW_HEATER_1S:

       break;
     case SHT4X_LOW_HEATER_100MS:

       break;
  }

}


void loop() {

  //print the proximity reading when the interrupt pin goes low
  int x=apds.readProximity();

    if(x<125)
    {light=true;}
    else
    {light=false;}

   delay(500);

    //clear the interrupt
    apds.clearInterrupt();

   /* Get new sensor events with the readings */
  sensors_event_t a, gg, temp;
  mpu.getEvent(&a, &gg, &temp);

  /* Print out the values */

  //create some variables to store the color data in
  uint16_t r, g, b, c;

  //wait for color data to be ready
  while(!apds.colorDataReady()){
    delay(5);
  }

  //get the data and print the different channels
  apds.getColorData(&r, &g, &b, &c);


  delay(500);
  sensors_event_t humidity, tempr;

  uint32_t timestamp = millis();
  sht4.getEvent(&humidity, &tempr);// populate temp and humidity objects with fresh data
  timestamp = millis() - timestamp;


  delay(1000);
   // call poll() regularly to allow the library to send MQTT keep alive which
  // avoids being disconnected by the broker
  mqttClient.poll();

  unsigned long currentMillis = millis();

  if (currentMillis - previousMillis >= interval) {
    // save the last time a message was sent
    previousMillis = currentMillis;

    //record random value from A0, A1 and A2
    int Rvalue = a.acceleration.x;
    int Rvalue2 = a.acceleration.y;
    int Rvalue3 = a.acceleration.z;
    int Rvalue4 = gg.gyro.x;
    int Rvalue5 = gg.gyro.y;
    int Rvalue6 = gg.gyro.z;
    int Rvalue7 = r;
    int Rvalue8 = g;
    int Rvalue9 =b;
    int Rvalue10 = tempr.temperature;
    int Rvalue11= humidity.relative_humidity;
    int Rvalue12= x;
    int Rvalue13= light;


    // send message, the Print interface can be used to set the message contents
    mqttClient.beginMessage(topic);
    mqttClient.print(Rvalue);
    mqttClient.endMessage();

    mqttClient.beginMessage(topic2);
    mqttClient.print(Rvalue2);
    mqttClient.endMessage();

    mqttClient.beginMessage(topic3);
    mqttClient.print(Rvalue3);
    mqttClient.endMessage();

    mqttClient.beginMessage(topic4);
    mqttClient.print(Rvalue4);
    mqttClient.endMessage();

        mqttClient.beginMessage(topic5);
    mqttClient.print(Rvalue5);
    mqttClient.endMessage();

    mqttClient.beginMessage(topic6);
    mqttClient.print(Rvalue6);
    mqttClient.endMessage();

        mqttClient.beginMessage(topic7);
    mqttClient.print(Rvalue7);
    mqttClient.endMessage();

        mqttClient.beginMessage(topic8);
    mqttClient.print(Rvalue8);
    mqttClient.endMessage();

        mqttClient.beginMessage(topic9);
    mqttClient.print(Rvalue9);
    mqttClient.endMessage();

        mqttClient.beginMessage(topic10);
    mqttClient.print(Rvalue10);
    mqttClient.endMessage();

        mqttClient.beginMessage(topic11);
    mqttClient.print(Rvalue11);
    mqttClient.endMessage();

   mqttClient.beginMessage(topic12);
    mqttClient.print(Rvalue12);
    mqttClient.endMessage();

       mqttClient.beginMessage(topic13);
    mqttClient.print(Rvalue13);
    mqttClient.endMessage();


  }
}
The final result :


The shelf sending data to node-red: