4. Embedded programming
This week I worked on embedad progiraming and we got the idea of Embedded Progiraming.
Embedded system
An embedded system is a computer system—a combination of a computer processor, computer memory, and input/output peripheral devices—that has a dedicated function within a larger mechanical or electronic system.
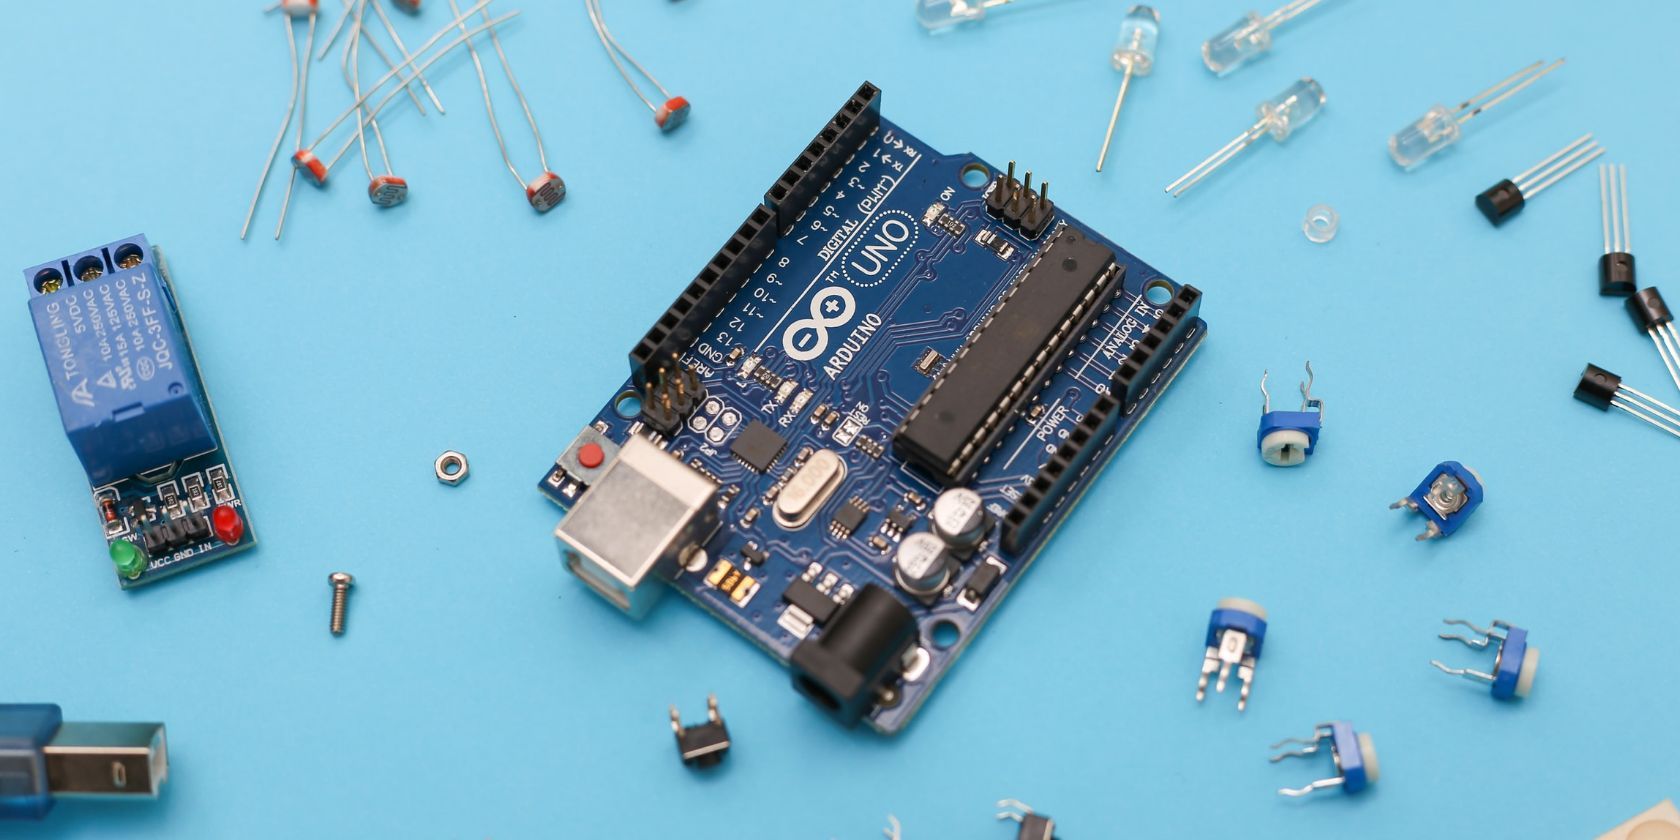
Microcontroller
A microcontroller (MCU for microcontroller unit) is a small computer on a single VLSI integrated circuit (IC) chip. A microcontroller contains one or more CPUs (processor cores) along with memory and programmable input/output peripherals. Program memory in the form of ferroelectric RAM, NOR flash or OTP ROM is also often included on chip, as well as a small amount of RAM. Microcontrollers are designed for embedded applications, in contrast to the microprocessors used in personal computers or other general purpose applications consisting of various discrete chips.Read more about Microcontroller.
Types of Microcontroller
Different types of Microcontroller Programming used in Embedded Systems such as - PIC Microcontroller - ARM Microcontroller - 8051 Microcontroller - AVR Microcontroller - 0MSP Microcontroller. Read more
Group Assignment.
- Group Assignment link
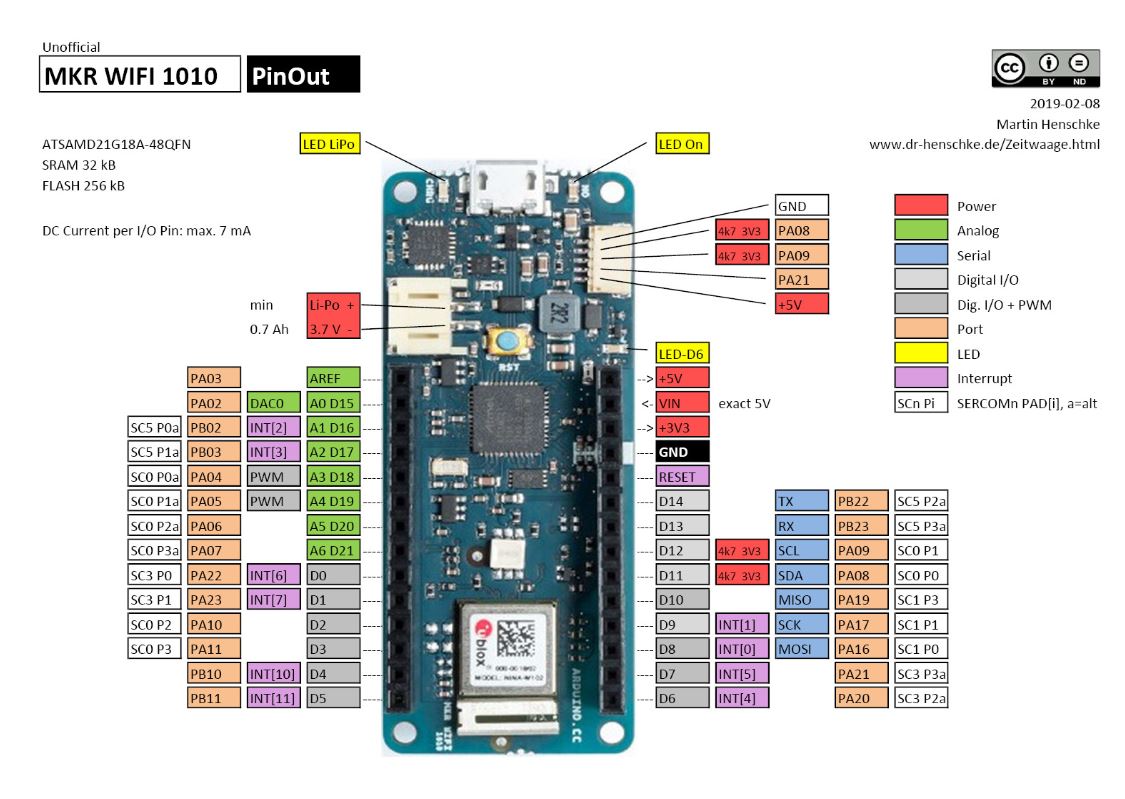
- After Compleating this gruop tast we got the idea how the pins working in microcontroller for different purposes and also we figered out the areas and functions of different pins like port , led, ground,analog and digital.
Individual Assignment.
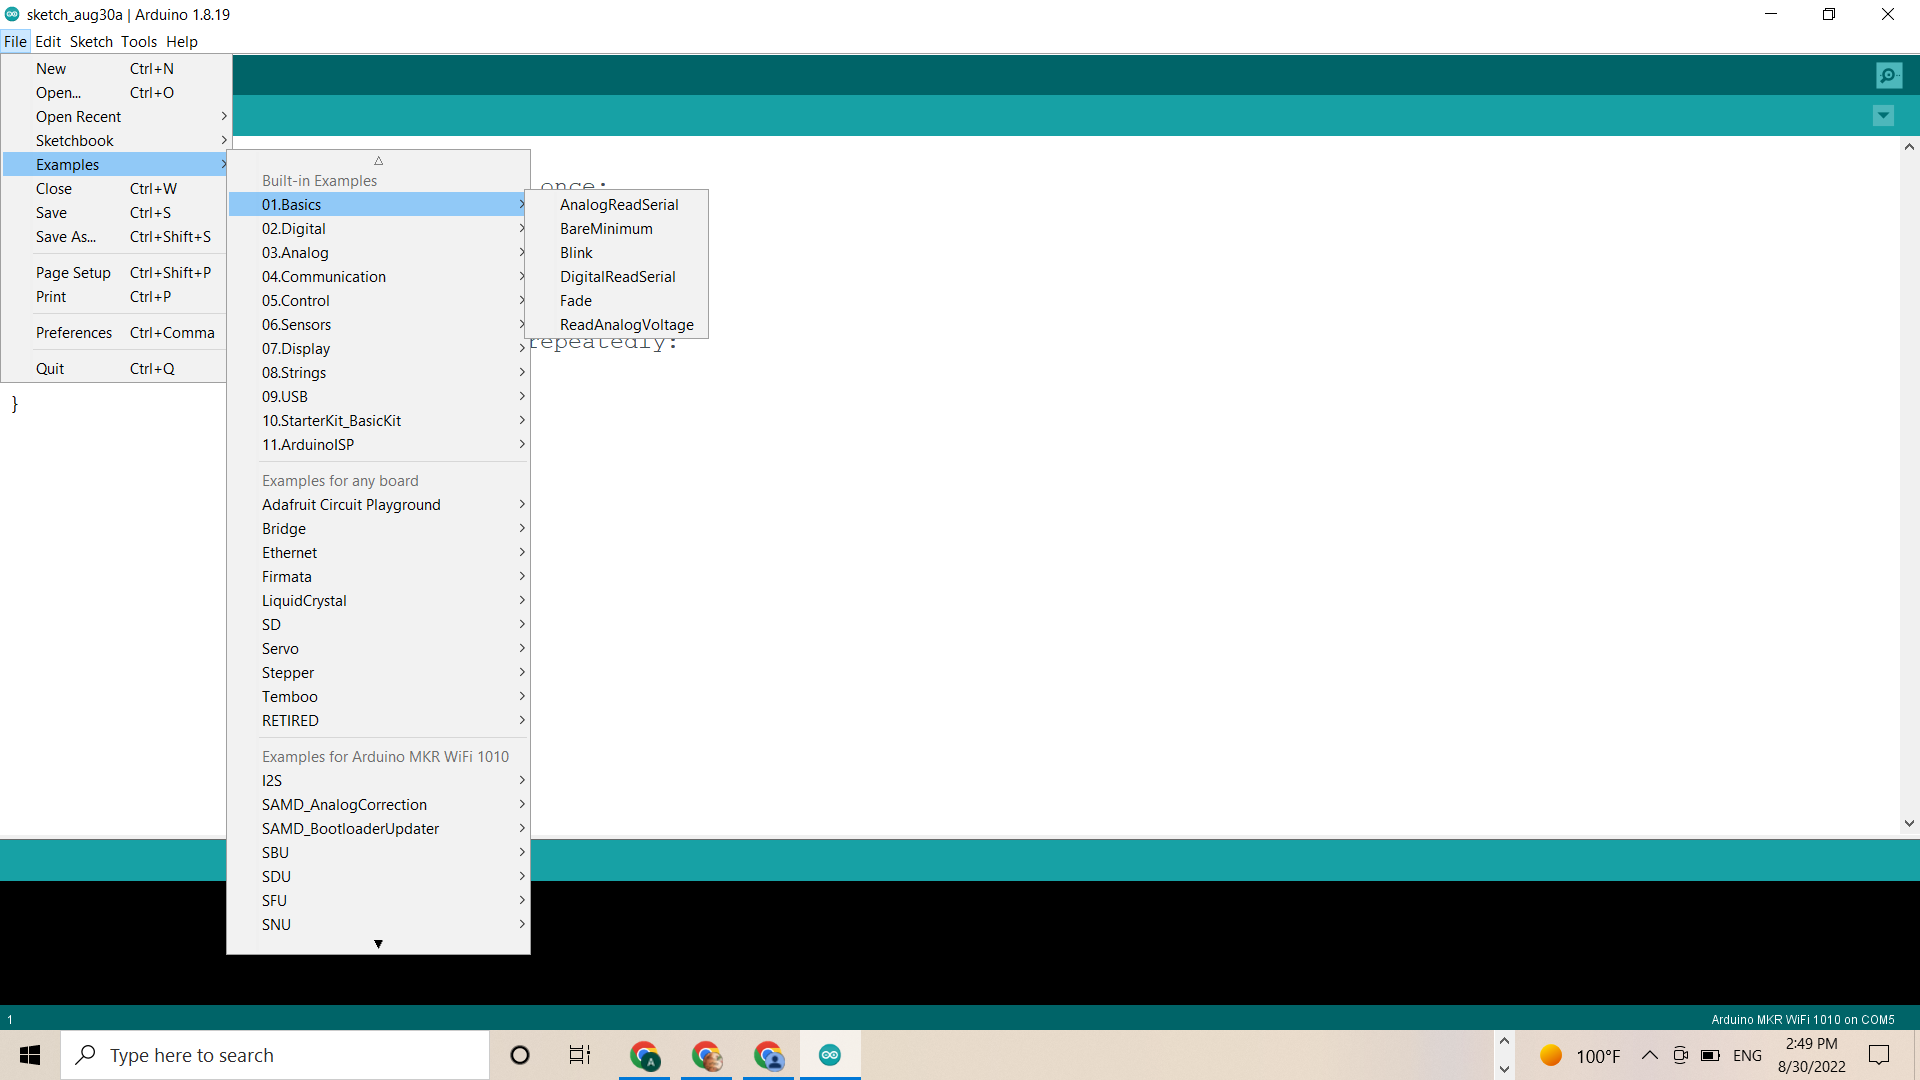
After getting the idea i start Downloading the Arduino Software in my system to work with Microcontroller.

Task 1.
We can see the process shown below.
Blinking bult-in LED.
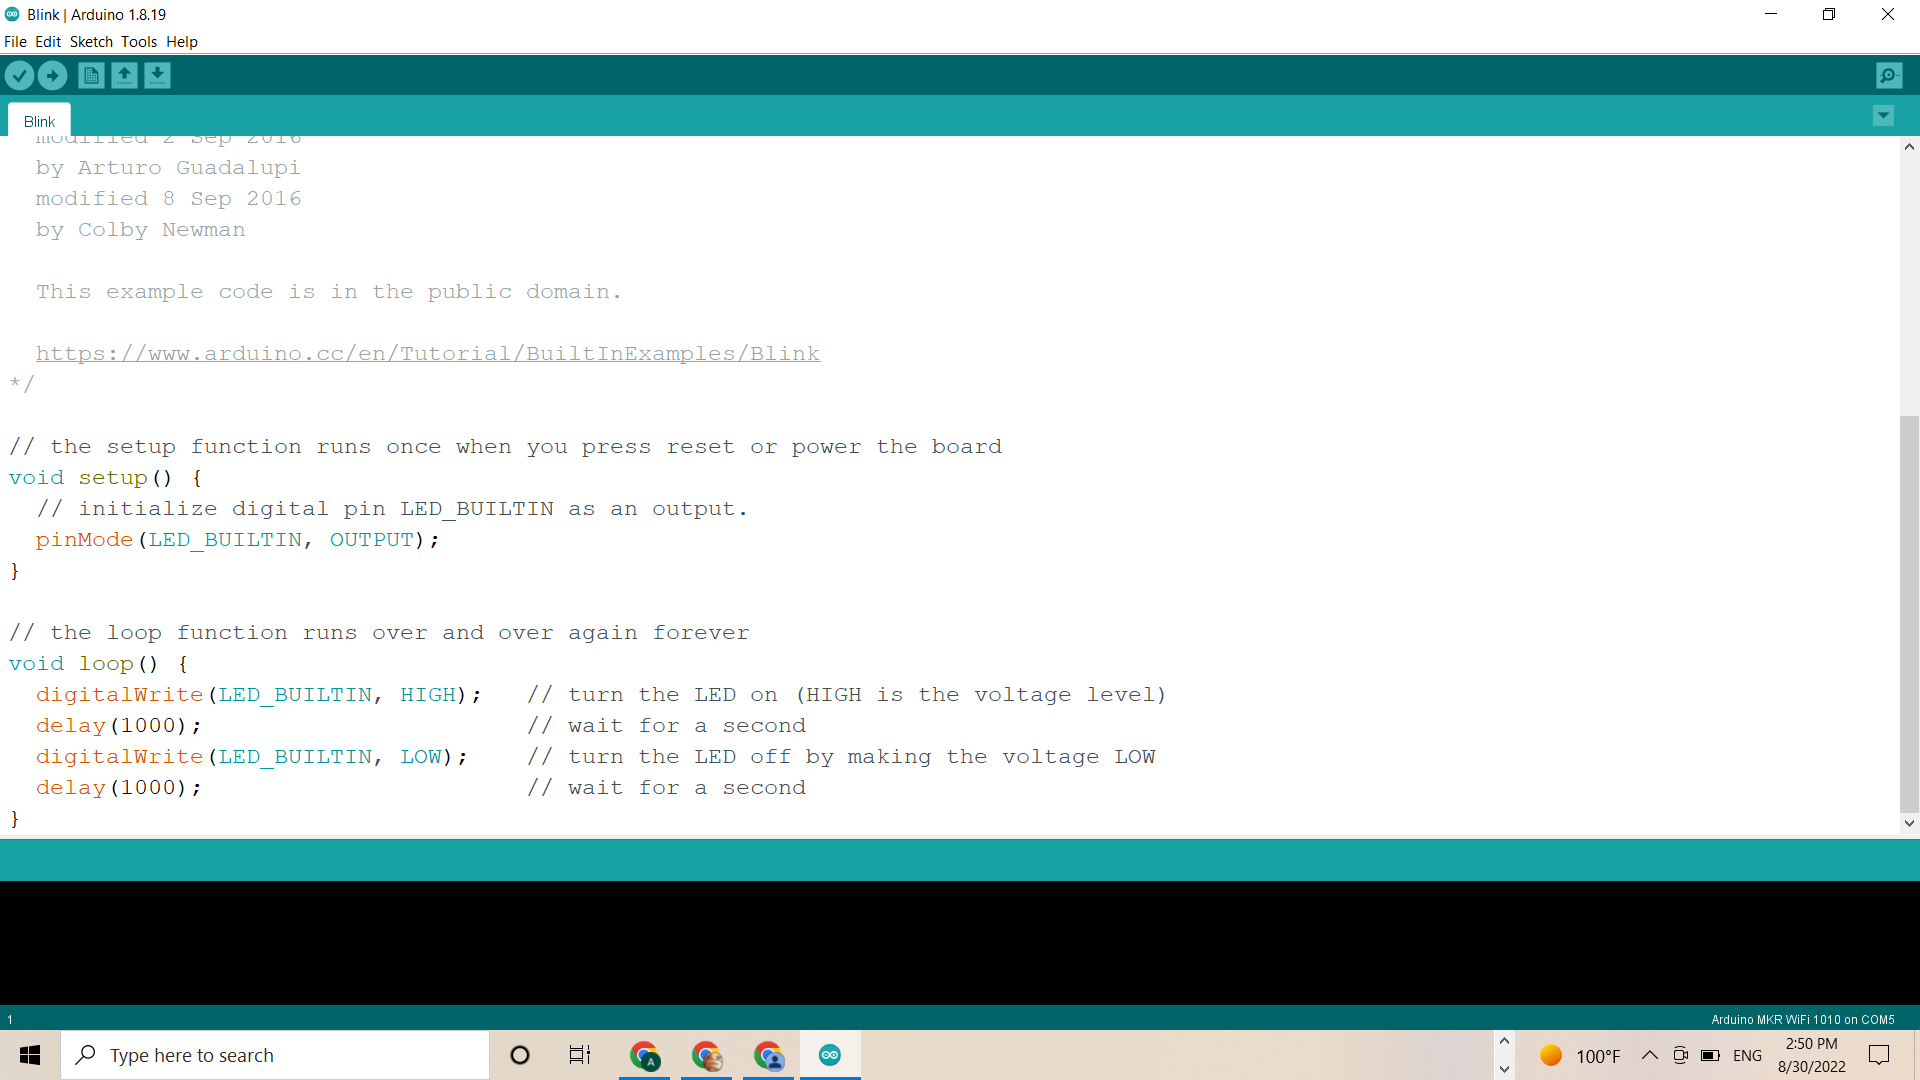
After completing the installation of software i started working on Blinking example.Microcontroller has built-in led on the board and Arduino software has many examples save inside which make user easily to check the microcontroller with different examples. - I started running the program with blinking Code example after Connecting the microcontroller with my system. The process is shown below in pictures.
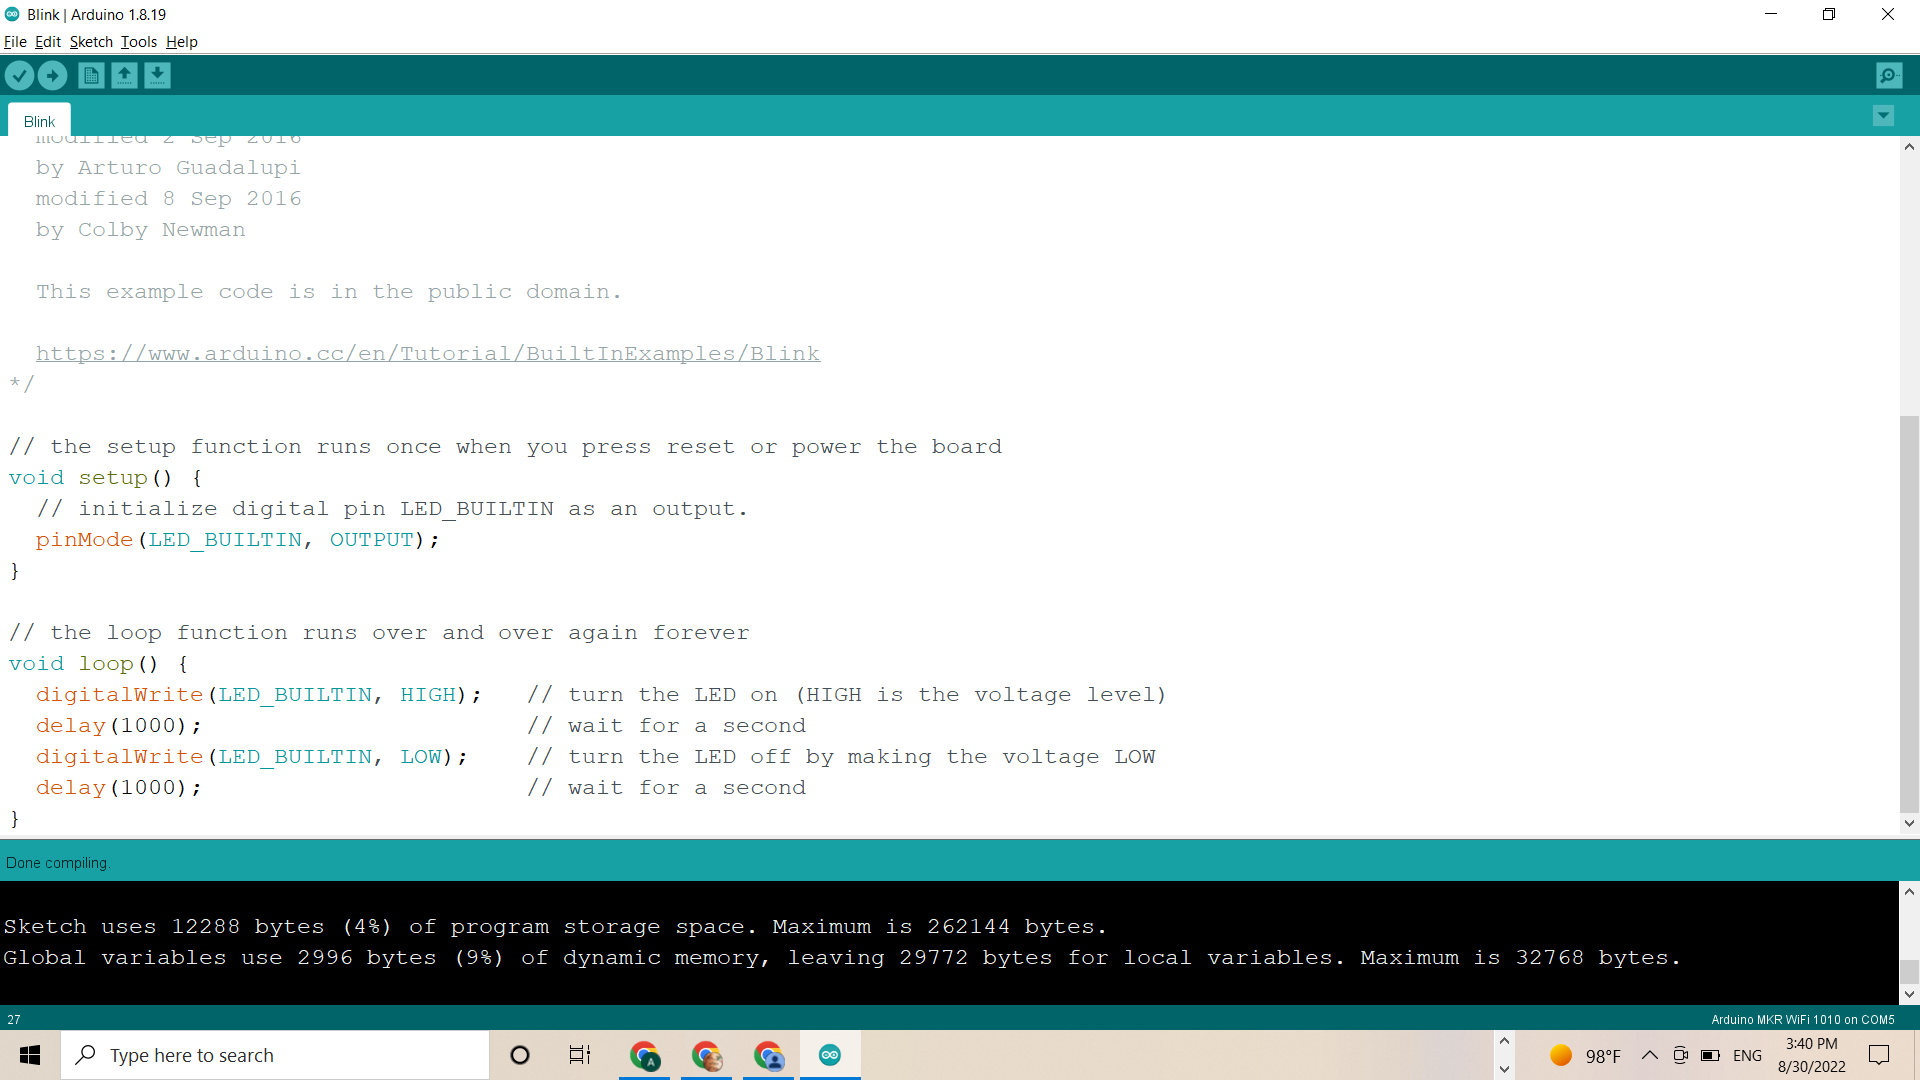
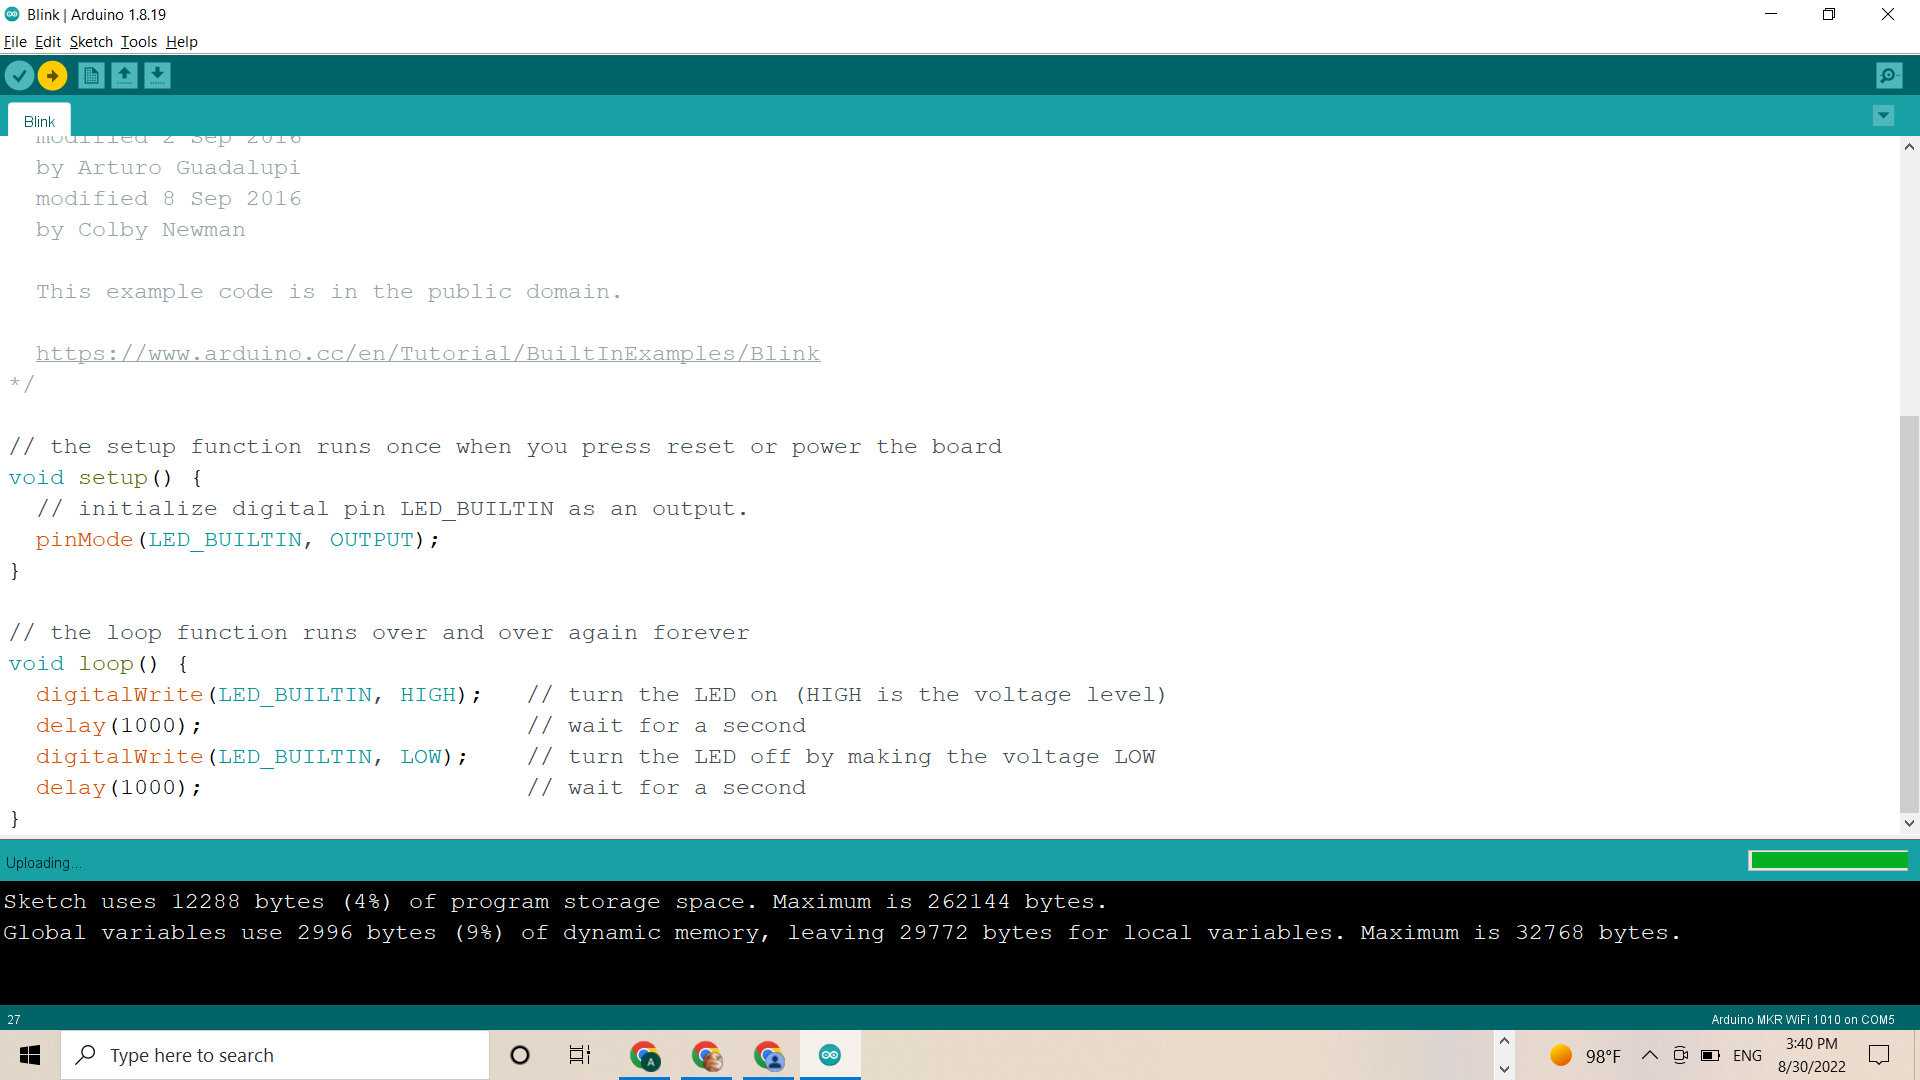
Compiling and uploading the code.
After getting the cod on compiler i chose to compile the code and upload it to run and see the results on Microcontroller.Process shown in pictures below.
Blinking Code example.
// the setup function runs once when you press reset or power the board
void setup() {
  // initialize digital pin LED_BUILTIN as an output.
  pinMode(LED_BUILTIN, OUTPUT);
}

// the loop function runs over and over again forever
void loop() {
  digitalWrite(LED_BUILTIN, HIGH);   // turn the LED on (HIGH is the voltage level)
  delay(1000);                       // wait for a second
  digitalWrite(LED_BUILTIN, LOW);    // turn the LED off by making the voltage LOW
  delay(1000);                       // wait for a second
}
Led blinking video
-After Compiling the code we can see the result on microcontroller the built-in led is blinking.
Task 2.
We can see the process shown below.
Random Dely
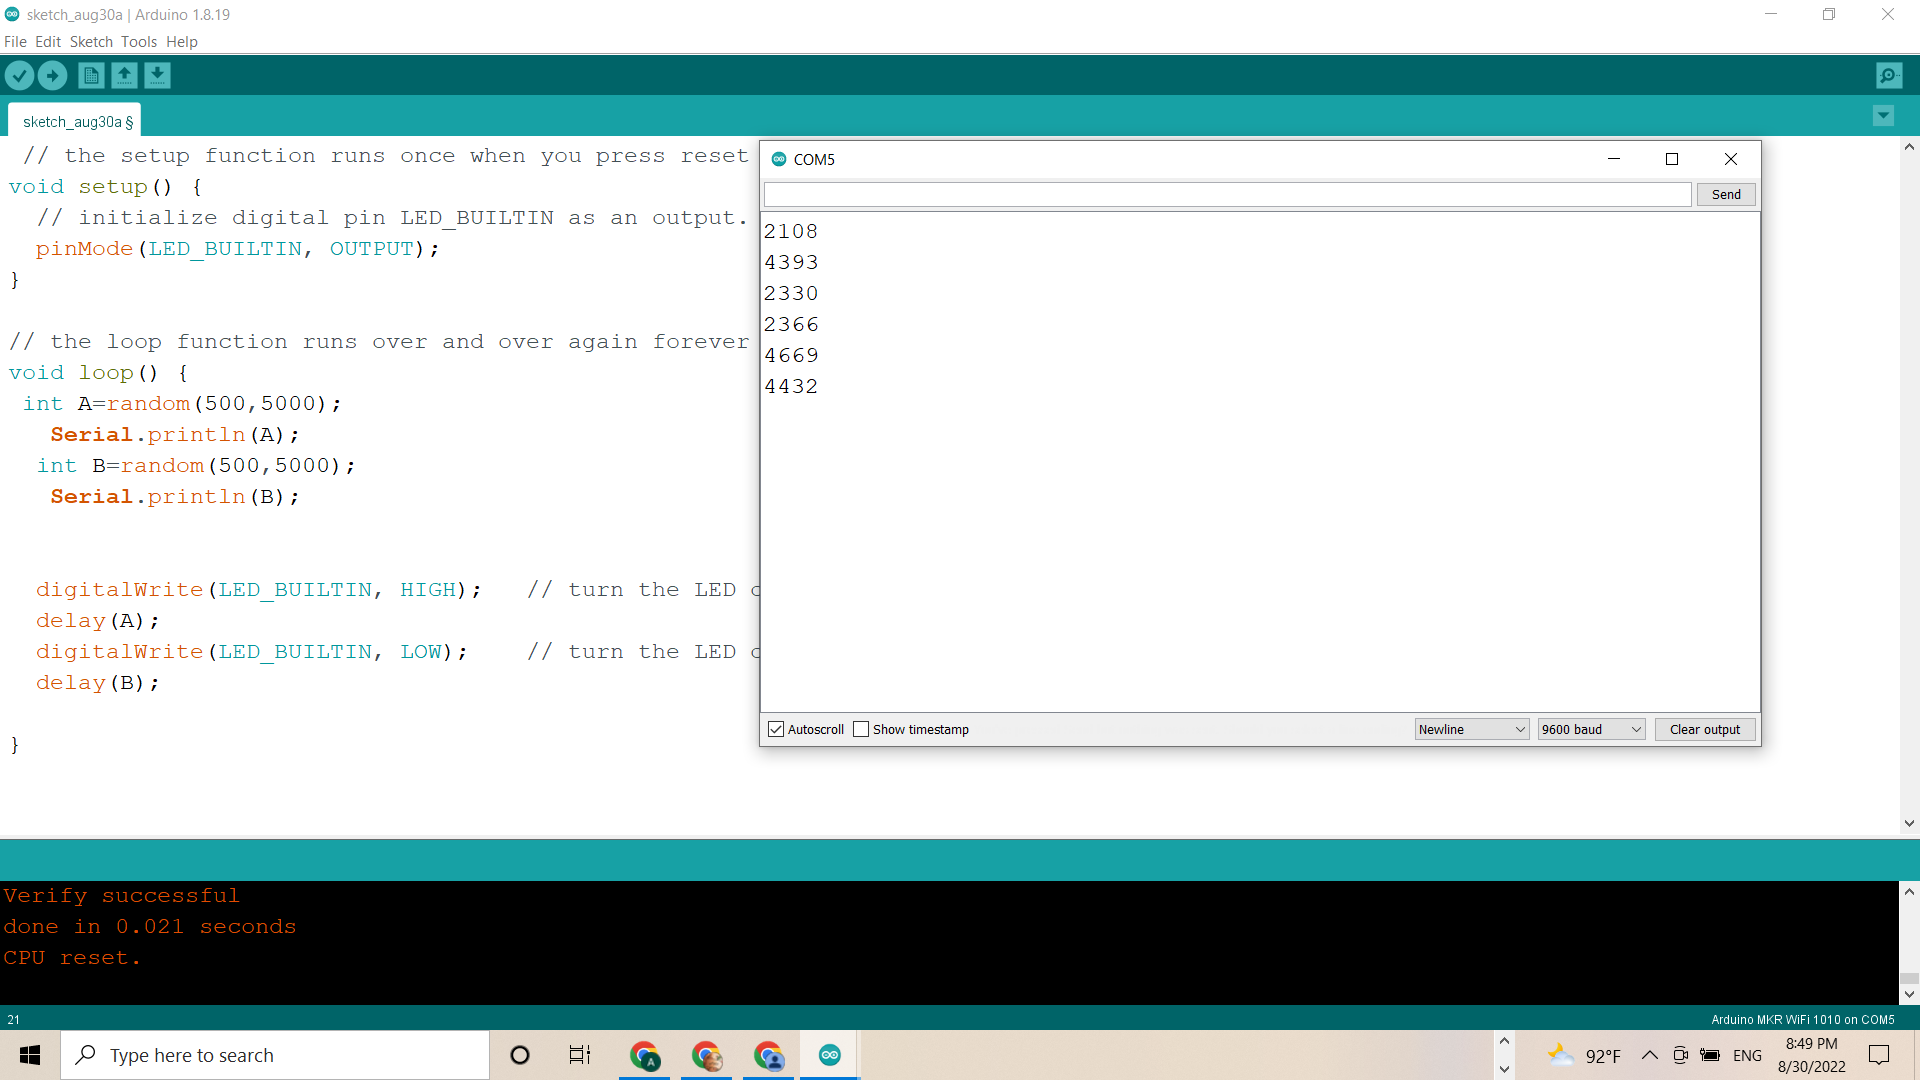
After completing the blinking code example i started to find out random dely process as we were asked to add random function to generate a random number between 500 and 5000 and put it as an input in the delay function. - I made some changes in Blinking code example, like adding a small random function code and values to generate a random number. As we can see in the picture shown below.

Serial Monitor
After Compiling the code we can see the random numbers on serial Monitor generating blinks on random numbers between 500 and 5000.
Video of Random Blinking.
Code of random dely.
void setup() {
  pinMode(LED_BUILTIN, OUTPUT);
}
void loop() {
 int A=random(500,5000);
   Serial.println(A);
  int B=random(500,5000);
   Serial.println(B);
  digitalWrite(LED_BUILTIN, HIGH);   // turn the LED on (HIGH is the voltage level)
  delay(A);
  digitalWrite(LED_BUILTIN, LOW);    // turn the LED off by making the voltage LOW
  delay(B);

}
Task 3.
We can see the process shown below.
Morse Code
In this task we started learning and understanding Morse code.
What Is Morse Code?
In the past times when communications were not as simple as today, one of the most common ways of communicating was Samuel Morse method called “Morse code“. In this method, each letter or number represents by using short (dot) and long (dash) elements.Morse code, like any other language, has its own alphabet and is currently available in both American and International types, and the most commonly used one is international type.
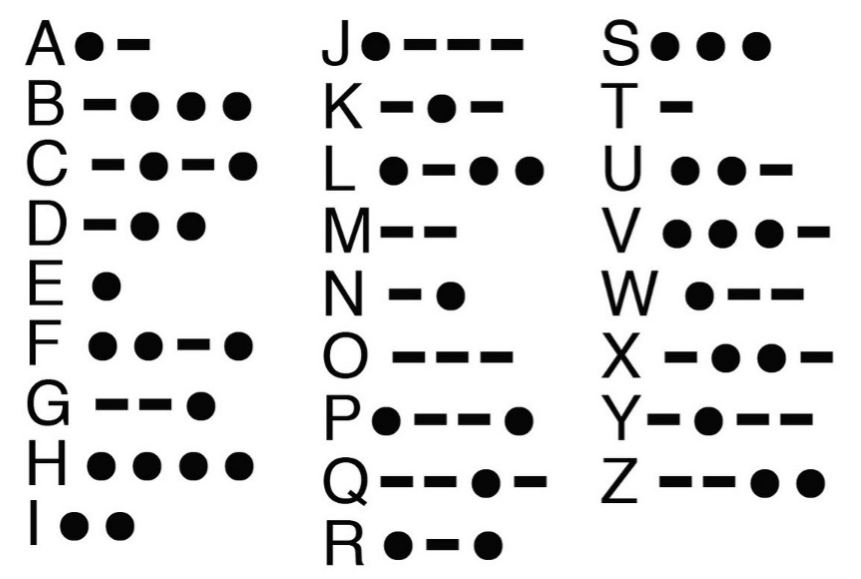
Morse code alphabet.
The below listshows the morse code for every letter and number.
Choosing random Word.
After getting the idea we were asked to create morse code of our name and let built-in LED blink according to thses controls.
dot .                   0.5 s ON
dash -                  1.5 s ON
between dot and dash    0.5 s OFF
between letters         2.5 s OFF
Creating Controls.
I chose my name to creat Morse code. To find the morse code of my name easily i nevigated to Morse Code Translator web site. We can see the result shown in picture below.
![]()
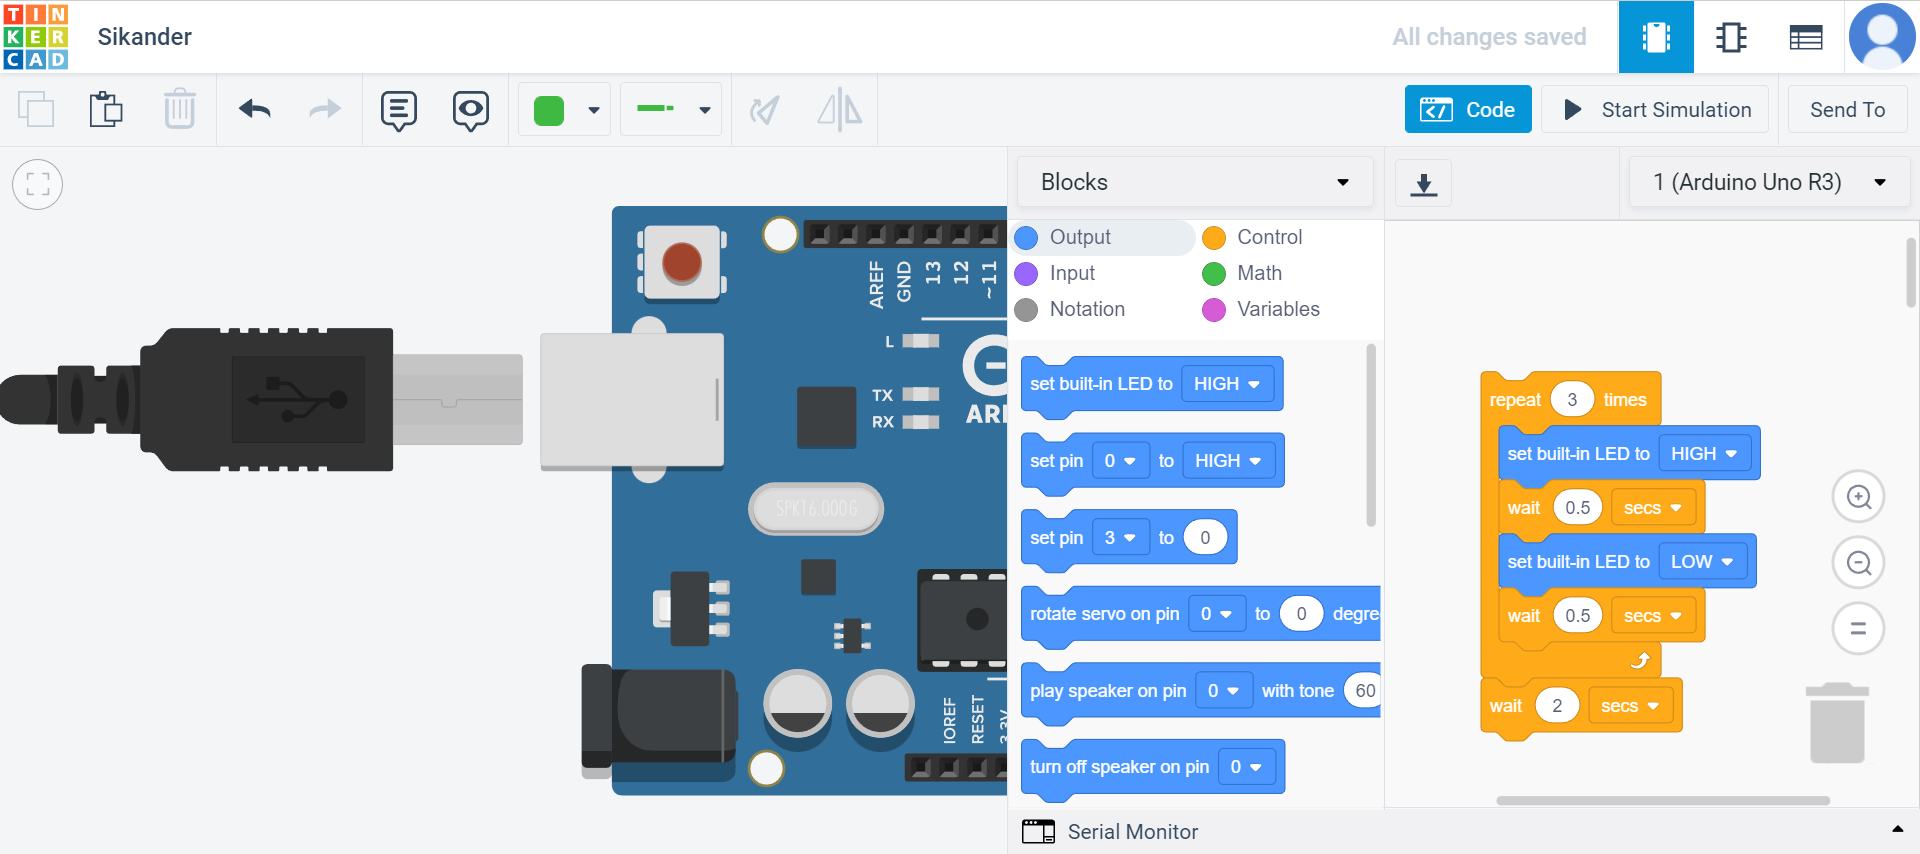
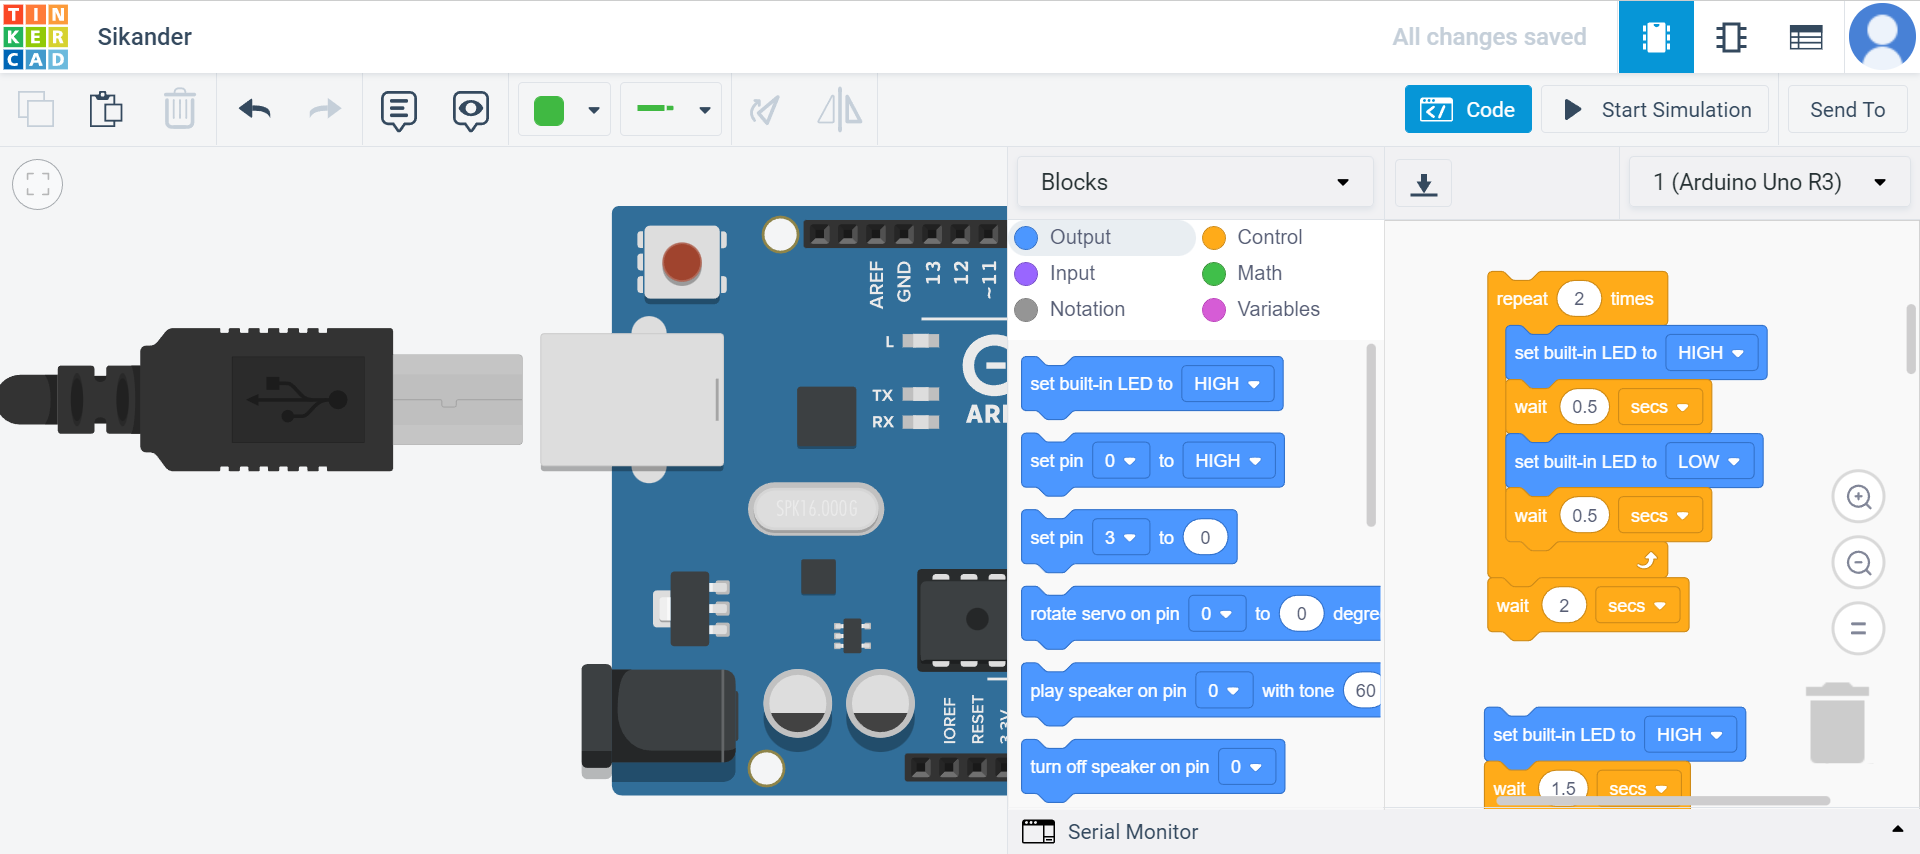
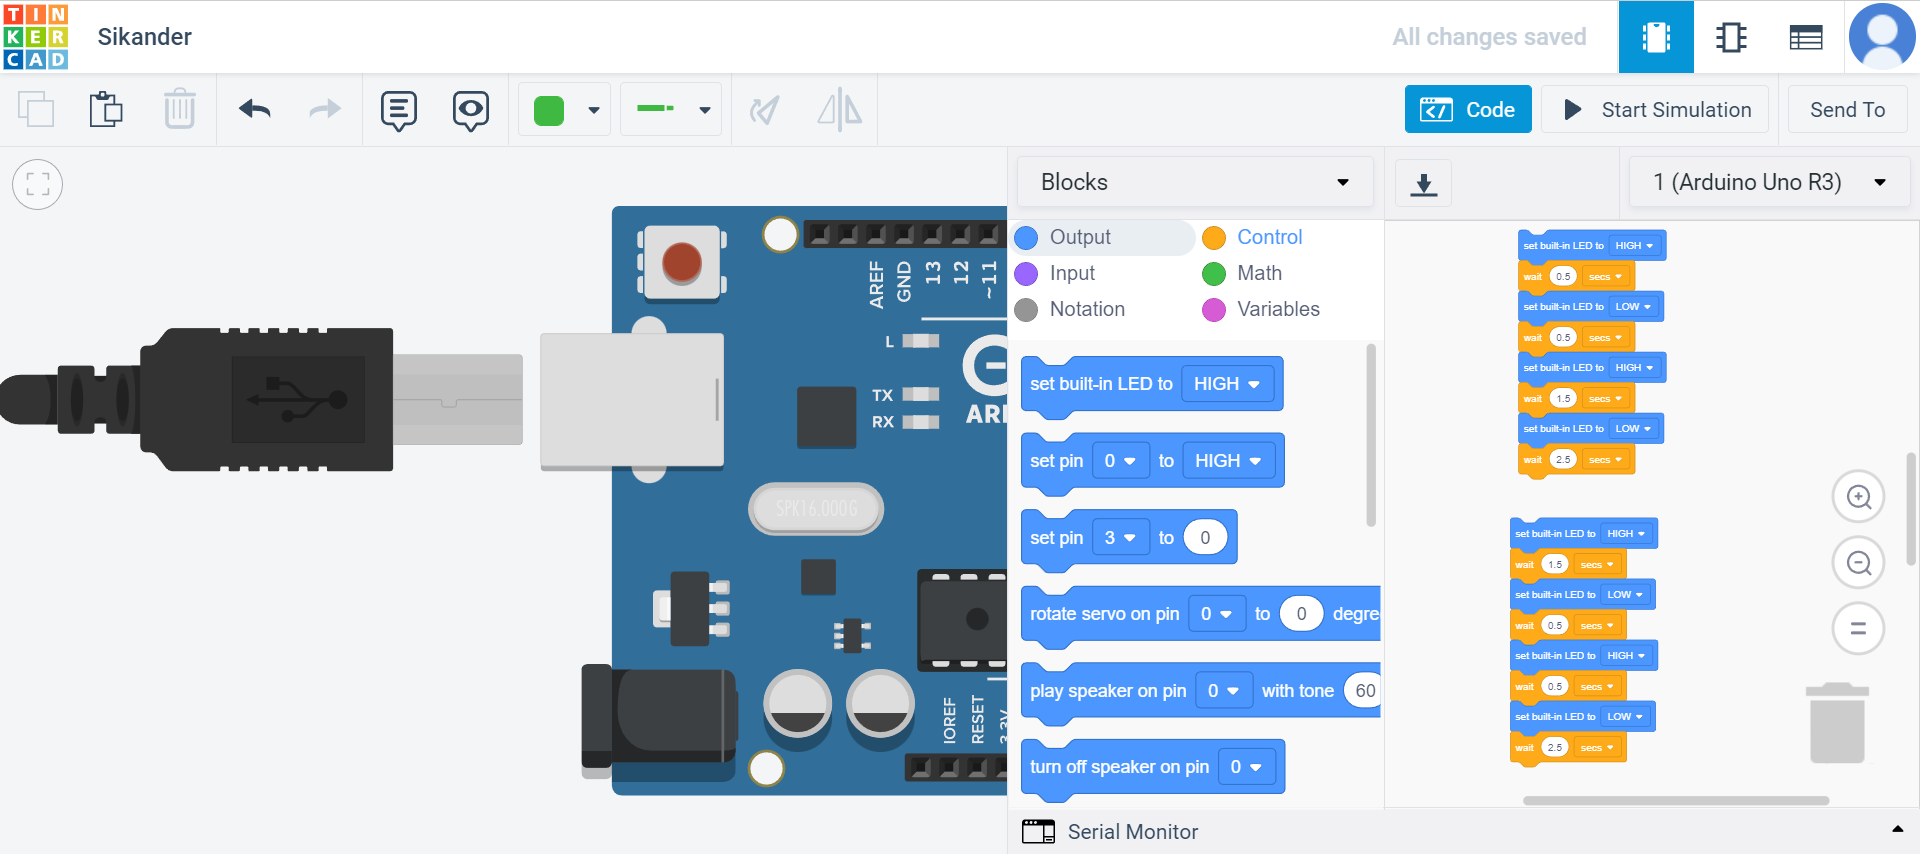
Creating Morse code.
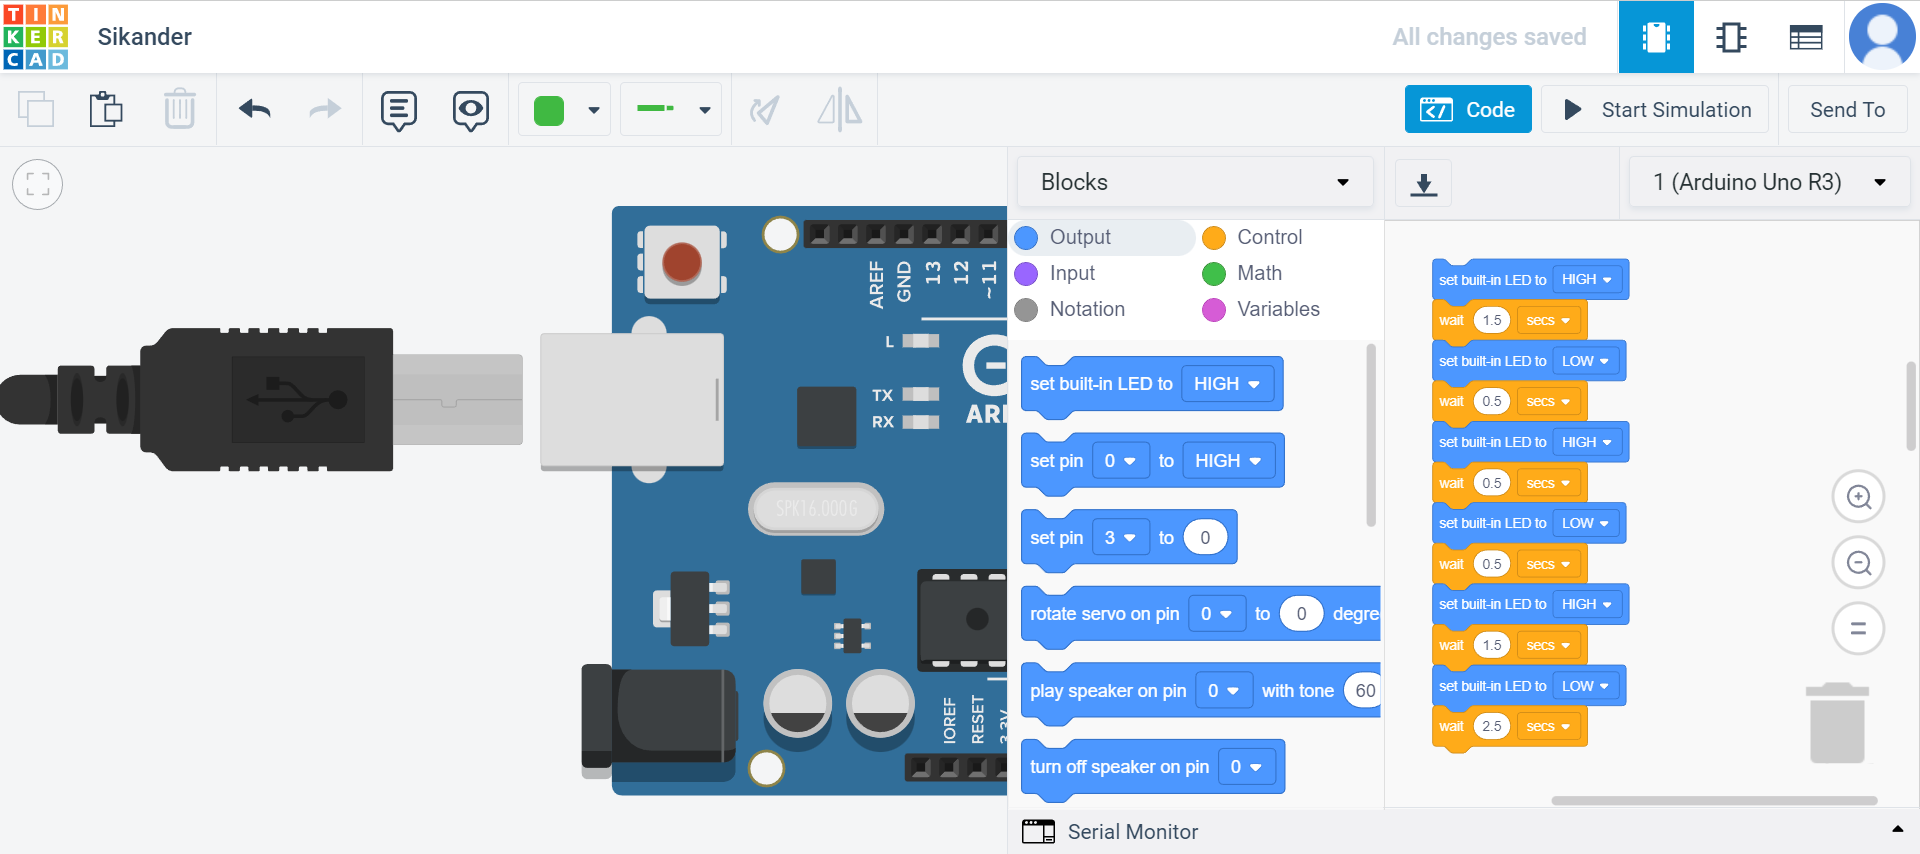
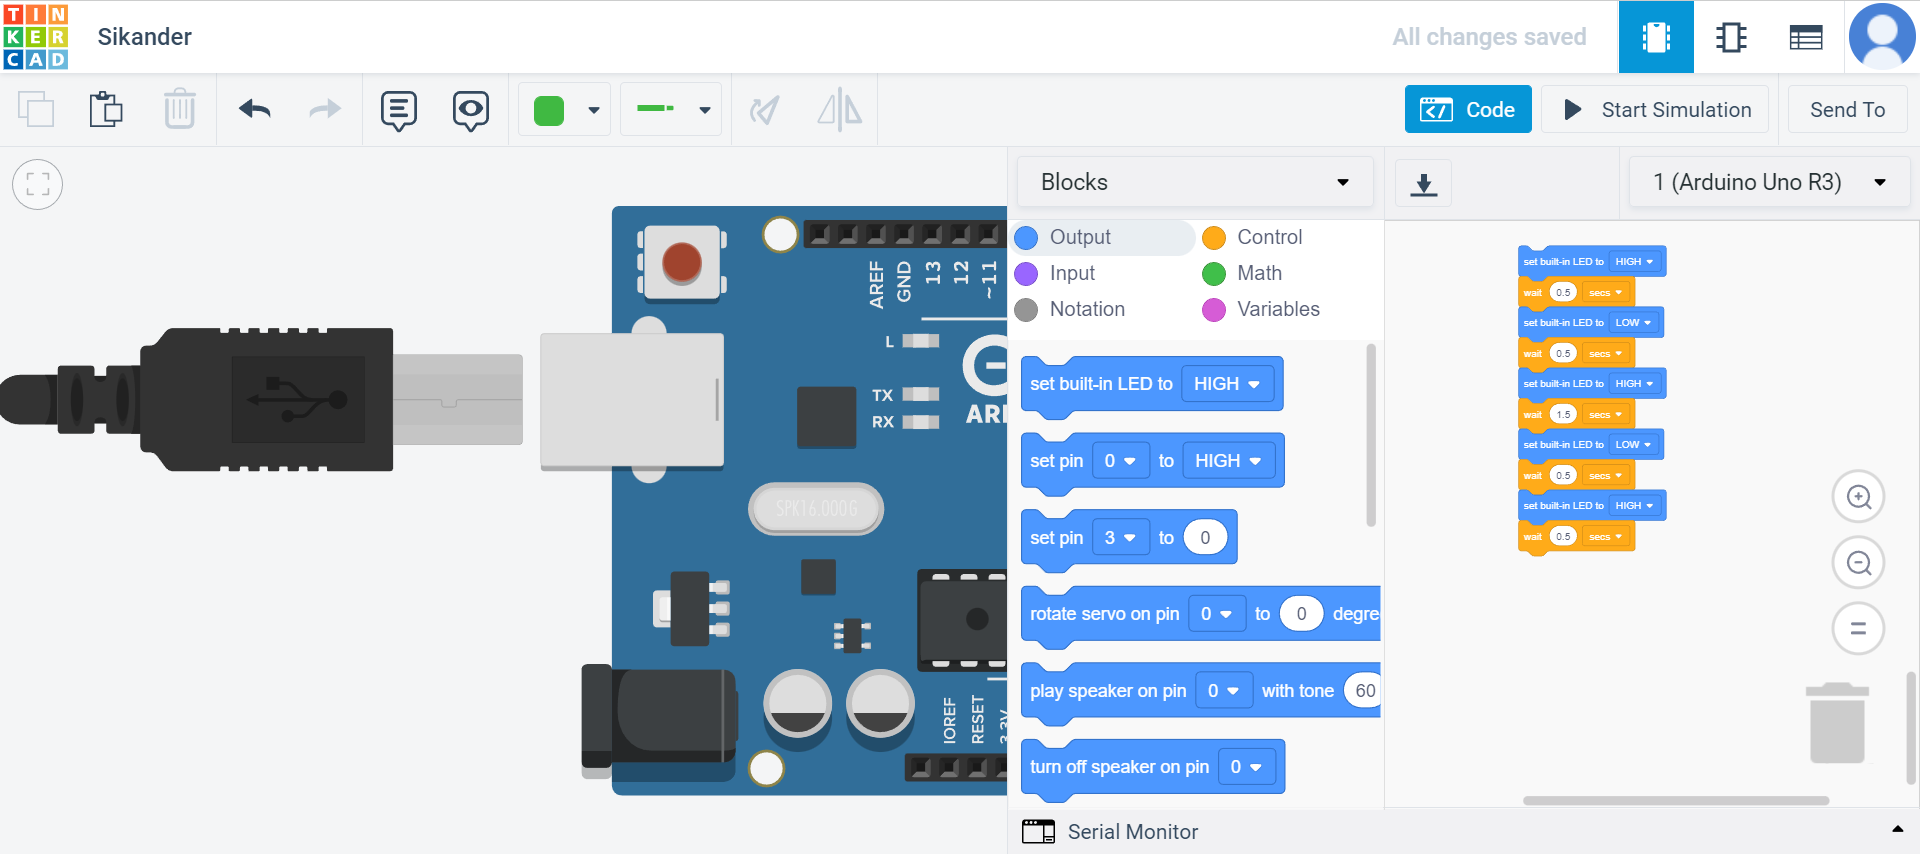
After creating the controlls of my name on Morse Code Translator I starte to generate the code so that i can the code on Arduino software for the results on Arduino built-in led.To generate the code easily i nevigated to Tinkercad and i created a circuit and started to fix the seconds according to morse code controlls. After getting done with controlls my morse code is ready. we can see the process in images shown below.
Final result
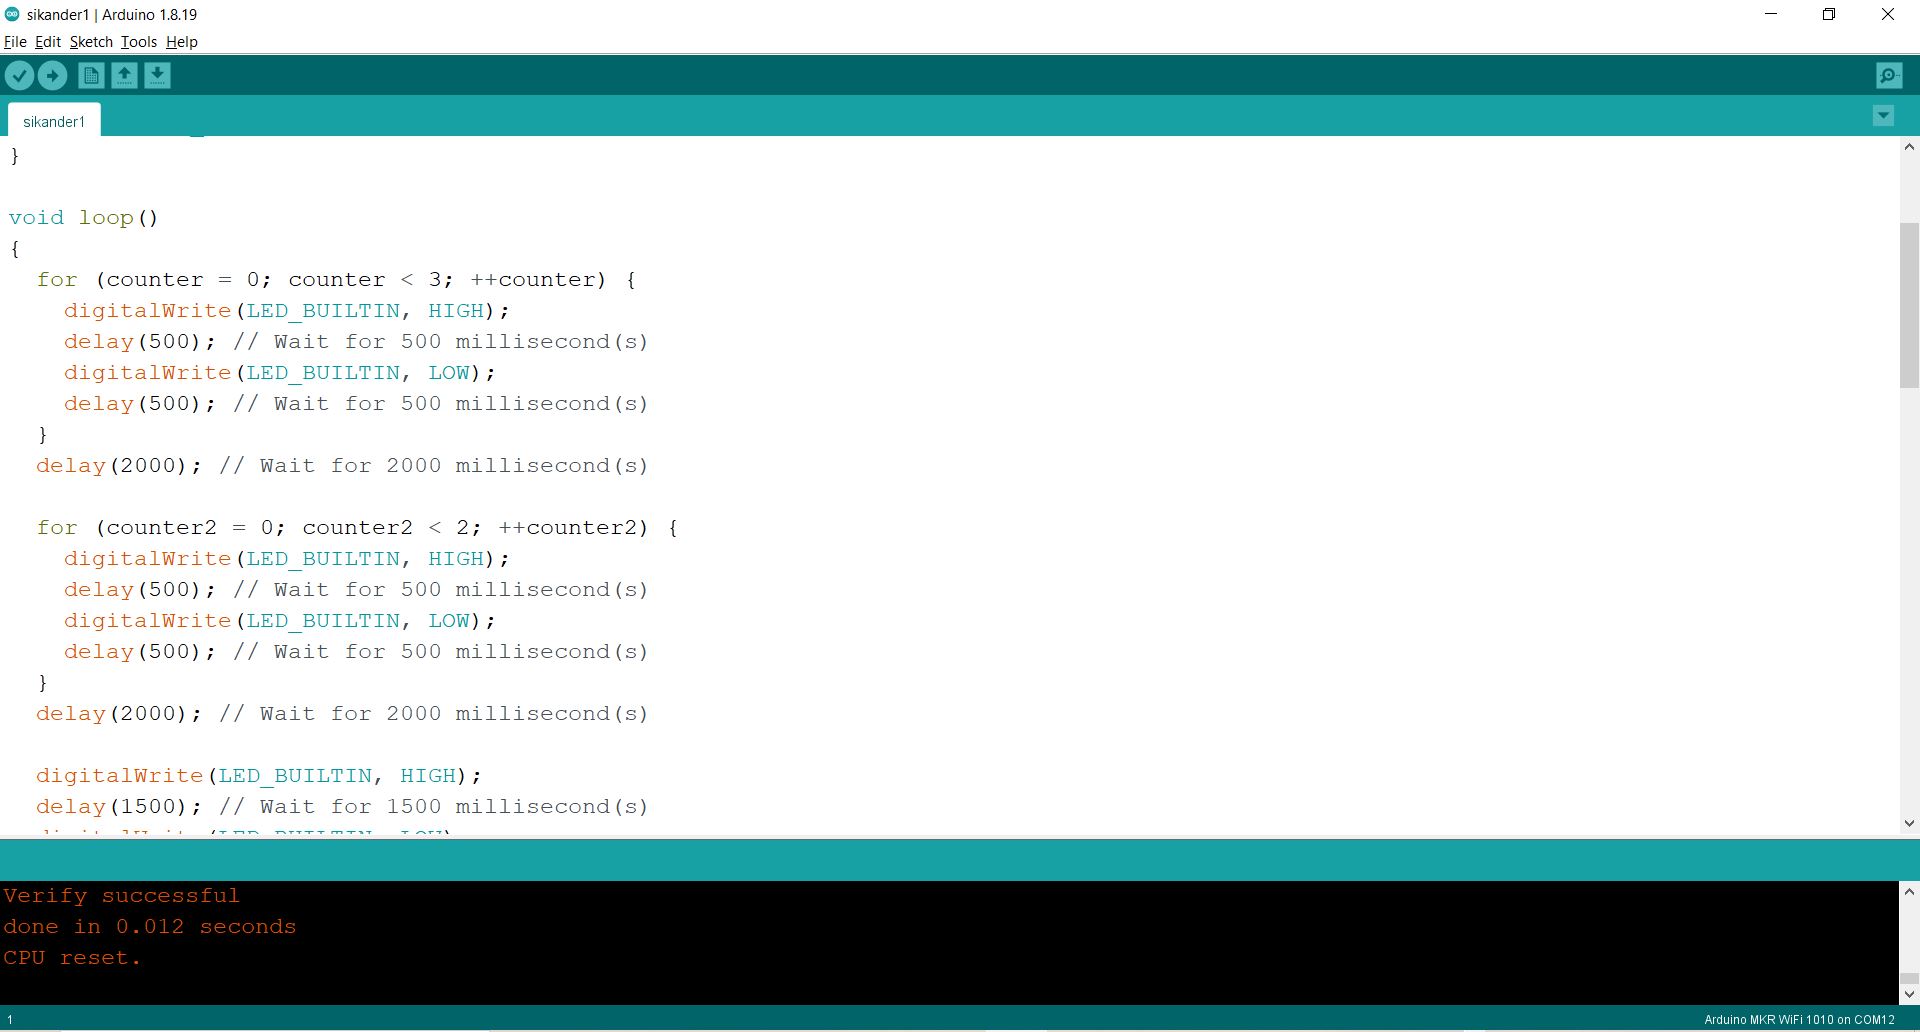
After completing from controlls using circuit option in Tinkercad i copied the code and started checking it on Arduino softwere.and then i connect microcontroller to my system and then i started running the code.After compiling the code the biult-in led started blinking according to mores code controlls. As we can see the results shown below. - Result.
Code.
 // C++ code
//
int counter;

int counter2;

void setup()
{
  pinMode(LED_BUILTIN, OUTPUT);
}

void loop()
{
  for (counter = 0; counter < 3; ++counter) {
    digitalWrite(LED_BUILTIN, HIGH);
    delay(500); // Wait for 500 millisecond(s)
    digitalWrite(LED_BUILTIN, LOW);
    delay(500); // Wait for 500 millisecond(s)
  }
  delay(2000); // Wait for 2000 millisecond(s)

  for (counter2 = 0; counter2 < 2; ++counter2) {
    digitalWrite(LED_BUILTIN, HIGH);
    delay(500); // Wait for 500 millisecond(s)
    digitalWrite(LED_BUILTIN, LOW);
    delay(500); // Wait for 500 millisecond(s)
  }
  delay(2000); // Wait for 2000 millisecond(s)

  digitalWrite(LED_BUILTIN, HIGH);
  delay(1500); // Wait for 1500 millisecond(s)
  digitalWrite(LED_BUILTIN, LOW);
  delay(500); // Wait for 500 millisecond(s)
  digitalWrite(LED_BUILTIN, HIGH);
  delay(500); // Wait for 500 millisecond(s)
  digitalWrite(LED_BUILTIN, LOW);
  delay(500); // Wait for 500 millisecond(s)
  digitalWrite(LED_BUILTIN, HIGH);
  delay(1500); // Wait for 1500 millisecond(s)
  digitalWrite(LED_BUILTIN, LOW);
  delay(2500); // Wait for 2500 millisecond(s)

  digitalWrite(LED_BUILTIN, HIGH);
  delay(500); // Wait for 500 millisecond(s)
  digitalWrite(LED_BUILTIN, LOW);
  delay(500); // Wait for 500 millisecond(s)
  digitalWrite(LED_BUILTIN, HIGH);
  delay(1500); // Wait for 1500 millisecond(s)
  digitalWrite(LED_BUILTIN, LOW);
  delay(2500); // Wait for 2500 millisecond(s)

  digitalWrite(LED_BUILTIN, HIGH);
  delay(1500); // Wait for 1500 millisecond(s)
  digitalWrite(LED_BUILTIN, LOW);
  delay(500); // Wait for 500 millisecond(s)
  digitalWrite(LED_BUILTIN, HIGH);
  delay(500); // Wait for 500 millisecond(s)
  digitalWrite(LED_BUILTIN, LOW);
  delay(500); // Wait for 500 millisecond(s)
  digitalWrite(LED_BUILTIN, HIGH);
  delay(500); // Wait for 500 millisecond(s)
  digitalWrite(LED_BUILTIN, LOW);
  delay(2500); // Wait for 2500 millisecond(s)

  digitalWrite(LED_BUILTIN, HIGH);
  delay(500); // Wait for 500 millisecond(s)
  digitalWrite(LED_BUILTIN, LOW);
  delay(2500); // Wait for 2500 millisecond(s)

  digitalWrite(LED_BUILTIN, HIGH);
  delay(500); // Wait for 500 millisecond(s)
  digitalWrite(LED_BUILTIN, LOW);
  delay(500); // Wait for 500 millisecond(s)
  digitalWrite(LED_BUILTIN, HIGH);
  delay(1500); // Wait for 1500 millisecond(s)
  digitalWrite(LED_BUILTIN, LOW);
  delay(500); // Wait for 500 millisecond(s)
  digitalWrite(LED_BUILTIN, HIGH);
  delay(500); // Wait for 500 millisecond(s)
}