Final Project
We started working in group as its a group project.
My Work on project.
As it is a group project i started working with my collegue and aslo i got some individual tasks.
Creating CNC object design.
For final project we needed a small ojbect. my collegue started making a object and for design i started to work and hepl my collegue in the design of object. The object for final project was squirrel box.
Using fusion 360 for Design.
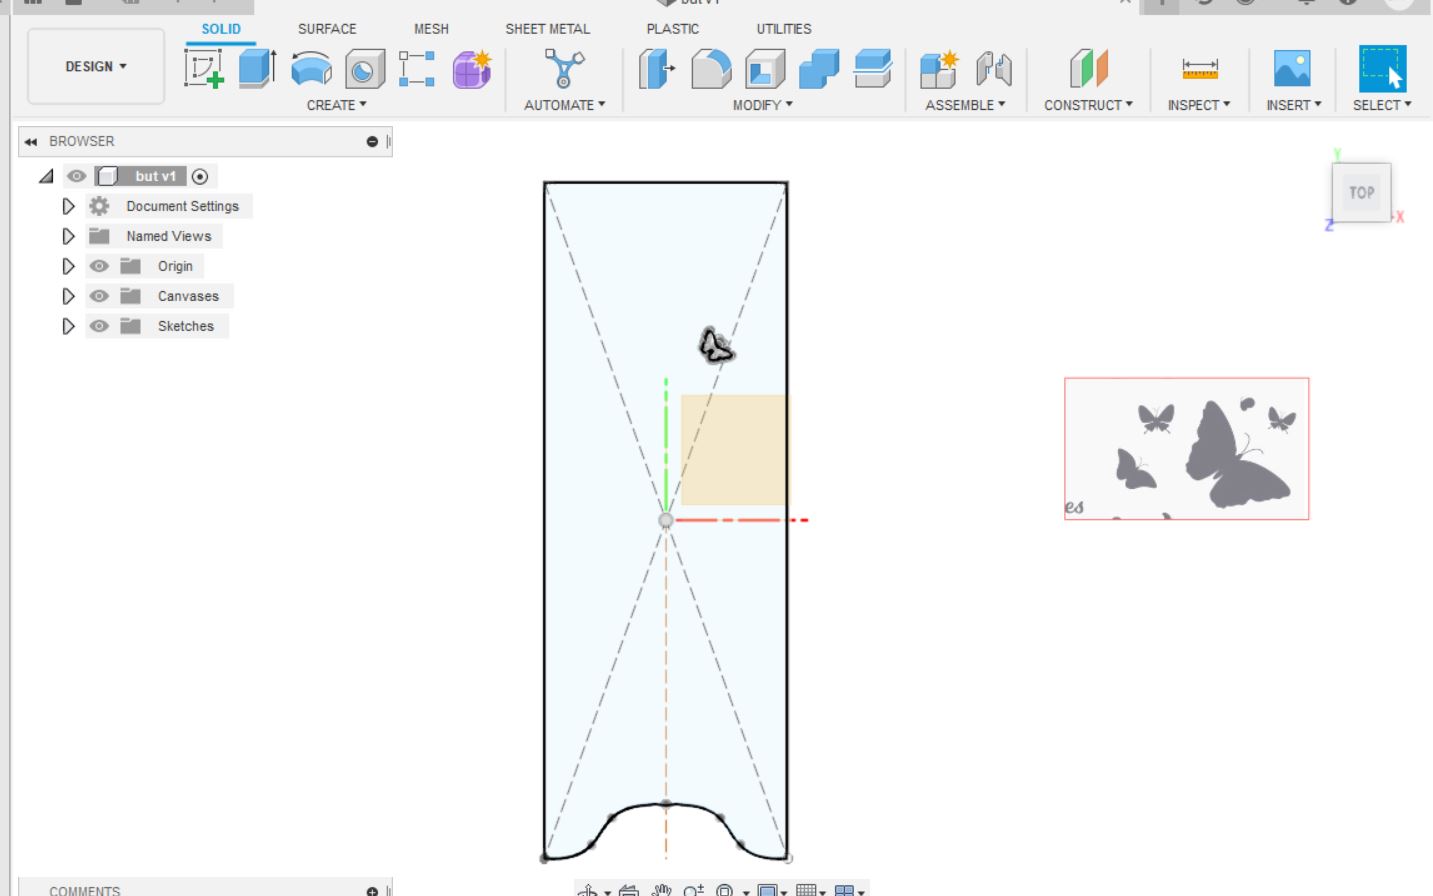
Fusion 360 is a free application availible for windows and mac systems. I started to creat some design on final project object using fusion 360.
Uploading image
For creating designs on object i nevigated to this website from where i downloaded a image of butter flyies and i uploaded the image on fusion 360 using canvas option.
Image

Uploaded image
- After using canvas option i uploaded the image on fusion 360.
Making Design
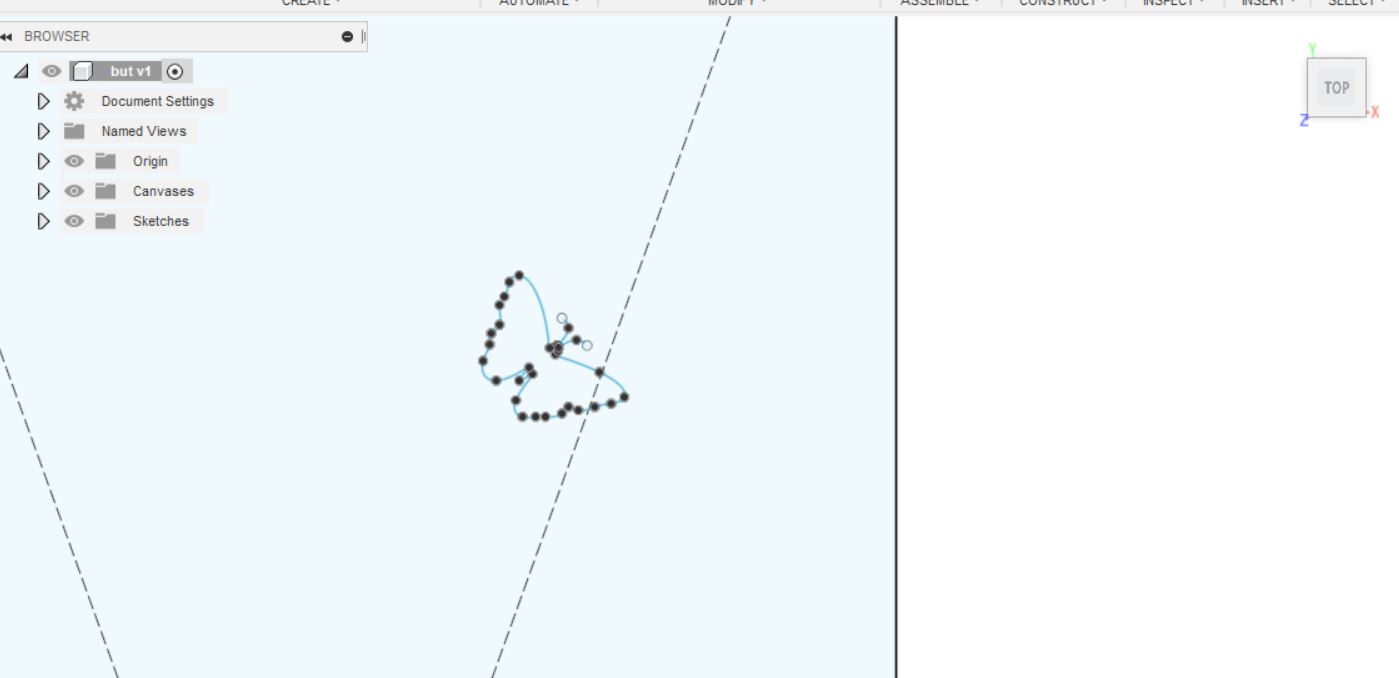
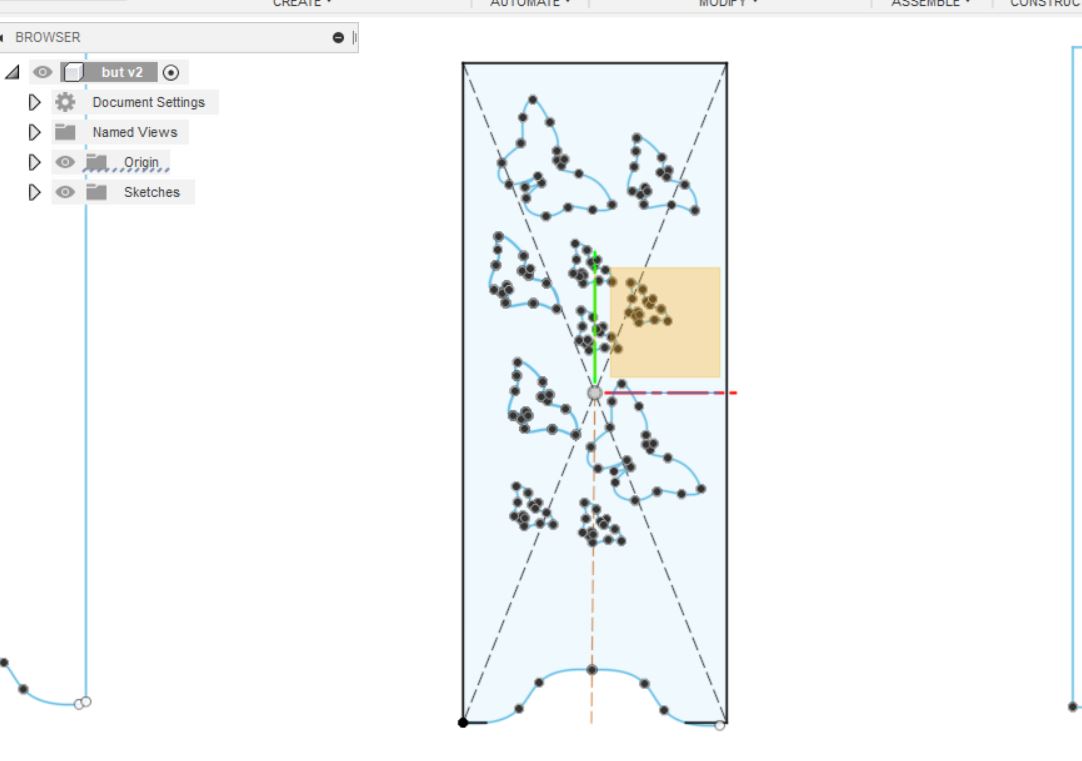
fter uploding the image on fusion i started making the same design for our object using fitpoint split option.
Result
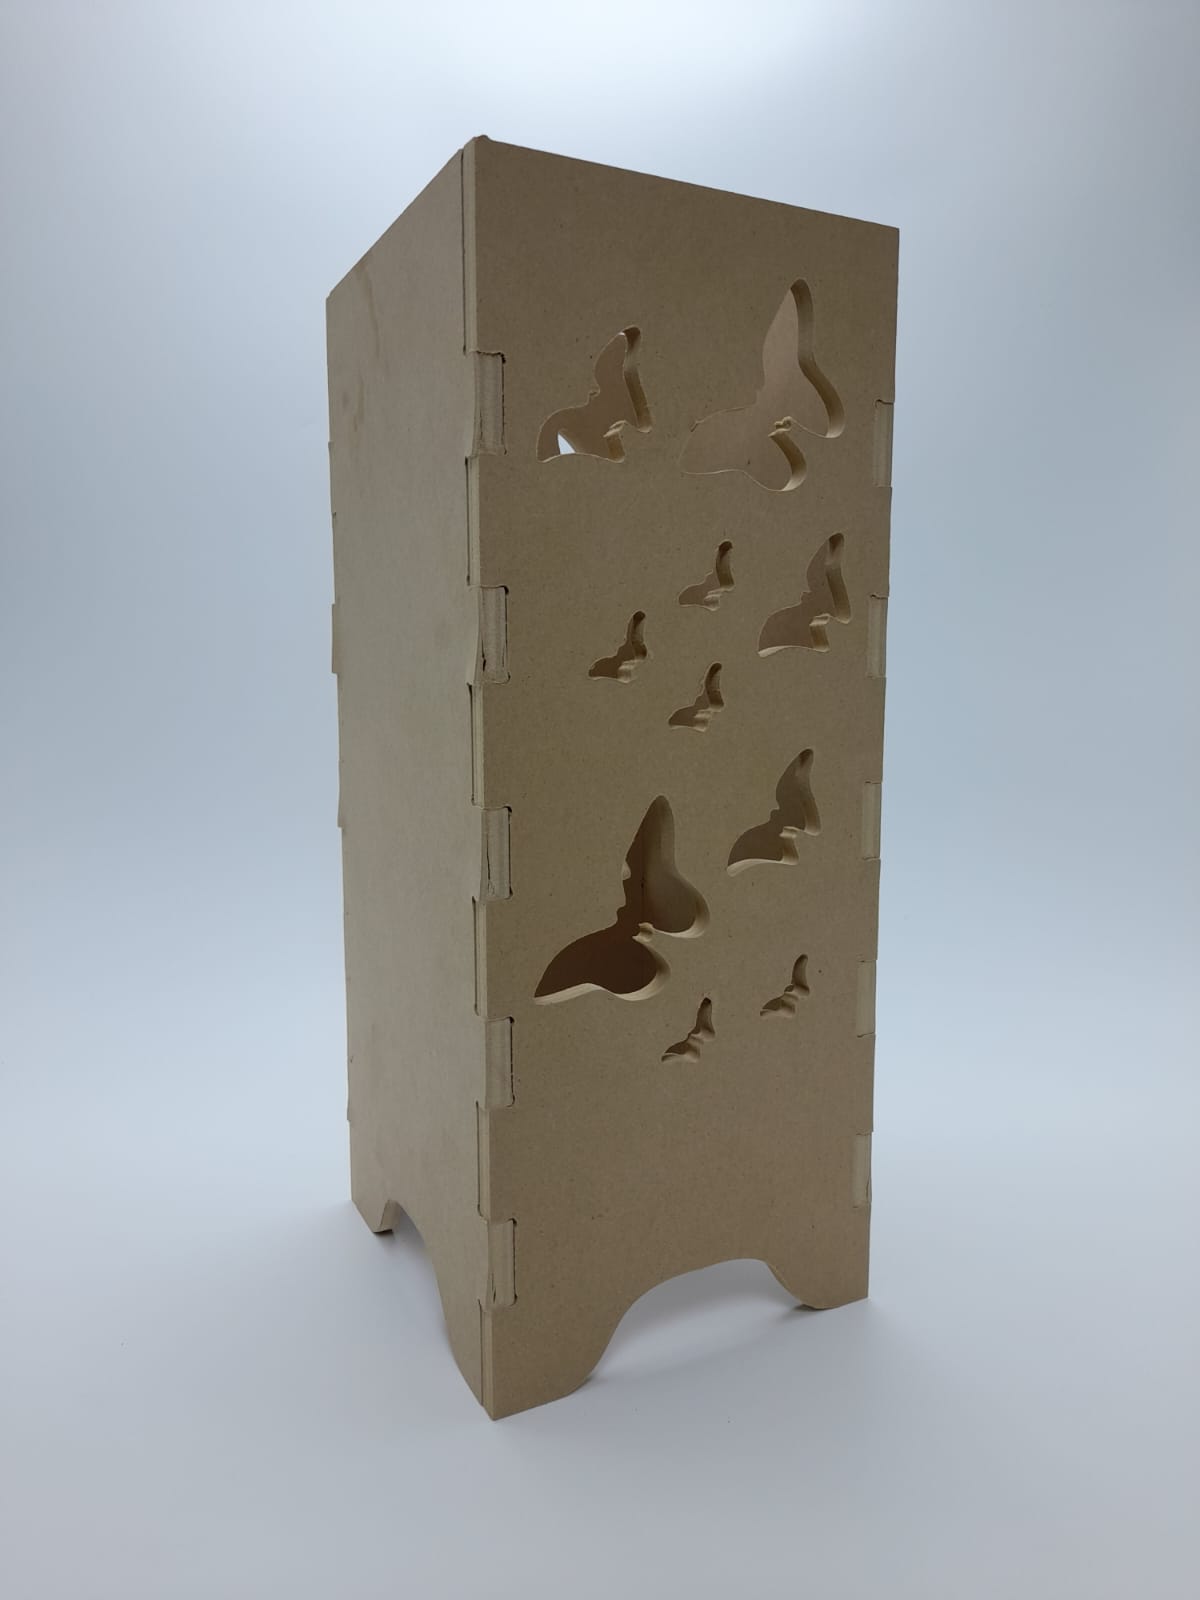
- This is the result after applying extrude option on object;

- Download orignal file
- This is the final result after cutting our object on CNC Machine.
RGB LED.
RGB LED means red, blue and green LEDs. RGB LED products combine these three colors to produce over 16 million hues of light. Note that not all colors are possible. Some colors are “outside” the triangle formed by the RGB LEDs. Also, pigment colors such as brown or pink are difficult, or impossible, to achieve.
Making ready RBG LED
After compleating from Design my instructor asked me to set a 3 pixel RGB led and randomly chose a code to make it work so i nevigated to this website from where i chose the code and run it on Arduino softwate to see the results.
Results
After connecting the RGB with Microcontroller and running the Code we can see the results. - Video
Code and source.
 // NeoPixel Ring simple sketch (c) 2013 Shae Erisson
// Released under the GPLv3 license to match the rest of the
// Adafruit NeoPixel library

#include <Adafruit_NeoPixel.h>
#ifdef __AVR__
 #include <avr/power.h> // Required for 16 MHz Adafruit Trinket
#endif

// Which pin on the Arduino is connected to the NeoPixels?
#define PIN        6 // On Trinket or Gemma, suggest changing this to 1

// How many NeoPixels are attached to the Arduino?
#define NUMPIXELS 16 // Popular NeoPixel ring size

// When setting up the NeoPixel library, we tell it how many pixels,
// and which pin to use to send signals. Note that for older NeoPixel
// strips you might need to change the third parameter -- see the
// strandtest example for more information on possible values.
Adafruit_NeoPixel pixels(NUMPIXELS, PIN, NEO_GRB + NEO_KHZ800);

#define DELAYVAL 500 // Time (in milliseconds) to pause between pixels

void setup() {
  // These lines are specifically to support the Adafruit Trinket 5V 16 MHz.
  // Any other board, you can remove this part (but no harm leaving it):
#if defined(__AVR_ATtiny85__) && (F_CPU == 16000000)
  clock_prescale_set(clock_div_1);
#endif
  // END of Trinket-specific code.

  pixels.begin(); // INITIALIZE NeoPixel strip object (REQUIRED)
}

void loop() {
  pixels.clear(); // Set all pixel colors to 'off'

  // The first NeoPixel in a strand is #0, second is 1, all the way up
  // to the count of pixels minus one.
  for(int i=0; i<NUMPIXELS; i++) { // For each pixel...

    // pixels.Color() takes RGB values, from 0,0,0 up to 255,255,255
    // Here we're using a moderately bright green color:
    pixels.setPixelColor(i, pixels.Color(0, 150, 0));

    pixels.show();   // Send the updated pixel colors to the hardware.

    delay(DELAYVAL); // Pause before next pass through loop
  }
}
- Source Nevigate
Creating Codes.
By the help of our instructor i start creating codes for differ positions of led. Like For humidity For Temprature.
Code for temprature.
To create the code for temprature my instructor thought me to write the code as we got the fixed temprature from our doctors side. That task was to creat a code for RGB that RGB led starts and show the colors when temprature gose high or low.Note the code is created on Arduino compiler as we are using microcontroller.
Mapping
RGB (red, green, and blue) is one of the six models of color used on a map. Under the RGB color model, the primary colors of red, green, and blue form the basis of almost every other color in the visible light spectrum (for example, a combination of red and green results in yellow). So I also started using mapping to combie the colors.
My code.
 #include <Adafruit_NeoPixel.h>
#ifdef _AVR_
#include <avr/power.h> // Required for 16 MHz Adafruit Trinket
#endif

#define PIN        6
#define NUMPIXELS 24
 int temp = 15;
 int maptemp =0;
Adafruit_NeoPixel pixels(NUMPIXELS, PIN, NEO_GRB + NEO_KHZ800);


void setup()
{
pixels.begin();
pixels.setBrightness(50);
}

void loop()
{
  maptemp=map(temp,15,50,0,255);
 uint32_t tempc = pixels.Color(maptemp,0,255-maptemp);
 pixels.fill(tempc,12,6 );
 pixels.show();
}
Code for humidity.
To create the code for humidity my instructor also thought me here to write the code as we got the fixed humidity in numbers from our doctors side. That task was to creat a code for RGB that RGB led starts and show the colors when humidity gose high or low.Note the code is created on Arduino compiler as we are using microcontroller.
Mapping
In this i also used mapping option as we need combination of different colors.
My code
 #include <Adafruit_NeoPixel.h>
#ifdef _AVR_
#include <avr/power.h> // Required for 16 MHz Adafruit Trinket
#endif

#define PIN        6
#define NUMPIXELS 24
 int humidity = 0;
 int maphumidity =0;
Adafruit_NeoPixel pixels(NUMPIXELS, PIN, NEO_GRB + NEO_KHZ800);


void setup()
{
pixels.begin();
pixels.setBrightness(50);
}

void loop()
{
  maphumidity=map(humidity,0,100,0,255);
 uint32_t tempc = pixels.Color(255-maphumidity ,maphumidity,255-maphumidity);
 pixels.fill(tempc,19,6 );
 pixels.show();
}
Main Code
After compleating the code as we were using mqtt to get the data from out side (As my collegue mentioned in above links) we started combine our code with main code to run it on Arduino and get the results. - Note All the video results are availible in the links ablove.
Code
 #include "arduino_secrets.h"
/*
  This program connects to a MQTT broker and subscribes to some topics,
  it also publishes a message to other topics.
  When a message is received it prints the message to the serial monitor,
  it uses the callback functionality of the library.

  It also demonstrates how to set the will message, get/set QoS,
  duplicate and retain values of messages.

  The circuit:
  - Arduino MKR 1010

*/
/*****************
//Start of editable area
******************/
int levelPin = A6;
int value;
int n;
int temp=0;
int hum=0;
int lig=0;
 int maphumidity =0;
/******************
 * END OF EDITABLE AREA.
 ******************/
#include <ArduinoMqttClient.h>
#if defined(ARDUINO_SAMD_MKRWIFI1010) || defined(ARDUINO_SAMD_NANO_33_IOT) || defined(ARDUINO_AVR_UNO_WIFI_REV2)
  #include <WiFiNINA.h>
#elif defined(ARDUINO_SAMD_MKR1000)
  #include <WiFi101.h>
#elif defined(ARDUINO_ESP8266_ESP12)
  #include <ESP8266WiFi.h>
#endif

///////please enter your sensitive data in the Secret tab/arduino_secrets.h
char ssid[] = SECRET_SSID;        // your network SSID (name)
char pass[] = SECRET_PASS;    // your network password (use for WPA, or use as key for WEP)

// To connect with SSL/TLS:
// 1) Change WiFiClient to WiFiSSLClient.
// 2) Change port value from 1883 to 8883.
// 3) Change broker value to a server with a known SSL/TLS root certificate
//    flashed in the WiFi module.

WiFiClient wifiClient;
MqttClient mqttClient(wifiClient);
const char broker[]    = "192.168.8.10";
int        port        = 1883;
/******************
 * Start OF EDITABLE AREA.
 ******************/
const char inTopic[]   = "tempr";
const char inTopic2[]   = "humd";
const char inTopic3[]   = "light";
const char outTopic[]  = "accelerationx";
const char outTopic2[]  = "gyrox";
const char outTopic3[]  = "r";
/******************
 * END OF EDITABLE AREA.
 ******************/
const long interval = 1000;
unsigned long previousMillis = 0;

int count = 0;

#include <Adafruit_NeoPixel.h>
#ifdef AVR
#include <avr/power.h> // Required for 16 MHz Adafruit Trinket
#endif

#define PIN        6
#define NUMPIXELS 24
 int maptemp =0;
Adafruit_NeoPixel pixels(NUMPIXELS, PIN, NEO_GRB + NEO_KHZ800);

void setup() {
pixels.begin();
pixels.setBrightness(50);

  //Define pins
  pinMode(levelPin, INPUT);
  //Initialize serial and wait for port to open:
  Serial.begin(9600);
  while (!Serial) {
    ; // wait for serial port to connect. Needed for native USB port only
  }
  Serial.println(F("test!"));

  // attempt to connect to Wifi network:
  Serial.print("Attempting to connect to WPA SSID: ");
  Serial.println(ssid);
  while (WiFi.begin(ssid, pass) != WL_CONNECTED) {
    // failed, retry
    Serial.print(".");
    delay(5000);
  }

  Serial.println("You're connected to the network");
  Serial.println();


  Serial.print("Attempting to connect to the MQTT broker: ");
  Serial.println(broker);

  if (!mqttClient.connect(broker, port)) {
    Serial.print("MQTT connection failed! Error code = ");
    Serial.println(mqttClient.connectError());

    while (1);
  }

  Serial.println("You're connected to the MQTT broker!");
  Serial.println();

  // set the message receive callback
  mqttClient.onMessage(onMqttMessage);

  Serial.print("Subscribing to topic: ");
  Serial.println(inTopic);
  Serial.println();

  // subscribe to a topic
  // the second parameter set's the QoS of the subscription,
  // the the library supports subscribing at QoS 0, 1, or 2
  int subscribeQos = 1;

  mqttClient.subscribe(inTopic, subscribeQos);

  // topics can be unsubscribed using:
  // mqttClient.unsubscribe(inTopic);

  Serial.print("Waiting for messages on topic: ");
  Serial.println(inTopic);
  Serial.println();

  Serial.print("Subscribing to topic: ");
  Serial.println(inTopic2);
  Serial.println();

  // subscribe to a second topic
  // the second parameter set's the QoS of the subscription

  mqttClient.subscribe(inTopic2, subscribeQos);

  // topics can be unsubscribed using:
  // mqttClient.unsubscribe(inTopic2);

  Serial.print("Waiting for messages on topic: ");
  Serial.println(inTopic2);
  Serial.println();

   Serial.print("Subscribing to topic: ");
  Serial.println(inTopic2);
  Serial.println();

  // subscribe to a third topic
  // the second parameter set's the QoS of the subscription

  mqttClient.subscribe(inTopic3, subscribeQos);

  // topics can be unsubscribed using:
  // mqttClient.unsubscribe(inTopic3);

  Serial.print("Waiting for messages on topic: ");
  Serial.println(inTopic3);
  Serial.println();
}

void loop() {
  maptemp=map(temp,15,50,0,255);
 uint32_t tempc = pixels.Color(maptemp,0,255-maptemp);
 pixels.fill(tempc,0,12 );
 pixels.show();

  maphumidity=map(hum,0,100,0,255);
 uint32_t humc = pixels.Color(255-maphumidity ,maphumidity,255-maphumidity);
 pixels.fill(humc,13,12);
 pixels.show();

  //Reading sensor information
  value = analogRead(levelPin);          //Read and save analog value from potentiometer
  String l = String(value);
  //controlling RGB LED - This is for common positive RGBs. For common (-), remove the map function and just keep r,b,g as is.
  //temp and humidity
    float h = 0;
    String hh = String(h);
  // Read temperature as Celsius (the default)
 float t = 0;
 String tt = String(t);

  // call poll() regularly to allow the library to receive MQTT messages and
  // send MQTT keep alives which avoids being disconnected by the broker
  mqttClient.poll();

  // avoid having delays in loop, we'll use the strategy from BlinkWithoutDelay
  // see: File -> Examples -> 02.Digital -> BlinkWithoutDelay for more info
  unsigned long currentMillis = millis();

  if (currentMillis - previousMillis >= interval) {
    // save the last time a message was sent
    previousMillis = currentMillis;

    String payload;

    payload += "hello world!";
    payload += " ";
    payload += count;

    Serial.print("Sending message to topic: ");
    Serial.println(outTopic);
//    Serial.println(tt);

    // send message, the Print interface can be used to set the message contents
    // in this case we know the size ahead of time, so the message payload can be streamed

    bool retained = false;
    int qos = 1;
    bool dup = false;

    mqttClient.beginMessage(outTopic, tt.length(), retained, qos, dup);
    mqttClient.print(tt);
    mqttClient.endMessage();

    Serial.print("Sending message to topic: ");
    Serial.println(outTopic2);
    Serial.println(l);

    mqttClient.beginMessage(outTopic2, l.length(), retained, qos, dup);
    mqttClient.print(l);
    mqttClient.endMessage();
    Serial.println();

    Serial.print("Sending message to topic: ");
    Serial.println(outTopic3);
//    Serial.println(hh);

    mqttClient.beginMessage(outTopic3, hh.length(), retained, qos, dup);
    mqttClient.print(hh);
    mqttClient.endMessage();
    Serial.println();

    count++;
  }
}

void onMqttMessage(int messageSize) {
  // we received a message, print out the topic and contents
  Serial.print("Received a message with topic '");
  Serial.print(mqttClient.messageTopic());
  Serial.print("', duplicate = ");
  Serial.print(mqttClient.messageDup() ? "true" : "false");
  Serial.print(", QoS = ");
  Serial.print(mqttClient.messageQoS());
  Serial.print(", retained = ");
  Serial.print(mqttClient.messageRetain() ? "true" : "false");
  Serial.print("', length ");
  Serial.print(messageSize);
  Serial.println(" bytes:");
  String test= mqttClient.messageTopic();
  Serial.println(test);
  char message[messageSize];

    // use the Stream interface to print the contents
    while (mqttClient.available()) {
      //Serial.print((char)mqttClient.read());
      for (int i = 0; i < messageSize; i++)
      {
        message[i]=(char)mqttClient.read();
      }
    }
    Serial.println(message);
    n = atoi(message);
    Serial.println(n);
     String topic1 = String(inTopic);
     String topic2 = String(inTopic2);
     String topic3 = String(inTopic3);
     Serial.println(topic1);
     Serial.println(topic2);
     Serial.println(topic3);
    if ( test == topic1){
      temp = n;
      Serial.println("temperature value saved");
    }
  else if (test == topic2) {
    hum = n;
        Serial.println("humidity value saved");
  }
  else if (test == topic3) {
    lig = n;
       Serial.println("light value saved");
  }
}