Final Project
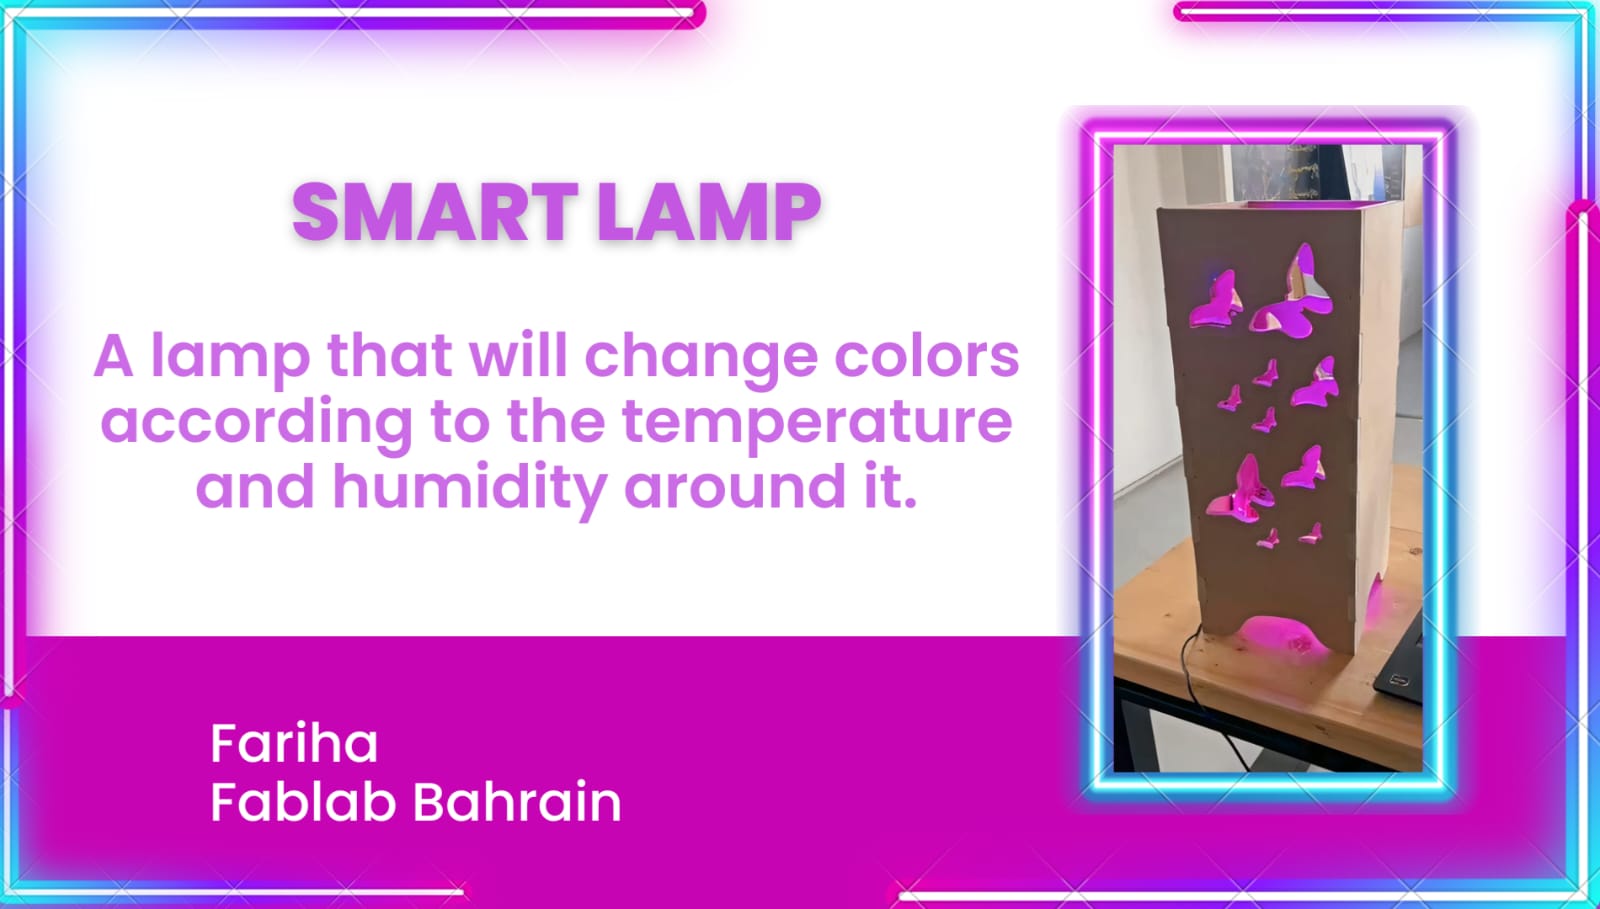
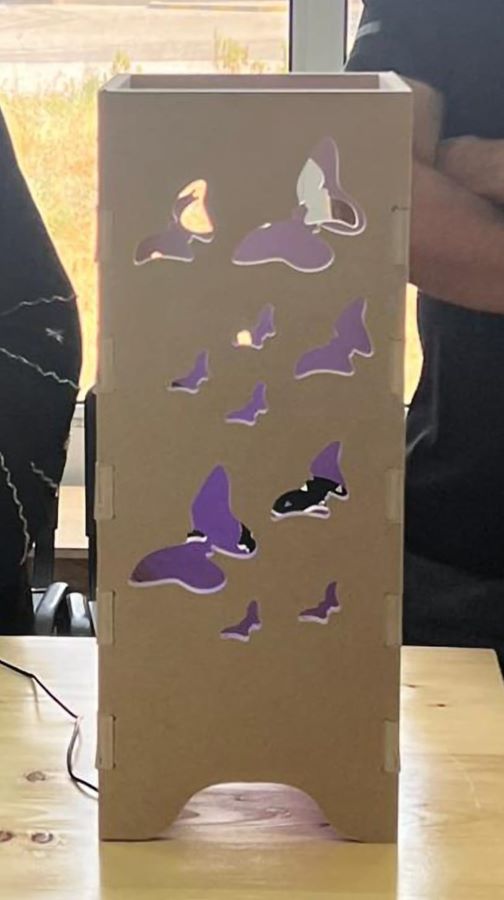
For my industrial training in Fab Lab Bahrain, I was part of a research project in which there were three teams, i.e., structure, electronics, and software. I was part of a software team, and in the software team , we were two members. Our goal was to provide a user interface for visualization and to formulate queries and to implement a full-stack software development environment for IOT applications. The system would communicate with nodes through an IOT message broker using one of the industrial common protocols ( MQTT, AMQP, CoAP, etc.). For our Fab Academy final project, we had to come up with an idea that would combine our industrial training project and the Fab Academy journey. We decided to create a table lamp that will change colors based on the temperature and humidity sensor values we will receive from the electronics team. So, the users will be able to directly visualize and know about the temperature and humidity around them without needing to read sensor values.
Table Lamp Design
During my CNC assignment week, I designed a finger joint table lamp using Fusion360, and the material I used to cut this design was MDF. More detailed documentation about how I designed the fingure joint lamp on fusion360 and how I cut the fingure joint table lamp on a CNC router can be found at CNC assignment documentation.

Original dxf files download link
Original fusion30 archieve file download link
Sending and receiving data on the Arduino Over MQTT
MQTT (MQ Telemetry Transport) is an OASIS standard messaging protocol for the Internet of Things (IoT). It is designed as an extremely lightweight publish/subscribe messaging transport that is ideal for connecting remote devices with a small code footprint and minimal network bandwidth. MQTT today is used in a wide variety of industries, such as automotive, manufacturing, telecommunications, oil and gas, etc. A basic explanation of how it works is that a node, for example an Arduino with a Wi-Fi module, sends a payload to a broker. A broker is a kind of “middle-point” server that essentially stores payloads sent to it in something called topics. A topic is a definition of what type of data it contains. It could, for example, be “basement humidity” or “living room temperature”. Another node can then subscribe to this information from the broker, and now data has been moved from Node A to Node B over the Internet.
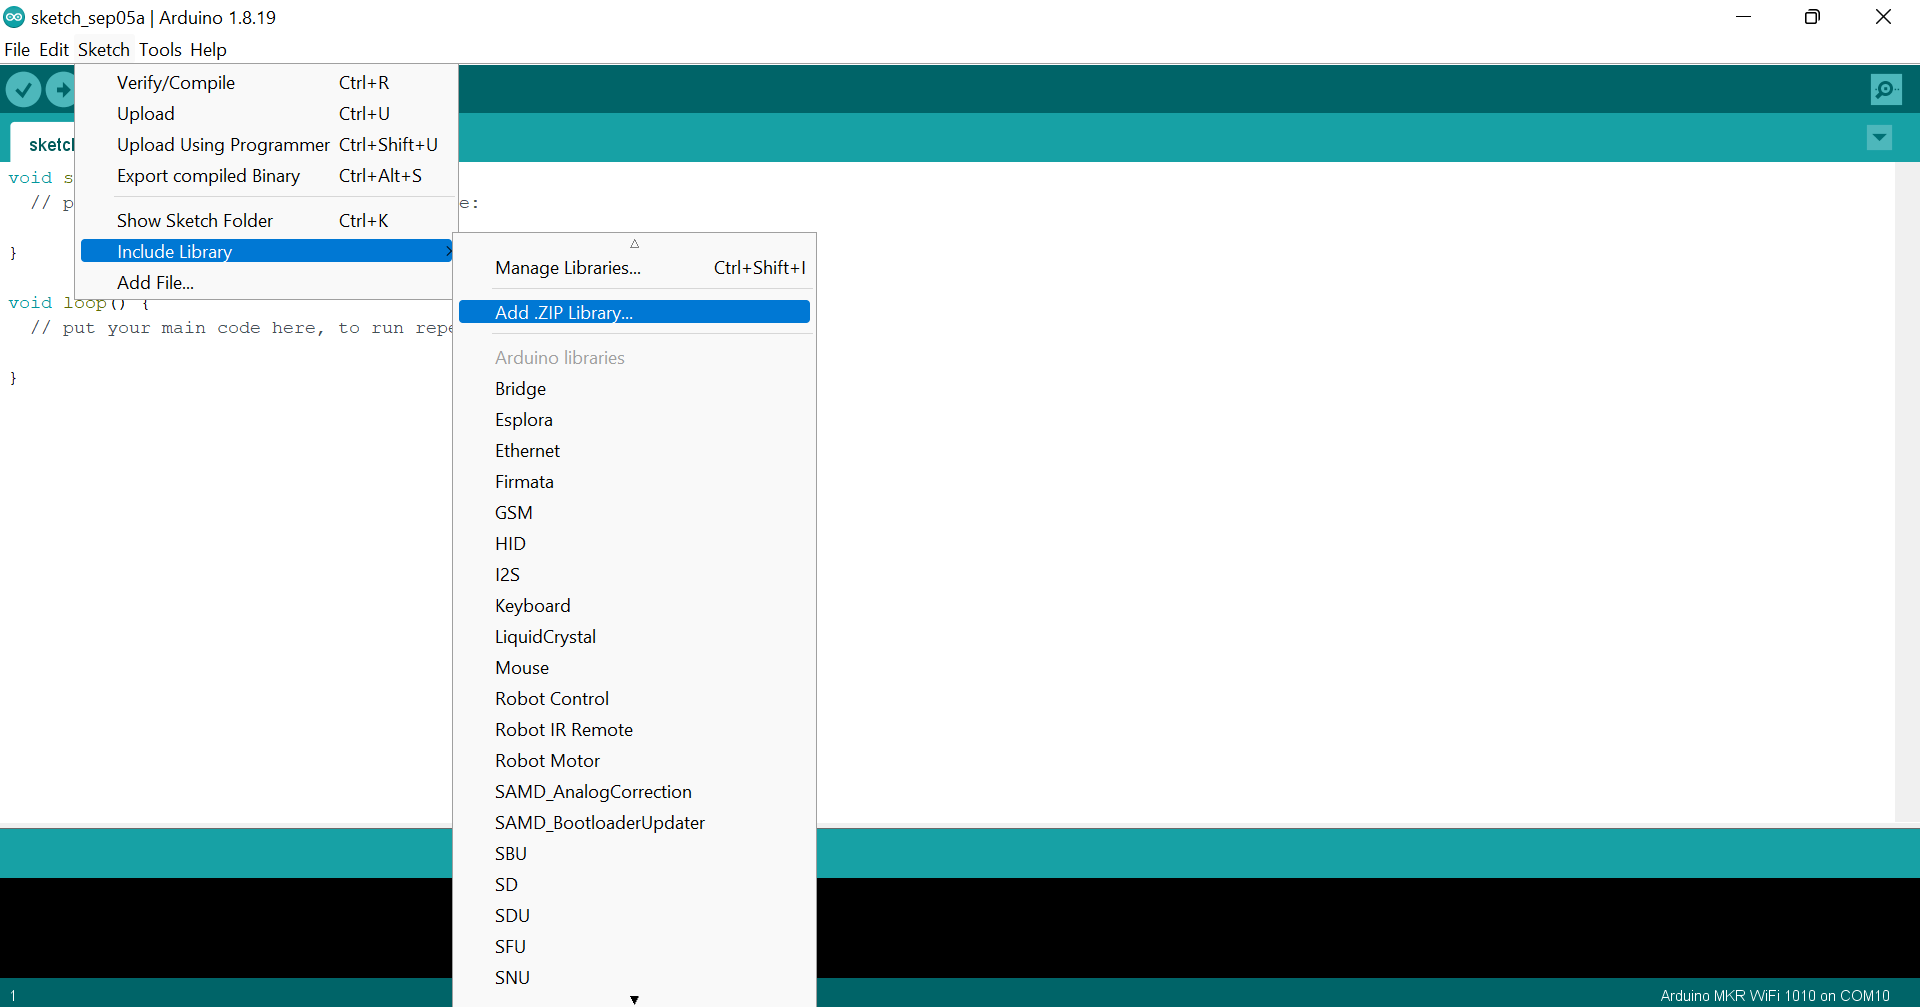
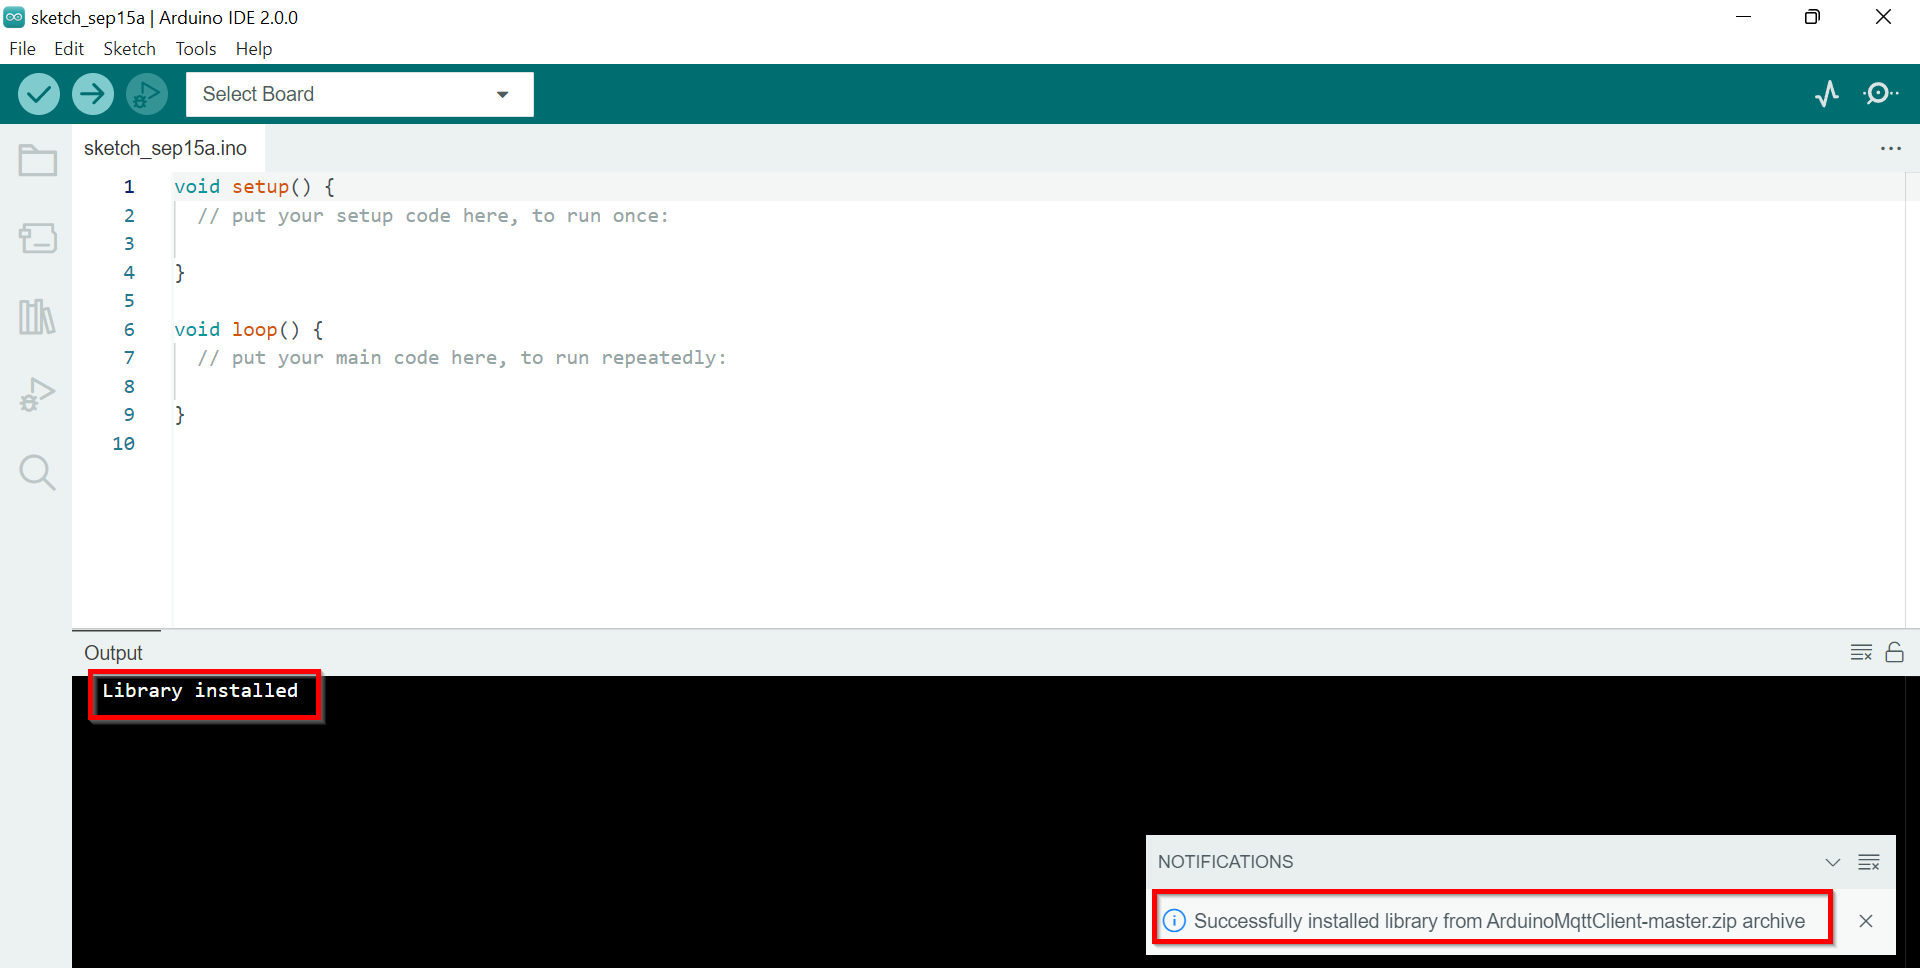
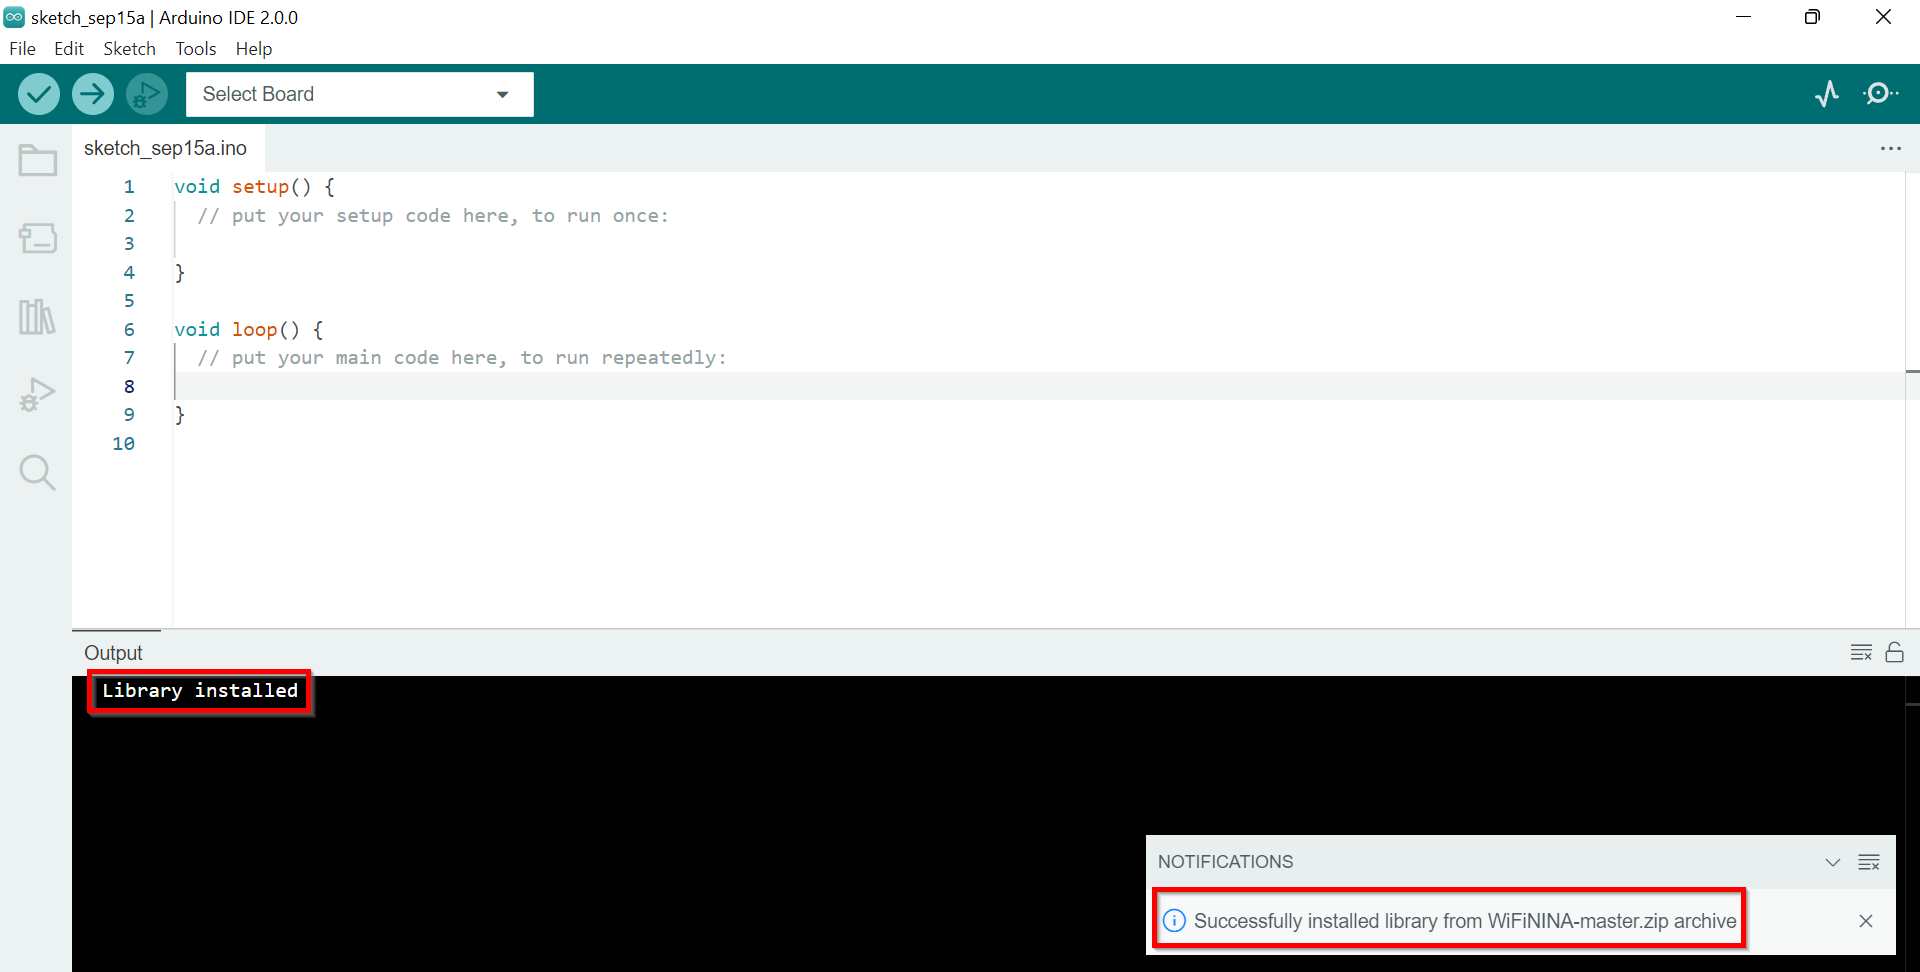
I started my research on how to receive and send data on the Arduino over mqtt. I found this tutorial and got to know that I needed to download some libraries. So first of all, I downloaded the ArduinoMqtClient library from here and the WiFiNINA library from here and added them to Arduino.
After adding the required libraries, I got this code from my instructor, Dua. This code is from some previous IOT workshops. This program connects to a MQTT broker and subscribes to some topics, it also publishes a message to other topics. When a message is received it prints the message to the serial monitor. In this code, they were using the humidity sensor. But, I do not need to use any sensors, so I commented out the part of the code that is related to the humidity sensor.
#include "arduino_secrets.h"
/*
  This program connects to a MQTT broker and subscribes to some topics,
  it also publishes a message to other topics.
  When a message is received it prints the message to the serial monitor,
  it uses the callback functionality of the library.

  It also demonstrates how to set the will message, get/set QoS,
  duplicate and retain values of messages.

  The circuit:
  - Arduino MKR 1010
*/
/***************************************************
//Start of editable area
****************************************************/
#define DHTPIN 2
#define DHTTYPE DHT11
int levelPin = A6;
int value;
/******************************************************
 * END OF EDITABLE AREA.
 ****************************************************/
//#include "DHT.h"
#include <ArduinoMqttClient.h>
#if defined(ARDUINO_SAMD_MKRWIFI1010) || defined(ARDUINO_SAMD_NANO_33_IOT) || defined(ARDUINO_AVR_UNO_WIFI_REV2)
  #include <WiFiNINA.h>
#elif defined(ARDUINO_SAMD_MKR1000)
  #include <WiFi101.h>
#elif defined(ARDUINO_ESP8266_ESP12)
  #include <ESP8266WiFi.h>
#endif
//DHT dht(DHTPIN, DHTTYPE);
///////please enter your sensitive data in the Secret tab/arduino_secrets.h
char ssid[] = SECRET_SSID;        // your network SSID (name)
char pass[] = SECRET_PASS;    // your network password (use for WPA, or use as key for WEP)

// To connect with SSL/TLS:
// 1) Change WiFiClient to WiFiSSLClient.
// 2) Change port value from 1883 to 8883.
// 3) Change broker value to a server with a known SSL/TLS root certificate
//    flashed in the WiFi module.

WiFiClient wifiClient;
MqttClient mqttClient(wifiClient);
const char broker[]    = "192.168.8.10";
int        port        = 1883;
/******************************************************
 * Start OF EDITABLE AREA.
 ****************************************************/
const char inTopic[]   = "RGB22";
const char inTopic2[]   = "Buzzer22";
const char outTopic[]  = "temp2";
const char outTopic2[]  = "level2";
const char outTopic3[]  = "hum2";
/******************************************************
 * END OF EDITABLE AREA.
 ****************************************************/
const long interval = 1000;
unsigned long previousMillis = 0;

int count = 0;

void setup() {
  //Define pins
  pinMode(levelPin, INPUT);
  //Initialize serial and wait for port to open:
  Serial.begin(9600);
  while (!Serial) {
    ; // wait for serial port to connect. Needed for native USB port only
  }
  Serial.println(F("DHTxx test!"));

//  dht.begin();
  // attempt to connect to Wifi network:
  Serial.print("Attempting to connect to WPA SSID: ");
  Serial.println(ssid);
  while (WiFi.begin(ssid, pass) != WL_CONNECTED) {
    // failed, retry
    Serial.print(".");
    delay(5000);
  }

  Serial.println("You're connected to the network");
  Serial.println();


  Serial.print("Attempting to connect to the MQTT broker: ");
  Serial.println(broker);

  if (!mqttClient.connect(broker, port)) {
    Serial.print("MQTT connection failed! Error code = ");
    Serial.println(mqttClient.connectError());

    while (1);
  }

  Serial.println("You're connected to the MQTT broker!");
  Serial.println();

  // set the message receive callback
  mqttClient.onMessage(onMqttMessage);

  Serial.print("Subscribing to topic: ");
  Serial.println(inTopic);
  Serial.println();

  // subscribe to a topic
  // the second parameter set's the QoS of the subscription,
  // the the library supports subscribing at QoS 0, 1, or 2
  int subscribeQos = 1;

  mqttClient.subscribe(inTopic, subscribeQos);

  // topics can be unsubscribed using:
  // mqttClient.unsubscribe(inTopic);

  Serial.print("Waiting for messages on topic: ");
  Serial.println(inTopic);
  Serial.println();

  Serial.print("Subscribing to topic: ");
  Serial.println(inTopic2);
  Serial.println();

  // subscribe to a second topic
  // the second parameter set's the QoS of the subscription

  mqttClient.subscribe(inTopic2, subscribeQos);

  // topics can be unsubscribed using:
  // mqttClient.unsubscribe(inTopic2);

  Serial.print("Waiting for messages on topic: ");
  Serial.println(inTopic2);
  Serial.println();

   Serial.print("Subscribing to topic: ");
  Serial.println(inTopic2);
  Serial.println();

  // subscribe to a third topic
  // the second parameter set's the QoS of the subscription

  mqttClient.subscribe(inTopic3, subscribeQos);

  // topics can be unsubscribed using:
  // mqttClient.unsubscribe(inTopic3);

  Serial.print("Waiting for messages on topic: ");
  Serial.println(inTopic3);
  Serial.println();
}

void loop() {
  //Reading sensor information
  value = analogRead(levelPin);          //Read and save analog value from potentiometer
  String l = String(value);
  //controlling RGB LED - This is for common positive RGBs. For common (-), remove the map function and just keep r,b,g as is.
  //temp and humidity
    float h = 0;
    String hh = String(h);
  // Read temperature as Celsius (the default)
 float t = 0;
 String tt = String(t);

  // call poll() regularly to allow the library to receive MQTT messages and
  // send MQTT keep alives which avoids being disconnected by the broker
  mqttClient.poll();

  // avoid having delays in loop, we'll use the strategy from BlinkWithoutDelay
  // see: File -> Examples -> 02.Digital -> BlinkWithoutDelay for more info
  unsigned long currentMillis = millis();

  if (currentMillis - previousMillis >= interval) {
    // save the last time a message was sent
    previousMillis = currentMillis;

    String payload;

    payload += "hello world!";
    payload += " ";
    payload += count;

    Serial.print("Sending message to topic: ");
    Serial.println(outTopic);
//    Serial.println(tt);

    // send message, the Print interface can be used to set the message contents
    // in this case we know the size ahead of time, so the message payload can be streamed

    bool retained = false;
    int qos = 1;
    bool dup = false;

    mqttClient.beginMessage(outTopic, tt.length(), retained, qos, dup);
    mqttClient.print(tt);
    mqttClient.endMessage();

    Serial.print("Sending message to topic: ");
    Serial.println(outTopic2);
    Serial.println(l);

    mqttClient.beginMessage(outTopic2, l.length(), retained, qos, dup);
    mqttClient.print(l);
    mqttClient.endMessage();
    Serial.println();

    Serial.print("Sending message to topic: ");
    Serial.println(outTopic3);
//    Serial.println(hh);

    mqttClient.beginMessage(outTopic3, hh.length(), retained, qos, dup);
    mqttClient.print(hh);
    mqttClient.endMessage();
    Serial.println();

    count++;
  }
}

void onMqttMessage(int messageSize) {
  // we received a message, print out the topic and contents
  Serial.print("Received a message with topic '");
  Serial.print(mqttClient.messageTopic());
  Serial.print("', duplicate = ");
  Serial.print(mqttClient.messageDup() ? "true" : "false");
  Serial.print(", QoS = ");
  Serial.print(mqttClient.messageQoS());
  Serial.print(", retained = ");
  Serial.print(mqttClient.messageRetain() ? "true" : "false");
  Serial.print("', length ");
  Serial.print(messageSize);
  Serial.println(" bytes:");
  String test= mqttClient.messageTopic();
  Serial.println(test);
  char message[messageSize];

    // use the Stream interface to print the contents
    while (mqttClient.available()) {
      //Serial.print((char)mqttClient.read());
      for (int i = 0; i < messageSize; i++)
      {
        message[i]=(char)mqttClient.read();
      }
    }
}
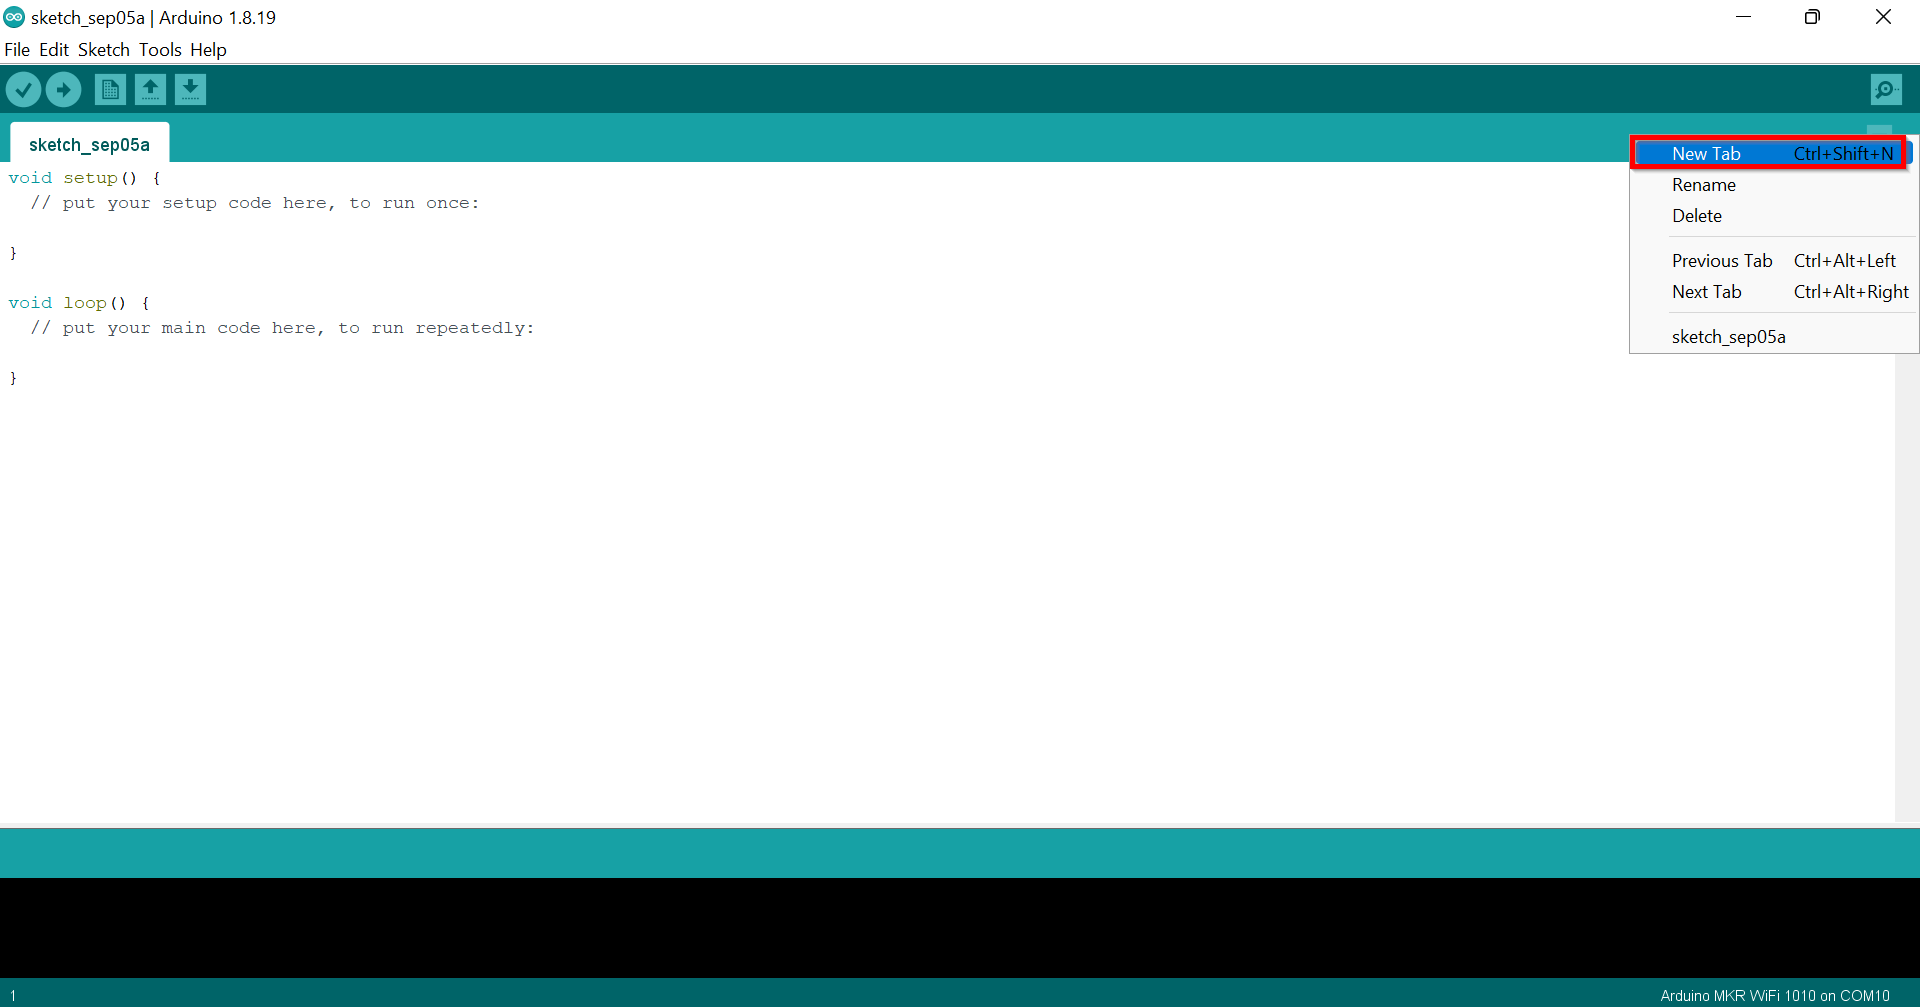
Arduino_secrets.h is a secret tab where we can enter our sensitive data. First of all, open an empty sketch and create a header file called arduino_secrets.h that we can store our Wi-Fi credentials in. To create a tab in the offline editor, click the arrow symbol underneath the Serial Monitor symbol, and then click on the “New tab” option.
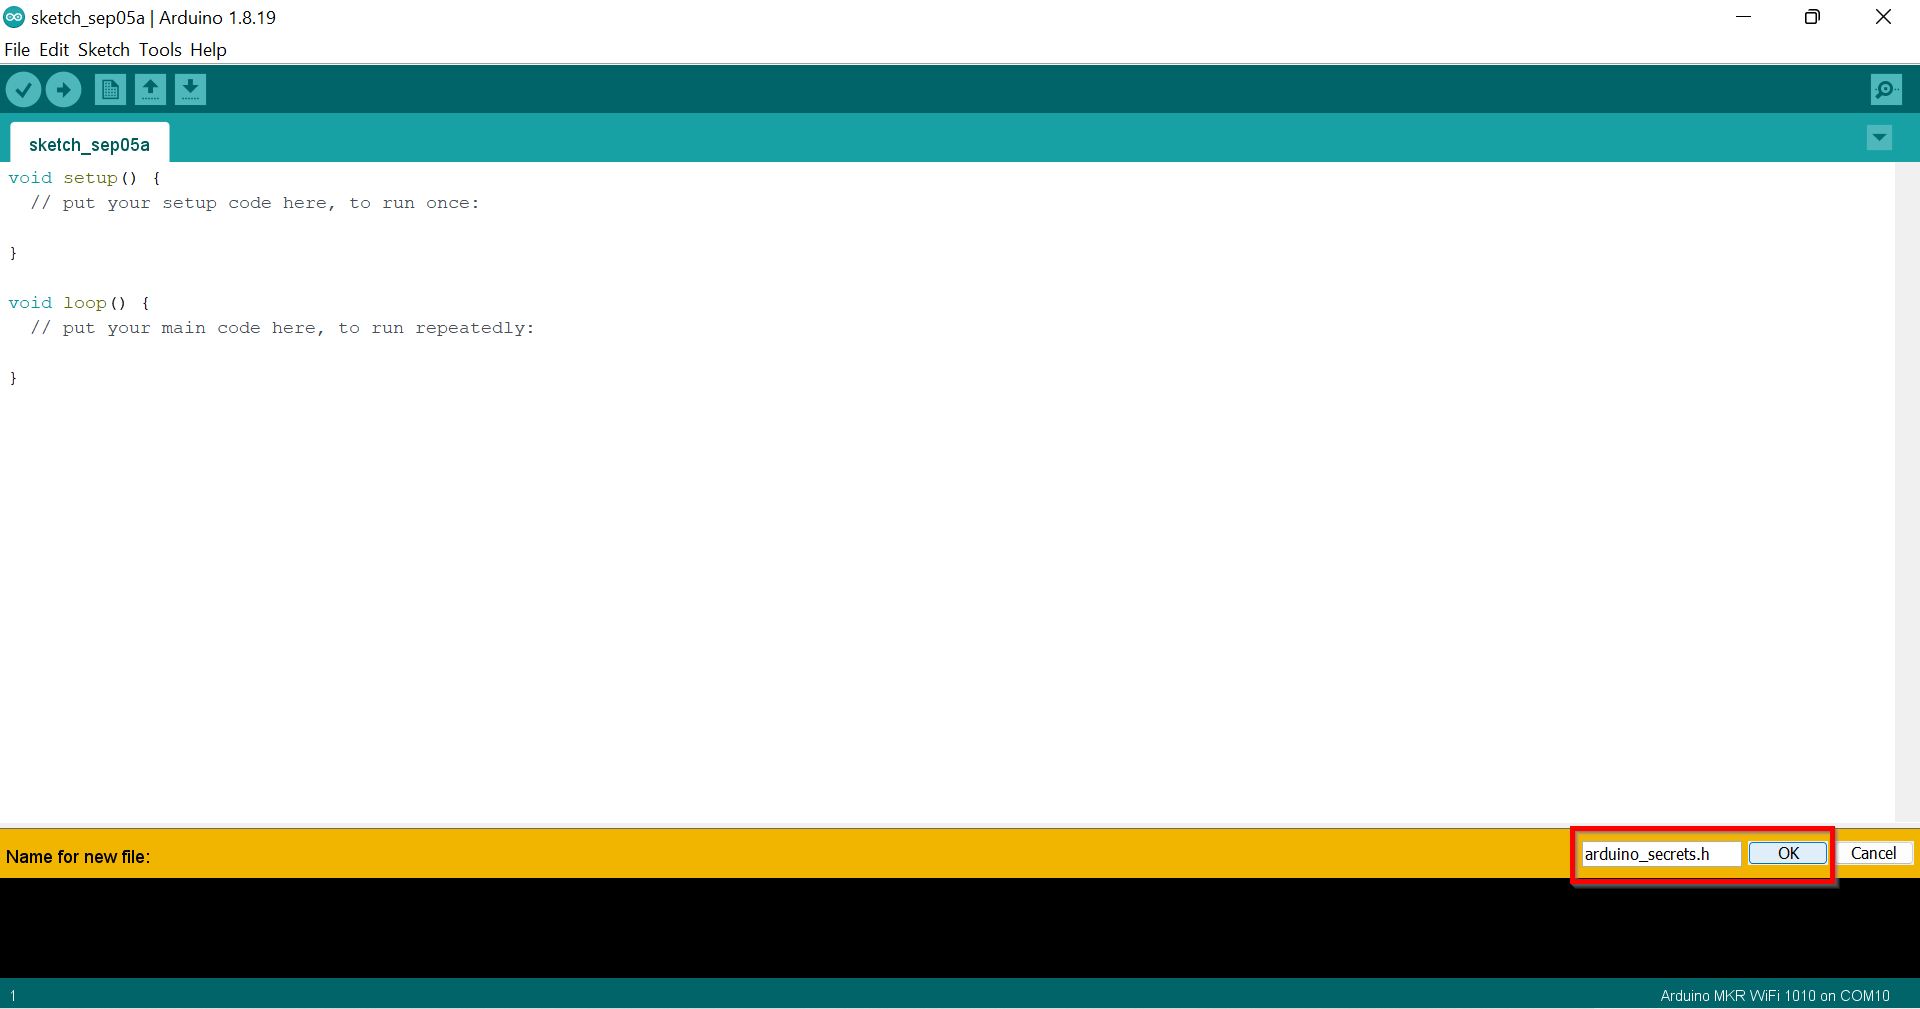
Then, name the file “arduino_secrets.h”.
Inside this new header file, we need to use the below code, where our SECRET_SSID (network name) and SECRET_PASS (password) needs to be replaced by your own credentials.
#define SECRET_SSID ""
#define SECRET_PASS ""
Testing code
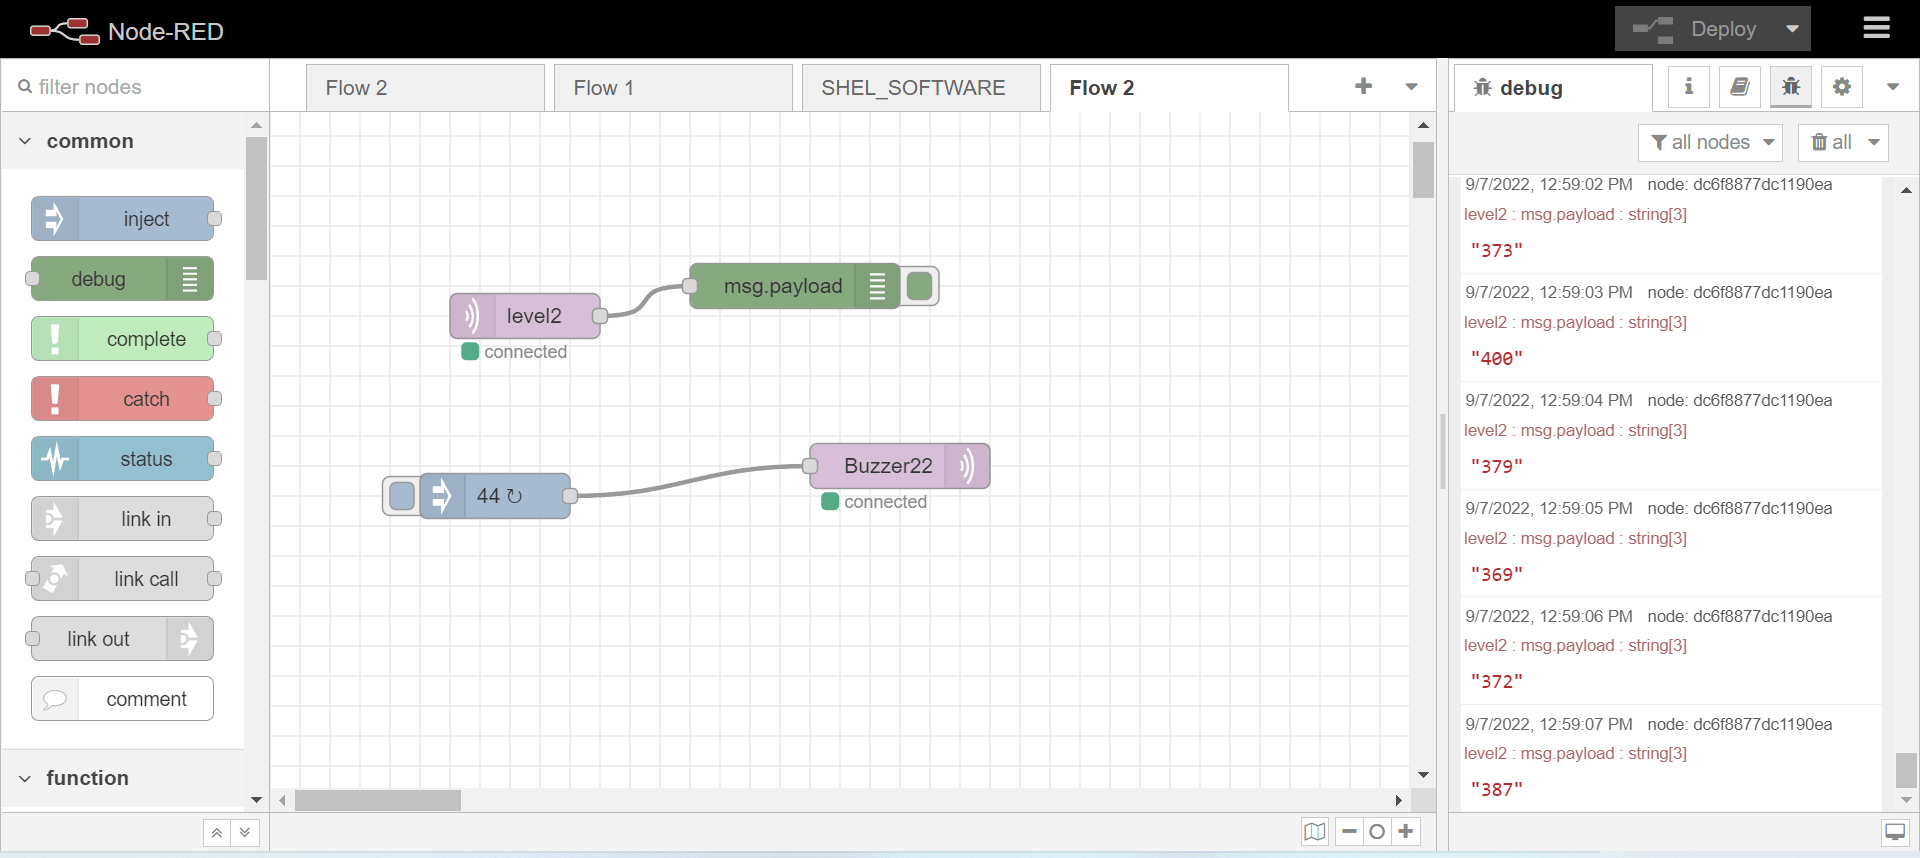
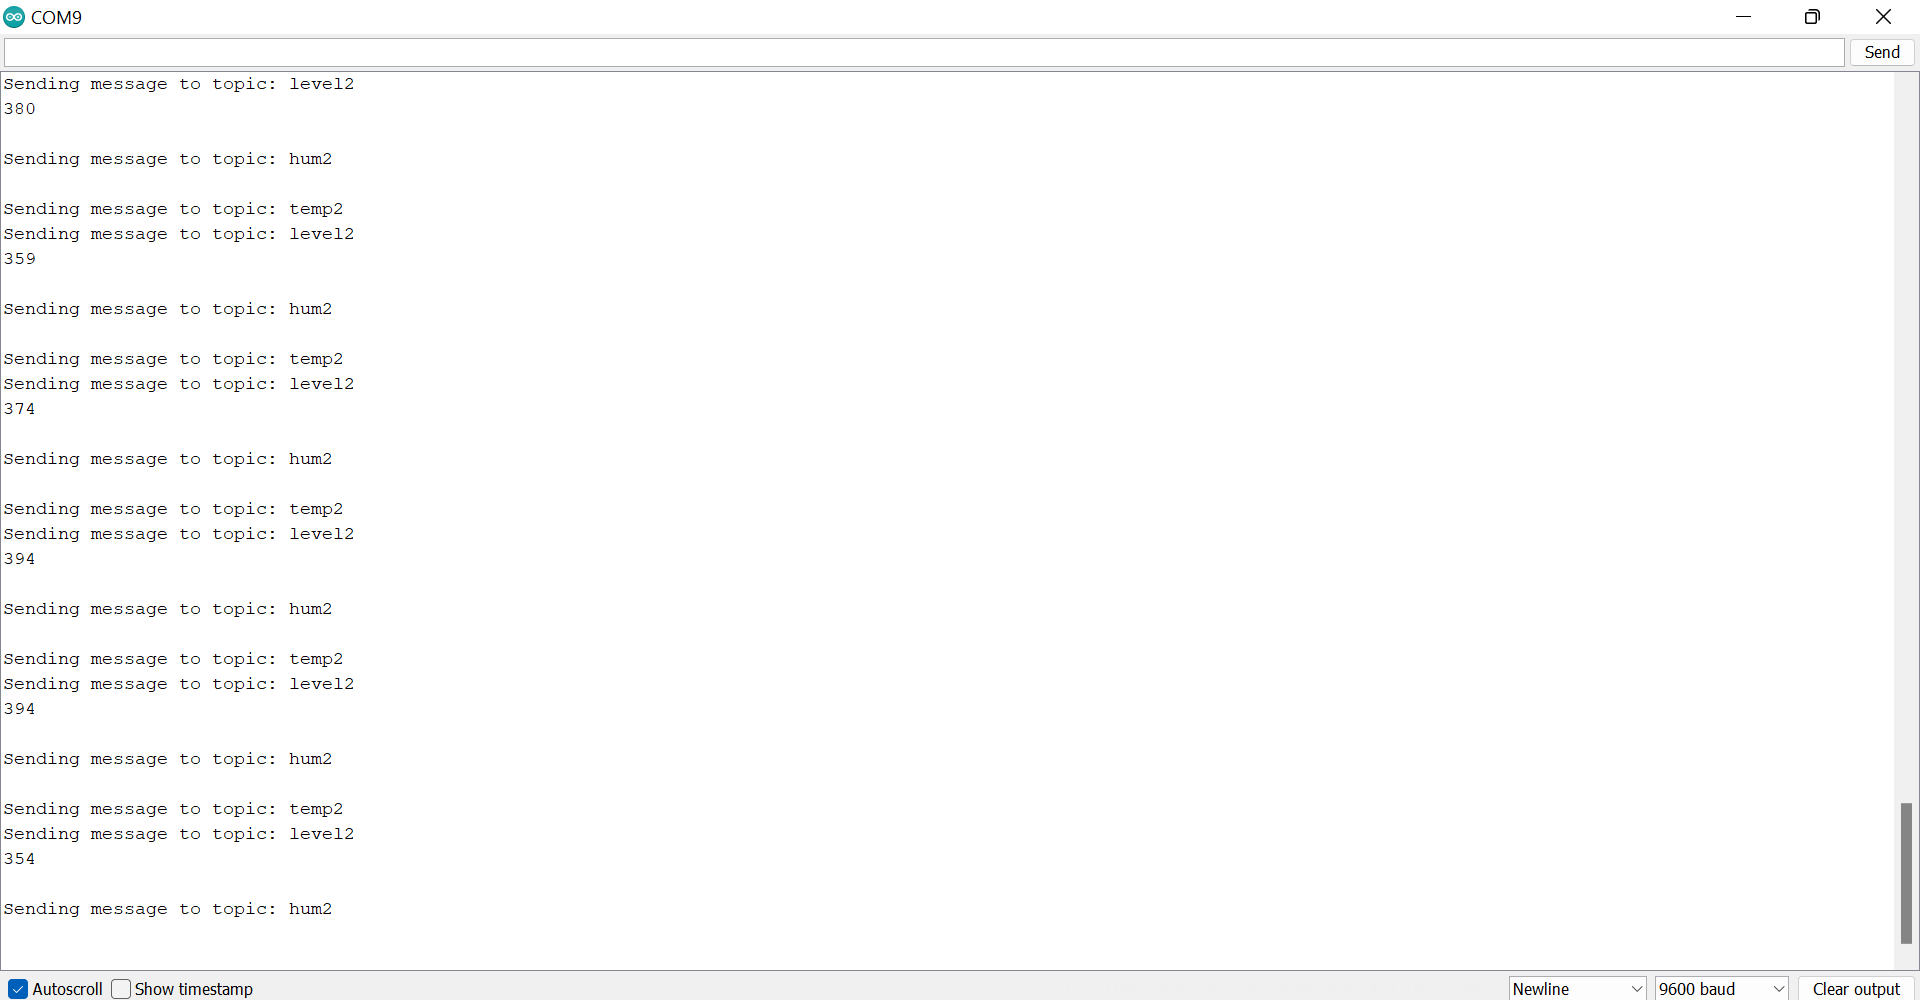
Before trying to read values from sensors from the electronics group, I tried to test the code to be sure that it was working. So I used Node Red to publish and subscribe MQTT messages, and I was able to read messages and values in the Arduino’s serial monitor.
Node-RED is a programming tool for wiring together hardware devices, APIs and online services in new and interesting ways. It provides a browser-based editor that makes it easy to wire together flows using the wide range of nodes in the palette that can be deployed to its runtime in a single-click. And it has gained tremendous popularity in the IoT space, by modeling bits of application functionality between IoT devices like sensors, cameras, and wireless routers.
Reading and Converting sensors values
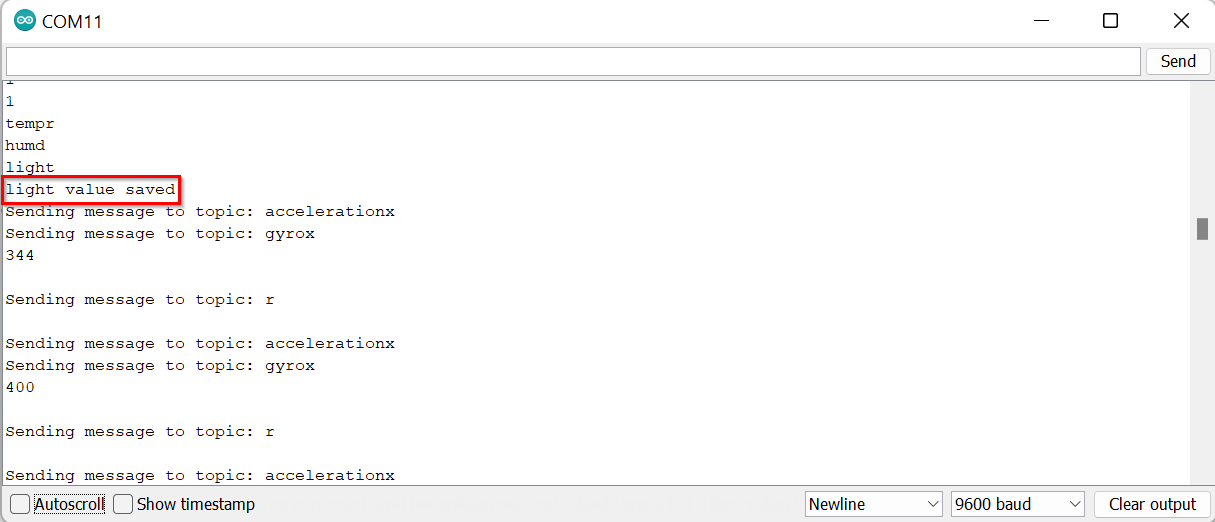
I got the topic names from the electronic teams and subscribed to the same topics, and I was able to read the values of sensors. I needed to convert the readings from a string into integers in order to blink the leds according to those readings. So, this is the code where I converted strings to ints. To convert strings into integers, I got some hints from this Arduino forum discussion. Also, in the above code, there were two topics, so I added one more topic and needed to add more codes to make topic 3 work.
int n;
int temp=0;
int hum=0;
int lig=0;
const char inTopic[] = "tempr";
const char inTopic2[] = "humd";
const char inTopic3[] = "light";
const char outTopic[] = "accelerationx";
const char outTopic2[] = "gyrox";
const char outTopic3[] = "r";
// subscribe to a third topic
// the second parameter set's the QoS of the subscription
mqttClient.subscribe(inTopic3, subscribeQos);
// topics can be unsubscribed using:
// mqttClient.unsubscribe(inTopic3);
Serial.print("Waiting for messages on topic: ");
Serial.println(inTopic3);
Serial.println();
}
Serial.println(message);
n = atoi(message);
Serial.println(n);
String topic1 = String(inTopic);
String topic2 = String(inTopic2);
String topic3 = String(inTopic3);
Serial.println(topic1);
Serial.println(topic2);
Serial.println(topic3);
if ( test == topic1){
temp = n;
Serial.println("temperature value saved");
}
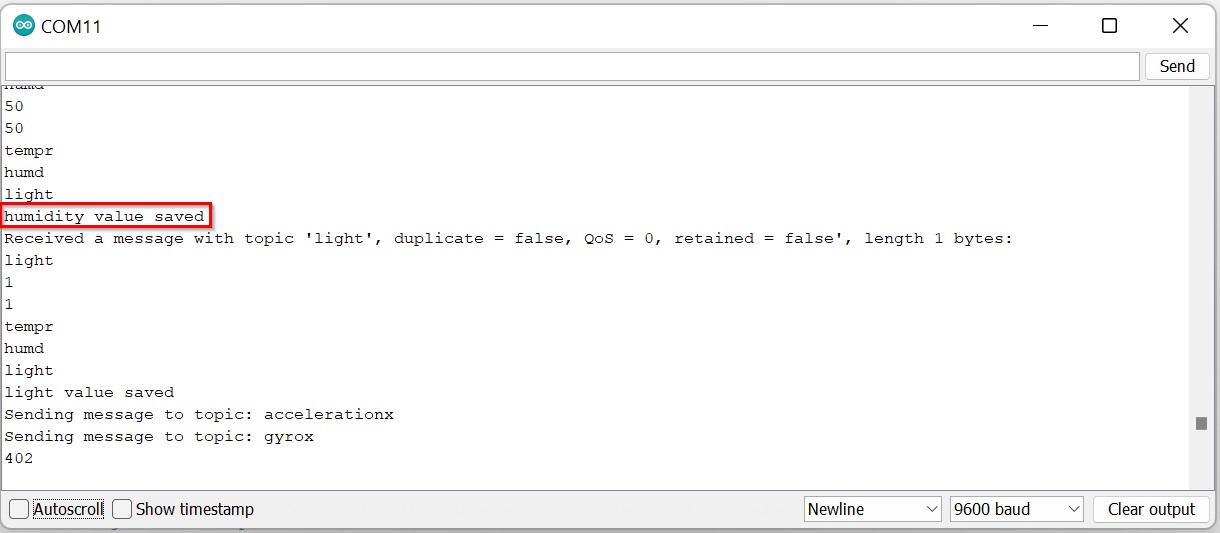
else if (test == topic2) {
hum = n;
Serial.println("humidity value saved");
}
else if (test == topic3) {
lig = n;
Serial.println("light value saved");
}
}

Making the LED Strip Blink according to the readings of sensors values

While I was working on receiving data in Arduino over mqtt and reading sensor values from the electronics team and converting those values, my other group member, Sikander, was working on programming LEDs. To see more detailed documentation about research and resources for LED programming codes, visit Sikandar.Saleh’s website.
To work with the LED strip, we need one USB cable and one microcontroller. We used the Arduino MKR Wifi 1010 microcontroller. You can find details about the Arduino MKR Wifi 1010 microcontroller on emdedded programming week documentation. We also needed to download the Adafruit NeoPixel library. So, I downloaded the Adafruit NeoPixel library from here and added it to Arduino.

Using Map function
The range of temperature readings electronic teams were getting was between 0 to 50, and the range of humidity readings was between 0 to 100. We used the map function to map the range of values of these values and rgba colors.
When you acquire analog values from an analog input pin, by default they are acquired as values ranging from 0 to 1023. The map function provided by the Arduino language allows you to map that range of values to a different range.
Testing!
For testing the led code, we set the temperature value to 50 and set the led to blink in red, and then set the temperature value to 0 and set the led to blink in blue.
#include <Adafruit_NeoPixel.h>
#ifdef _AVR_
#include <avr/power.h> // Required for 16 MHz Adafruit Trinket
#endif

#define PIN        6
#define NUMPIXELS 24
 int temp =15;
 int maptemp =50;  //intmaptemp=0; for low temperature
Adafruit_NeoPixel pixels(NUMPIXELS, PIN, NEO_GRB + NEO_KHZ800);

void setup()
{
pixels.begin();
pixels.setBrightness(50);
}

void loop()
{
 maptemp=map(temp,15,50,0,255);
 uint32_t tempc = pixels.Color(maptemp,0,255-maptemp);
 pixels.fill(tempc,12,6 );
 pixels.show();
}
We uploaded this code and set the humidity value to 50 and set the led to blink in green, and then set the humidity value to 0 and set the led to blink in purple.
#include <Adafruit_NeoPixel.h>
#ifdef _AVR_
#include <avr/power.h> // Required for 16 MHz Adafruit Trinket
#endif

#define PIN        6
#define NUMPIXELS 24
 int humidity = 0;
 int maphumidity = 100;
Adafruit_NeoPixel pixels(NUMPIXELS, PIN, NEO_GRB + NEO_KHZ800);

void setup()
{
pixels.begin();
pixels.setBrightness(50);
}

void loop()
{
  maphumidity=map(humidity,0,100,0,255);
 uint32_t tempc = pixels.Color(255-maphumidity,maphumidity,255-maphumidity);
 pixels.fill(tempc,19,6);
 pixels.show();
}
Final code
#include "arduino_secrets.h"
/*
  This program connects to a MQTT broker and subscribes to some topics,
  it also publishes a message to other topics.
  When a message is received it prints the message to the serial monitor,
  it uses the callback functionality of the library.

  It also demonstrates how to set the will message, get/set QoS,
  duplicate and retain values of messages.

  The circuit:
  - Arduino MKR 1010

*/
/***************************************************
//Start of editable area
****************************************************/
int levelPin = A6;
int value;
int n;
int temp=0;
int hum=0;
int lig=0;
 int maphumidity =0;
/******************************************************
 * END OF EDITABLE AREA.
 ****************************************************/
#include <ArduinoMqttClient.h>
#if defined(ARDUINO_SAMD_MKRWIFI1010) || defined(ARDUINO_SAMD_NANO_33_IOT) || defined(ARDUINO_AVR_UNO_WIFI_REV2)
  #include <WiFiNINA.h>
#elif defined(ARDUINO_SAMD_MKR1000)
  #include <WiFi101.h>
#elif defined(ARDUINO_ESP8266_ESP12)
  #include <ESP8266WiFi.h>
#endif

///////please enter your sensitive data in the Secret tab/arduino_secrets.h
char ssid[] = SECRET_SSID;        // your network SSID (name)
char pass[] = SECRET_PASS;    // your network password (use for WPA, or use as key for WEP)

// To connect with SSL/TLS:
// 1) Change WiFiClient to WiFiSSLClient.
// 2) Change port value from 1883 to 8883.
// 3) Change broker value to a server with a known SSL/TLS root certificate
//    flashed in the WiFi module.

WiFiClient wifiClient;
MqttClient mqttClient(wifiClient);
const char broker[]    = "192.168.8.10";
int        port        = 1883;
/******************************************************
 * Start OF EDITABLE AREA.
 ****************************************************/
const char inTopic[]   = "tempr";
const char inTopic2[]   = "humd";
const char inTopic3[]   = "light";
const char outTopic[]  = "accelerationx";
const char outTopic2[]  = "gyrox";
const char outTopic3[]  = "r";
/******************************************************
 * END OF EDITABLE AREA.
 ****************************************************/
const long interval = 1000;
unsigned long previousMillis = 0;

int count = 0;

#include <Adafruit_NeoPixel.h>
#ifdef _AVR_
#include <avr/power.h> // Required for 16 MHz Adafruit Trinket
#endif

#define PIN        6
#define NUMPIXELS 24
int maptemp =0;
Adafruit_NeoPixel pixels(NUMPIXELS, PIN, NEO_GRB + NEO_KHZ800);

void setup() {
pixels.begin();
pixels.setBrightness(50);

  //Define pins
  pinMode(levelPin, INPUT);
  //Initialize serial and wait for port to open:
  Serial.begin(9600);
  while (!Serial) {
    ; // wait for serial port to connect. Needed for native USB port only
  }
  Serial.println(F("test!"));

  // attempt to connect to Wifi network:
  Serial.print("Attempting to connect to WPA SSID: ");
  Serial.println(ssid);
  while (WiFi.begin(ssid, pass) != WL_CONNECTED) {
    // failed, retry
    Serial.print(".");
    delay(5000);
  }

  Serial.println("You're connected to the network");
  Serial.println();


  Serial.print("Attempting to connect to the MQTT broker: ");
  Serial.println(broker);

  if (!mqttClient.connect(broker, port)) {
    Serial.print("MQTT connection failed! Error code = ");
    Serial.println(mqttClient.connectError());

    while (1);
  }

  Serial.println("You're connected to the MQTT broker!");
  Serial.println();

  // set the message receive callback
  mqttClient.onMessage(onMqttMessage);

  Serial.print("Subscribing to topic: ");
  Serial.println(inTopic);
  Serial.println();

  // subscribe to a topic
  // the second parameter set's the QoS of the subscription,
  // the the library supports subscribing at QoS 0, 1, or 2
  int subscribeQos = 1;

  mqttClient.subscribe(inTopic, subscribeQos);

  // topics can be unsubscribed using:
  // mqttClient.unsubscribe(inTopic);

  Serial.print("Waiting for messages on topic: ");
  Serial.println(inTopic);
  Serial.println();

  Serial.print("Subscribing to topic: ");
  Serial.println(inTopic2);
  Serial.println();

  // subscribe to a second topic
  // the second parameter set's the QoS of the subscription

  mqttClient.subscribe(inTopic2, subscribeQos);

  // topics can be unsubscribed using:
  // mqttClient.unsubscribe(inTopic2);

  Serial.print("Waiting for messages on topic: ");
  Serial.println(inTopic2);
  Serial.println();

   Serial.print("Subscribing to topic: ");
  Serial.println(inTopic2);
  Serial.println();

  // subscribe to a third topic
  // the second parameter set's the QoS of the subscription

  mqttClient.subscribe(inTopic3, subscribeQos);

  // topics can be unsubscribed using:
  // mqttClient.unsubscribe(inTopic3);

  Serial.print("Waiting for messages on topic: ");
  Serial.println(inTopic3);
  Serial.println();
}

void loop() {
 maptemp=map(temp,15,50,0,255);
 uint32_t tempc = pixels.Color(maptemp,0,255-maptemp);
 pixels.fill(tempc,0,12 );
 pixels.show();

  maphumidity=map(hum,0,100,0,255);
 uint32_t humc = pixels.Color(255-maphumidity ,maphumidity,255-maphumidity);
 pixels.fill(humc,13,12);
 pixels.show();

  //Reading sensor information
  value = analogRead(levelPin);          //Read and save analog value from potentiometer
  String l = String(value);
  //controlling RGB LED - This is for common positive RGBs. For common (-), remove the map function and just keep r,b,g as is.
  //temp and humidity
    float h = 0;
    String hh = String(h);
  // Read temperature as Celsius (the default)
 float t = 0;
 String tt = String(t);

  // call poll() regularly to allow the library to receive MQTT messages and
  // send MQTT keep alives which avoids being disconnected by the broker
  mqttClient.poll();

  // avoid having delays in loop, we'll use the strategy from BlinkWithoutDelay
  // see: File -> Examples -> 02.Digital -> BlinkWithoutDelay for more info
  unsigned long currentMillis = millis();

  if (currentMillis - previousMillis >= interval) {
    // save the last time a message was sent
    previousMillis = currentMillis;

    String payload;

    payload += "hello world!";
    payload += " ";
    payload += count;

    Serial.print("Sending message to topic: ");
    Serial.println(outTopic);
//    Serial.println(tt);

    // send message, the Print interface can be used to set the message contents
    // in this case we know the size ahead of time, so the message payload can be streamed

    bool retained = false;
    int qos = 1;
    bool dup = false;

    mqttClient.beginMessage(outTopic, tt.length(), retained, qos, dup);
    mqttClient.print(tt);
    mqttClient.endMessage();

    Serial.print("Sending message to topic: ");
    Serial.println(outTopic2);
    Serial.println(l);

    mqttClient.beginMessage(outTopic2, l.length(), retained, qos, dup);
    mqttClient.print(l);
    mqttClient.endMessage();
    Serial.println();

    Serial.print("Sending message to topic: ");
    Serial.println(outTopic3);
//    Serial.println(hh);

    mqttClient.beginMessage(outTopic3, hh.length(), retained, qos, dup);
    mqttClient.print(hh);
    mqttClient.endMessage();
    Serial.println();

    count++;
  }
}

void onMqttMessage(int messageSize) {
  // we received a message, print out the topic and contents
  Serial.print("Received a message with topic '");
  Serial.print(mqttClient.messageTopic());
  Serial.print("', duplicate = ");
  Serial.print(mqttClient.messageDup() ? "true" : "false");
  Serial.print(", QoS = ");
  Serial.print(mqttClient.messageQoS());
  Serial.print(", retained = ");
  Serial.print(mqttClient.messageRetain() ? "true" : "false");
  Serial.print("', length ");
  Serial.print(messageSize);
  Serial.println(" bytes:");
  String test= mqttClient.messageTopic();
  Serial.println(test);
  char message[messageSize];

    // use the Stream interface to print the contents
    while (mqttClient.available()) {
      //Serial.print((char)mqttClient.read());
      for (int i = 0; i < messageSize; i++)
      {
        message[i]=(char)mqttClient.read();
      }
    }
    Serial.println(message);
    n = atoi(message);
    Serial.println(n);
     String topic1 = String(inTopic);
     String topic2 = String(inTopic2);
     String topic3 = String(inTopic3);
     Serial.println(topic1);
     Serial.println(topic2);
     Serial.println(topic3);
    if ( test == topic1){
      temp = n;
      Serial.println("temperature value saved");
    }
  else if (test == topic2) {
    hum = n;
        Serial.println("humidity value saved");
  }
  else if (test == topic3) {
    lig = n;
       Serial.println("light value saved");
  }
}
Original code file download link
In this final code, we set the first 12 leds to change colors according to temperature readings and the other 12 leds to change colors according to humidity readings. When we uploaded this code, we were getting white color for temperature and purple color for humidity. After moving to another room, we were getting a pink color for both temperature and humidity.
Hero shots
Materials
| Qty | Description |
|---|---|
| 1 | MDF (Medium Density Fibreboard) |
| 1 | USB Cable |
| 1 | MKR Wifi 1010 Microcontroller |
| 1 | LED Strip |
Future improvements
We only had 5 days to work on this project, and due to the short period of time, we were not able to work more with LEDs. The future improvement will be working on the mapping of colors more carefully. Also, all the LEDs were blinking at the same time. The future improvement could also be to make them blink at different times (different times for temperature and different times for humidity) and to use only two colors for temperature and two colors for humidity. For example, for temperature, red color for higher 25 values and the blue color for lower 25 values, and also for the humidity, green color for higher 50 values and yellow color for lower 50 values.
One future improvement could also be to take more and nicer pics and videos of the final code working :(
Acknowledgment
I would like to thank my supervisor, Dr. Salman, for giving us the idea of this project and for guiding us through this project and throughout our industrial training and fab academy course. A special thanks to our instructor, Duaa; without her help and support, we would not have been able to finish this project in such a short period of time. I would also like to thank the other Fab academy instructors, Abdullah and Abdul Ghafoor, my colleague and team member, Sikander, and my colleague Islam for helping me with the CNC design and cutting.
Useful links
- MQTT
- Arduino ArduinoMqttClient library
- WiFiNINA library
- How to send and receive data in Arduino over mqtt?
- Node-RED
- Adafruit NeoPixel library
- What is the map function?