Final Project
This week I worked on defining my final project idea and started to getting used to the documentation process.
BRIEF
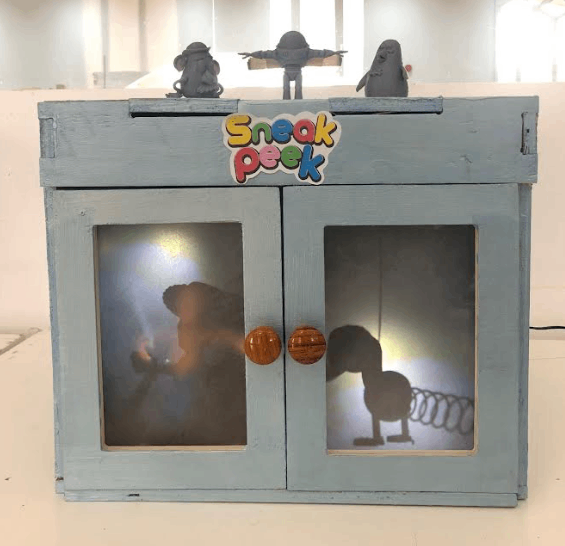
Have a sneak peek at our project!
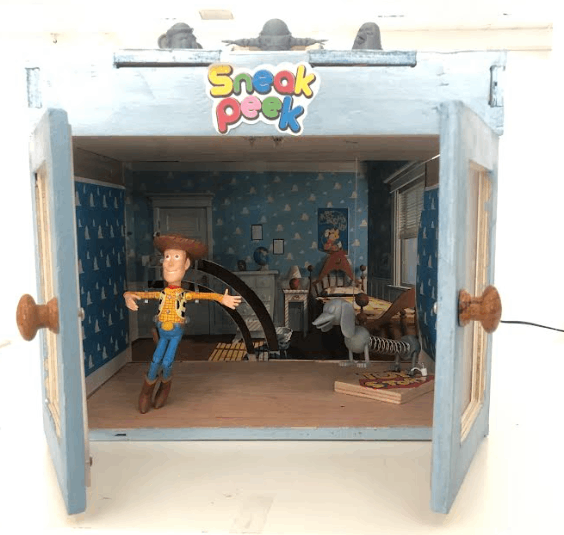
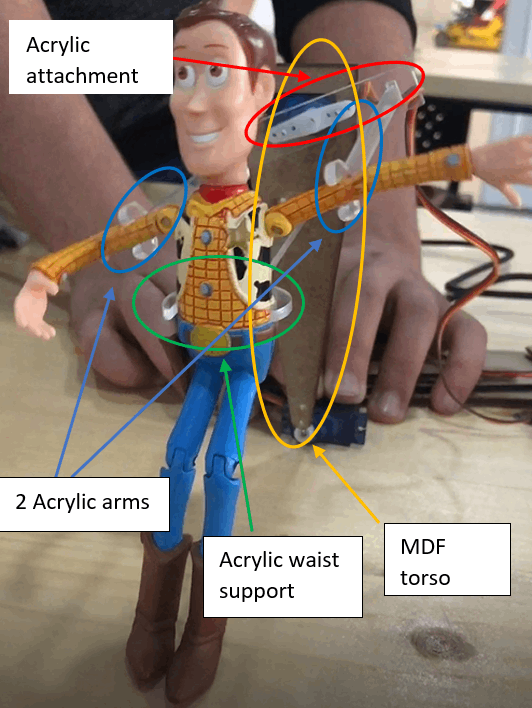
The project idea was inspired by the movie Toy Story (which I am sure you are familiar with) where the toys move and talk when no one sees them and they will act all dead when they feel someone is coming to them. A lot of characters are there in this movie. But the lights were spotted on those two funny characters. Those two characters were used in our project: Woody and Slinky. 1

The project was a teamwork of my colleague and I. this is why you will not find the whole project just in this page. Even the introduction is not complete in here! You have to look at her website too in order for you to have full understanding of how this project was made. And of course, many thanks to FabLab members who dedicated a bucketful of time just for us to succeed in our projects and this course. With that being said, let us see how this project was made from my side.
COMPUTER AIDED DESIGN
Woody
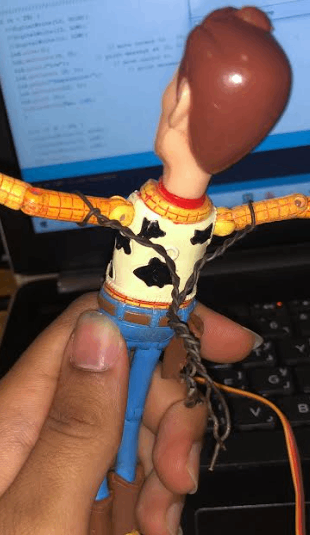
After a lot of searches, only one toy from the toy story was found in one of the malls with reasonable price which is the character woody. The toy had pin joints on the shoulders, elbows, legs, and knees. Below are pictures illustrating pin joints. 2 -3


At first, it was thought to move the toy as a marionette however, the toy was light weight and the joints were tight with considerable amount of friction. We tried to loosen them using a penetrating oil (WD-40) but it did not do much.

So, instead of using strings such in marionettes, rigid materials were considered to make the toy move with circular motion. The first rigid material used was metal wires in which it was bent, twisted, and then connected to Woody’s arms and a servo motor(PIC)(VID-2). 4
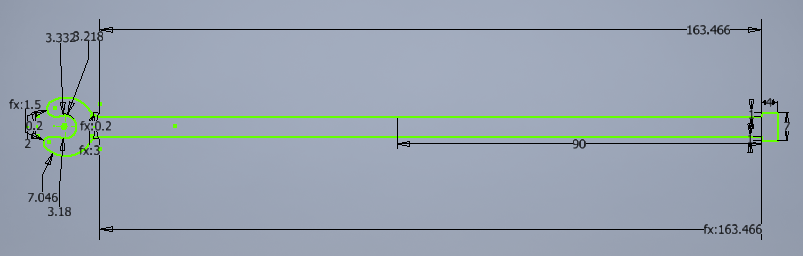
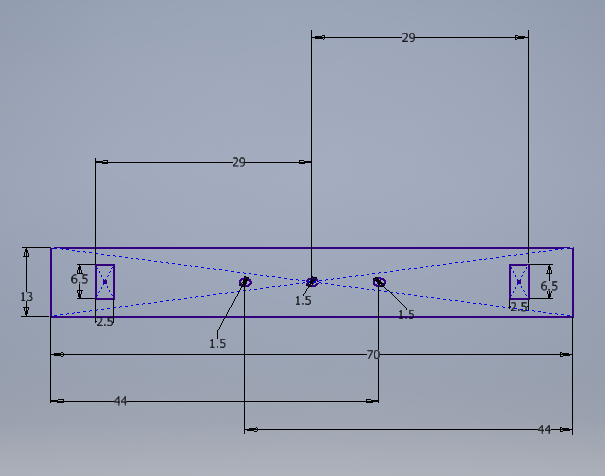
Using this method one servo was used to move both hands thus simplifying the design. Both hands moved well but the metal wires did not make a tight grip around Woody’s arms. The wires were then replaced with another rigid material which was acrylic sheets. After taking the dimensions of Woody’s arms, an arm was designed via Autodesk Inventor CAD software. Two arms were needed to control both arms of Woody. 5
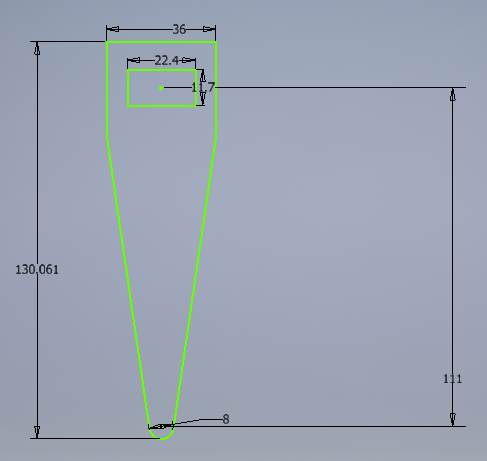
Also, Woody needed a support at the waist because Woody’s arm joints had a lot of friction that when the servo moves the arms, the whole body also moves.6

Another piece (we can call it an attachment) was designed to attach the two designed arms with the servo motor. 7
Woody required another servo in order for him to fall. So, two servos needed to be connected to Woody. But, since the servos were to be hidden and not attached directly to Woody, a structure was designed to act as the hidden torso for Woody. It has a hole for the servo to be connected to the arms and the waist acrylic support. 8
You see that most sketches are green (they need to be constrained more). The reason behind this that we had to make many alterations to get to the final design. We had to measure, design, and then test. If the test fails, the process repeats. The picture below shows the assembly of each part then Woody’s motion was tested and it successfully worked. 9 (VID-3)
Slinky
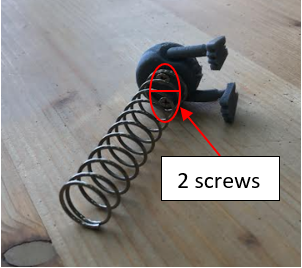
First, Slinky was 3D printed (Check my colleague’s website). A spring was used to connect both body parts of Slinky using two screws on each body part. Below is how did we connect the spring to the back of Slinky. The frontal part was connected the same way.10 11

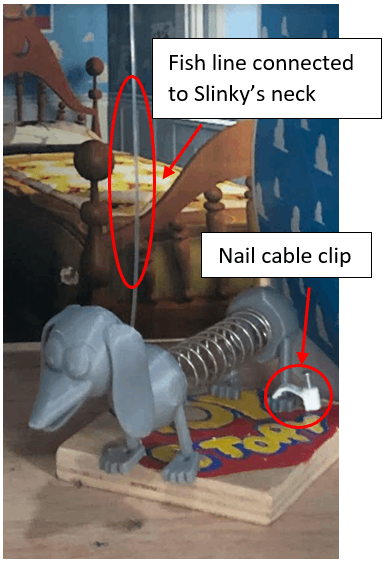
Slinky’s motion was rectilinear. The rotational motion of servo motor was converted by using a transparent string (fish line). We only wanted Slinky to move up and down like a dog jumping with his frontal paws so we also had to fix the back part of Slinky. We clipped one rear leg with a small nail cable clip. 12
COMPUTER CONTROLLED CUTTING (Laser Beam Cutting)
The two arms and attachment to connect them with the servo motor were cut with laser beam cutting machine and the material used was 3mm thickness transparent acrylic sheet. The waist support was also made using 3mm transparent acrylic sheet cut by laser beam machine. Transparent acrylic sheet was used to minimize their reflected shadow and to make Woody as if he moving by himself. But because of light refraction the shadow of the supports will still be visible to some extent. The hidden torso design for Woody was cut using the laser cutter but with MDF (Medium-Density Fiberboard) material since this part will be hidden. As seen below, the printed parts were not success from the start. The process was iterative as we had to test the joints and their lengths too. The joints were tested with MDF first and then acrylic sheets were used. 13
INPUT & OUTPUT DEVICES
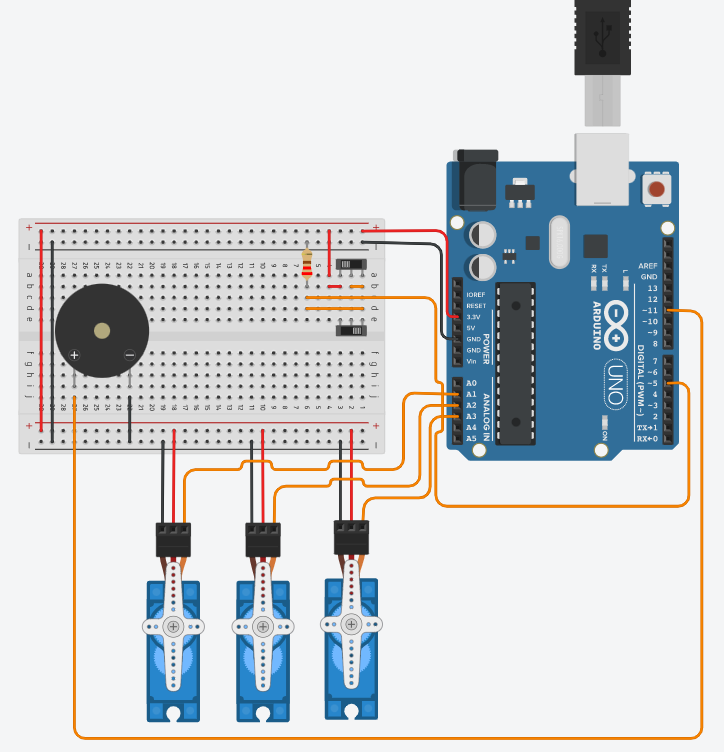
The project is simple. Moving toys in a box having its shadows projected on semi-transparent doors and when the door is opened, the toys stop moving. Maybe some background music would make it a cut above. The doors must be connected to kind of switches so that when they are opened, the switches will be triggered, hence stopping the motion of the toys. From this you can conclude the necessary electronic devices for this project: 1- Servo motors to move the toys. 2- LED lights for the shadow. 3- On/Off switch for the LED lights. 4- Limit switches to change state of motion of the toys. 5- Micro controller to program the servos and the switches. 6- Piezo buzzer for music. 7- 12 Volts power adaptor for the LED lights. Below is picture showing the connection of the electronic devices using Tinkercad. Arduino Uno r3 was used since Tinkercad does not have Adafruit microcontrollers. However, the same connection and same pins will be used for the Adafruit which will be used in this project. 14
After validating the connection and determining the pins to be used, a Vero board was soldered to be used in the project and connections were made. 15

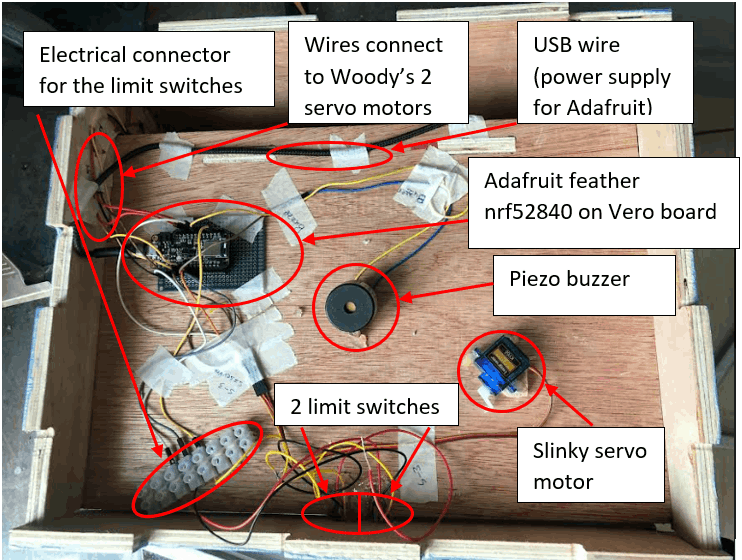
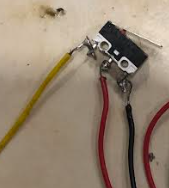
Below is a picture showing the places of electronic devices at the upper control box. Since the 2 limit switches were to be connected to the same pin, they need a special connection before connecting them to the Adafruit. This is why an electrical connector was utilized. 16
You can also see how the limit switches were soldered below. 17
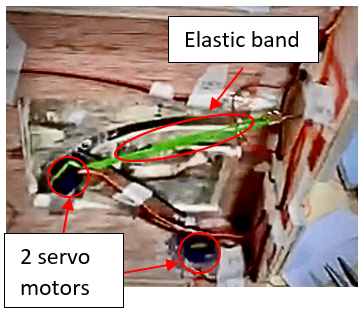
This picture below shows how we attached the two servo motors and the torso together. You can see that we added that green elastic band. This is because we made the acrylic arms longer. So, the lower servo that controls the falling and standing of Woody could not handle its Woody’s weight and its supports and attachments combined. Meaning, the servo motor can let Woody fall on the ground with the help of gravity but also, because of gravity, it could not lift it up back to its standing pose. So, the elastic band helps in lifting Woody back up while the gravity helps him fall down.18
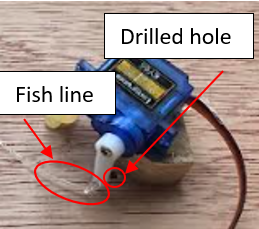
You can see in the picture below Slinky’s servo motor at the upper control box. A hole was drilled for the fish line to pass through and then to be connected to Slinky’s body.19
Note that the LED lights were supplied via a 12 Volts power adaptor just like shown in picture below and not the microcontroller because the Adafruit feather nrf52840 can give 3.3 Volts maximum which is not enough to power the LED lights. 20

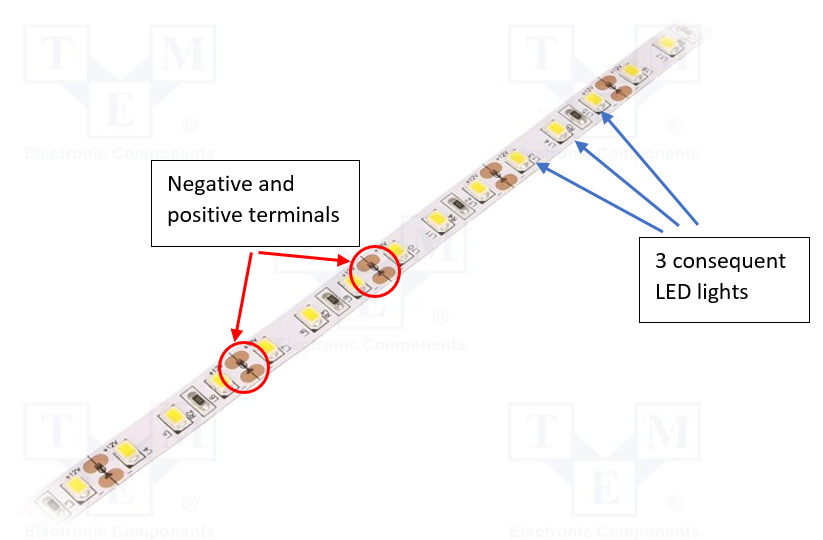
The 12 Volts power adaptor was cut and then 2 stripes of LED lights were connected to it (each stripe had 3 LED lights because you can only cut the LED strips in multiples of triplets because it only had positive and negative terminals (which we need to make our connection) after every 3 LED lights as you can see below. 21
We only needed one LED light for each Woody and Slinky so the rest LED lights were covered with aluminum foil tape. Finally, the LED lights and the plug were connected to an On/Off switch. 22-23


EMBEDDED PROGRAMMING
Everything had to be programmed with the microcontroller except for the LED lights. The LED lights just required a power source and an On/Off switch. To start with, our project had only two states, that is, when doors are closed, the toys must move and when either door is opened, the toys must stop moving. From this, we can conclude that the main statement will be used in programming is the if/else statement for a switch or a button (we used limit switch). So, we can say that when the switch state is HIGH (door is closed), the toys will be in moving state and when the switch state LOW (door is closed), the toys will be in another state (not moving). However, with Woody, the states of motion are as follow: 1- Closed doors: Woody’s arms shall move and he should be standing. 2- Any door is open: Woody’s arms will stop moving and he will fall on the side. So, the servo controlling Woody’s arms can have the same code of Sweep. The Sweep code is used to move the RC servo motor back and forth across certain angle.( CODE)
{
  for (pos = 0; pos <= 90; pos += 4) { // goes from 0 degrees to 90 degrees
    // in steps of 1 degree
    servo1.write(pos);              // tell servo to go to position in variable 'pos'

    delay(15);                       // waits 15ms for the servo to reach the position
  }
  for (pos = 90; pos >= 0; pos -= 4) { // goes from 90 degrees to 0 degrees
    servo1.write(pos);              // tell servo to go to position in variable 'pos'

    delay(15);                       // waits 15ms for the servo to reach the position
  }
The servo that will control the standing and falling state of Woody will be a simple a change in the angle of the servo. One angle will be the angle in which he will be in ‘standing’ state and another for which he will be in ‘falling on the ground’ state.(CODE)
servo2.write(130);         // Standing pose of Woody
  servo2.write(-50);        // Falling pose of Woody
As for Slinky: 1- Closed doors: He will move up and down. 2-Any door is open: He will stop moving but he should not be dangling up in the air. The servo that will control the motion of Slinky can also have the code of Sweep(CODE).
for (pos = 0; pos <= 180; pos += 10) { // goes from 0 degrees to 180 degrees
    // in steps of 1 degree
  servo3.write(pos);              // tell servo to go to position in variable 'pos'

   delay(15);                       // waits 15ms for the servo to reach the position
 }
  for (pos = 180; pos >= 0; pos -= 10) { // goes from 180 degrees to 0 degrees
   servo3.write(pos);              // tell servo to go to position in variable 'pos'

   delay(15); }                      // waits 15ms for the servo to reach the position
However, Slinky needs one more code so that he does not float on air when a door is opened. Meaning, when the door is opened, Slinky should be standing on the floor. The code for this is simply:(CODE)
servo3.write(180); // Slinky is standing on the ground
Finally, a music code was taken from a website.
Now we can combine all codes together(CODE).
#include <Servo.h>
//////////////////////Start music

/*  RickRollCode

    AUTHOR: Rowan Packard
    rowanpackard@gmail.com

    DISCLAIMER: The song "Never Gonna Give You Up" by Rick Astley
    is not the creative property of the author. This code simply
    plays a Piezo buzzer rendition of the song.
*/
#include<SPI.h>
#define  a3f    208     // 208 Hz
#define  b3f    233     // 233 Hz
#define  b3     247     // 247 Hz
#define  c4     261     // 261 Hz MIDDLE C
#define  c4s    277     // 277 Hz
#define  e4f    311     // 311 Hz
#define  f4     349     // 349 Hz
#define  a4f    415     // 415 Hz
#define  b4f    466     // 466 Hz
#define  b4     493     // 493 Hz
#define  c5     523     // 523 Hz
#define  c5s    554     // 554 Hz
#define  e5f    622     // 622 Hz
#define  f5     698     // 698 Hz
#define  f5s    740     // 740 Hz
#define  a5f    831     // 831 Hz

#define rest    -1

int piezo = 11; // Connect your piezo buzzer to this pin or change it to match your circuit!
int led = LED_BUILTIN;

volatile int beatlength = 100; // determines tempo
float beatseparationconstant = 0.3;

int threshold;

int a; // part index
int b; // song index
int c; // lyric index

boolean flag;

// Parts 1 and 2 (Intro)

int song1_intro_melody[] =
{c5s, e5f, e5f, f5, a5f, f5s, f5, e5f, c5s, e5f, rest, a4f, a4f};

int song1_intro_rhythmn[] =
{6, 10, 6, 6, 1, 1, 1, 1, 6, 10, 4, 2, 10};

// Parts 3 or 5 (Verse 1)

int song1_verse1_melody[] =
{ rest, c4s, c4s, c4s, c4s, e4f, rest, c4, b3f, a3f,
  rest, b3f, b3f, c4, c4s, a3f, a4f, a4f, e4f,
  rest, b3f, b3f, c4, c4s, b3f, c4s, e4f, rest, c4, b3f, b3f, a3f,
  rest, b3f, b3f, c4, c4s, a3f, a3f, e4f, e4f, e4f, f4, e4f,
  c4s, e4f, f4, c4s, e4f, e4f, e4f, f4, e4f, a3f,
  rest, b3f, c4, c4s, a3f, rest, e4f, f4, e4f
};

int song1_verse1_rhythmn[] =
{ 2, 1, 1, 1, 1, 2, 1, 1, 1, 5,
  1, 1, 1, 1, 3, 1, 2, 1, 5,
  1, 1, 1, 1, 1, 1, 1, 2, 1, 1, 1, 1, 3,
  1, 1, 1, 1, 2, 1, 1, 1, 1, 1, 1, 4,
  5, 1, 1, 1, 1, 1, 1, 1, 2, 2,
  2, 1, 1, 1, 3, 1, 1, 1, 3
};

const char* lyrics_verse1[] =
{ "We're ", "no ", "strangers ", "", "to ", "love ", "", "\r\n",
  "You ", "know ", "the ", "rules ", "and ", "so ", "do ", "I\r\n",
  "A ", "full ", "commitment's ", "", "", "what ", "I'm ", "thinking ", "", "of", "\r\n",
  "You ", "wouldn't ", "", "get ", "this ", "from ", "any ", "", "other ", "", "guy\r\n",
  "I ", "just ", "wanna ", "", "tell ", "you ", "how ", "I'm ", "feeling", "\r\n",
  "Gotta ", "", "make ", "you ", "understand", "", "\r\n"
};

// Parts 4 or 6 (Chorus)

int song1_chorus_melody[] =
{ b4f, b4f, a4f, a4f,
  f5, f5, e5f, b4f, b4f, a4f, a4f, e5f, e5f, c5s, c5, b4f,
  c5s, c5s, c5s, c5s,
  c5s, e5f, c5, b4f, a4f, a4f, a4f, e5f, c5s,
  b4f, b4f, a4f, a4f,
  f5, f5, e5f, b4f, b4f, a4f, a4f, a5f, c5, c5s, c5, b4f,
  c5s, c5s, c5s, c5s,
  c5s, e5f, c5, b4f, a4f, rest, a4f, e5f, c5s, rest
};

int song1_chorus_rhythmn[] =
{ 1, 1, 1, 1,
  3, 3, 6, 1, 1, 1, 1, 3, 3, 3, 1, 2,
  1, 1, 1, 1,
  3, 3, 3, 1, 2, 2, 2, 4, 8,
  1, 1, 1, 1,
  3, 3, 6, 1, 1, 1, 1, 3, 3, 3, 1, 2,
  1, 1, 1, 1,
  3, 3, 3, 1, 2, 2, 2, 4, 8, 4
};

const char* lyrics_chorus[] =
{ "Never ", "", "gonna ", "", "give ", "you ", "up\r\n",
  "Never ", "", "gonna ", "", "let ", "you ", "down", "", "\r\n",
  "Never ", "", "gonna ", "", "run ", "around ", "", "", "", "and ", "desert ", "", "you\r\n",
  "Never ", "", "gonna ", "", "make ", "you ", "cry\r\n",
  "Never ", "", "gonna ", "", "say ", "goodbye ", "", "", "\r\n",
  "Never ", "", "gonna ", "", "tell ", "a ", "lie ", "", "", "and ", "hurt ", "you\r\n"
};


/////////////////////End music

Servo servo1;  // create servo object to control a servo
// this servo is for Woody's arms
// twelve servo objects can be created on most boards

Servo servo2; // this servo is for falling and standing poses for Woody

Servo servo3; // SLINKY servo

int pos = 0;    // variable to store the servo position

//////////LiMit SWITCH//////////

const int buttonPin1 = 5;     // the number of the pushbutton pin

int buttonState1 = 0;         // variable for reading the pushbutton status

void setup() {
  servo1.attach(A1);  // attaches the servo on pin A1 to the servo object
  servo2.attach(A2);  // attaches the servo on pin A2 to the servo object
  servo3.attach(A3);  // attaches the servo on pin A3 to the servo object
//////////Start music Void setup
  pinMode(piezo, OUTPUT);
  pinMode(led, OUTPUT);

  digitalWrite(led, LOW);
  Serial.begin(9600);
  flag = true;
  a = 4;
  b = 0;
  c = 0;
///////////End music Void setup
  pinMode(buttonPin1, INPUT);

  Serial.begin(9600);
}

void loop() {


  ///////////////////Start music Void loop

 // play next step in song
  if (flag == true) {
    play();
  }

  buttonState1 = digitalRead(buttonPin1);
  servo2.write(130);
  Serial.println(buttonState1);


///////////////////////// WOODY
  if (buttonState1 == HIGH) {
  for (pos = 0; pos <= 90; pos += 4) { // goes from 0 degrees to 90 degrees
    // in steps of 1 degree
    servo1.write(pos);              // tell servo to go to position in variable 'pos'

    delay(15);                       // waits 15ms for the servo to reach the position
  }
  for (pos = 90; pos >= 0; pos -= 4) { // goes from 90 degrees to 0 degrees
    servo1.write(pos);              // tell servo to go to position in variable 'pos'

    delay(15);                       // waits 15ms for the servo to reach the position
  }

//////////////////////SLINKY
  for (pos = 0; pos <= 180; pos += 10) { // goes from 0 degrees to 180 degrees
    // in steps of 1 degree
  servo3.write(pos);              // tell servo to go to position in variable 'pos'

   delay(15);                       // waits 15ms for the servo to reach the position
 }
  for (pos = 180; pos >= 0; pos -= 10) { // goes from 180 degrees to 0 degrees
   servo3.write(pos);              // tell servo to go to position in variable 'pos'

   delay(15);                       // waits 15ms for the servo to reach the position

    ///////////////////////////
 }
  }
 else if (buttonState1 == LOW)
  servo2.write(-50); // Woody falls when door is opened
  servo3.write(180); // Slinky stays on the ground when door is opened
  delay (1);
  }


 ////////////////Start music
 void play(){
  int notelength;
  if (a == 1 || a == 2) {
    // intro
    notelength = beatlength * song1_intro_rhythmn[b];
    if (song1_intro_melody[b] > 0) {
      digitalWrite(led, HIGH);
      tone(piezo, song1_intro_melody[b], notelength);
    }
    b++;
    if (b >= sizeof(song1_intro_melody) / sizeof(int)) {
      a++;
      b = 0;
      c = 0;
    }
  }
  else if (a == 3 || a == 5) {
    // verse
    notelength = beatlength * 2 * song1_verse1_rhythmn[b];
    if (song1_verse1_melody[b] > 0) {
      digitalWrite(led, HIGH);
      Serial.print(lyrics_verse1[c]);
      tone(piezo, song1_verse1_melody[b], notelength);
      c++;
    }
    b++;
    if (b >= sizeof(song1_verse1_melody) / sizeof(int)) {
      a++;
      b = 0;
      c = 0;
    }
  }
  else if (a == 4 || a == 6) {
    // chorus
    notelength = beatlength * song1_chorus_rhythmn[b];
    if (song1_chorus_melody[b] > 0) {
      digitalWrite(led, HIGH);
      Serial.print(lyrics_chorus[c]);
      tone(piezo, song1_chorus_melody[b], notelength);
      c++;
    }
    b++;
    if (b >= sizeof(song1_chorus_melody) / sizeof(int)) {
      Serial.println("");
      a++;
      b = 0;
      c = 0;
    }
  }
  delay(notelength);
  noTone(piezo);
  digitalWrite(led, LOW);
  delay(notelength * beatseparationconstant);
  if (a == 7) { // loop back around to beginning of song
    a = 1;
  }
  //////////////End music
}
3D PRINTING & SCANNING
This is part of the project was made and documented by my colleague Hafsa. Please check her website
LARGE FROMAT CNC (Computer Controlled Machining)
This part of the project was also madeand documented by my colleague Hafsa. Please check her website
MATERIALS
| Qty | Description | Price | Link | Notes |
|---|---|---|---|---|
| 1 | Plywood 12mm | 22.94 $ | Link | 0.469”x 23.75”x 47.75” |
| 1 | MDF board 3mm | 22.00 $ | Link | 300 * 300 * 3mm |
| 2 | servo motor | 7.49 $ | Link | |
| 1 | Acrylic 3mm | 10.95 $ | Link | 12”x12” 3mm thick |
| 1 | Piezo buzzer | 0.80 $ | Link | $0.80 / Count |
| 1 | Adafruit nrf52840 | 24.95 $ | Link | |
| 2 | Limit switch | 0.58 $ | Link | $0.58 / Count |
| 1 | 220 ohm resistor | 5.99 $ | Link | $0.60 /10 Items |
| 1 | Jumper wires | 6.79 $ | Link | $0.06 / Count |
| 1 | 12V adaptor | 6.99 $ | Link | |
| 1 | 12V LED | 12.77 $ | Link | $0.78 / Count |
| 1 | On/Off switch | 5.99 $ | Link | $1.20 / Count |
| 2 | Drawer knobs | 7.99 $ | Link | |
| 4 | Mini hinges | 6.43 $ | Link | $1.29 /10 Items |
PROBLEMS & CONCLUSION
Some of the problems that we had faced were:
• We discovered that one limit switch was not functioning well when we installed it. • We had to put the characters close to the door so that their shadow would fully appear. So, we had to make the acrylic arms and waist support taller for Woody. • The green elastic band to aid the servo motor was added because we made the acrylic parts taller. So, when actually tried to solve a problem, this problem’s solution caused another problem. • Some acrylic parts broke while installation. • We had to try some connections to figure what connection can function the way we wanted the 2 limit switches with the same pin. • Slinky’s leg broke and we had to glue it. • We replaced one servo motor because it had some ticking noise. • We had to place the torso which is connected to both servos of Woody accurately so that the attachment does not scratch the wall.
The reason I put the problems and conclusion together is that you need to know that while making the project, you will probably face a lot of issues and obstacles that you will have to overcome. The chances of making a perfect design and product from the start are extremely low. You always have to design, test, and then improve or even redesign in some cases. You also have to think of the simplest solution first because this reduces overall complexity of the product and saves time and time is money. The project might have completed the requirements but there is still room to improve it.
Hero Shots!!