FINAL PROJECT!
For the Final project, there are a number of ideas in my mind, but the ones I found interesting are explained below:
FINAL PROJECT: SNEAKPEAK!
Click to see the youtube video with the tune
IDEAS!!
For my Final project, there are some Ideas in my mind right now.
1- I want to design a rectangular box, that would showcase the TOY STORY characters in it. And the whole idea about it is that, these characters would be moving inside the box, but they wont be seen to others. The only way to see if they are moving or not, is the LCD screen with white sheet, that would show their shadows, of them moving. The concept here is the same as the animation movie: The characters move, when no one is looking at them, but they immediately stop moving when someone looks at them.
So, I thought of having touch sensors on the box’s door knobs, so that when someone sees their shadow of them moving in the box, they will try to open the box, but when they touch the door knob, and the box opens, the characters immediately stop moving.
2- Another idea that I’m thinking of right now, is something related to LED lights.
One, I’m thinking of making an LED cube lights, that will generate different patterns, depending on the number of buttons pushed.
Second, I’m thinking of making LED Digital Clock, with RGB colors, or different colors, that would show the weather, change brightness etc.etc.
Third, I’m thinking of making an infinity illusion box with LED.
3- I’m thinking of making a box, which would contain plants and depending on the light coming from sun, it wll get activated and would start watering the plants. It would be done by the help of servo motor with light sensors.
I still haven’t decided which idea I’m going to work on.
FINAL SELECTED IDEA!
I decided to go with my 1st idea, that is to make a toystory box. And my colleague Yusuf has also joined me, on working with this project. We are a team now! yayy!!
Questions for projects!
1- what will it do?
It’s going to be a fun project. The inspiration is from Toystory animation, and it will consist of a box, that will contain the toystory characters, that will move when no one is looking at them, but they will immediately stop when someone opens the door to take a sneak-peak.
2- who has done what beforehand?(Similar projects others have done before).
I saw a similar box video in Instagram, that represented this idea, and I thought of making this design, in the lab.
3- What will you design? (Which parts need to be designed)
A box. It will be designed using CNC machine, while the toys will be 3D printed using Prusa 3D printer.
4- what materials and components will be used?
Strings, hinges, toy characters, acrylic sheets, wood material for the box, Flash light, LED lights, Adafruit coding, servo motors, limit switch and it’s wires, wallpaper stickers for decorating the inside room moods etc. etc.
5- where will they come from?
1- Moveable Toys will be bought from shops, and some solid toys will be found online as 3D models that would be later on 3D printed in the lab.
2- Strings and hinges will either be brought from home, or if they are available in the lab, or bought in some shops.
3- Wood material for the box will come from the wood board in the lab, used in CNC machine purposes.
4- Acrylic sheet will come from the lab, which will be scratched, to make it look foggy, and let it show the shadows on the door screen.
5- Flashlight or LED will be take from lab.
6- Adafruit, servo motors and limit switch will be used in lab.
7- Wallpaper stickers will have online images, cut and printed from a printer shop outside.
8- Painting the box blue, because of the interior blue wallpapers of Andy’s room.
6- how much will they cost?
1- The toys will cost around 4-5 bd, as they arent found much in shops, and are expensive too.
2- The wallpapers will cost around 1-2 BD.
7- How will users interact with the project?
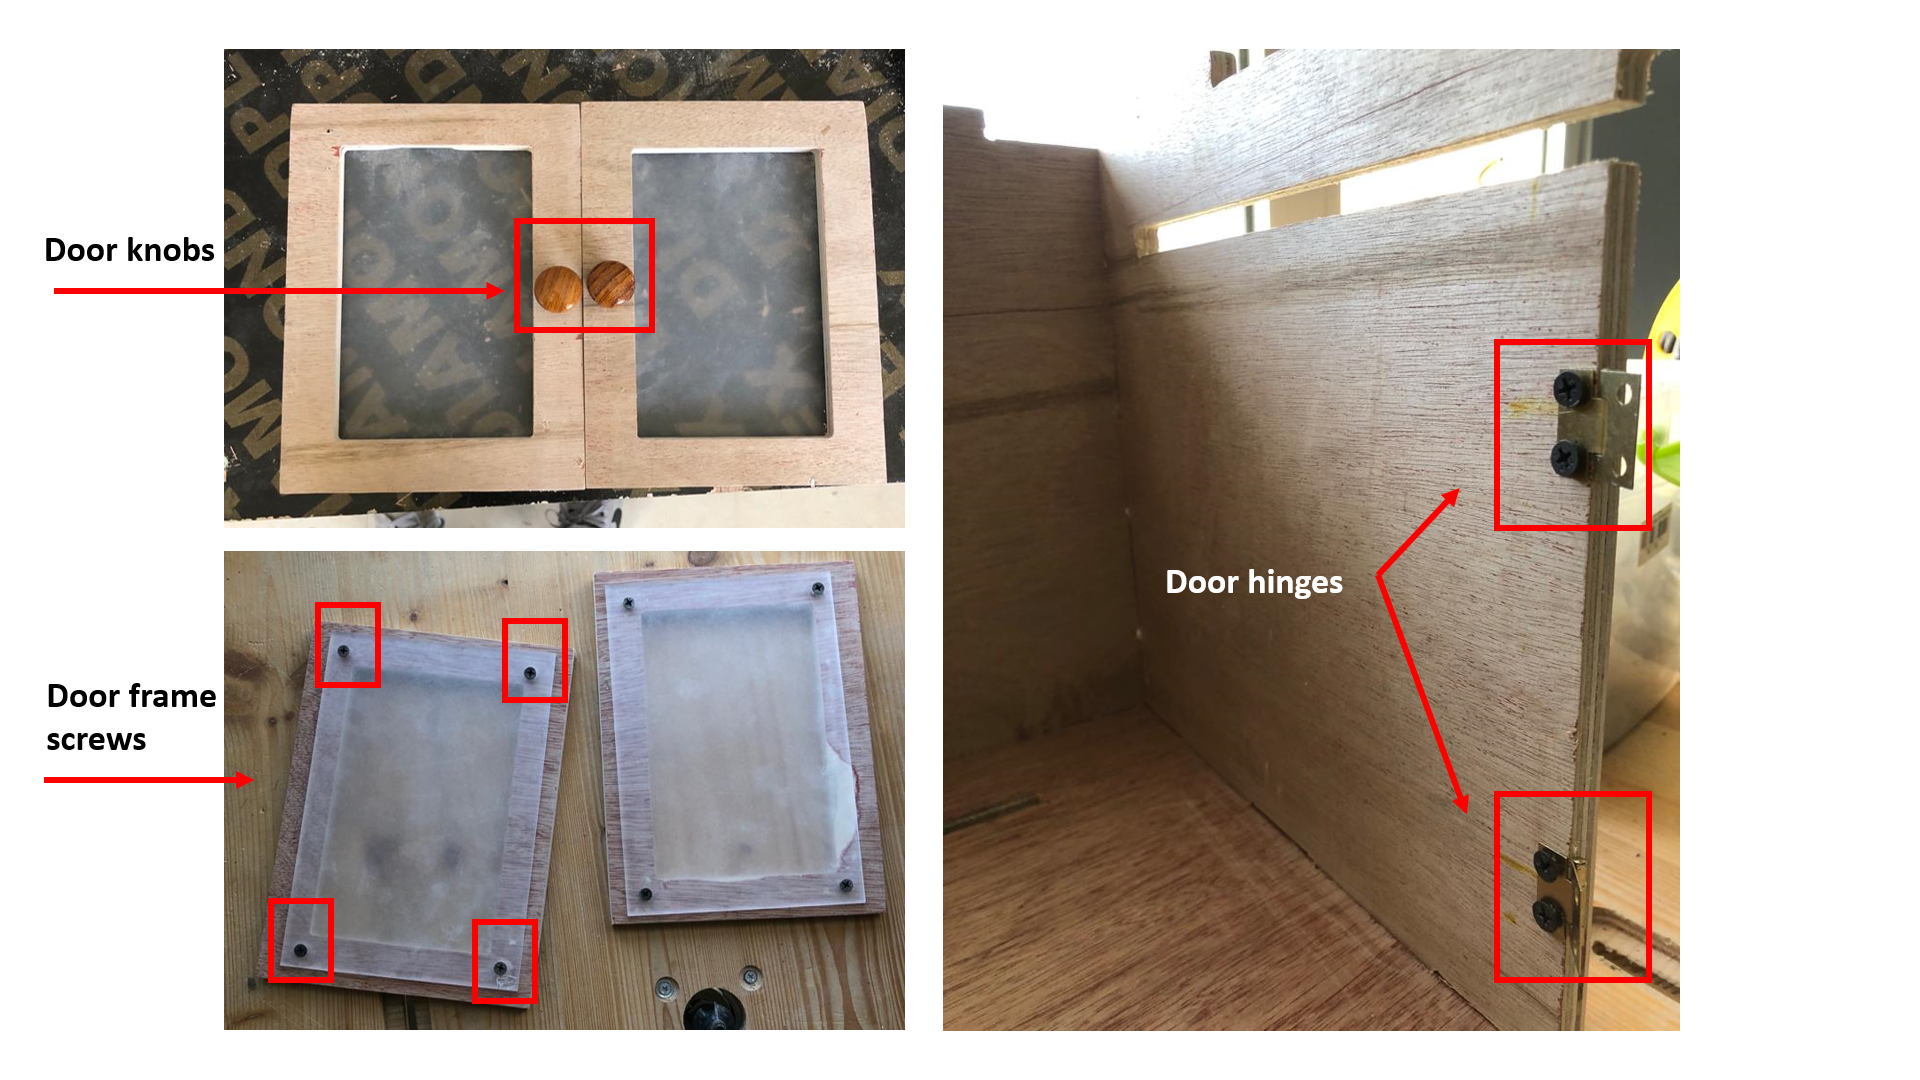
The box will have 2 door frames, with knobs. It will have a limit switch attached to it on the inside, and its purpose is to close off the wiring connection when someone opens the doors.
The toys will be moving inside the box, and their shadow will be seen from that acrylic sheet on the door frame. When someone gets curious to see how the toys are moving, they will touch the door knob and try to open the box. But as soon as the door is opened, the limit switch will signal the servo motors to stop working, and the toys would stop moving, giving u the impression that they weren’t moving at all.
8- what processes (machines in the lab) will be used?
CNC machine for box layout/ frame, Laser cutting machine for acylic sheets and joints, & 3D printer machine.
9- what questions need to be answered? (Unknowns for you)
1- How to make them move?
2- How many servo motors will be needed?
3- How to cast shadows on the acrylic sheet?
10- How will You determine if the project is a success?
The only 2 things that would determine the project’s success’ are:
1- When the toys move, and stop on opening and closing of the doors.
2- When their shadows will be casted on the door frame’s acrylic sheet.
Work Progress!!
Special thanks and a shoutout to our amazing instructors Haitham, dua, Mohammad, Abdullah, Abdulgafoor and everyone else for guiding us so well in our project. Haitham encouraged me to go with the idea of the toystory project that I had in mind, and I’m truly grateful to him for helping me and my teammate in the whole process of our project.
Below mentioned are the steps we took, in order to define and finalise our main project:
1. Designing the Box (Fusion 360 Software)
LARGE FROMAT CNC (Computer Controlled Machining):
In order to make the toys move, I envisioned a box, in which their movements could be detected, with the help of a sheet screen attached on the door frames. For this to work, I first sketched the desired dimensions in a sketch note, and later started designing the box in Fusion 360 software.
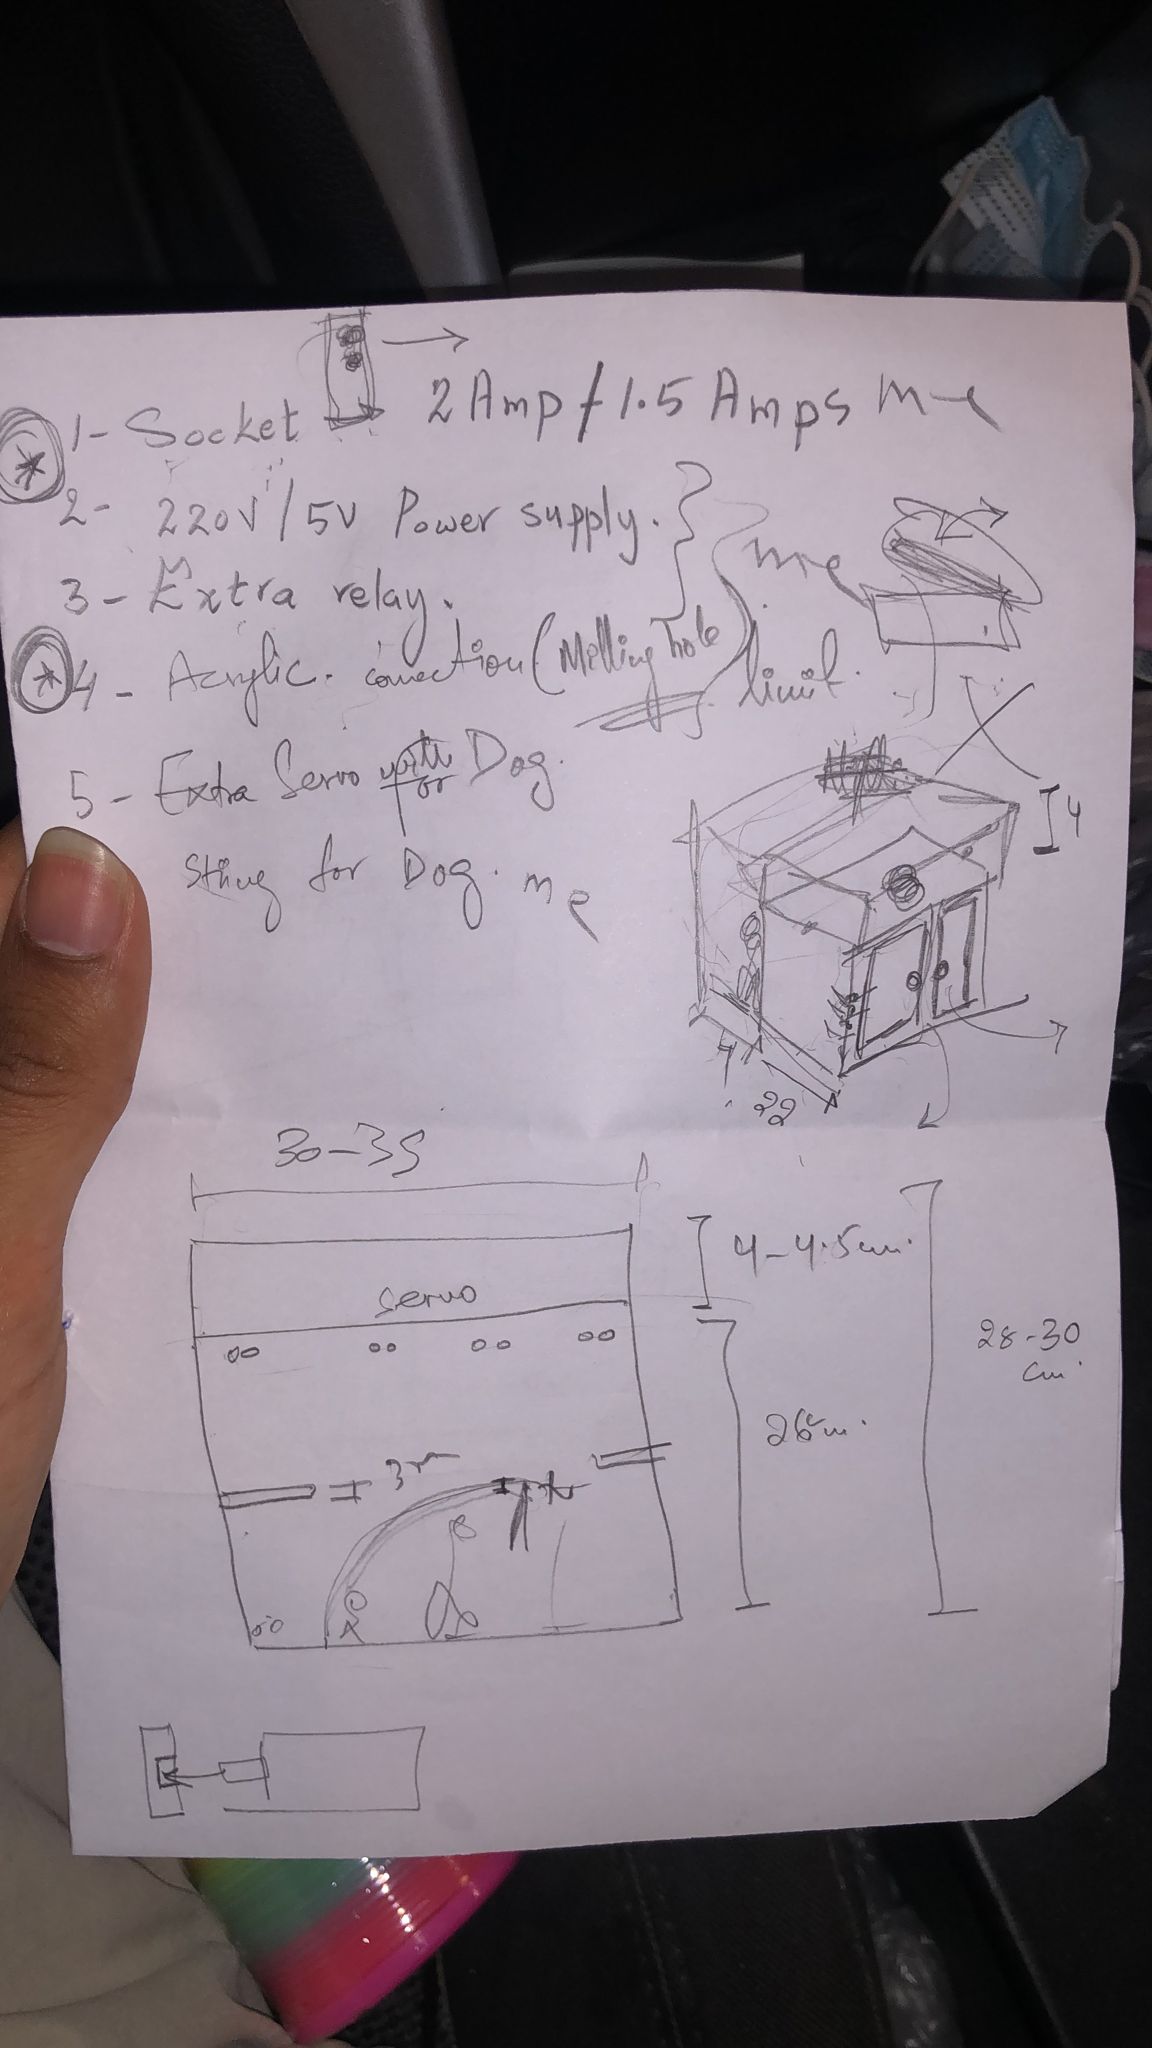
After finalising the dimensions of the box with my teammate yusif, the final dimensions were: 35 (l) x 30 (b) x 30 (h), with 4 meters gap given for the top and back shelf coverings of the toys, so the servo motors would get enough space to move in.
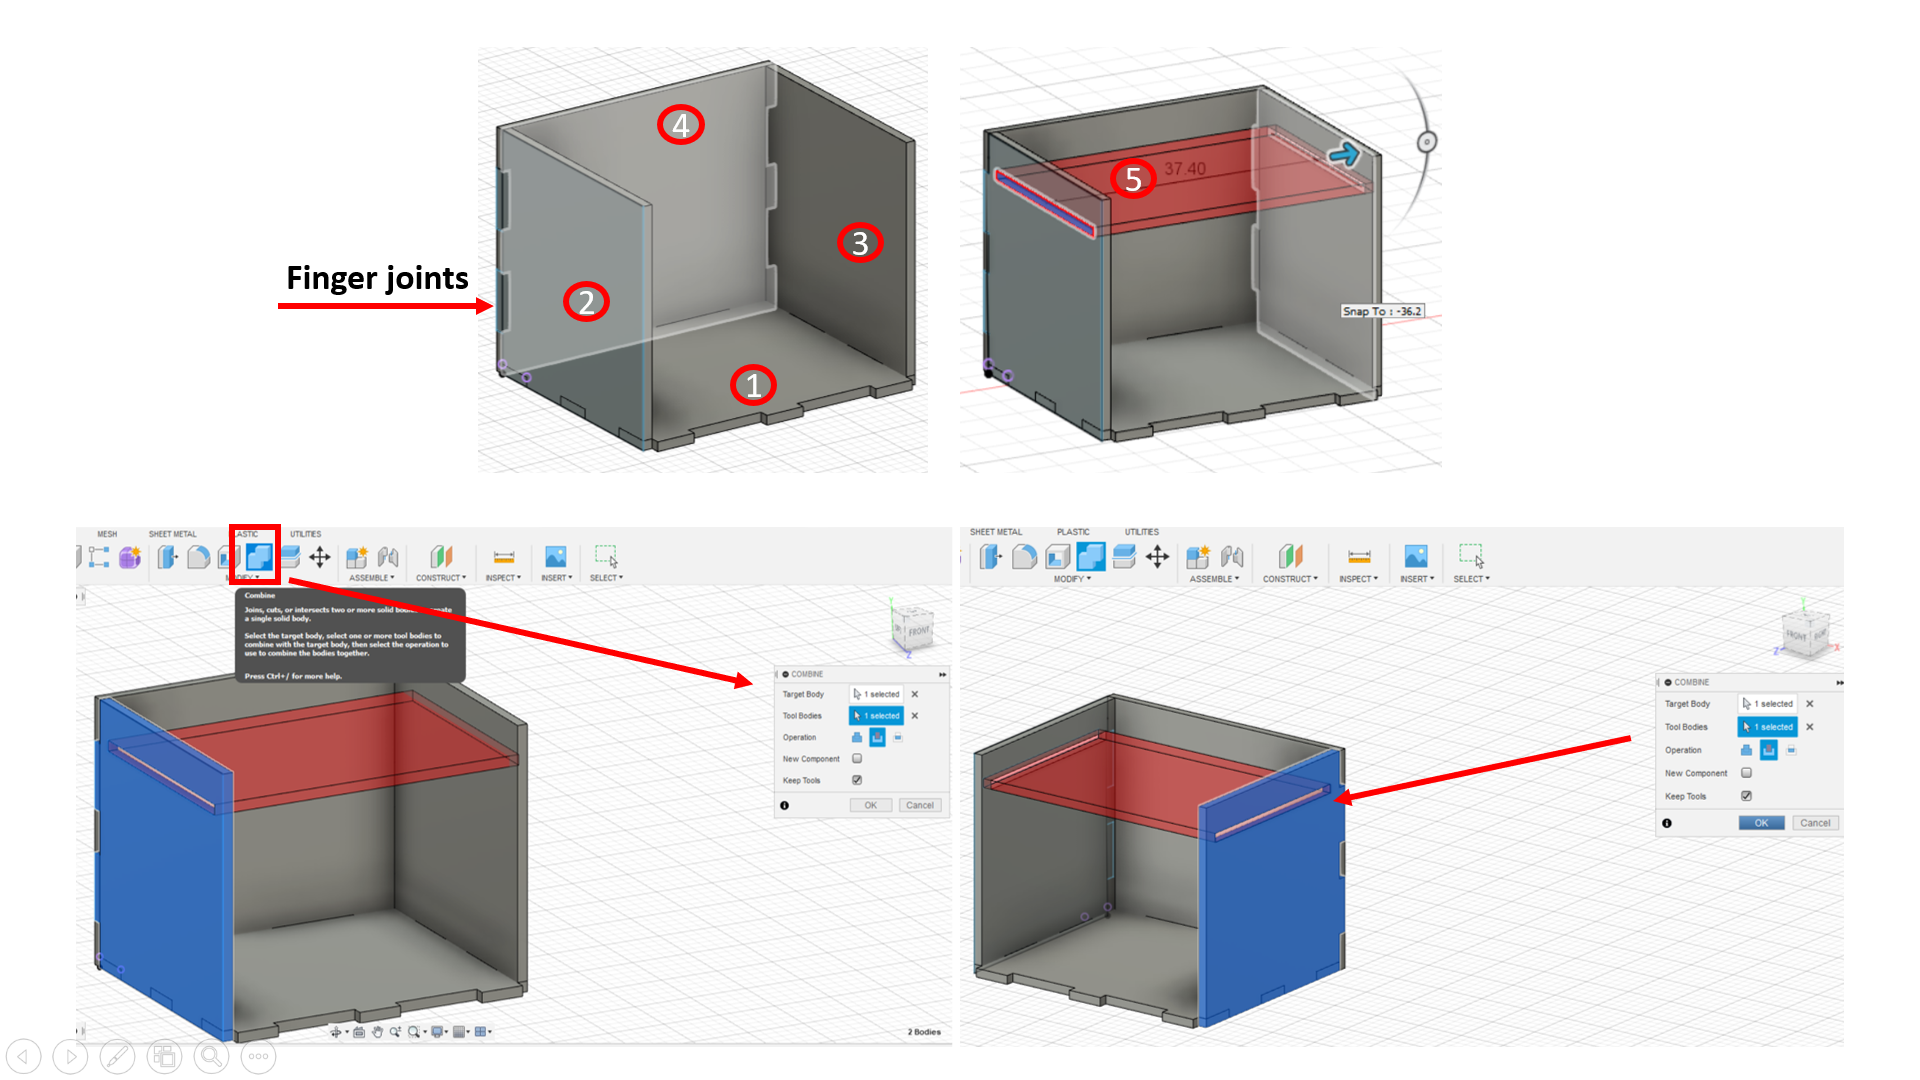
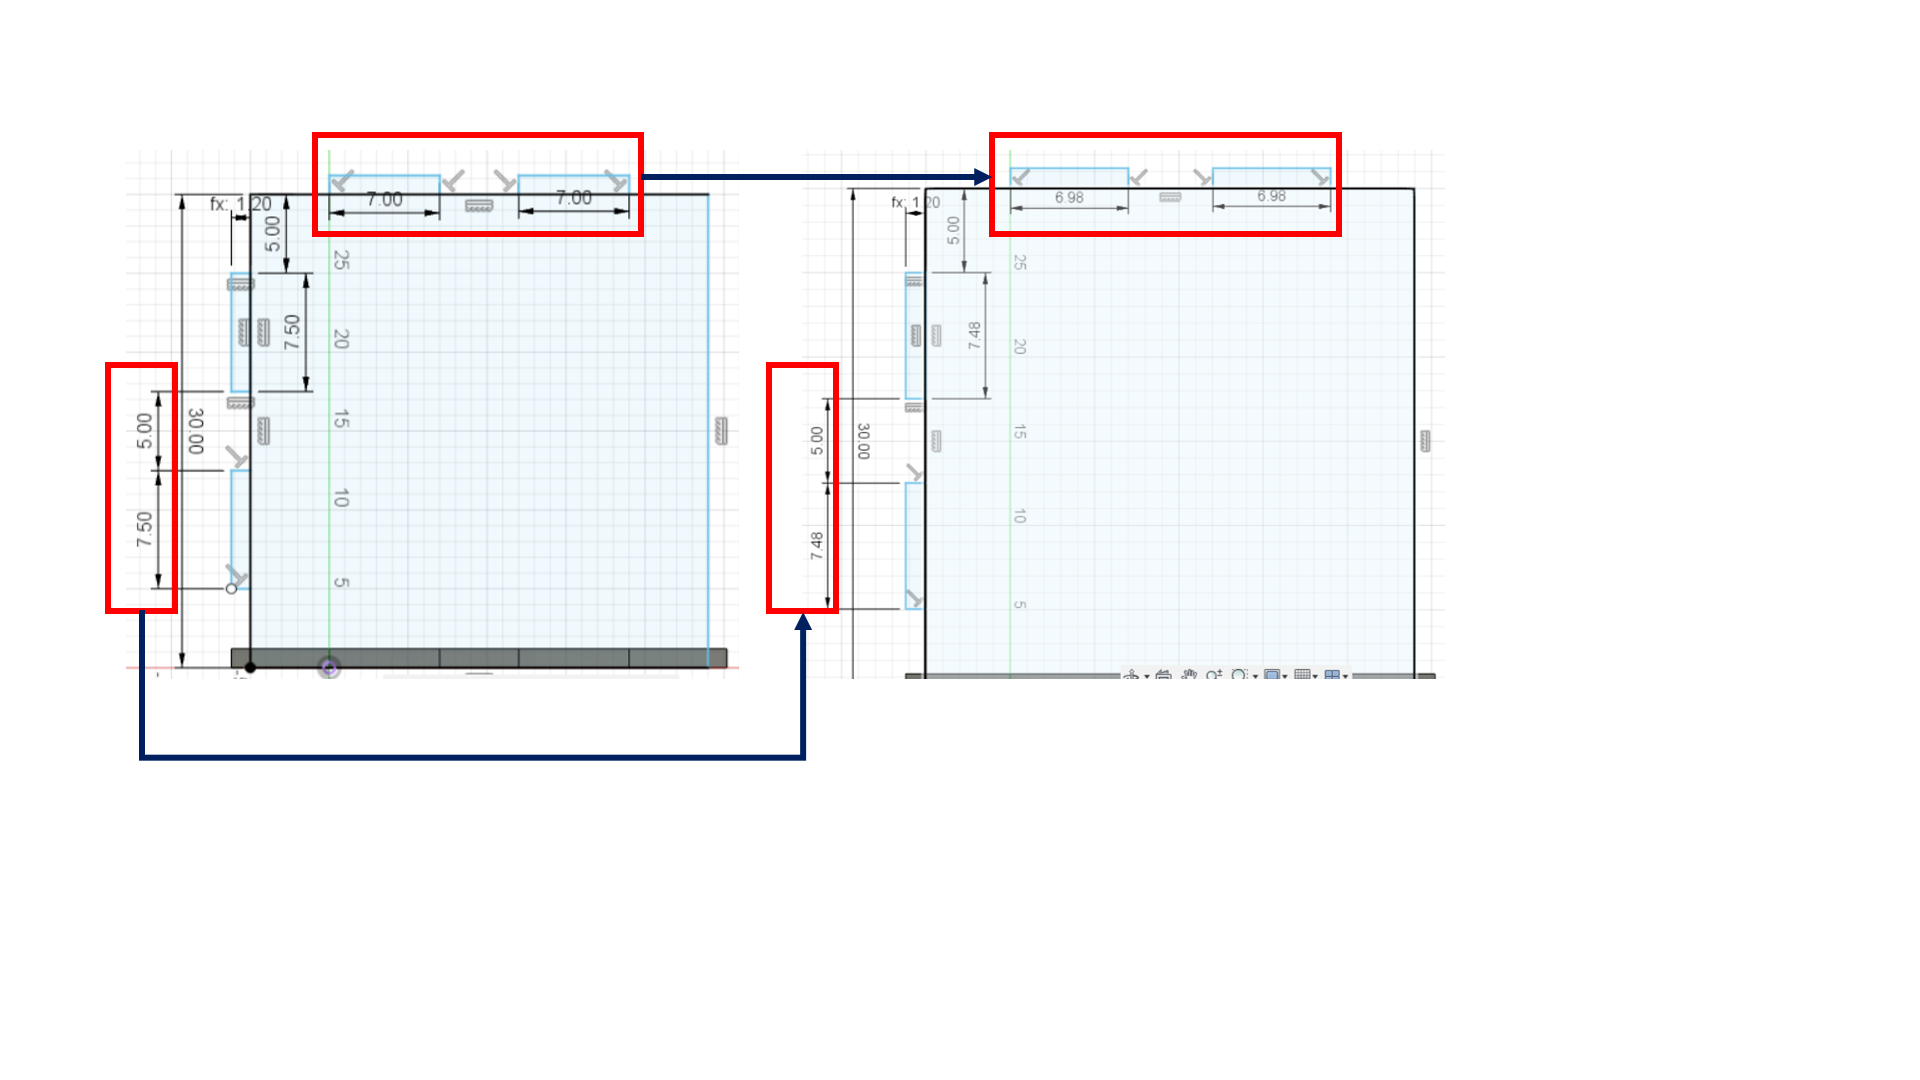
After the dimensions, I started working on making the box, using finger joints in fusion360. These joints will serve as connecting points for the wood (that would be later cutout to fit all the pieces together). I started sketching on the needed surfaces, and also used the tool “Combine”, that helped in cutting out the desired spaces, that would later be able to fit into the other wood piece. This combine tool process is repeated for the top and back shelf of the box, colored as “red” in the pictures below.
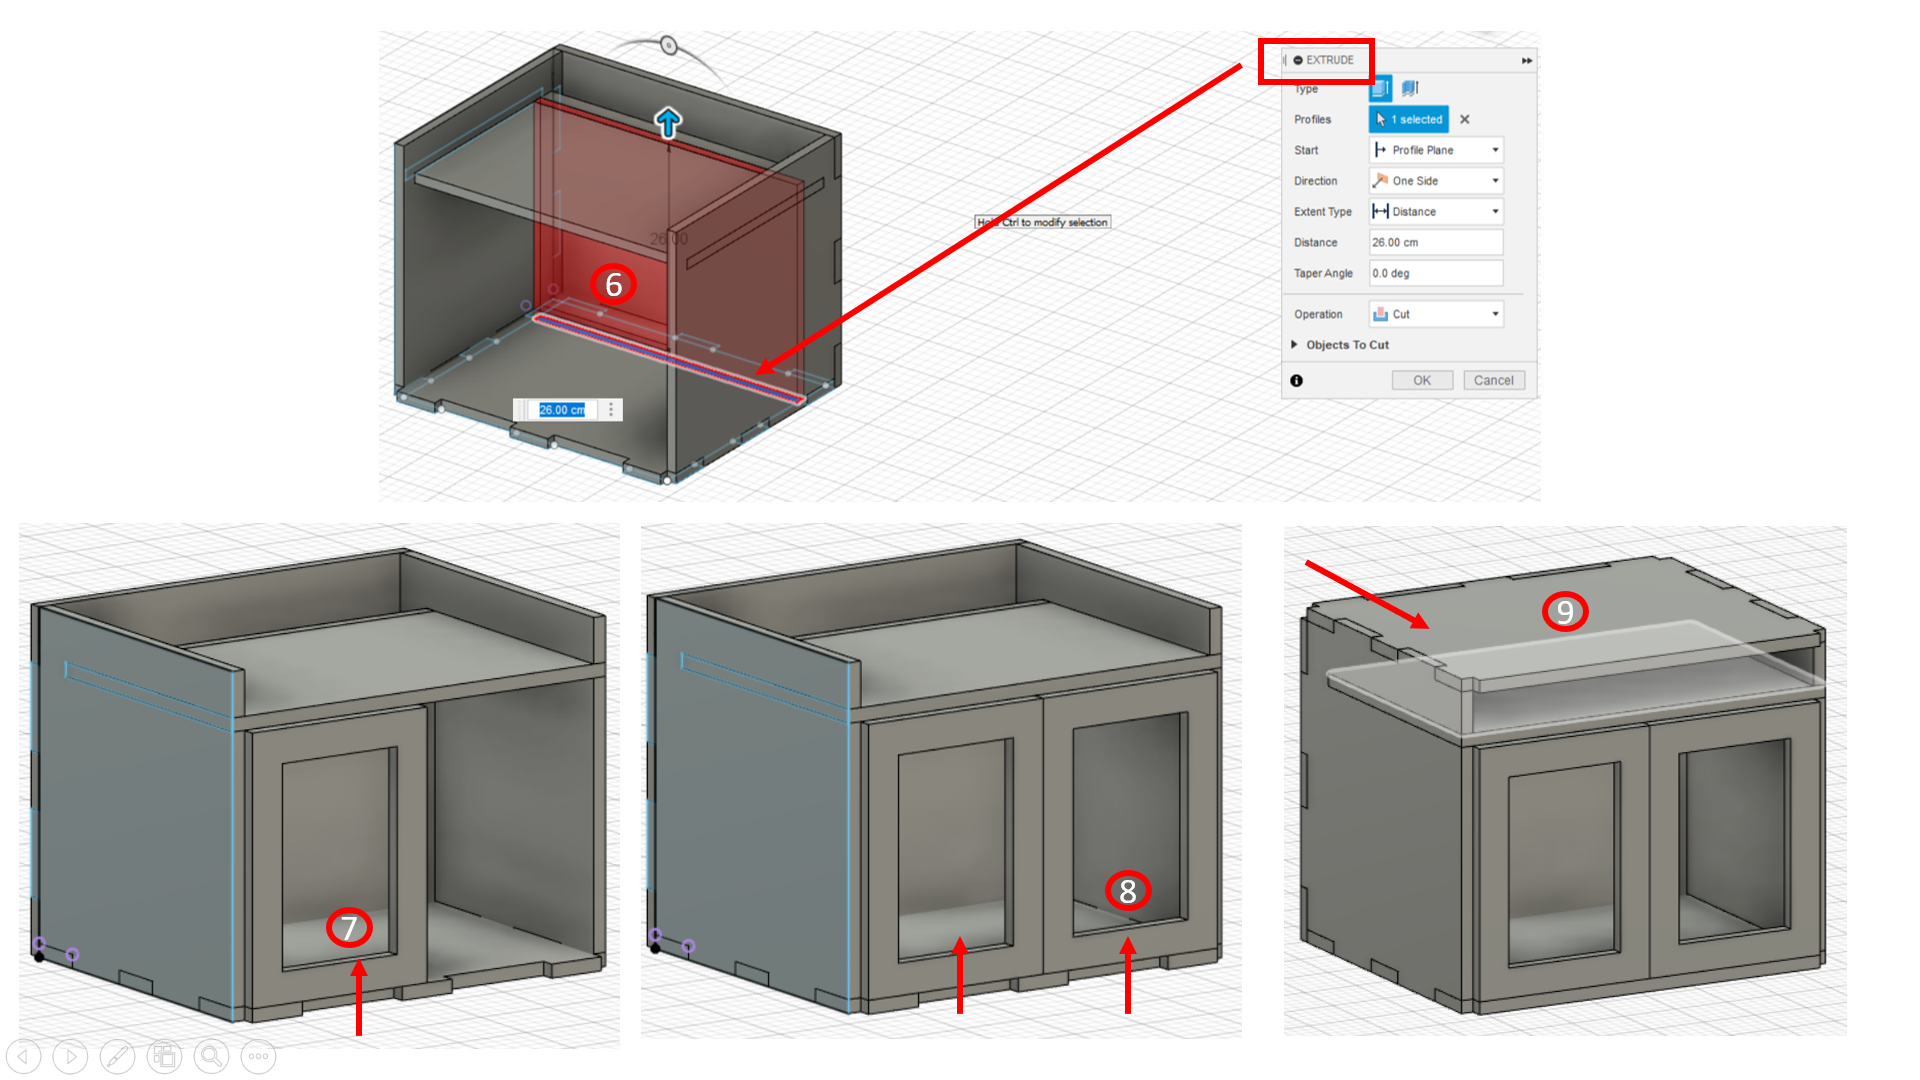
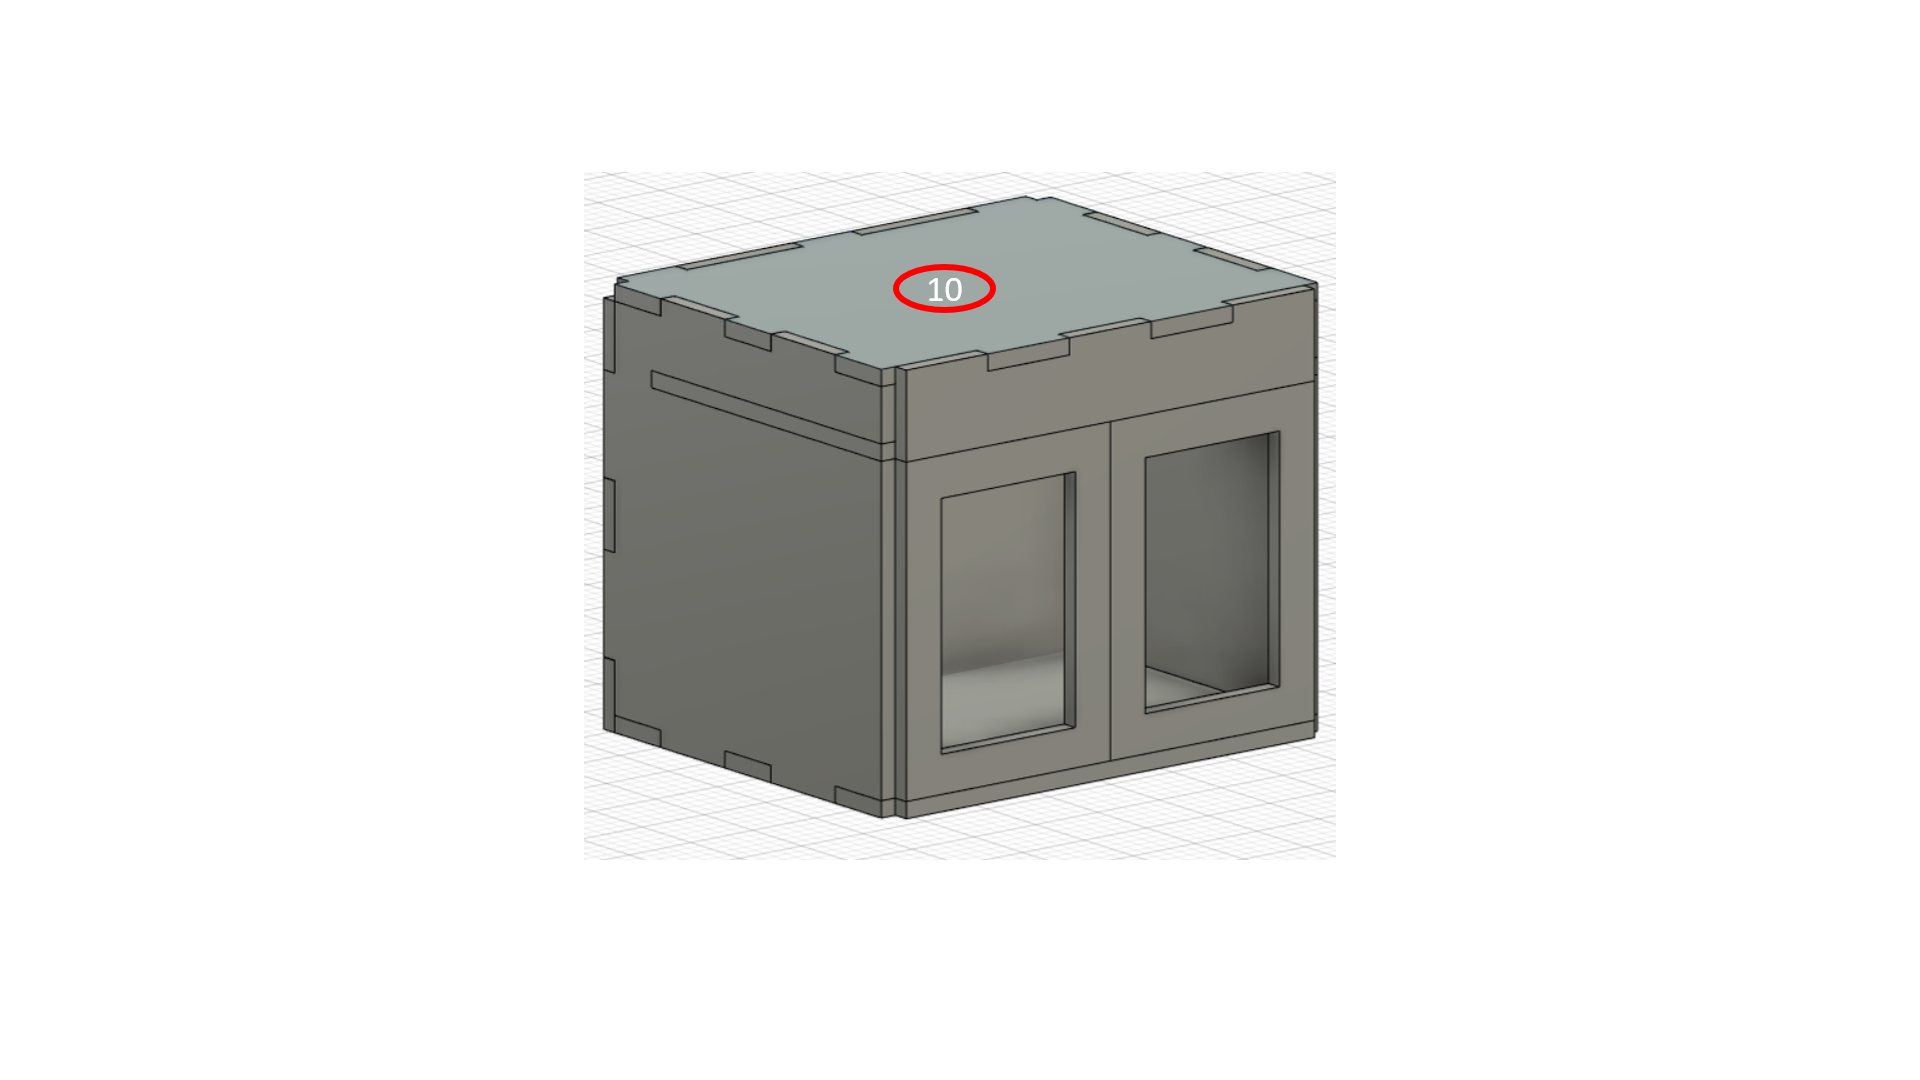
After combining, I made a door frame, leaving enough space for the screen area, which is an acrylic sheet that is scratched, in order to get the shadows to appear on this screen. After making the door, I copied it and mirrored it to the opposite side.
In the end, the top piece and the front piece of the box were made, to cover the whole box up.
Another point to note here, is that in the sketch, I tried to change the dimension by 0.01 to 0.02 cm in difference, so that the pieces would be able to fit each other perfectly, without having any issues.
After making the box in fusion 360, I saved each of the sketches as dxf files, and sent them to fablab email, for test printing the first 2 pieces.
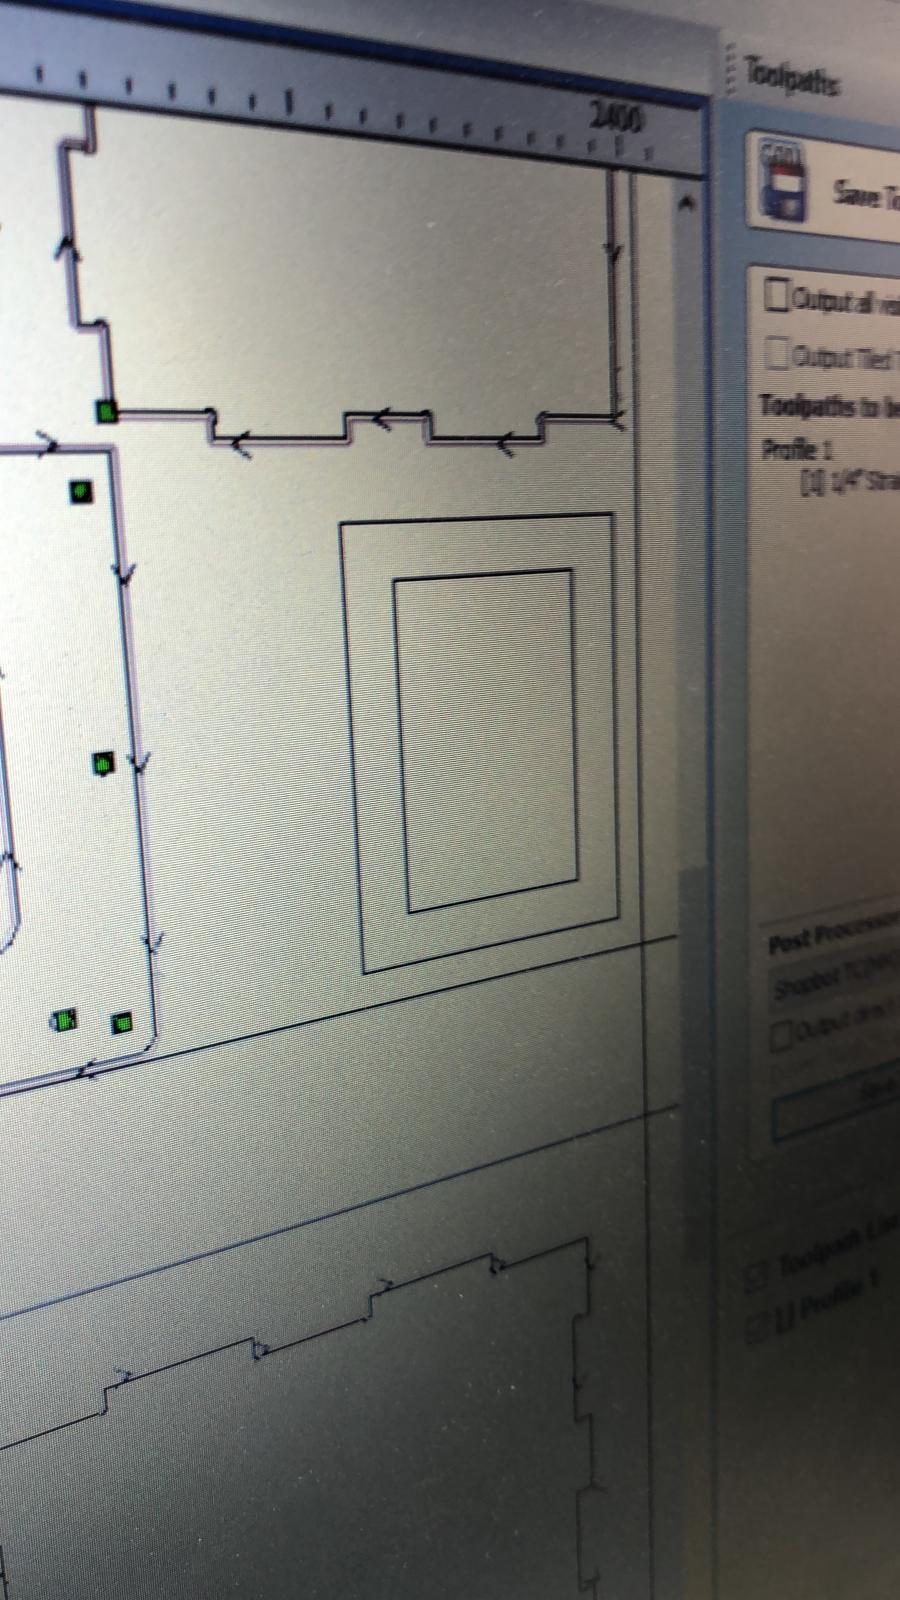
Click here to see the CNC Box - wood piece cutting - Test Check!
Click here to see the CNC wood pieces cutting
Click here to see the Drilling the piece with the Arc cut
3D model of the box
Stl & dxf files
Click on the files below to download them.
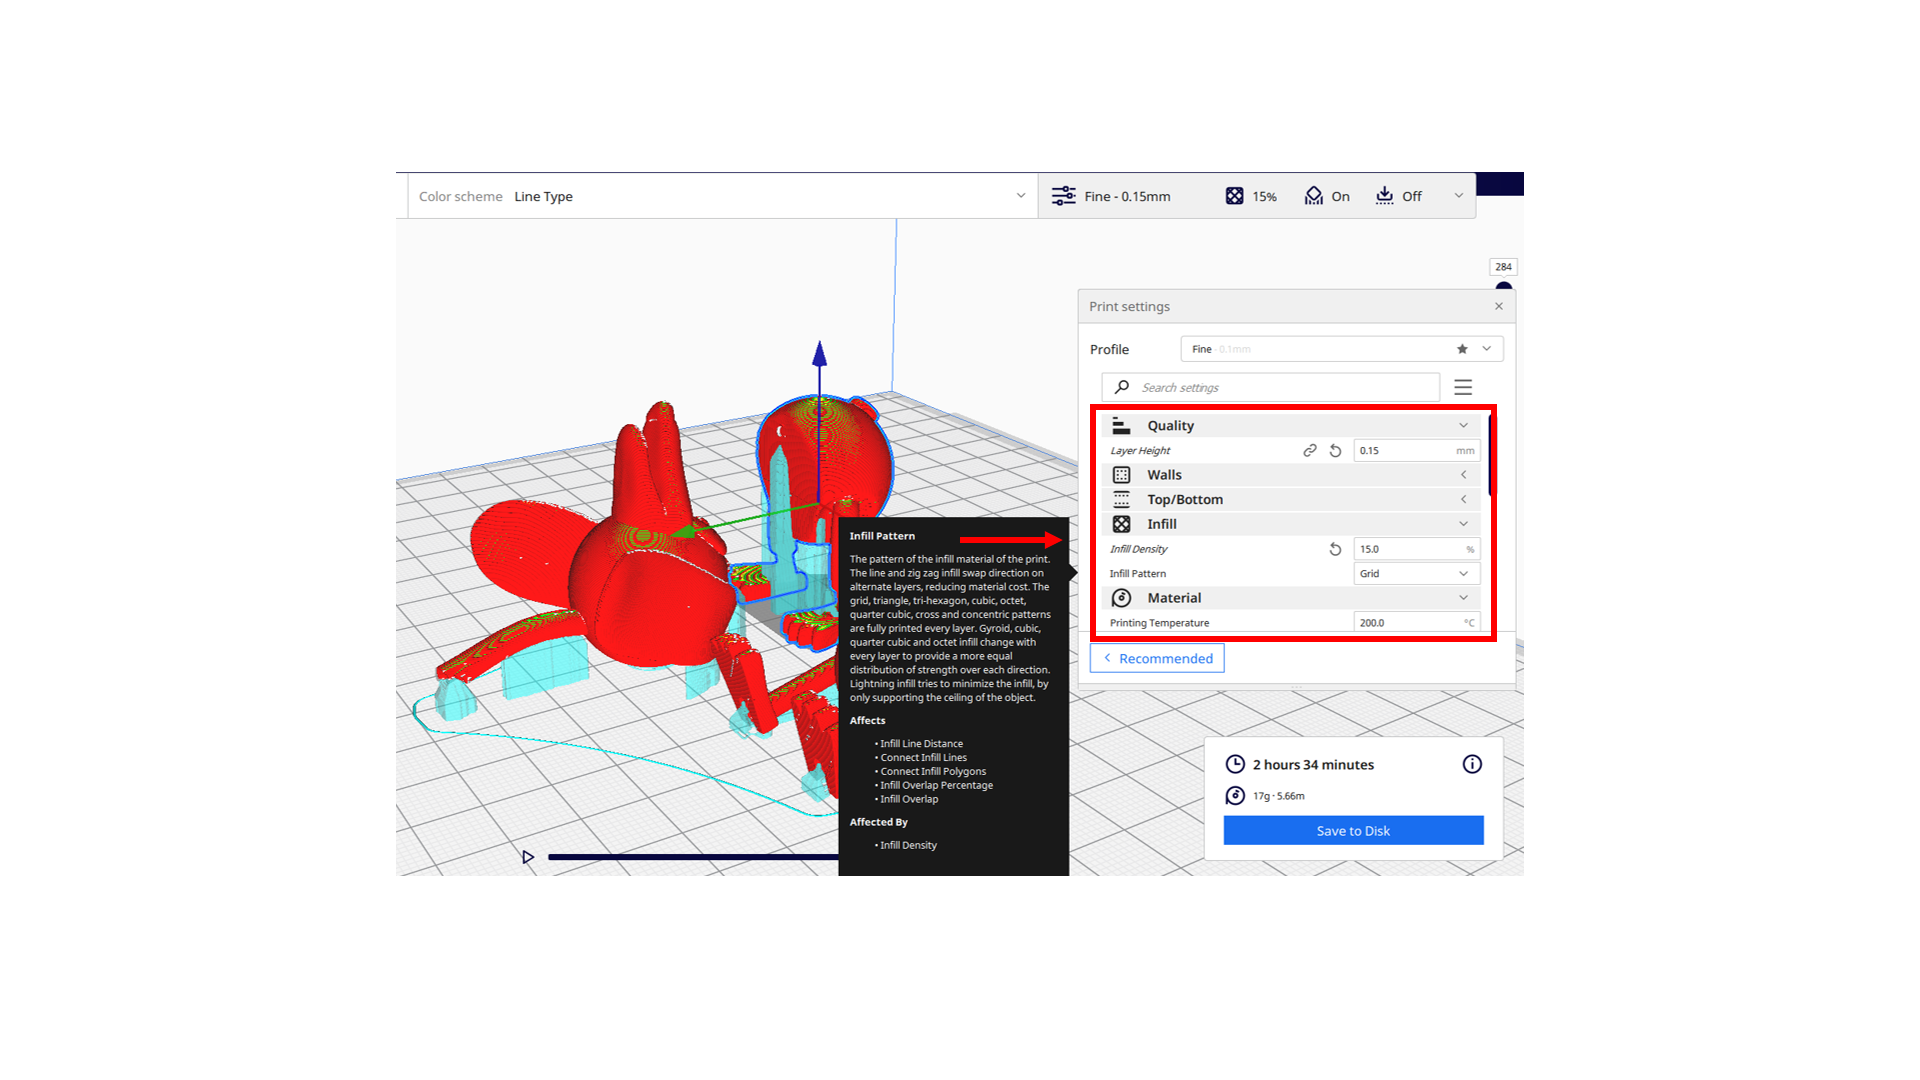
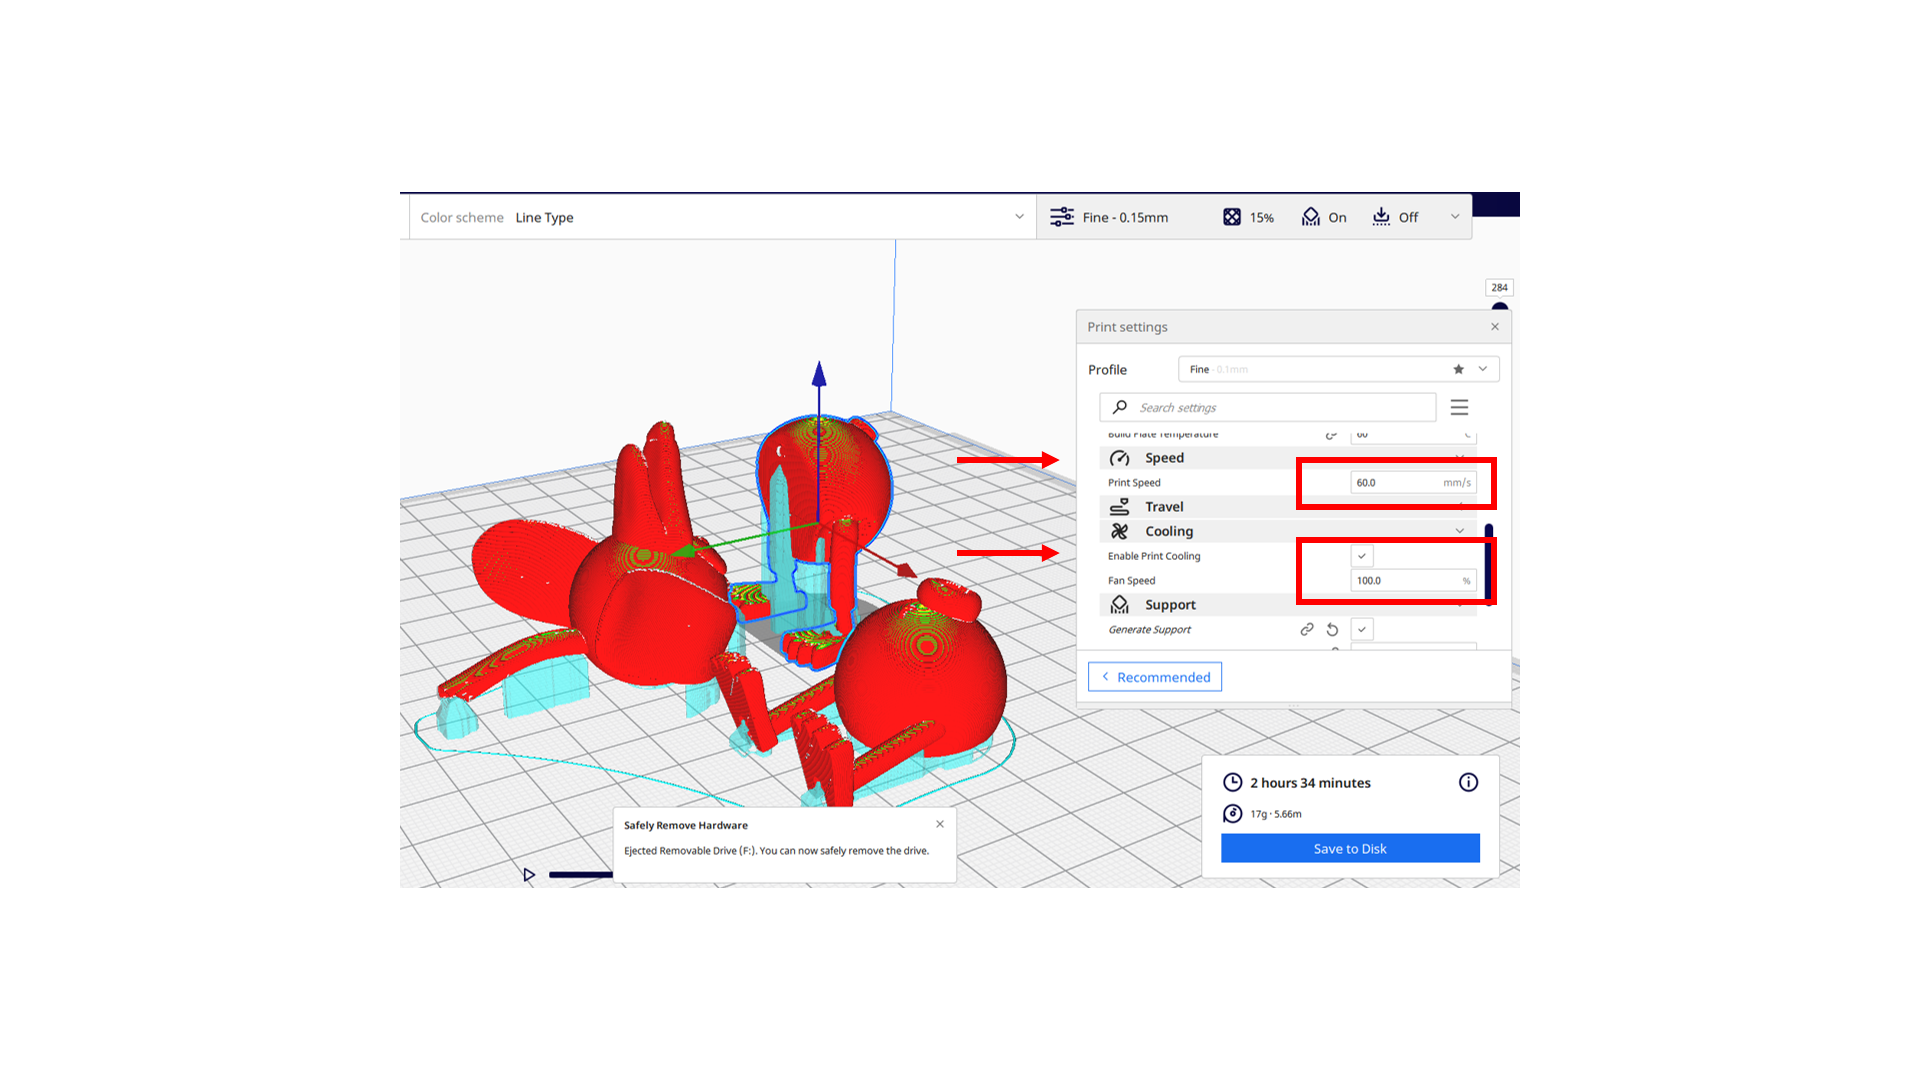
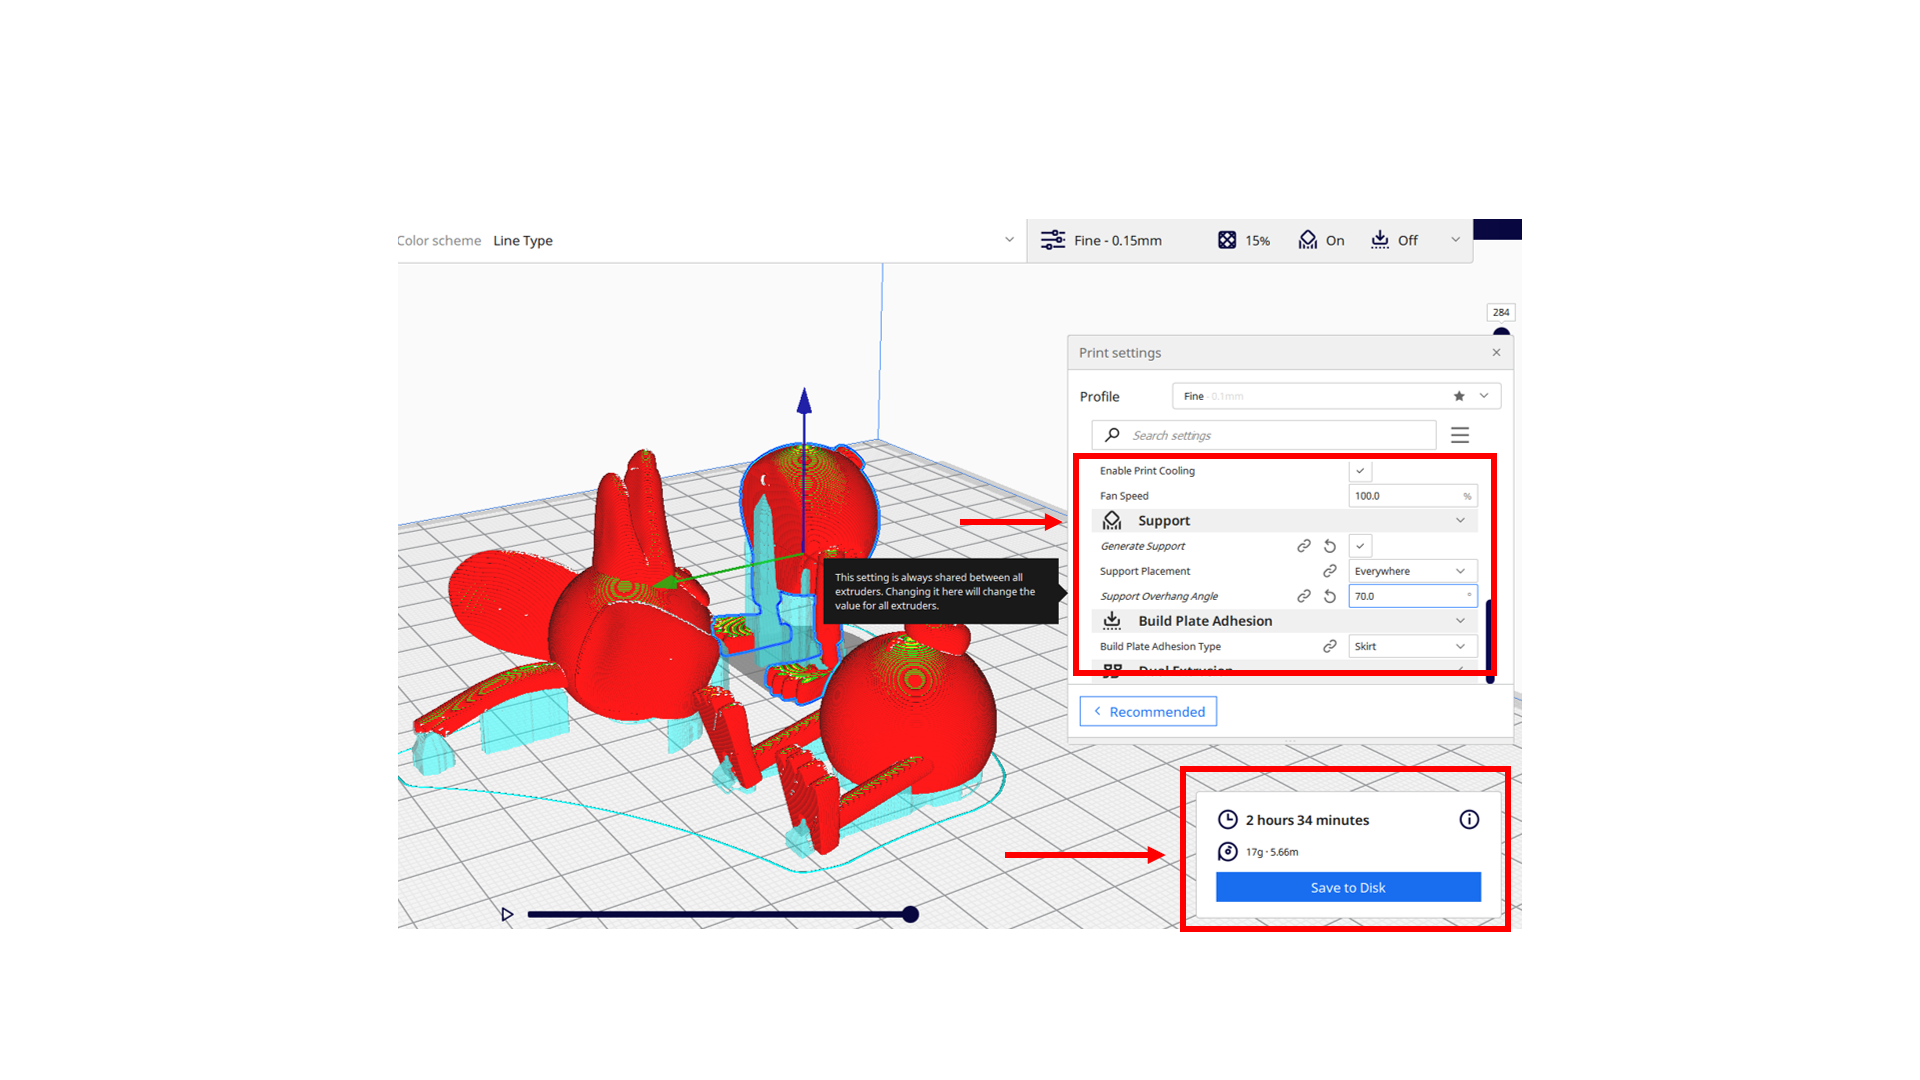
2. Printing 3D static toys of ToyStory (Fusion 360 & Ultimaker Cura Software)
3D PRINTING & SCANNING:
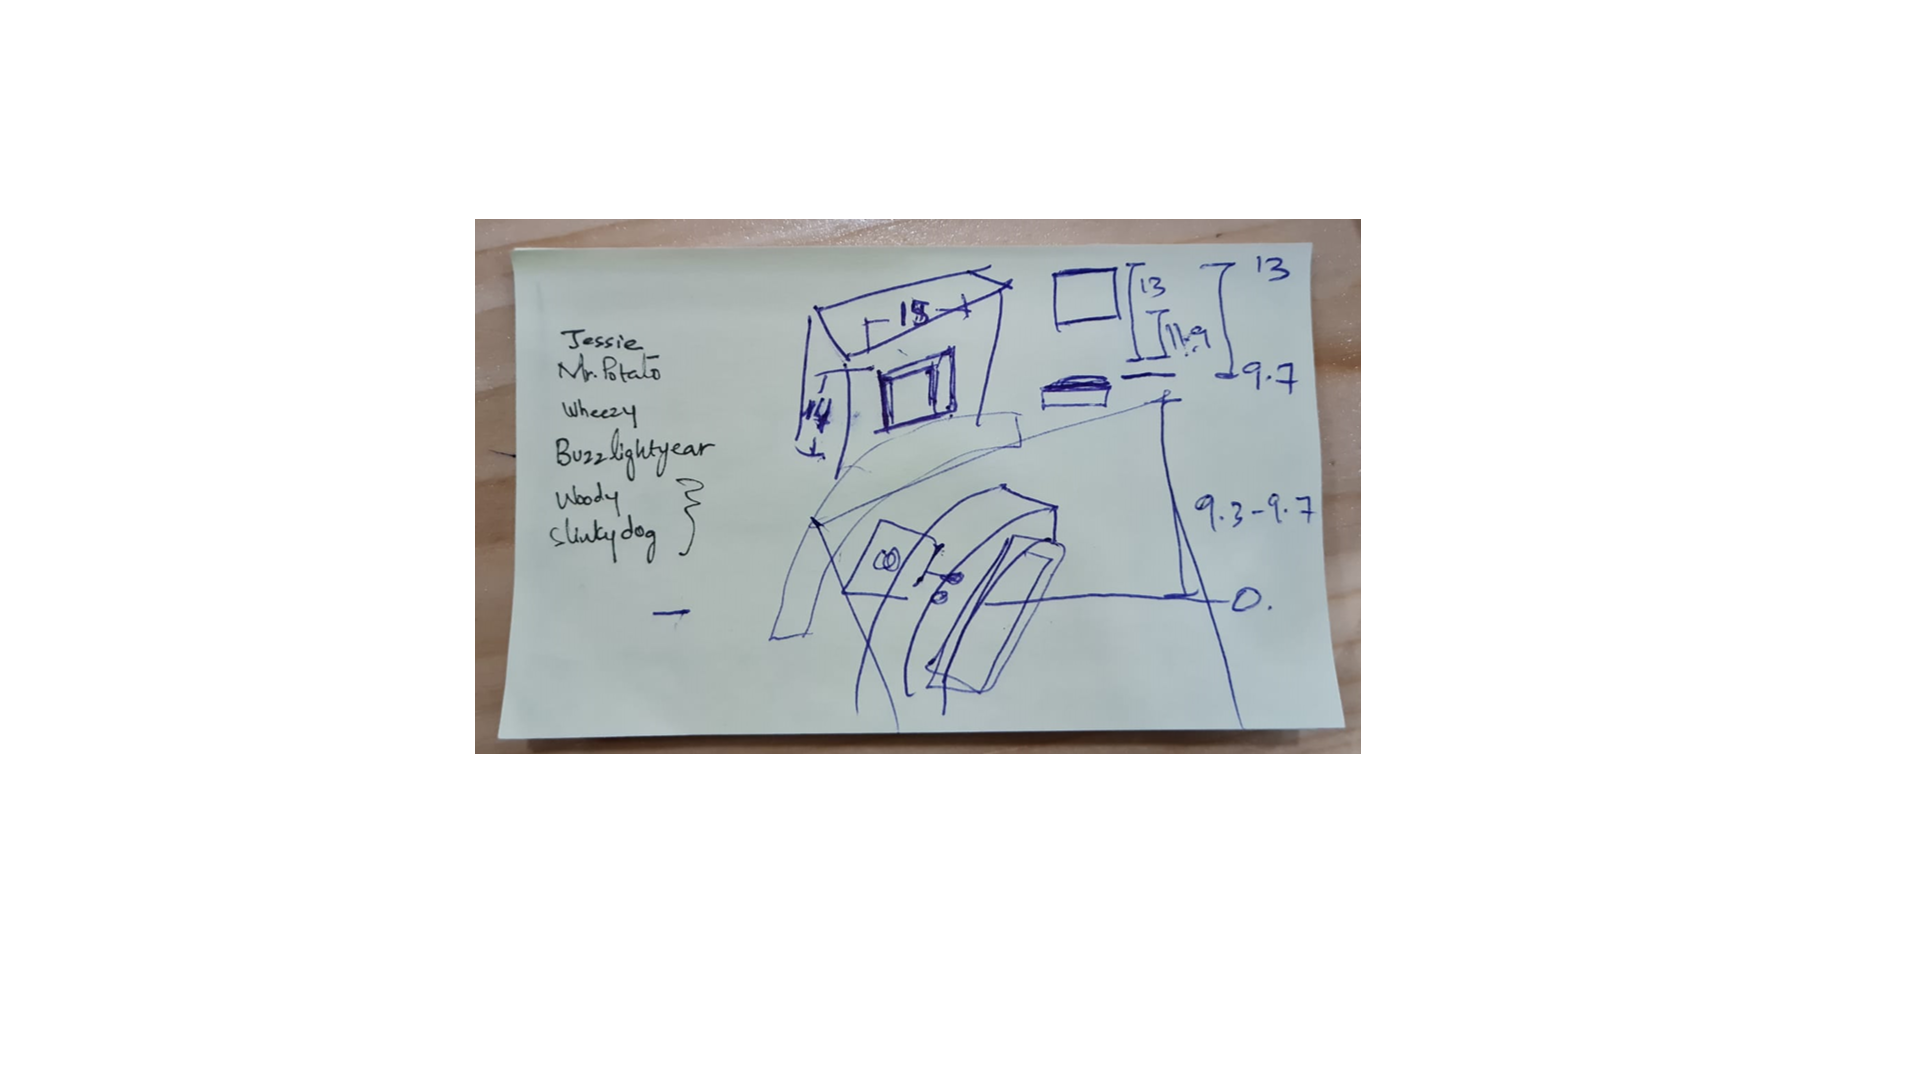
Woody toy was available in a toyshop and was bought from that shop, which was hard to find though. Toy story characters were only available as stuffed toys, and not as moveable ones. So, I bought the WOODY toy from the shop, whereas for the other toys, I searched them online in websites, that had 3D models (stl files) of toy story characters, and I downloaded them from those websites, and brought them in Fusion 360 for final touches, and sent it as stl files to Cura Software, for final finishing touchings to the settings of these toys, before printing them in the 3D printer.
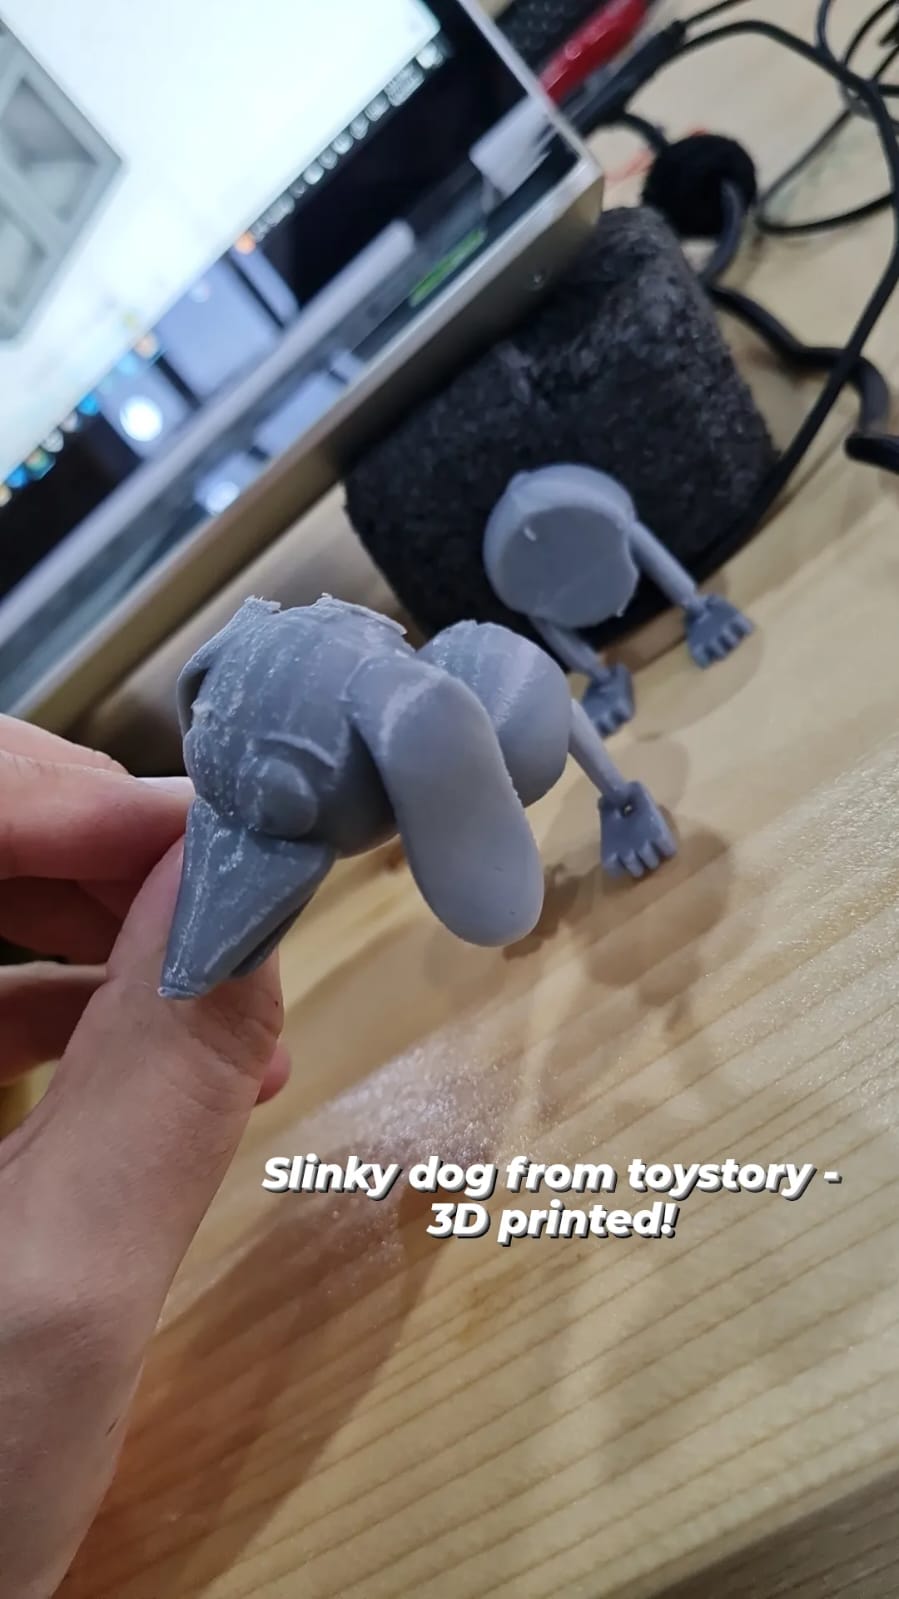
Slinky Dog:
I downloaded the 3D file for the slinky from the following website.
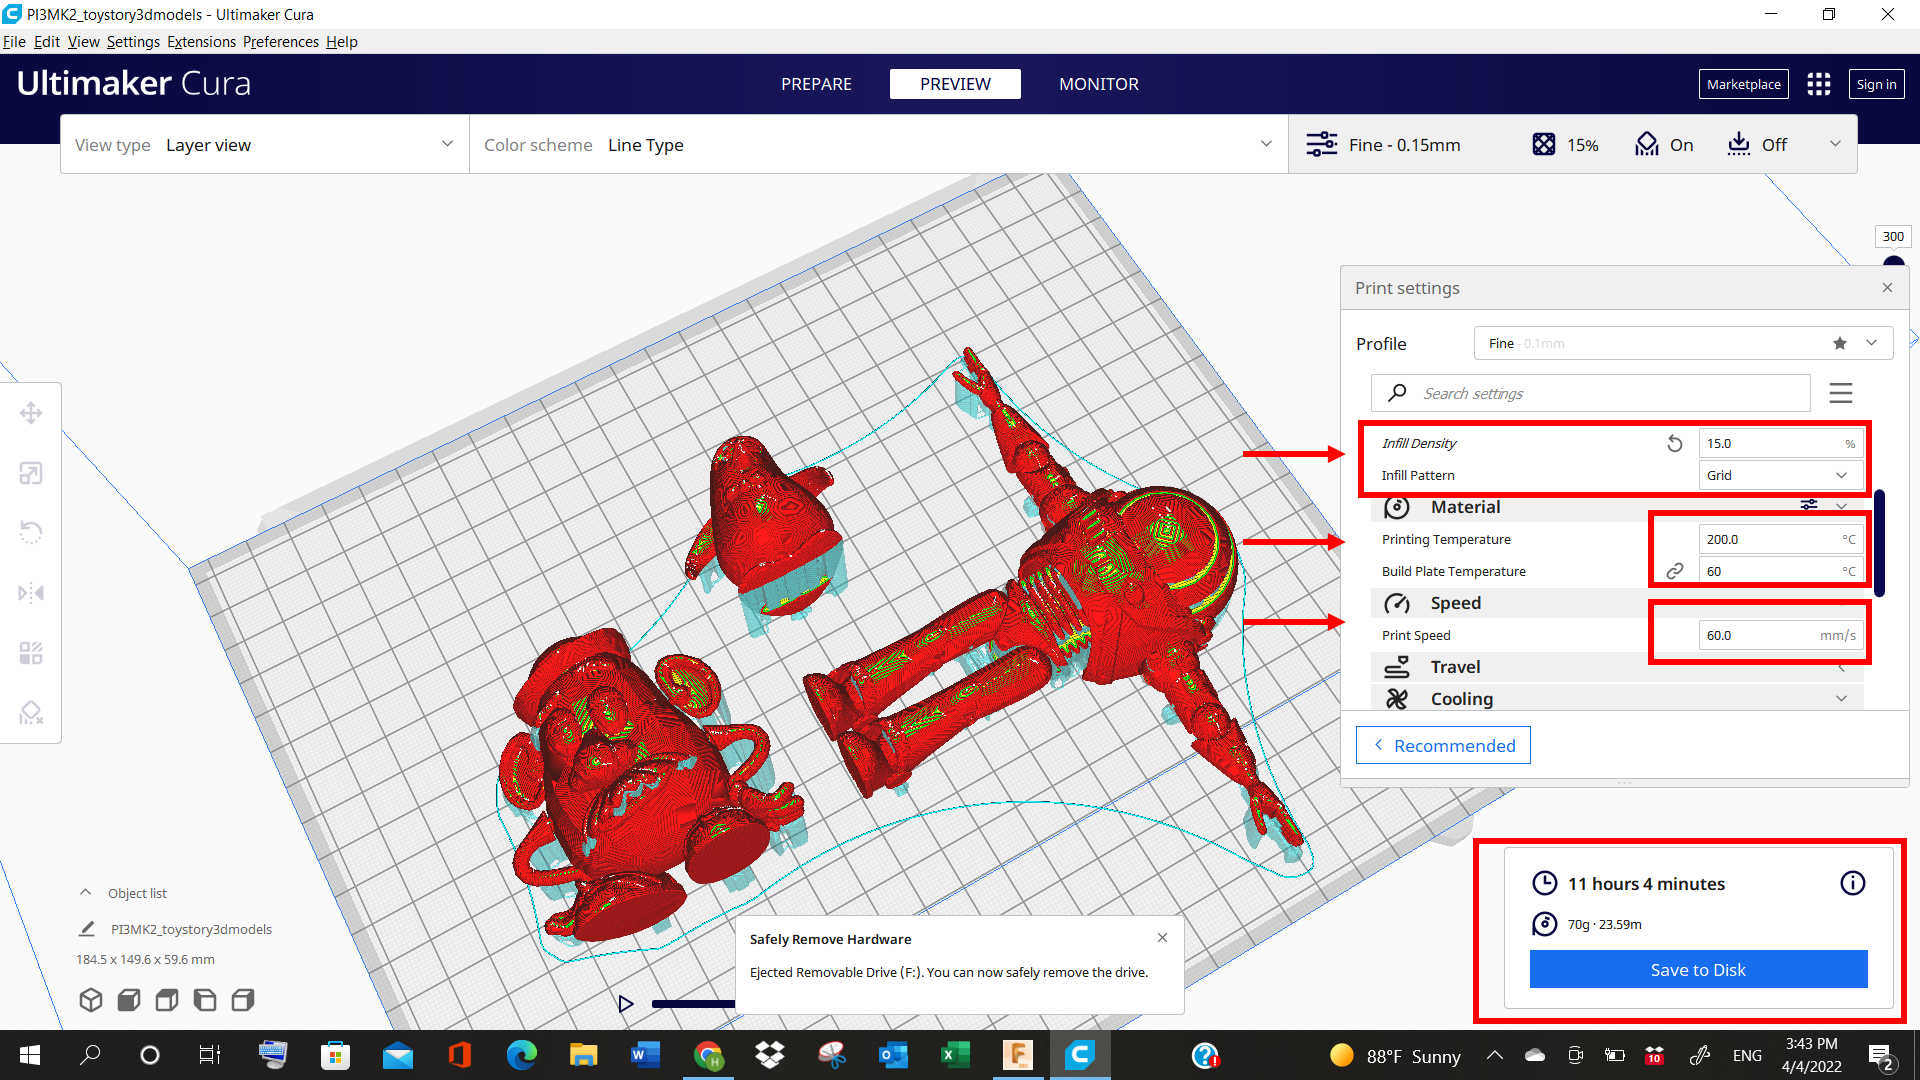
After downloading it, it had several body parts, so I tried to attach the body parts together in fusion360, but after bringing it in Cura for slicing process, I got to know that it would need a lot of support in the bottom, for it to be sliced as one body. So, I tried to separate the body parts, and brought them in Cura to be sliced, with as minimum support as possible, but also something that would give a better quality result.
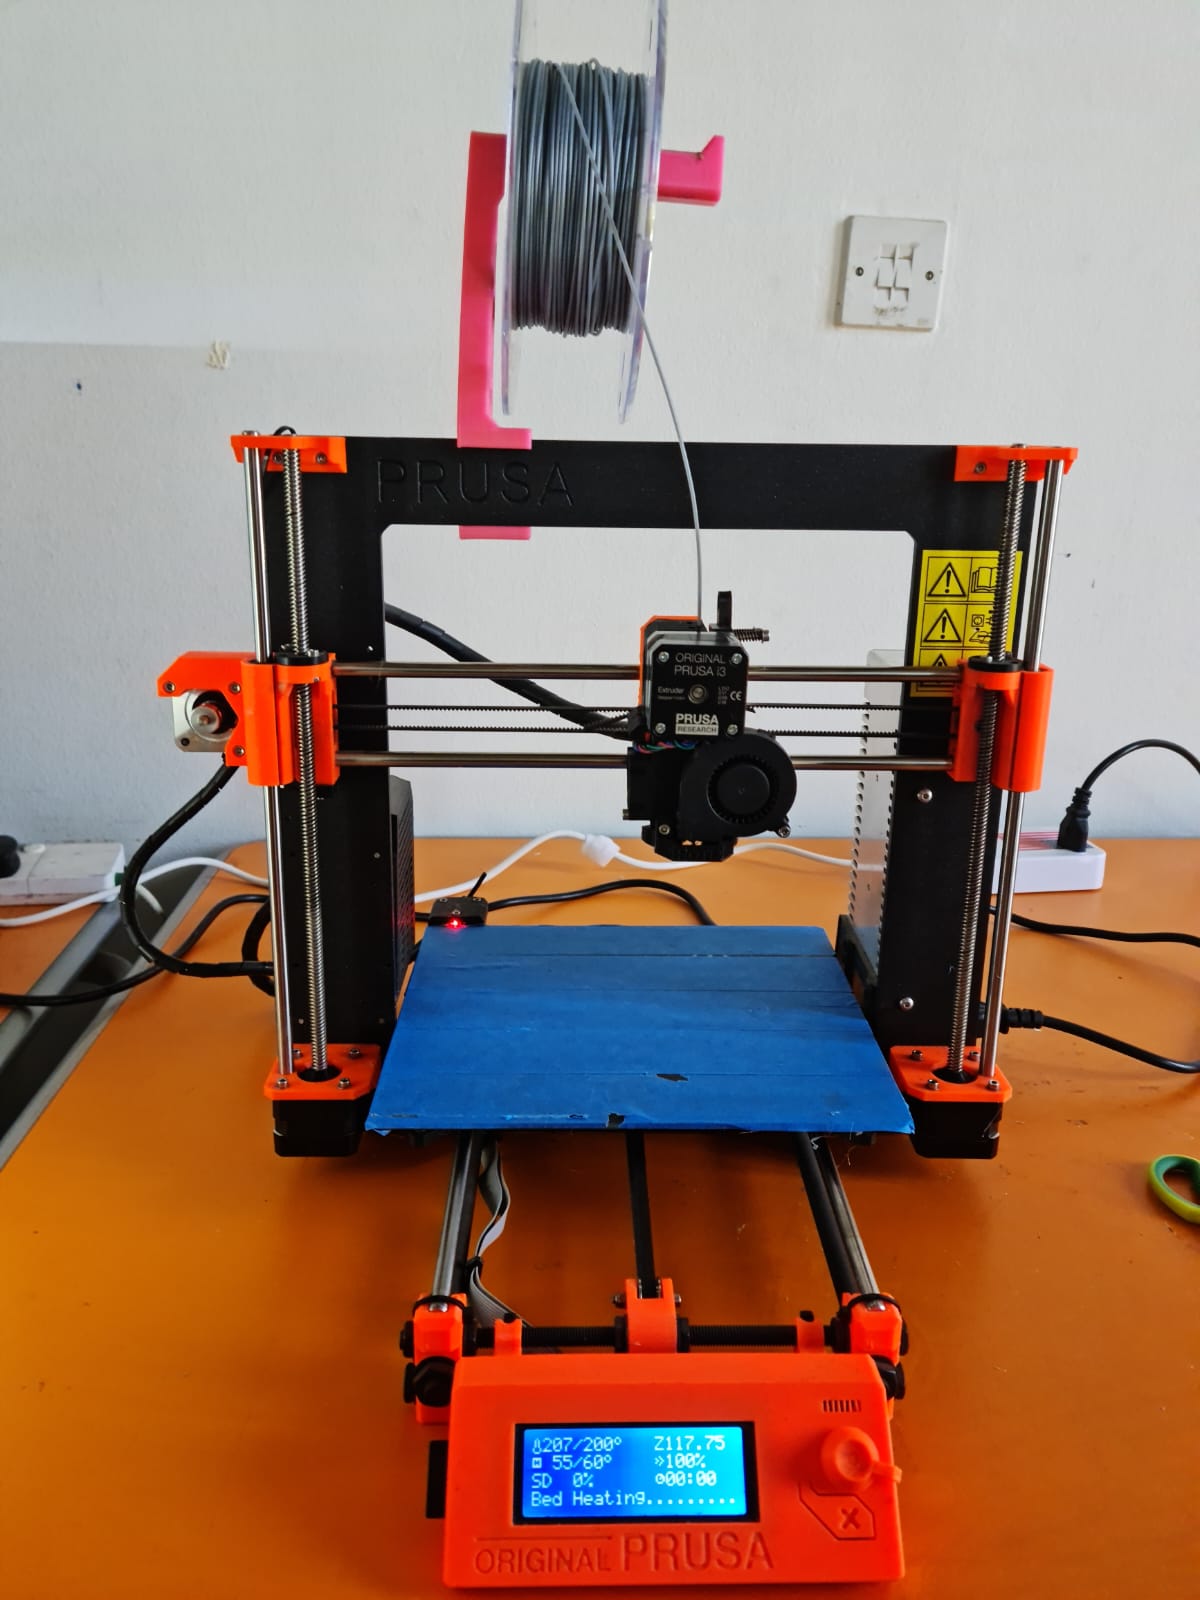
After bringing it in Cura, it was seen that it would take around 2 hours for the 3D printer, to finish printing this toy. So I set the printer, put the file as gcode in the SD card, inserted the SD card in the printer, and started the process.
The videos for them can be found here in youtube sites:
Cutting the support from Slinky dog
Attaching the body parts of slinky dog
After printing, this is the final look.

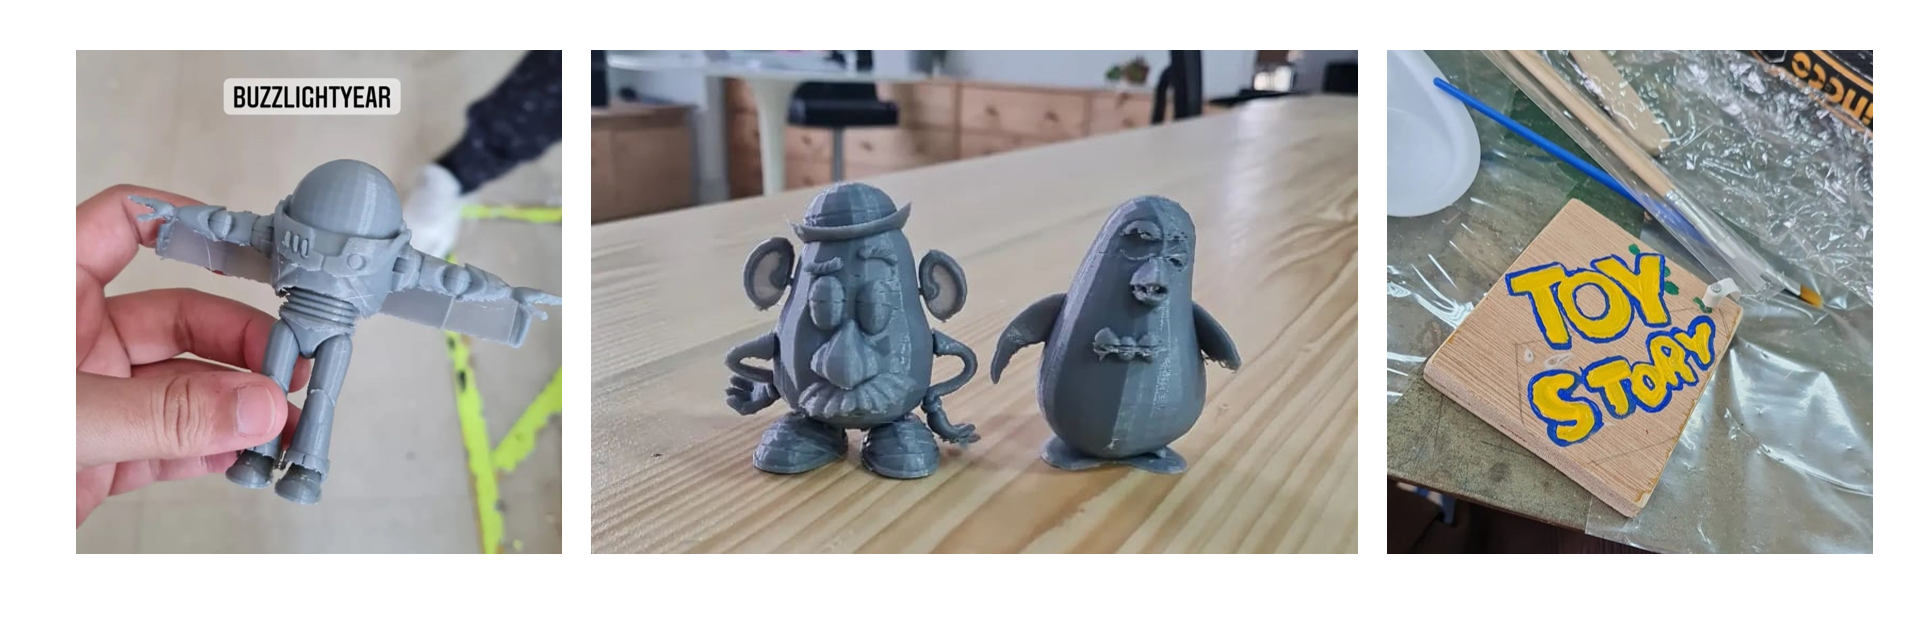
Mr.Potato Head:
I downloaded the 3D file for Mr.Potato Head from the following website
Buzzlightyear:
I downloaded the 3D file for Buzzlightyear from the following website
Wheezy:
I downloaded the 3D file for Buzzlightyear from the following website
3D printing:
Final 3D results:
3D models
The other 3D models were combined together in Cura, with their specified settings, and given the support too, and I started 3d printing them in Prusa 3D Printer.
1. Mr. Potato
2. Wheezy the penguin
3. Buzzlightyear
Stl files & Cura file
Click on the files below to download them.
3. Embedded Programming (Adafruit feather - Arduino) & Input Output Devices
Coding Process for toy movements:
Please refer to my teammate Yusif’s website, for detailed explanation on the coding process, and what all issues and problems were faced, along with their solutions.
4. Assembling the box,Setting the Interior Vibe of Andy’s room in the Toystory Animation & Adding final touches!
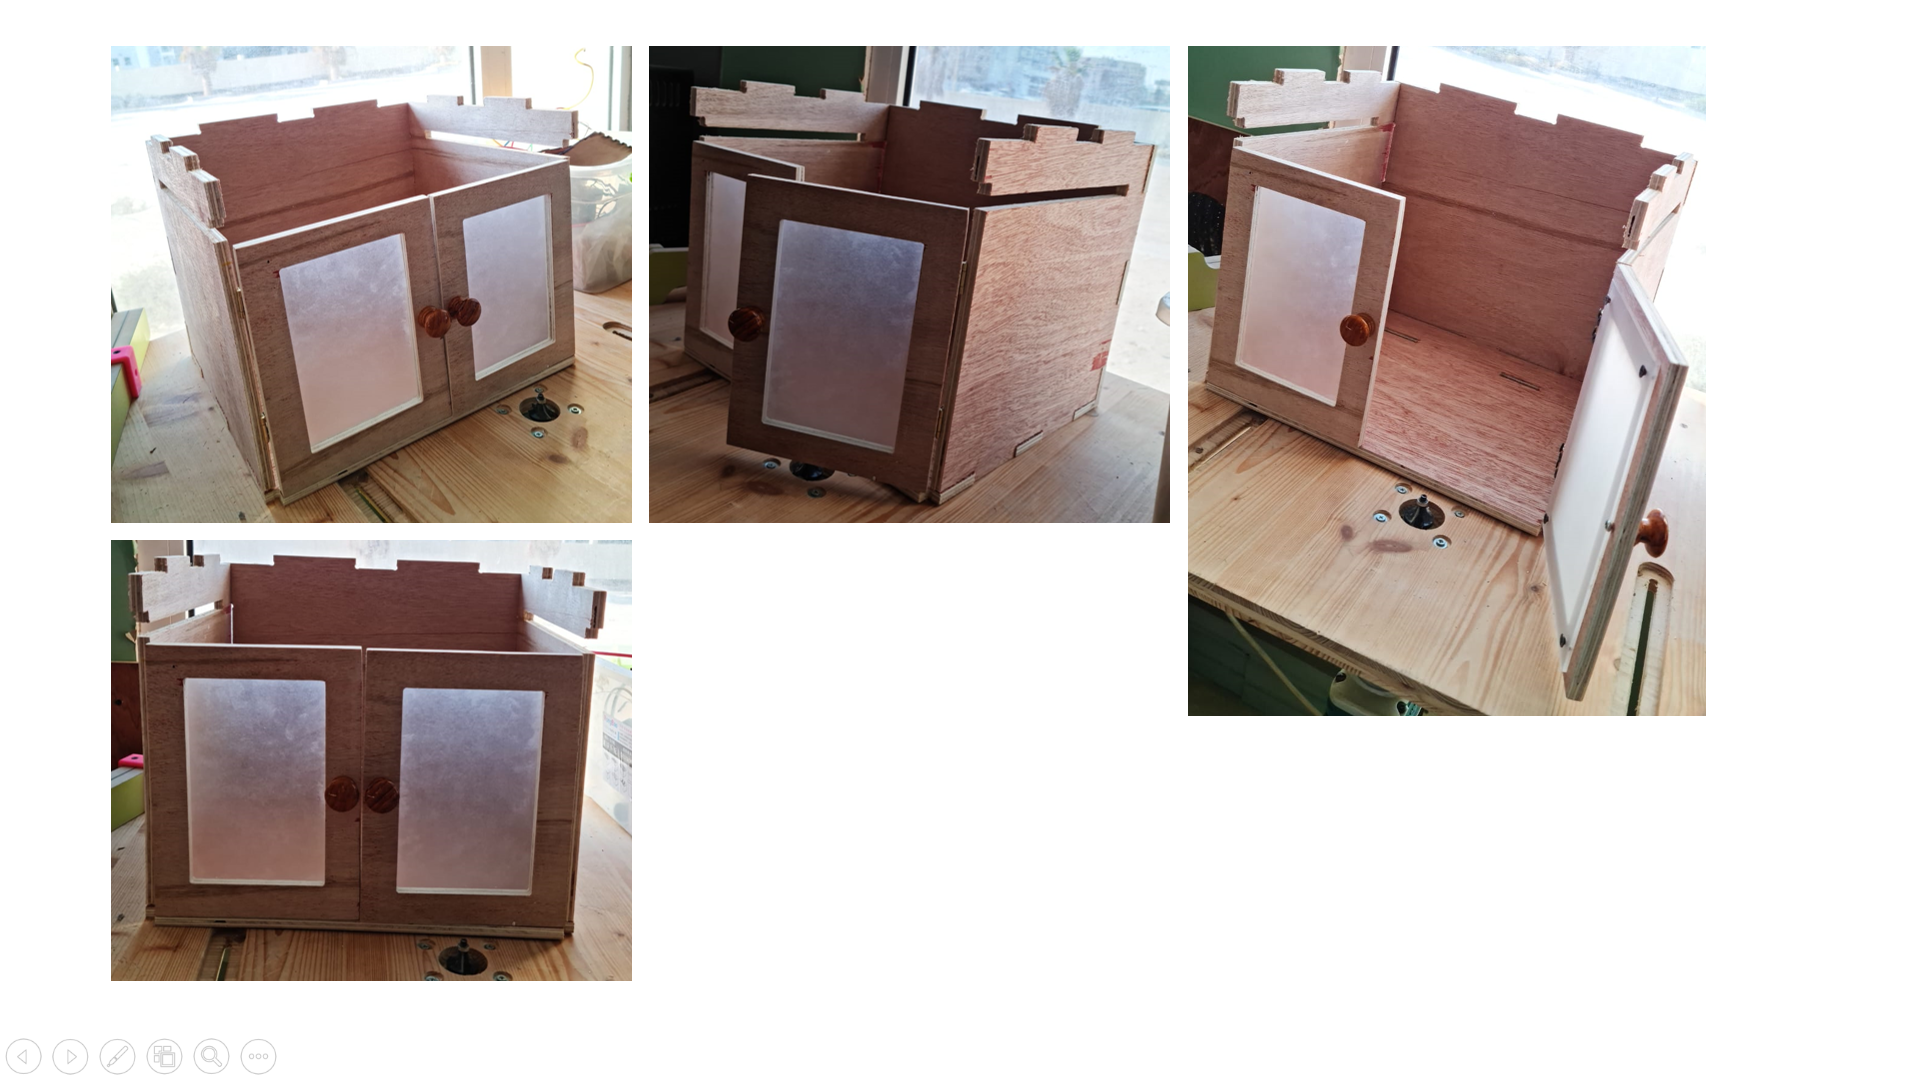
Assembling the box:
After the CNC machine cutting, all the wood pieces were cut, and I started to assemble those pieces together. Next, the clear acrylic sheets were sand-papered, in order to get a foggy look on it, and were test checked with a torch from phone.
Acrylic sheet - Test Check!
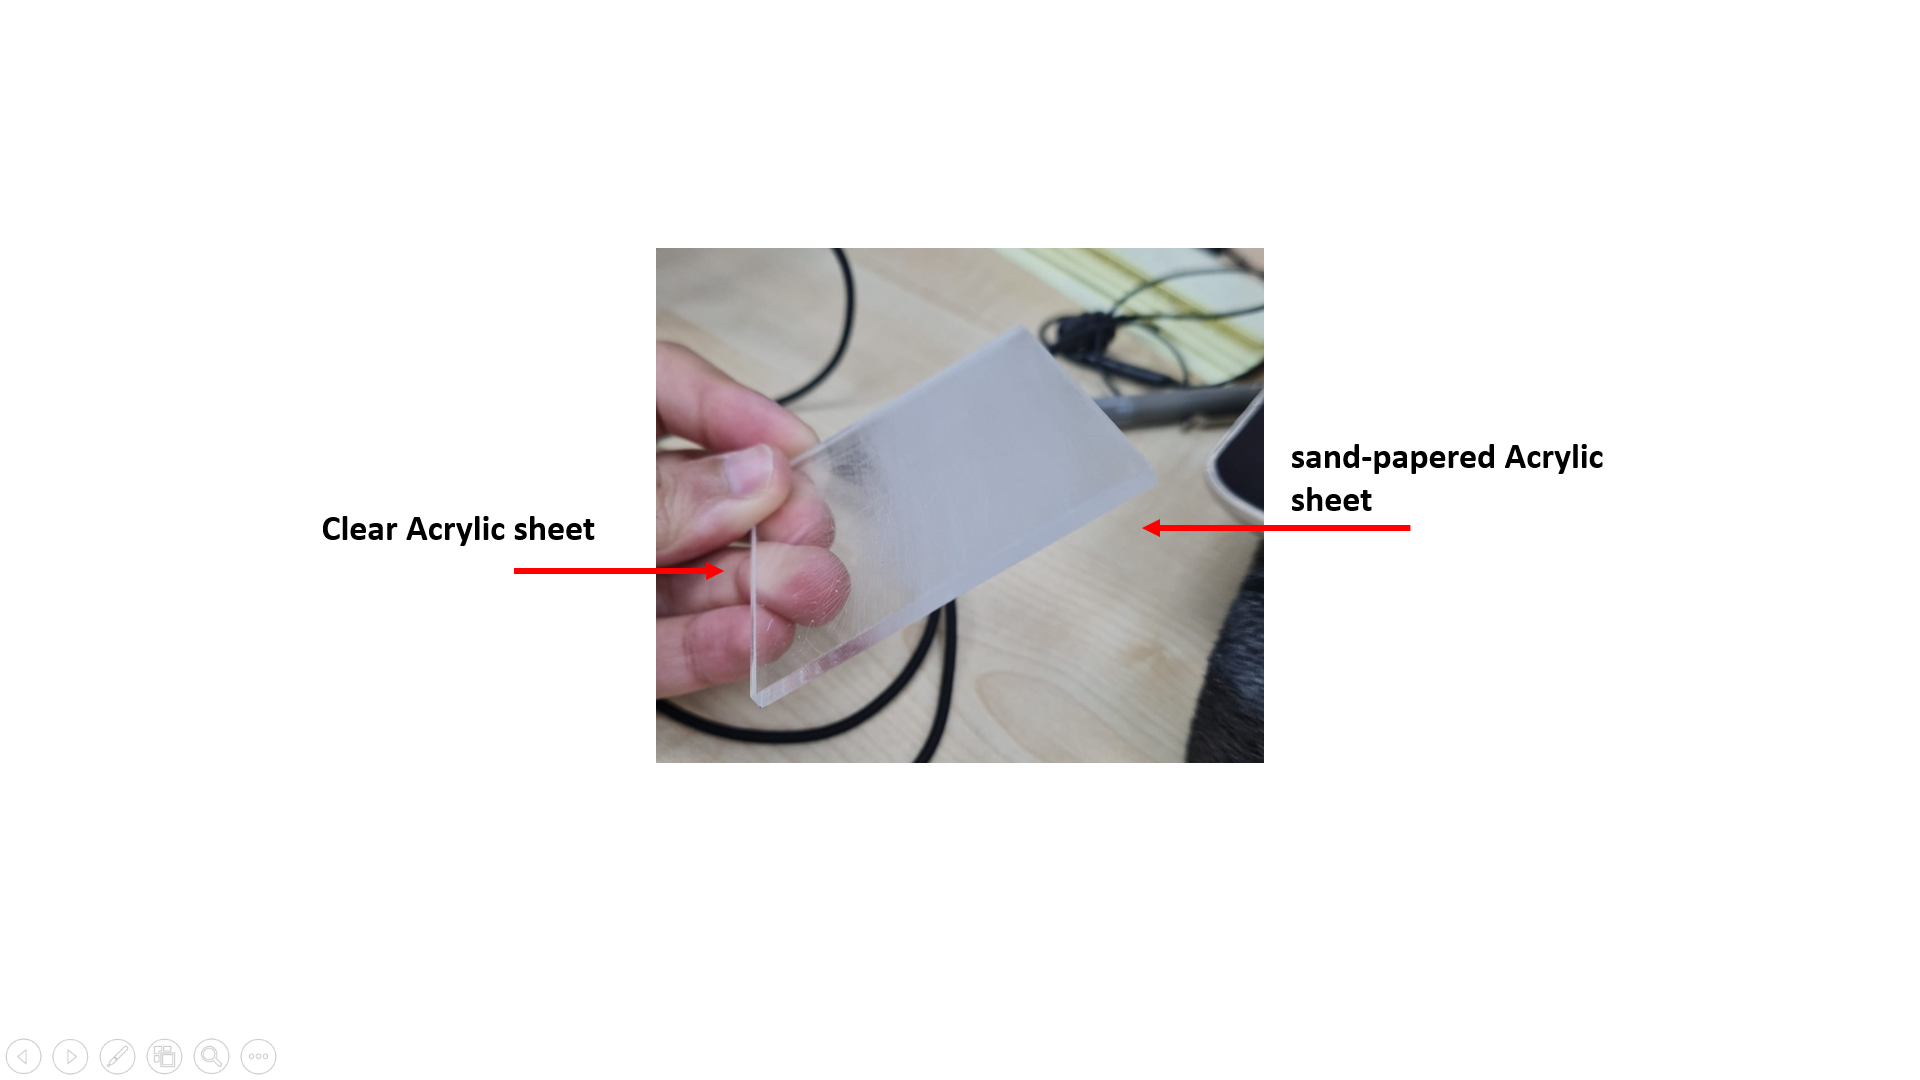
My teammate yusif and I started working on sand-papering the 2 acrlyic sheets, and cut them using the Laser cutting machine. And these 2 acrylic sheets were then attached and screwed to the door frames, with the final results as shown below. The door knobs and hinges were also attached and fixed to the box.
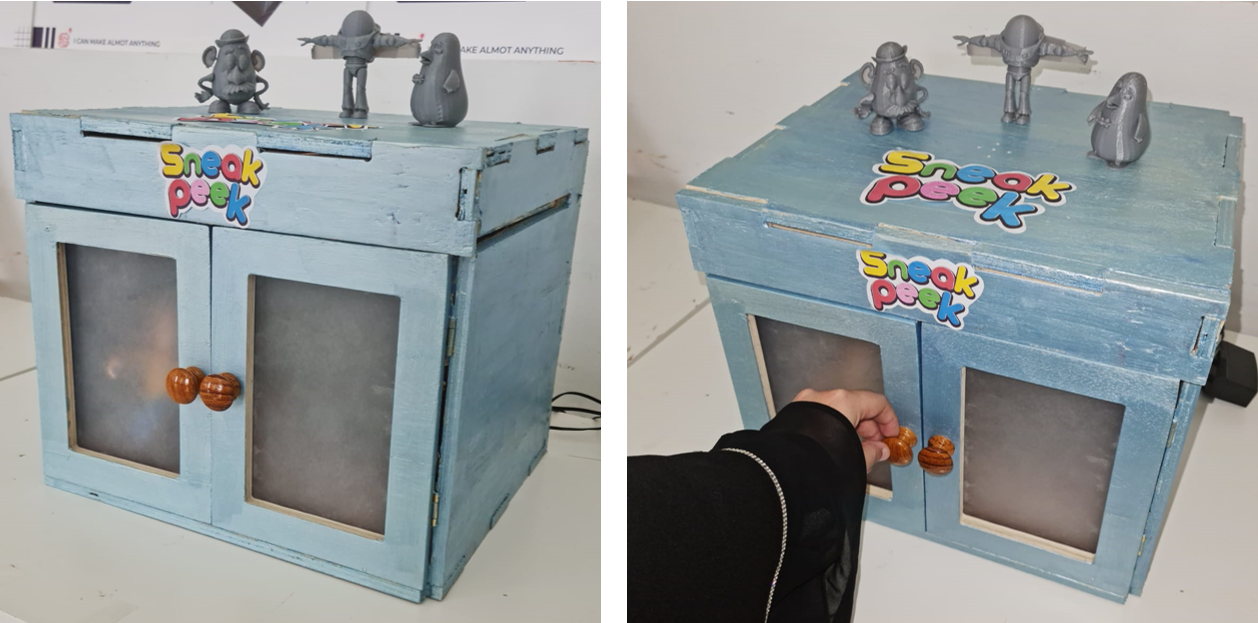
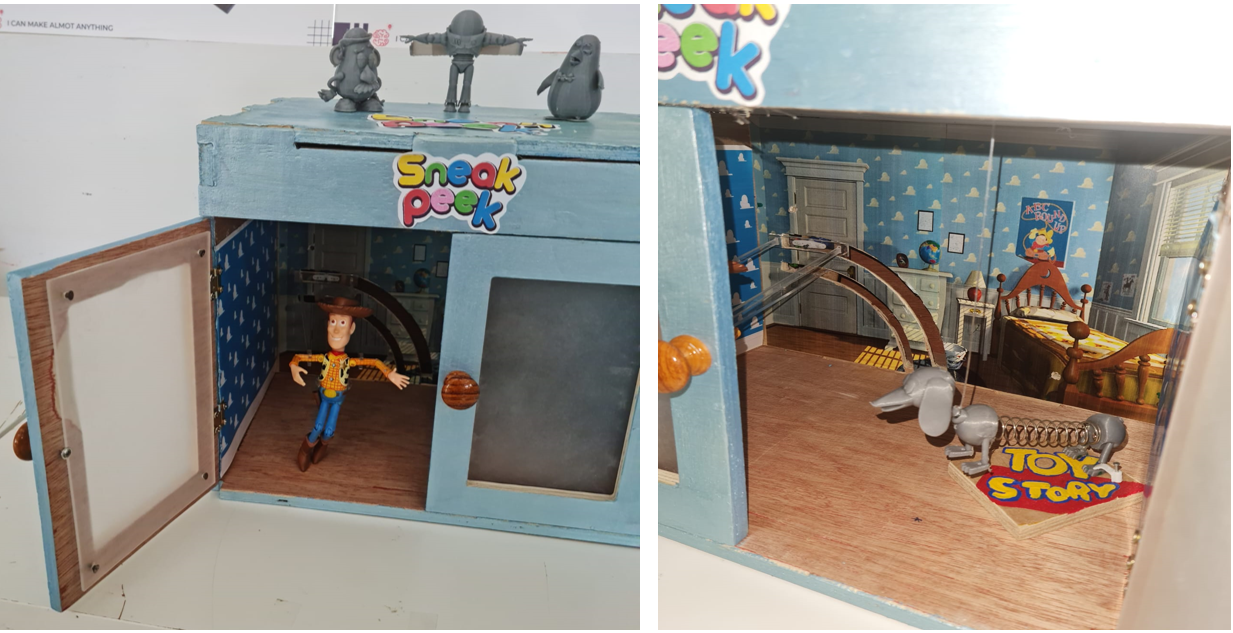
Setting the wires connections, Printing & sticking “Sneakpeek”, and Fixing woody to the arc:
Printing & fixing the wallpaper stickers, setting the interior vibe:
Painting the box with final touches:
Final touches.mp4 from Hafsa Ishtiaq on Vimeo.
Materials - BOM
This part is documented in my teammate yusif’ website
Problems & Issues
For the 3D toys, I faced a few issues:
1- The toys weren’t of proper sizes, when they got 3D printed. some were big in scale, others were small in comparison.
2- I had to make 2-3 test prints for these toys, in order to see their sizes, and whether they would fit in the box or not.
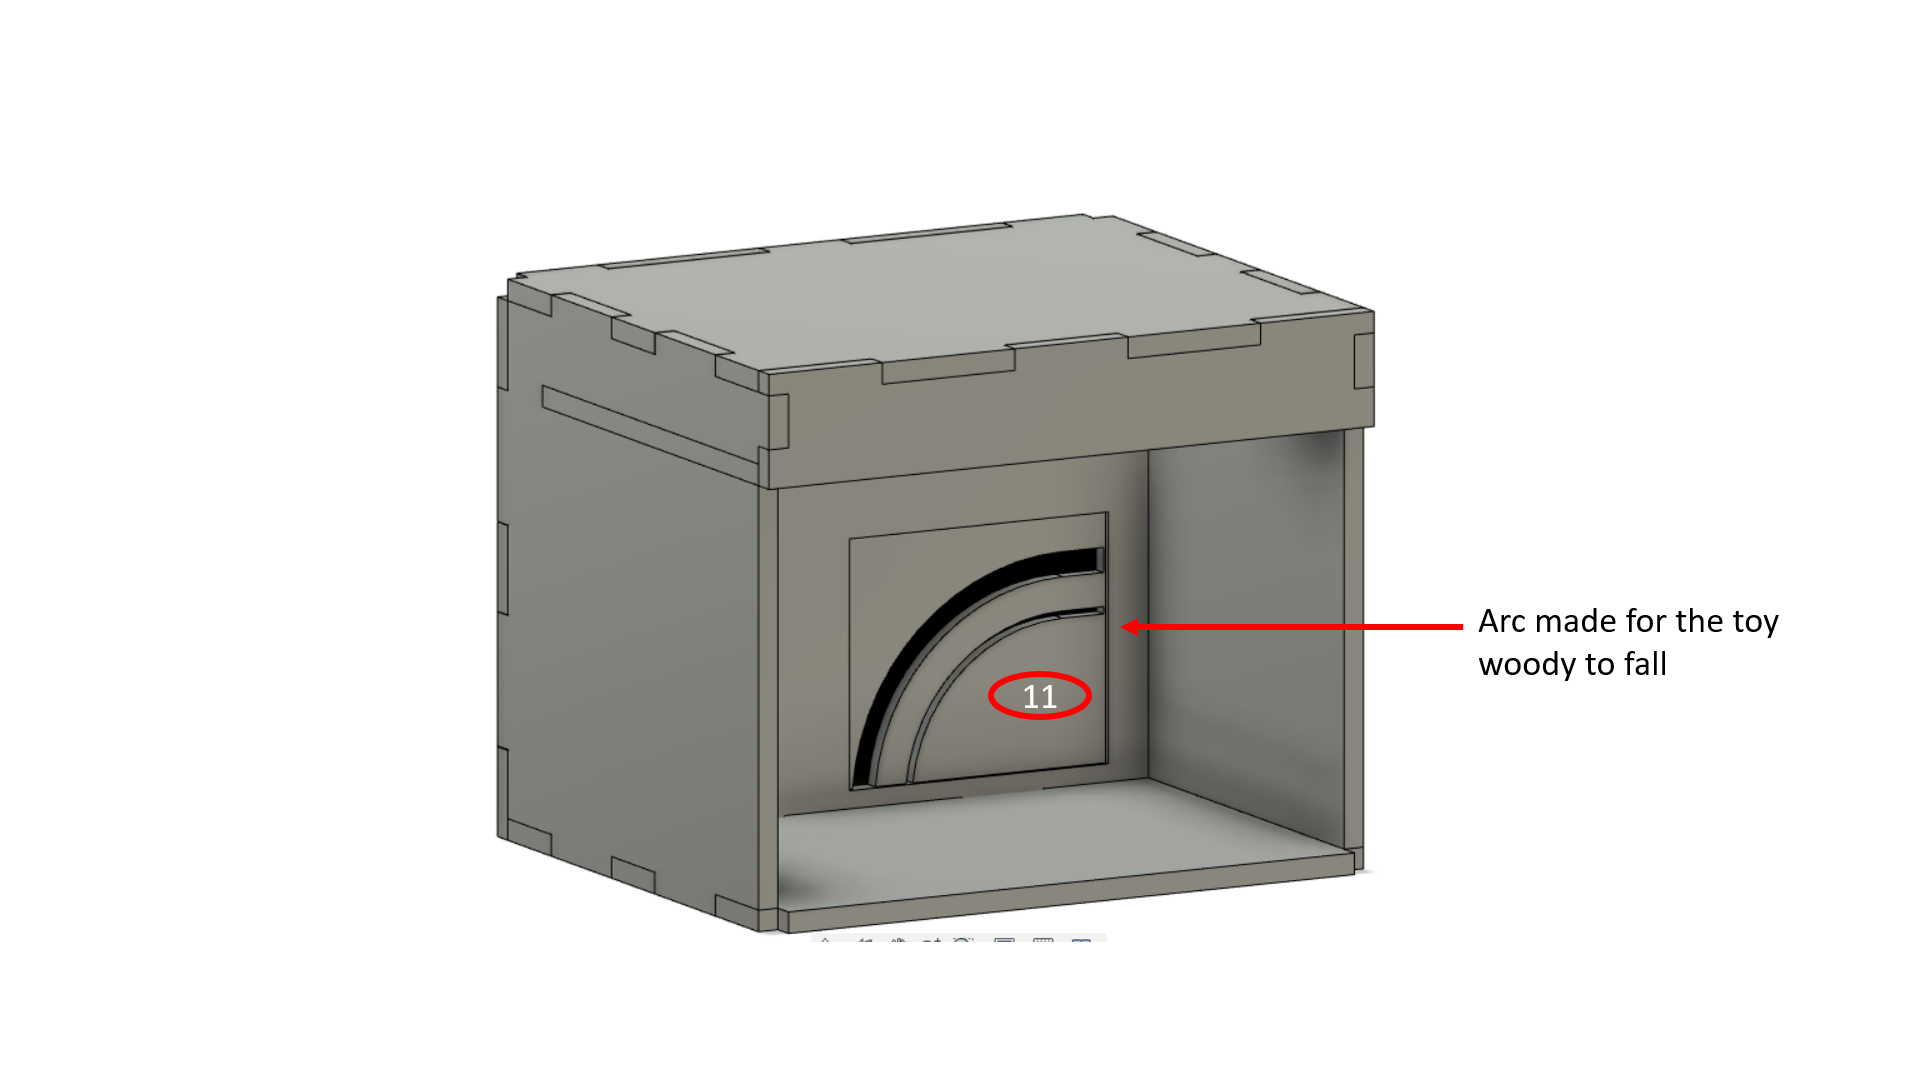
3- Another issue is that, the original idea was to have these toys printed and used within the interior of the box, in order to set the interior toy mood. However, the space inside had arc in it, that allowed the woody to move. So the printed toys will not have enough space inside to be put.
4- One more issue was that, the lights inside were too many, which caused the shadows to look like they are scattered or dispersed on the screen. It didn’t create a good quality look of shadow on the screen. So, we removed all the excess lights, and thought back to our Phone torchlight test check, and got to know, that only one LED light is enough, to create a good shadow on the door screen.
5- Other issues related to programming etc. are mentioned on my teammate yusif’s website.
Extra Toys References!
Here are some site references, in case anyone wants to search more for the downloadable toystory toys:
Final Hero Shots!
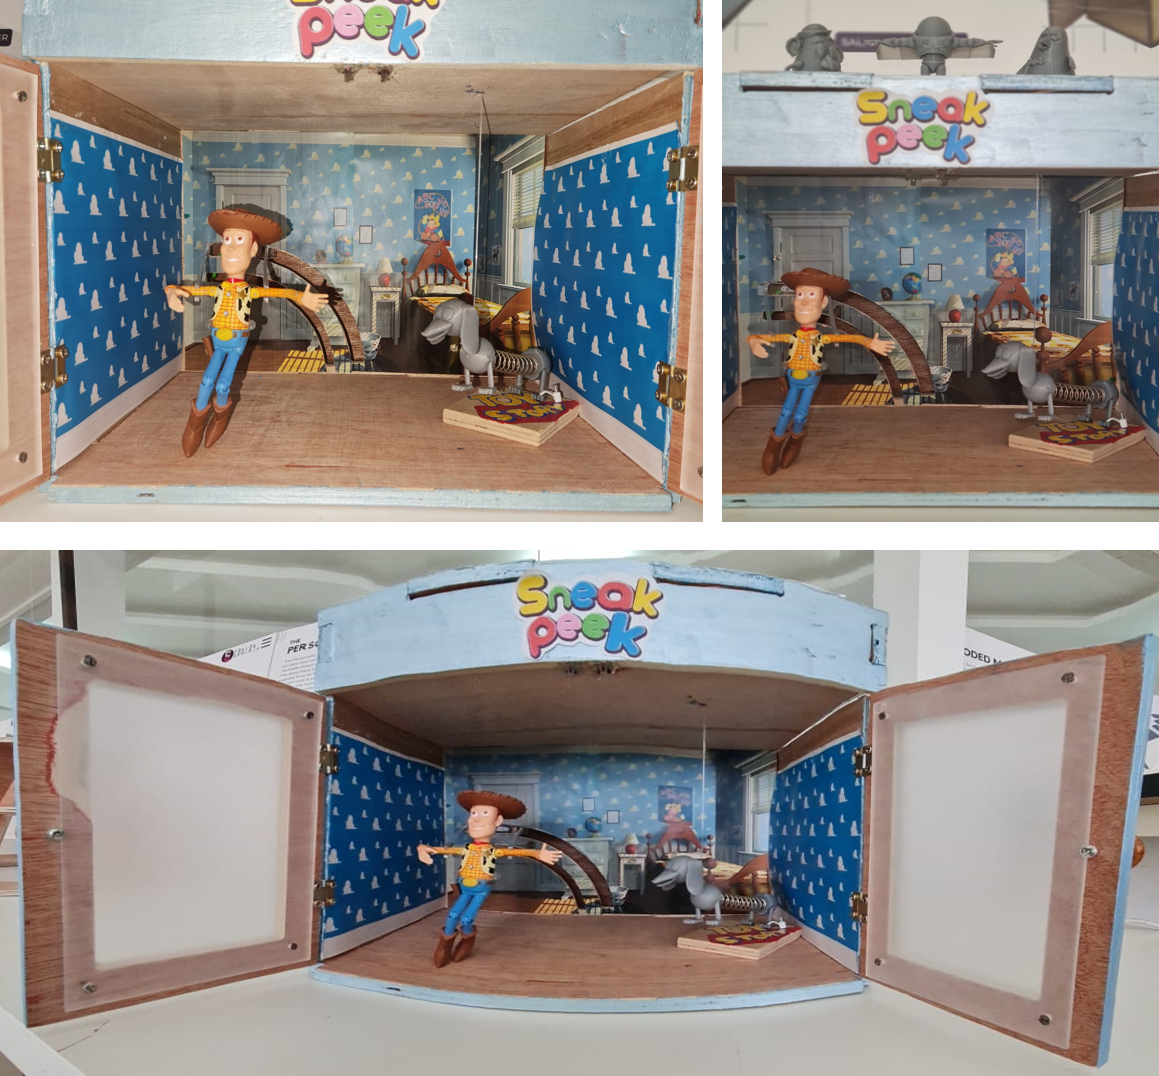
Test check Overview of the final box!
Future Developments!
For future developments, the project has much scope for it to be developed further. For example, the toys could be 3D printed in such a way, that their body parts are different (just like slinky dog), and small ball joints could be made in Fusion 360, which would combine with the body parts. These joints would then allow the toys to move, and create actions or movements in the box.
Strong holders or joints, or wires, or strings etc. Anything could be added in order to make the toys move.
In this box, the woody’s hands move up and down, and it falls sideways. Whereas the slinky dog only moves up and down. The future development could be that they toys move forward and backward, left and right, up and down. The idea here is that, by creating such ball joints, they would be able to move freely inside the box, and create an illusion of toys moving around inside the box.
Conclusion
I have learnt a lot in my FABLAB journey. I didn’t expect I would gain this much knowledge and experience in this lab, but it exceeded my expectations, and I’m truly grateful I was able to participate in this program.
Even if anyone doesn’t know about coding or programming, or even designing and printing etc. etc., the instructors have been our greatest support in this program, helping us out in each and every step. And even staying up late in the lab with us, in order to work out and sort out our problems. They, just like us, were truly dedicated to working and figuring out our problems, and how we could solve them.
Even though we only had 2 weeks to think and design our final project, but if more time was given, we could have worked more on our final touches and representation of the box. However, the progress that me and my teammate made, and the things we learnt, we will forever remember it, and incorporate it in our projects in the future, whenever needed.
This whole project couldn’t have successfully completed, without our instructor’s support and guidance, so we are truly grateful to them. I don’t want to say bye to my final project in the lab yet, but it was truly an amazing experience for me, because being an architect, I always wanted to try out 3D printings and cuttings, and I was able to perform all these activities in the lab, which I truly loved.
I feel that that these whole assignments in each week that we had, made me more knowledageable about such machines, and I even thought of how many things I could make and accomplish, using the techniques I learnt in the lab.
Being an architect, I truly enjoyed all the designs I made, ranging from Teddy Bear, to light and shadows (from laser cutting week), and finally to the last designing of the toystory box. It made me realise that we architects don’t have to just stick to the good ol’ thinking of just desinging things or objects or buildings, but also that we can test and print some amazing works ourselves too, and see how such things would look in reality.
With this, I say good-bye to my Fablab journey. But it ain’t a farewell, as I know I will use these techniques that I learnt, in much future life ahead.
Good luck to everyone, who’s going to start making their final projects. Just know, if me (who had zero idea about coding and programming) could do this, YOU CAN DEFINITELY DO THIS TOO!
The END!
Have you ?
Made your slide: 1920 x 1080 pixels with your name, project name, Fab Lab name, a photo/render/sketch of your project, a brief description of what your project is/does
Made a ~1 minute (10MB/1080p) video demo of your project and you explaining your project
Made a separate Final Project page that briefly summarises your project
Included the BOM (Bill of Materials) for your project
Linked from this page to any weeks that you worked on your final project
Included all of your original design files in the archive (2D & 3D, board files & code). No external hosting of final project files - discuss file sizes with your instructor
Included the license you chose
Acknowledged work done by others