3. Computer Controlled Cutting
This week I worked on computer controlled cutting including laser cutting and using vinyl cutter.
Group Assignment
In the group assignment we explored the characteristics of the CO2 laser cutter including the focus, power, speed, rate, kerf, and joint clearance. You can find more details in Sara’s Website.
About Laser Cutting Machine
The CO2 laser engraving and cutting machine that is available in the FabLab has a 1000 W power output. The largest size that can be cut out of it is 90 x 60 cm, which is the size of the cutting bed. The machine uses the X, Y, and Z axes to operate. The machine may be used to cut or engrave a variety of materials with variable thicknesses, including MDF wood, cardboard, acrylic, and thin wood. More about the machine focus, power, speed, rate, kerf, and joint clearance in Sara’s Website.
In the group assignment we did the laser foucs exercise where the purpose was to determine the focal point needed to set for the laser to cut the required material with precision and accuracy and minimal waste or damage to the material.
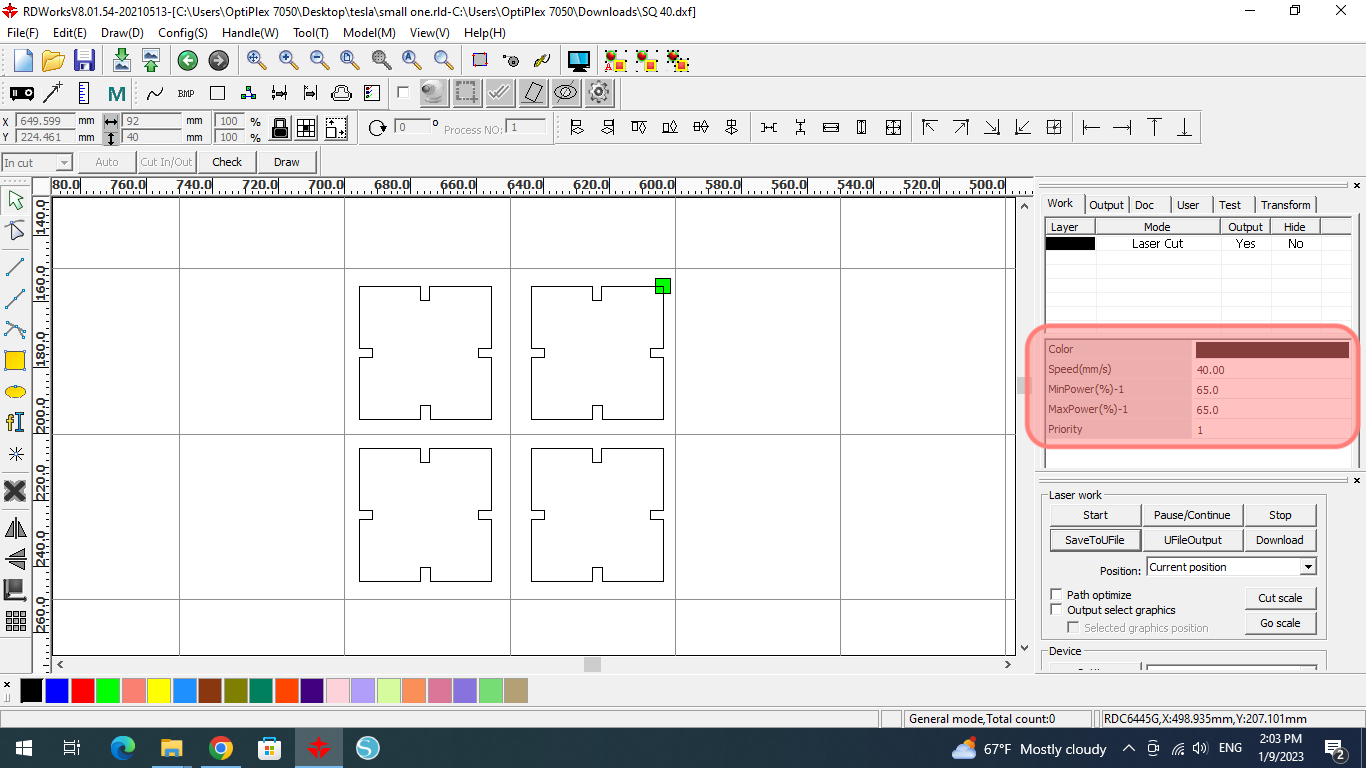
Speed and power experiment, the objective was to determine the ideal speed and power settings for cutting designs with the laser-cutting machine for a specific mateial. For the group assignment we used 6 mm cardboard, so on the sofware we created a grid of squares then assigned different speed and power combination to each. We started from a speed of 10 mm/s for the first square, and incremented by 10 for each following square. For the power, we started with 50 Watts and incremented by 5 for each following square. The result showed that only one of the squares was cut completely through on both sides of the cardboard, which had the settings as follows power of 65 W and Speed of 40 mm/s. For every different material you want to use you should do a speed and power test.
When using the machine pay attention to safety procotions including, keeping the hood closed, and keeping a distance between you and the machine while it is cutting. When the machine is done cutting wait a little bit before opening the hood, becouse the machine has a vacuum that get rid of the fumes. In case of a fire use the fire blanket aviliable near by, or use the red fire extinguisher aviliable near by in the lab.

Laser Cutting
This week individual assignment was to design, lasercut, and document a parametric press-fit construction kit, which can be assembeled in multiple ways.
What is Parametric Design?
With parametric modeling, you can easily change dimensions of a model without having to painfully go over individual steps and correct it there. Go to modify then change parameters, here you can create new parameters and assign its value, you can use this parameter whenever you’re defining dimensions in a sketch. Also, you can do basic math with them; for example you can define that an edge should be thickness×2 long. Using parameters you can quickly resize your model and see the changes happening in real time.
What is Press-Fit Construction Kit?
The pieces must fit together without using glue, nails, screws or other fasteners. The design should have joints that fit together in a precise way. The pieces should be assembeled in multiple ways.
With all the information mentioned above, I created a simple square 🧩 design in Fusion360 using parametric design which made editing my design pretty easy by changeing the dimention only one time. Following is the steps of making the square 🧩:
1. Step 1, in Fusion360 create a sketck of a square (size: 40mm)
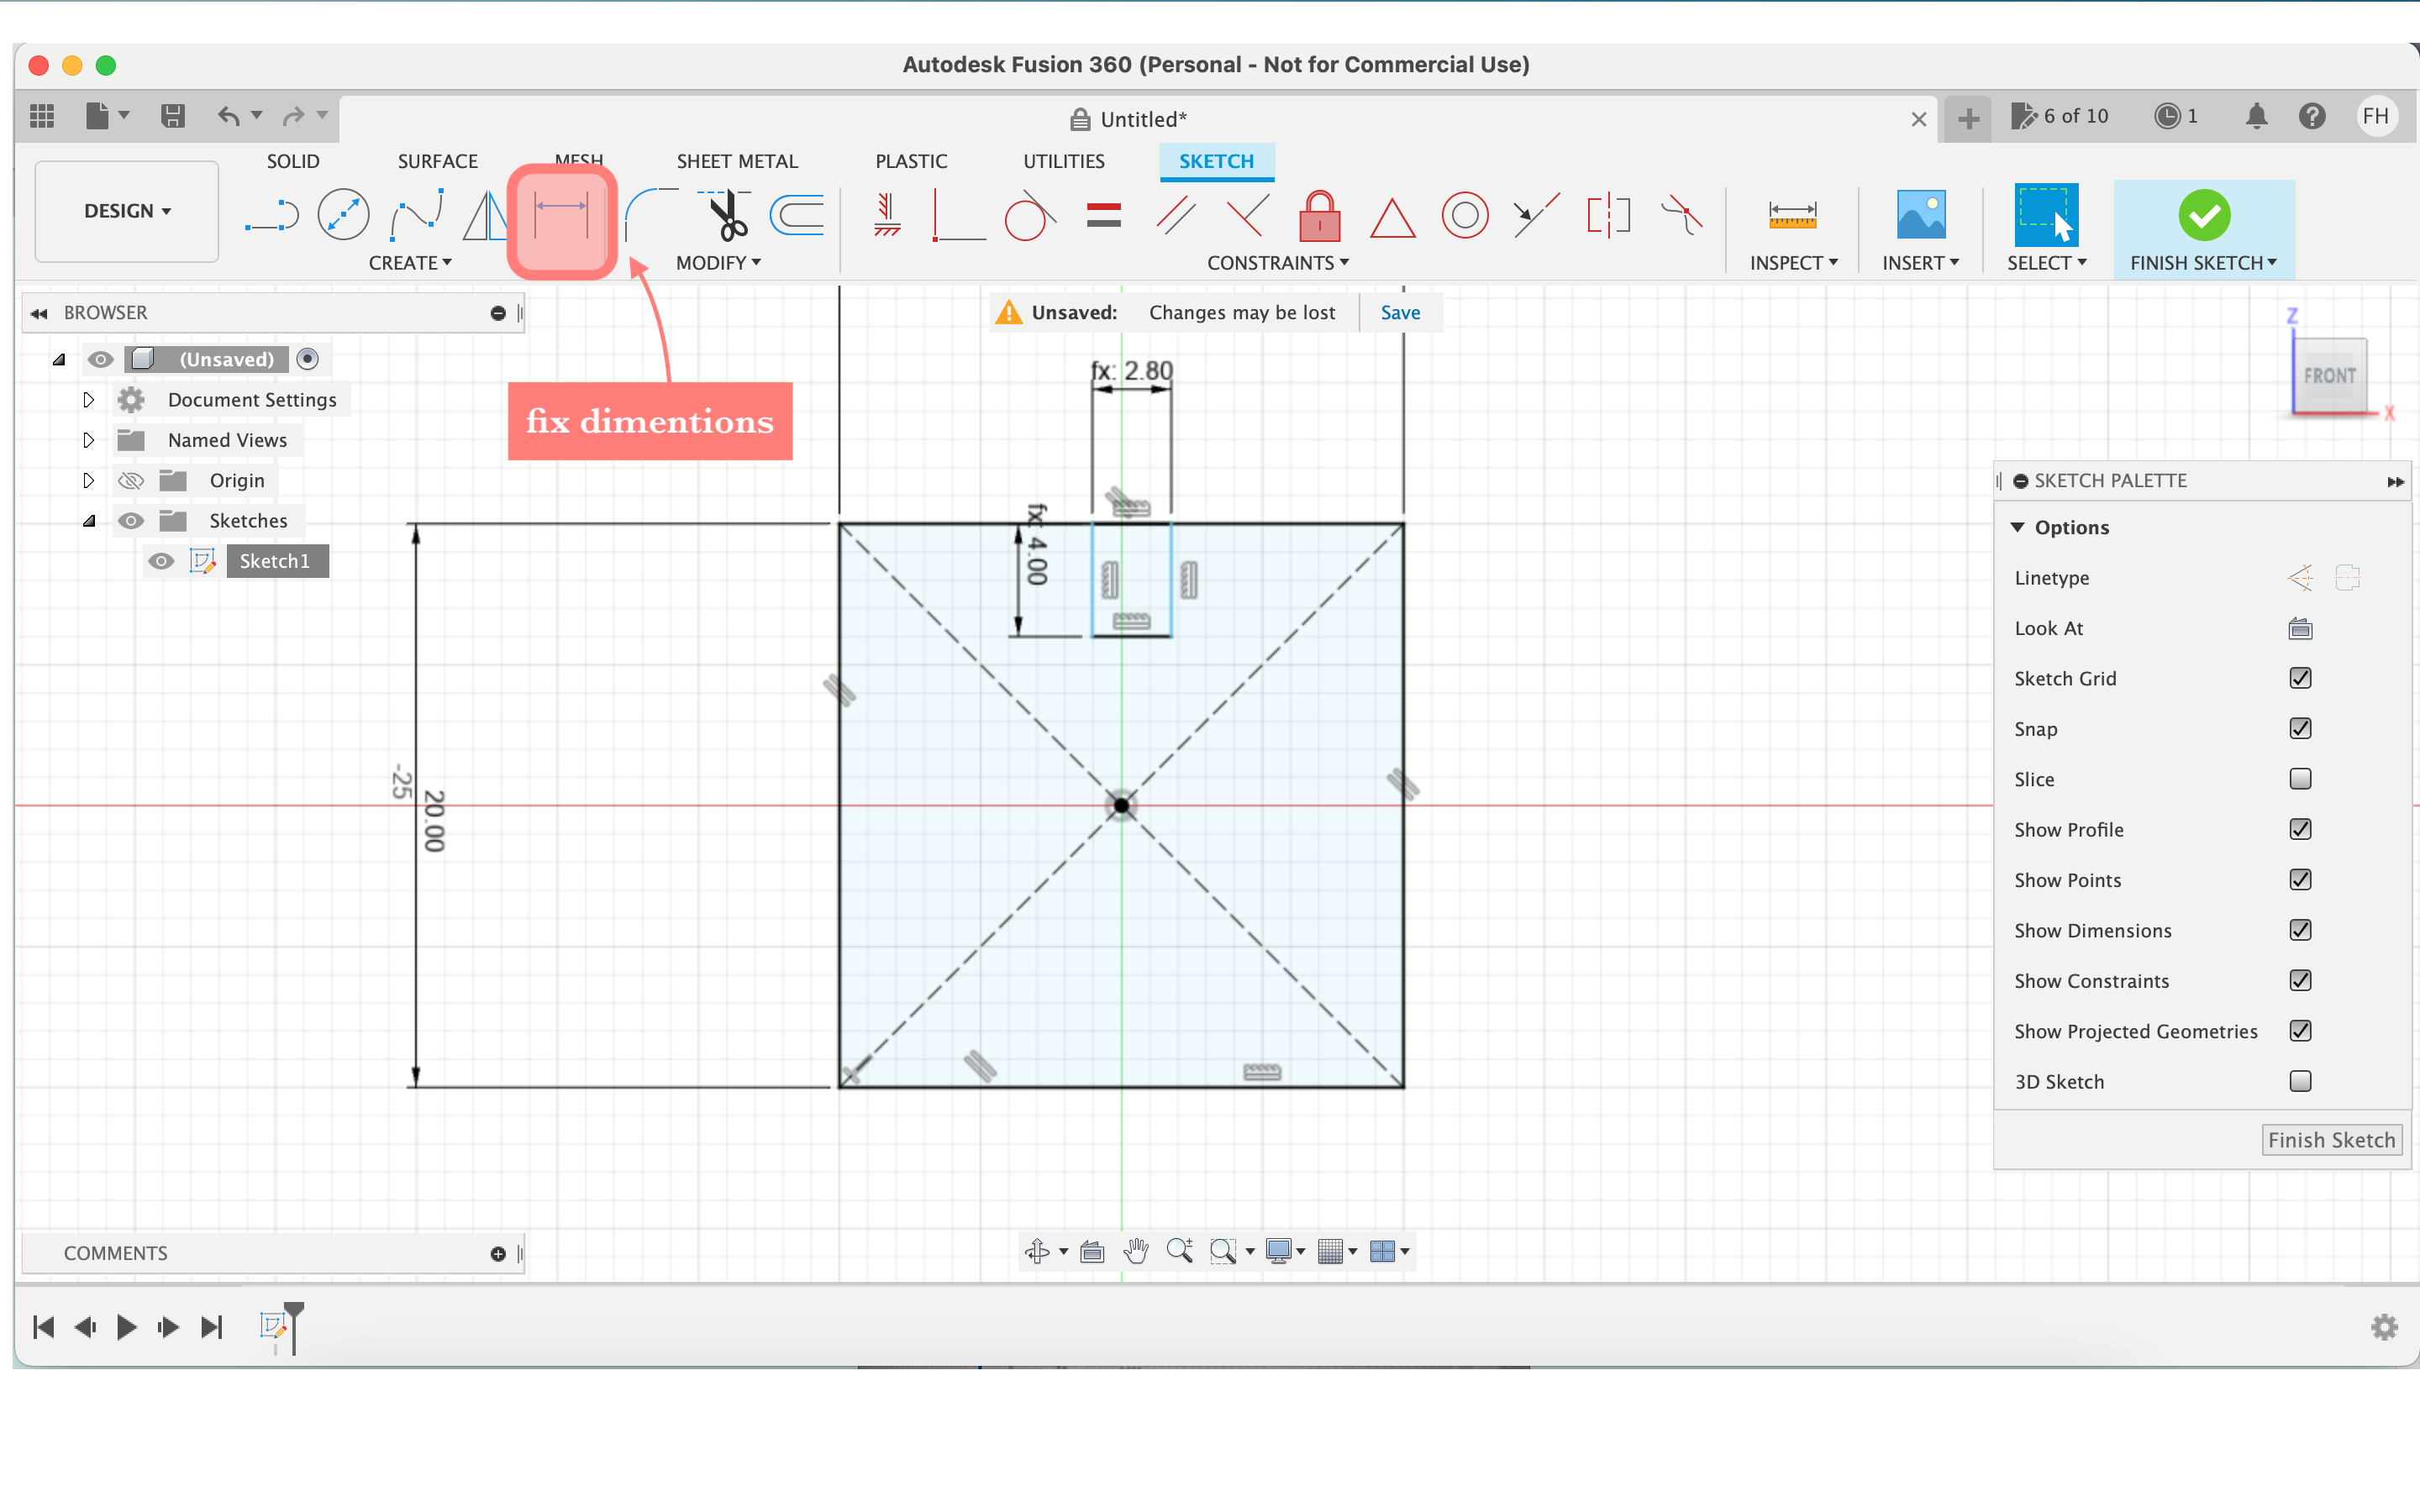
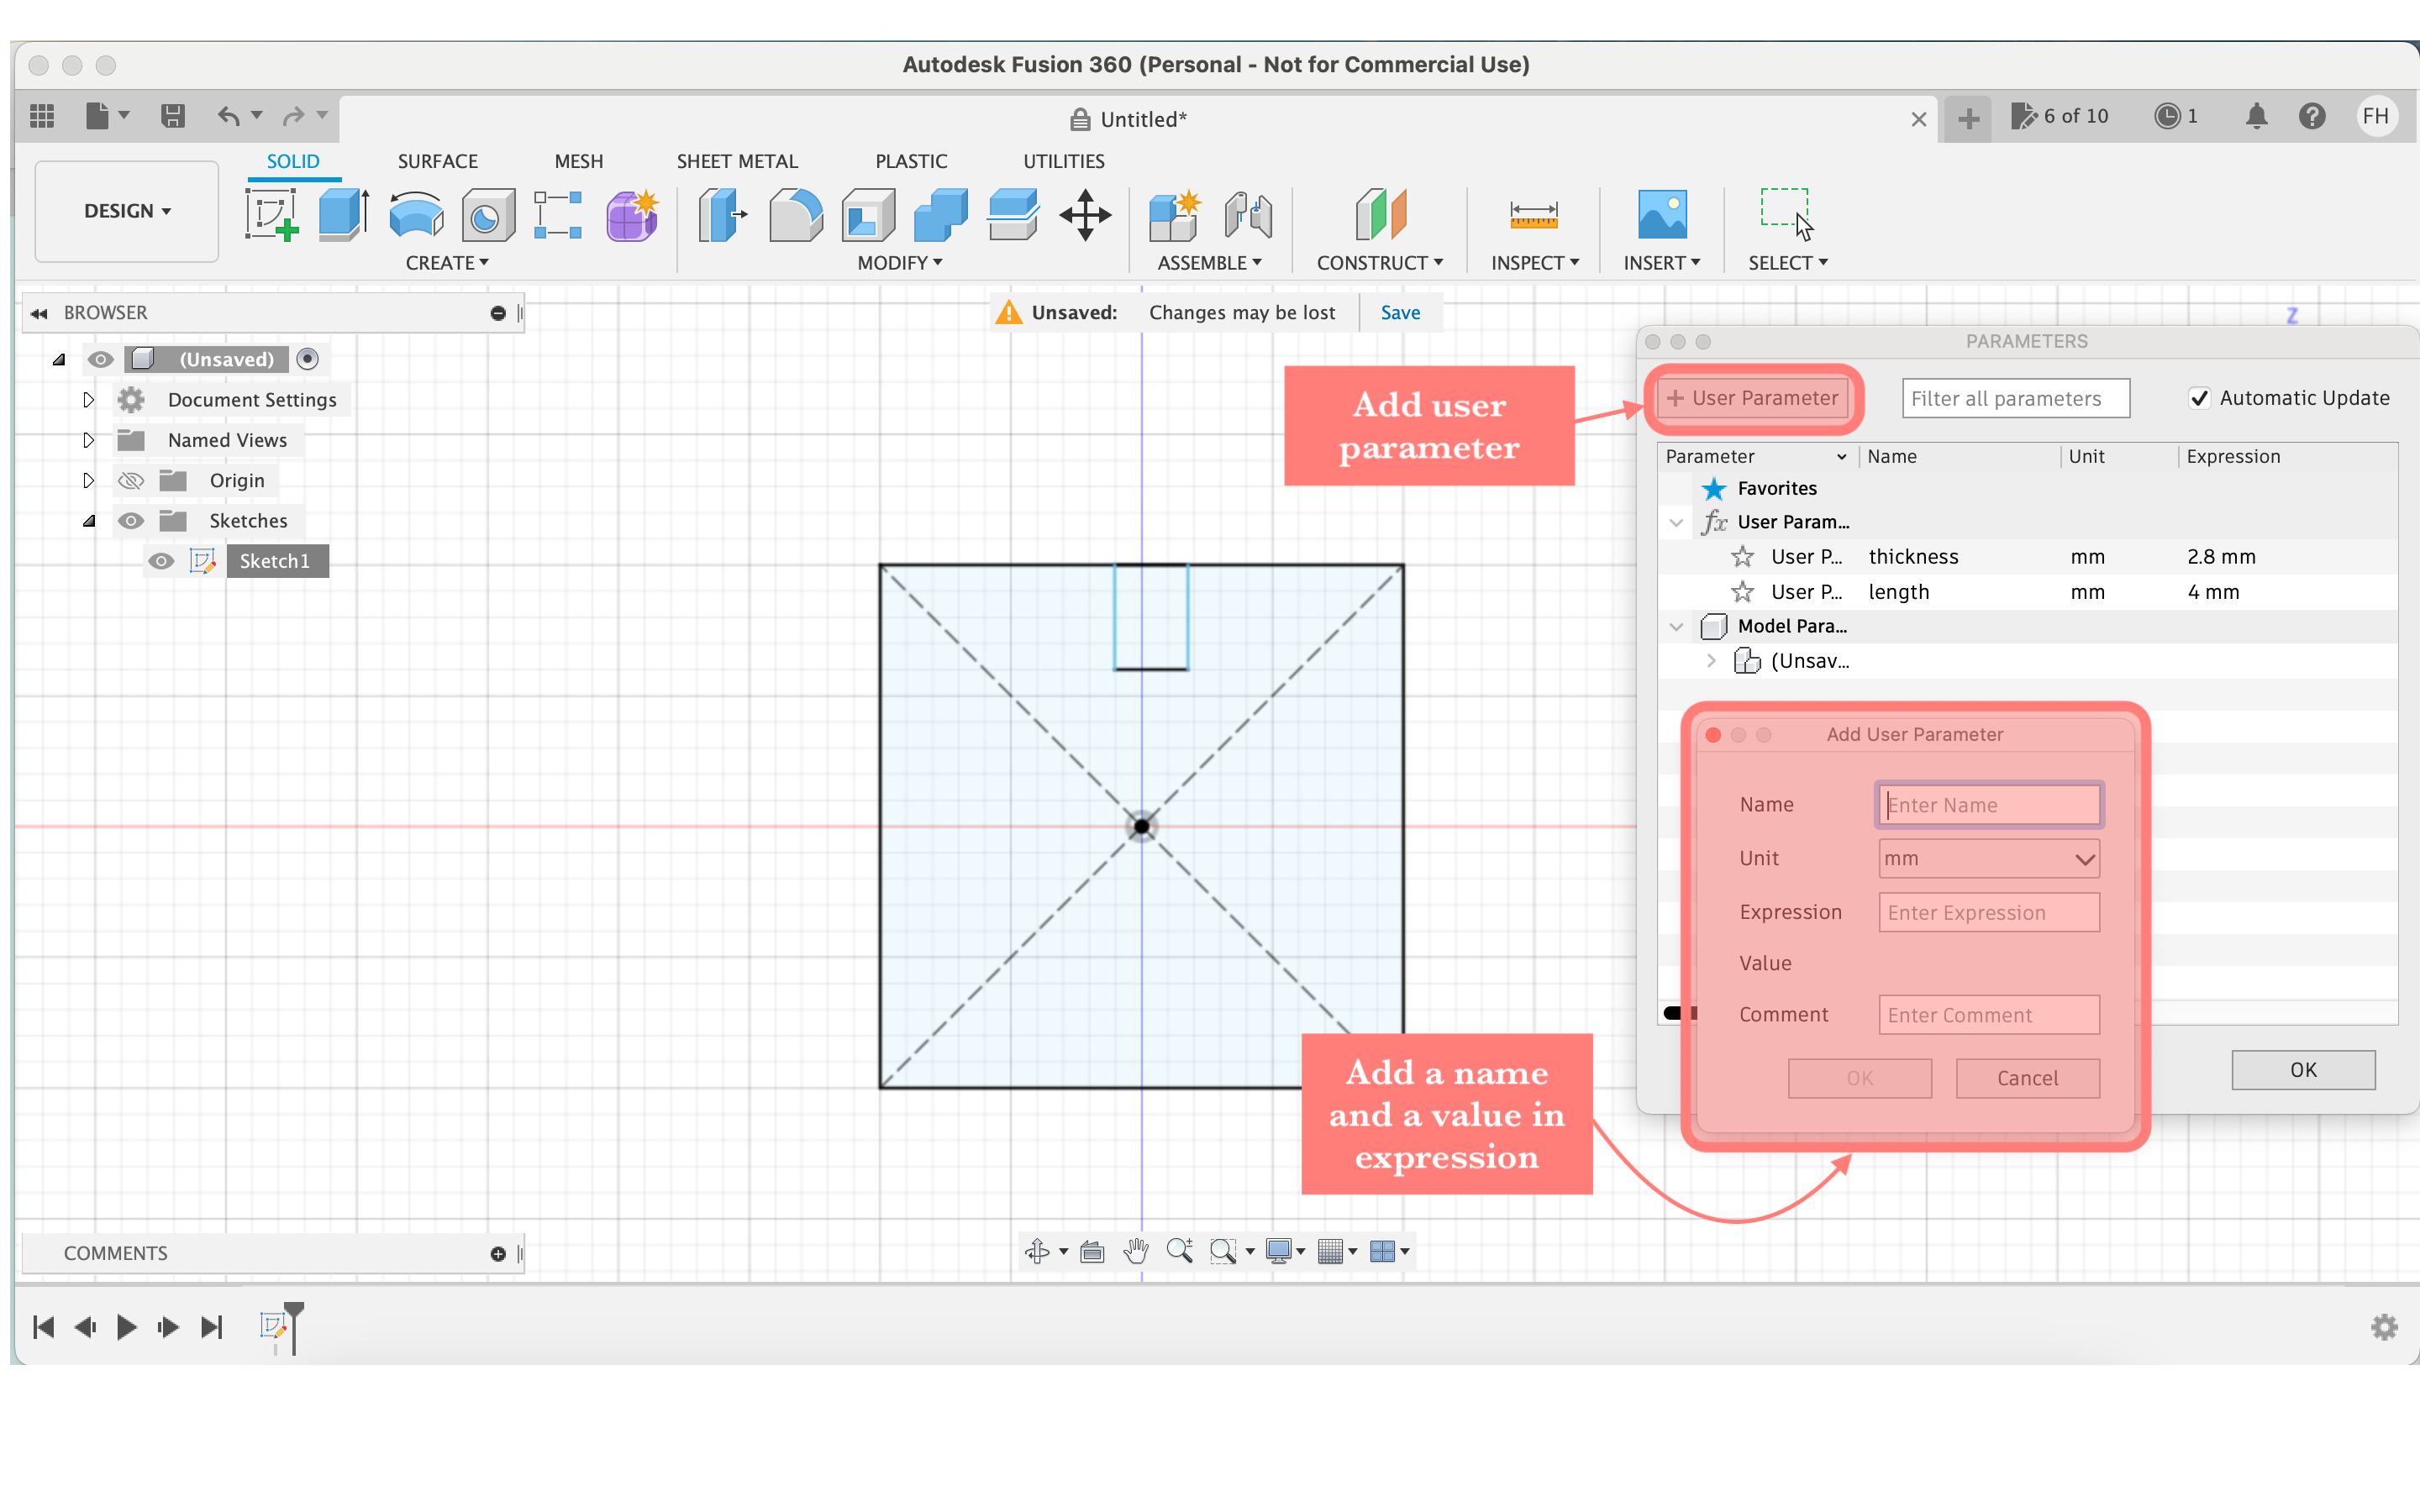
2. Step 2, create a smaller rectangle, then from modify click on change parameters

3. Step 3, now from the parameters window add a new user parameter, then call it a name and give it a dimention. I created thickness of 2.8mm and length of 40mm
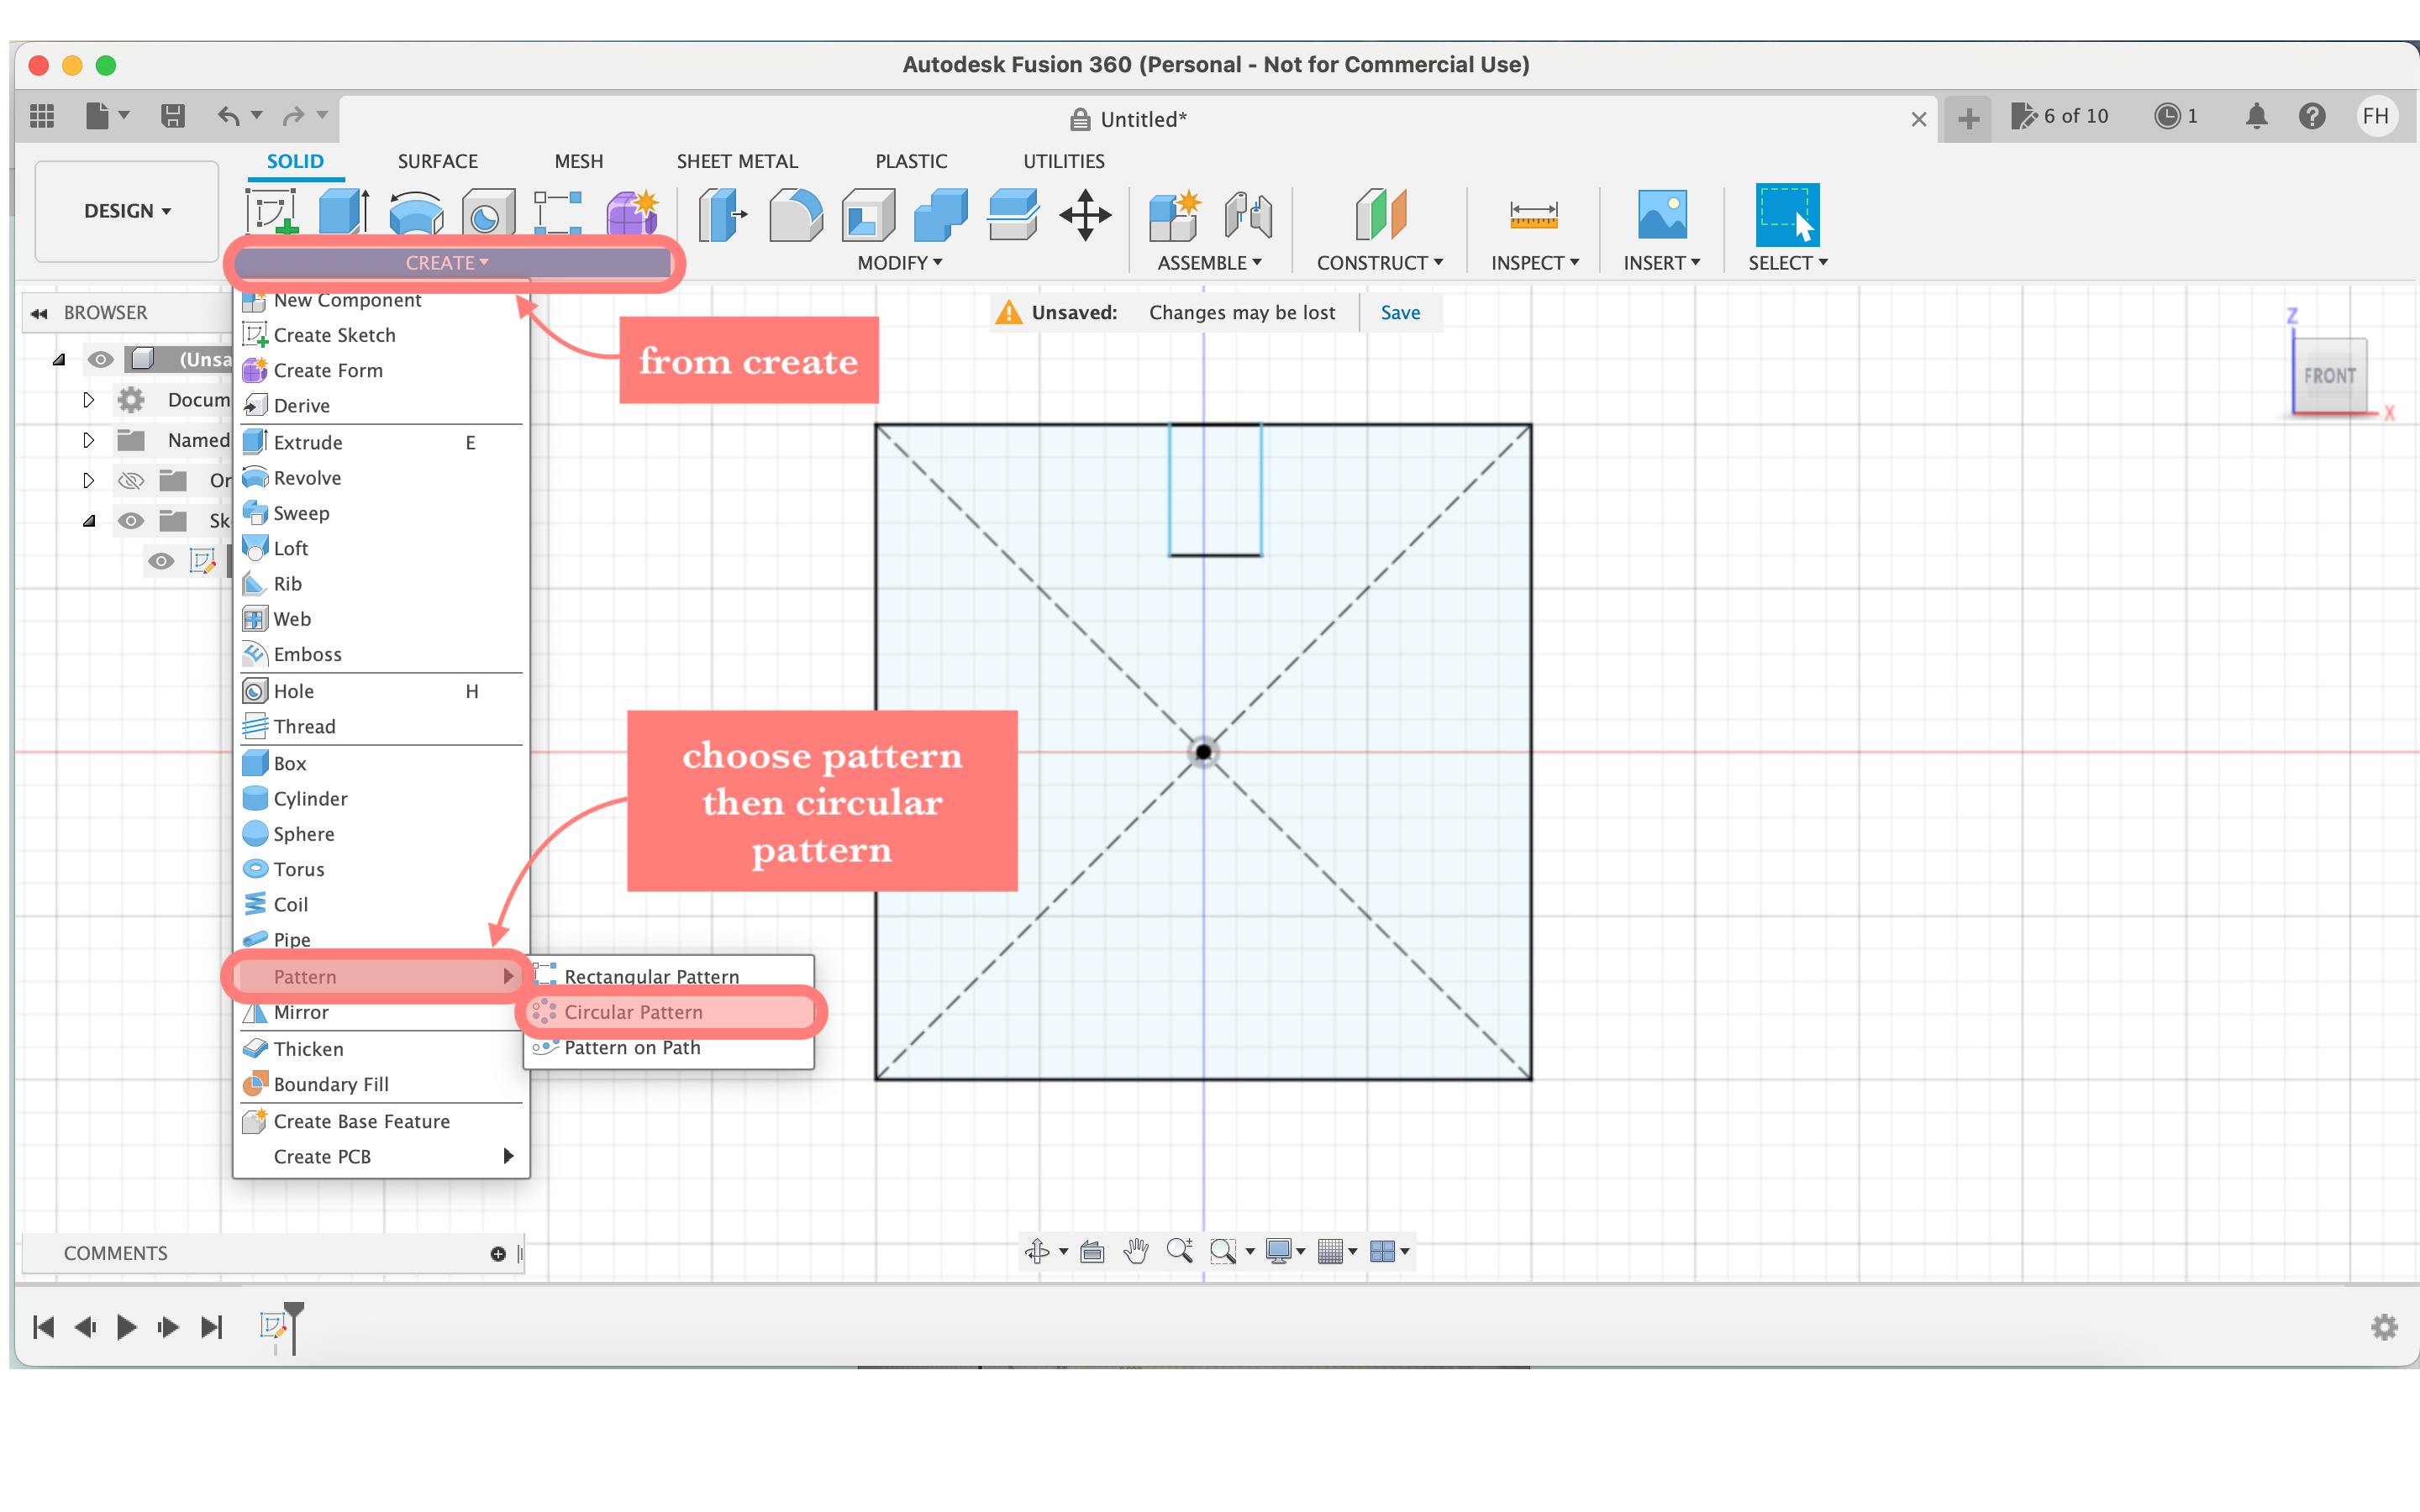
4. Step 4, from create do a circluar pattern for the rectangle
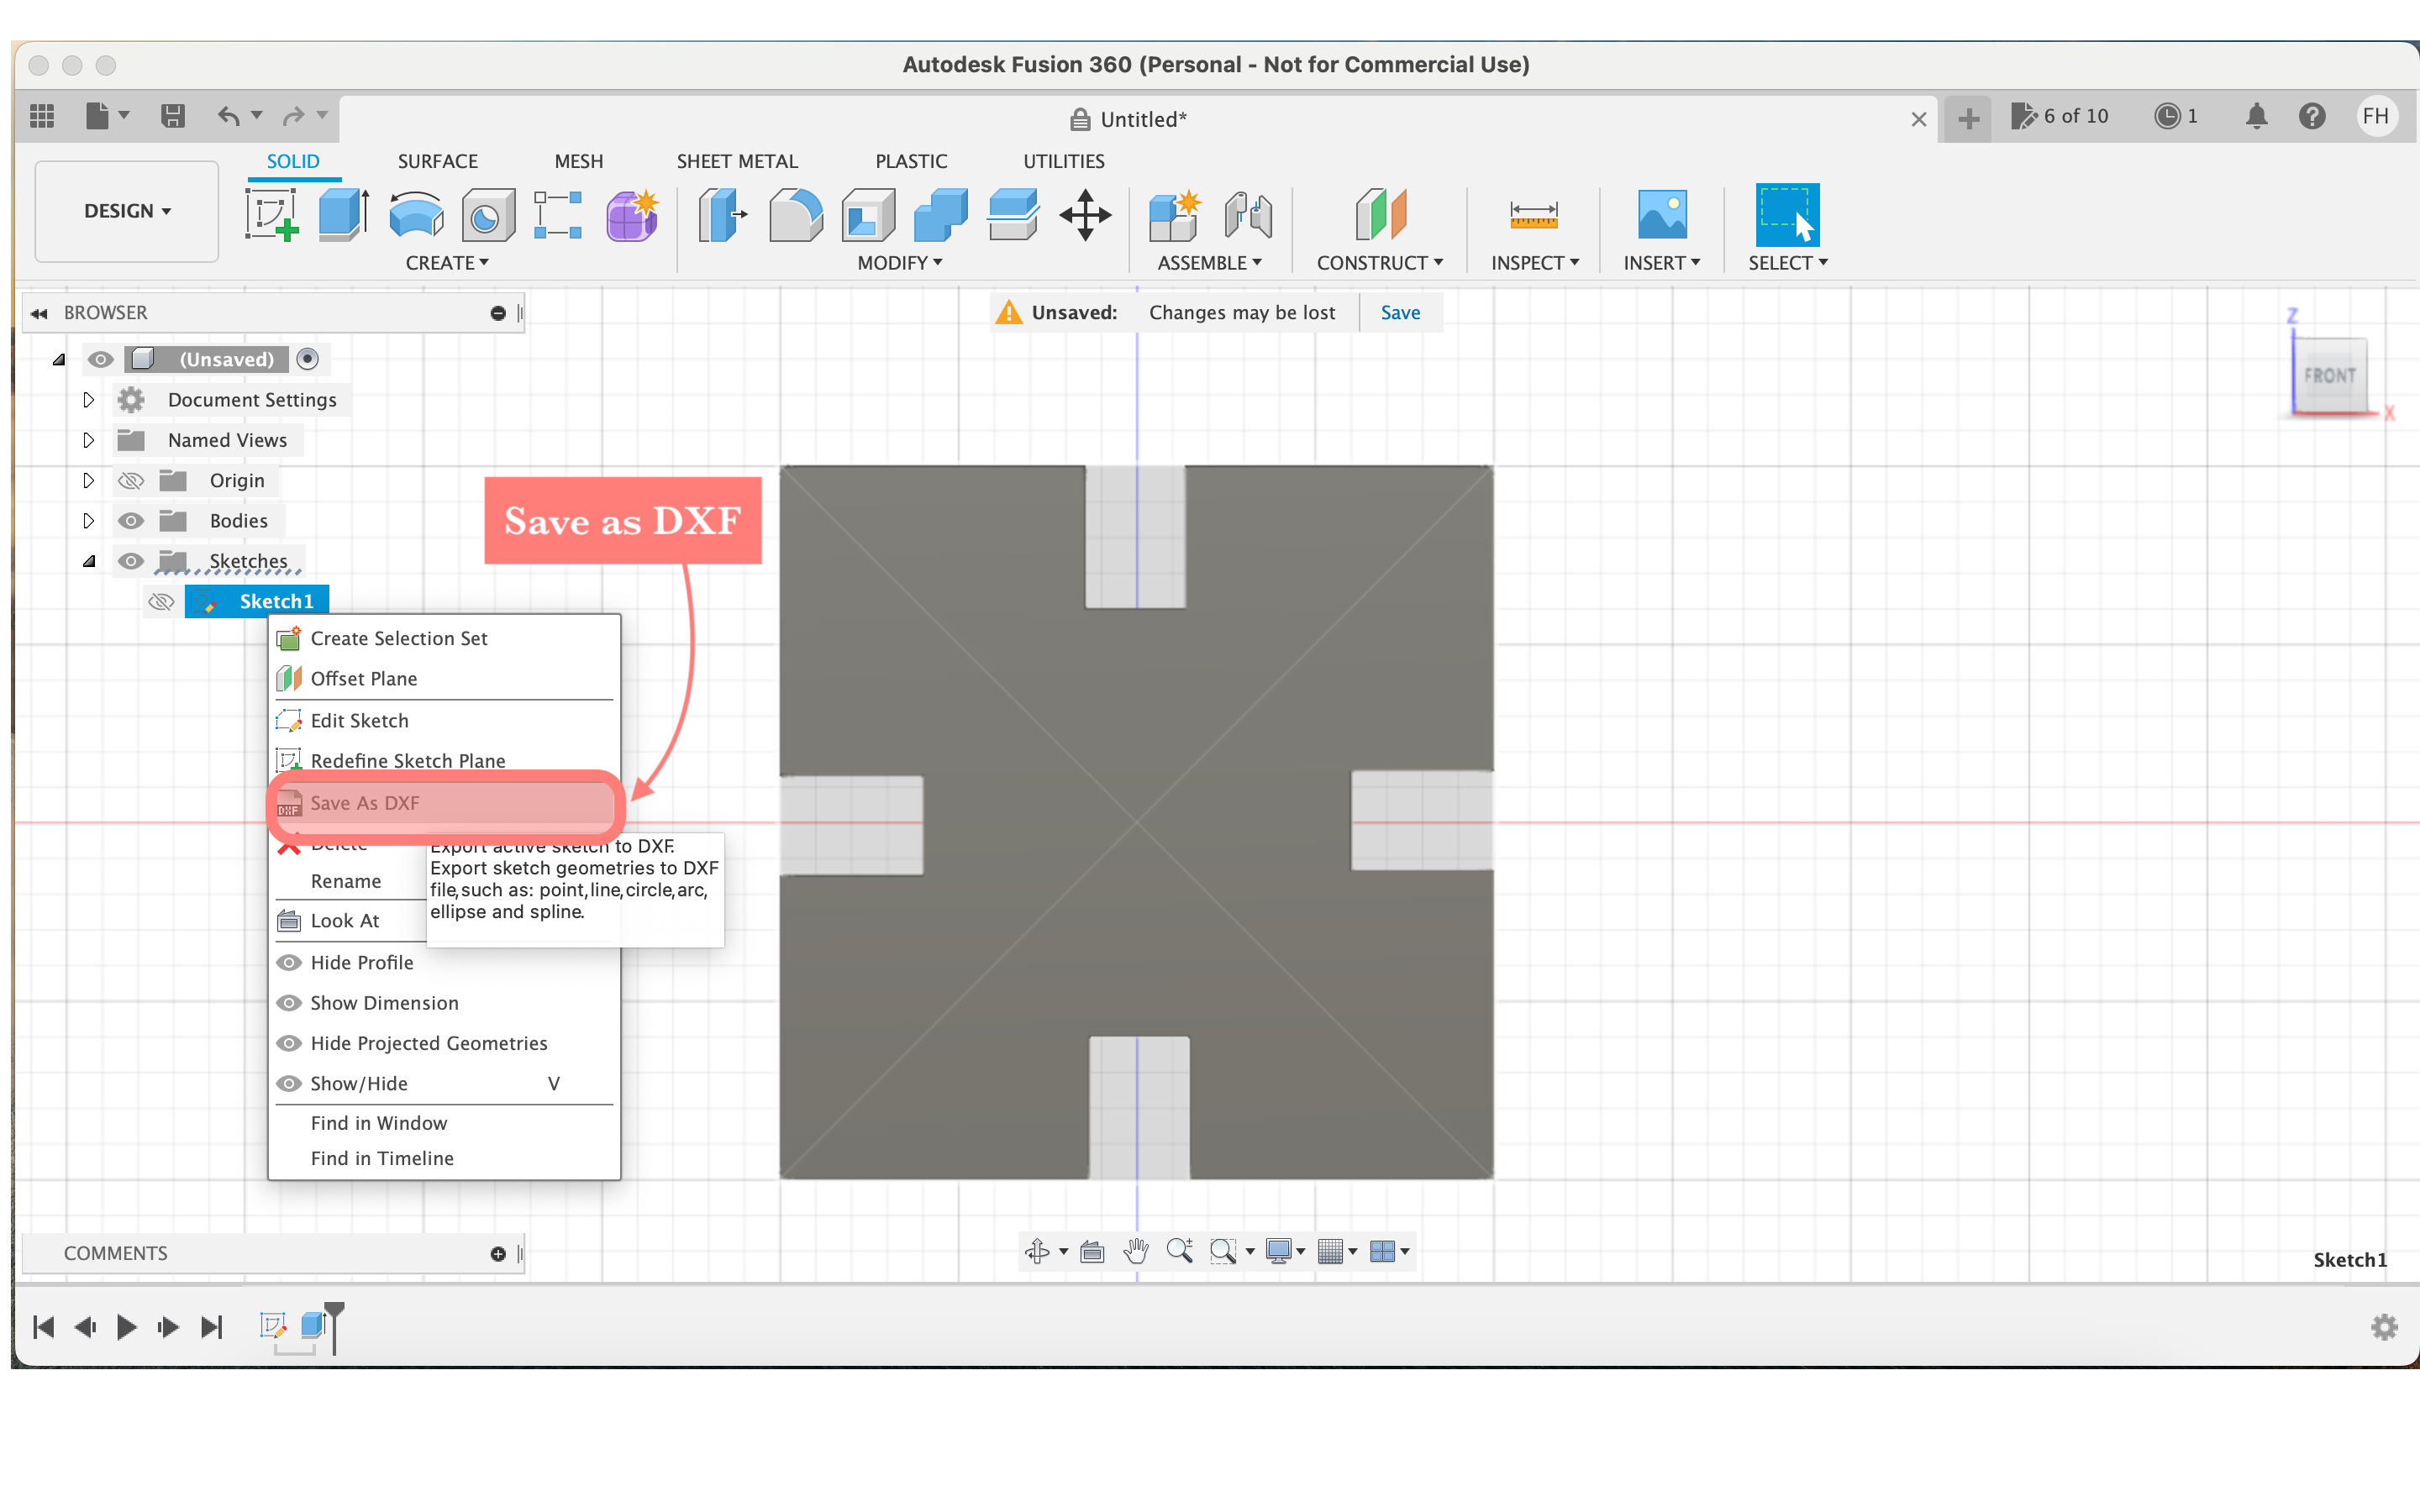
5. Step 5, finsh the sketch and extrodue it, then on the extroded sketch create another new sketch, finally save the last sketch you made as DXF
You can see the design in Fusion360 below.
6. Step 6, afer finishing the sketch I exported it as DXF file, and then sent it to fablabbh.share@gmail.com then I imported the design to laser machine software.

7. Step 7, next, I duplicated the design using array.

8. Step 8, after that I modified the settings to sute the cardboard which was almost 6 mm in thickness, so I set the speed and power to 40 and 65, according to previous results. After that, I sent the design to the machine by clicking download.
The result of group assignment showed that only one of the squares was cut completely through on both sides of the cardboard, which had the settings of 65 W for power and Speed of 40 mm/s.
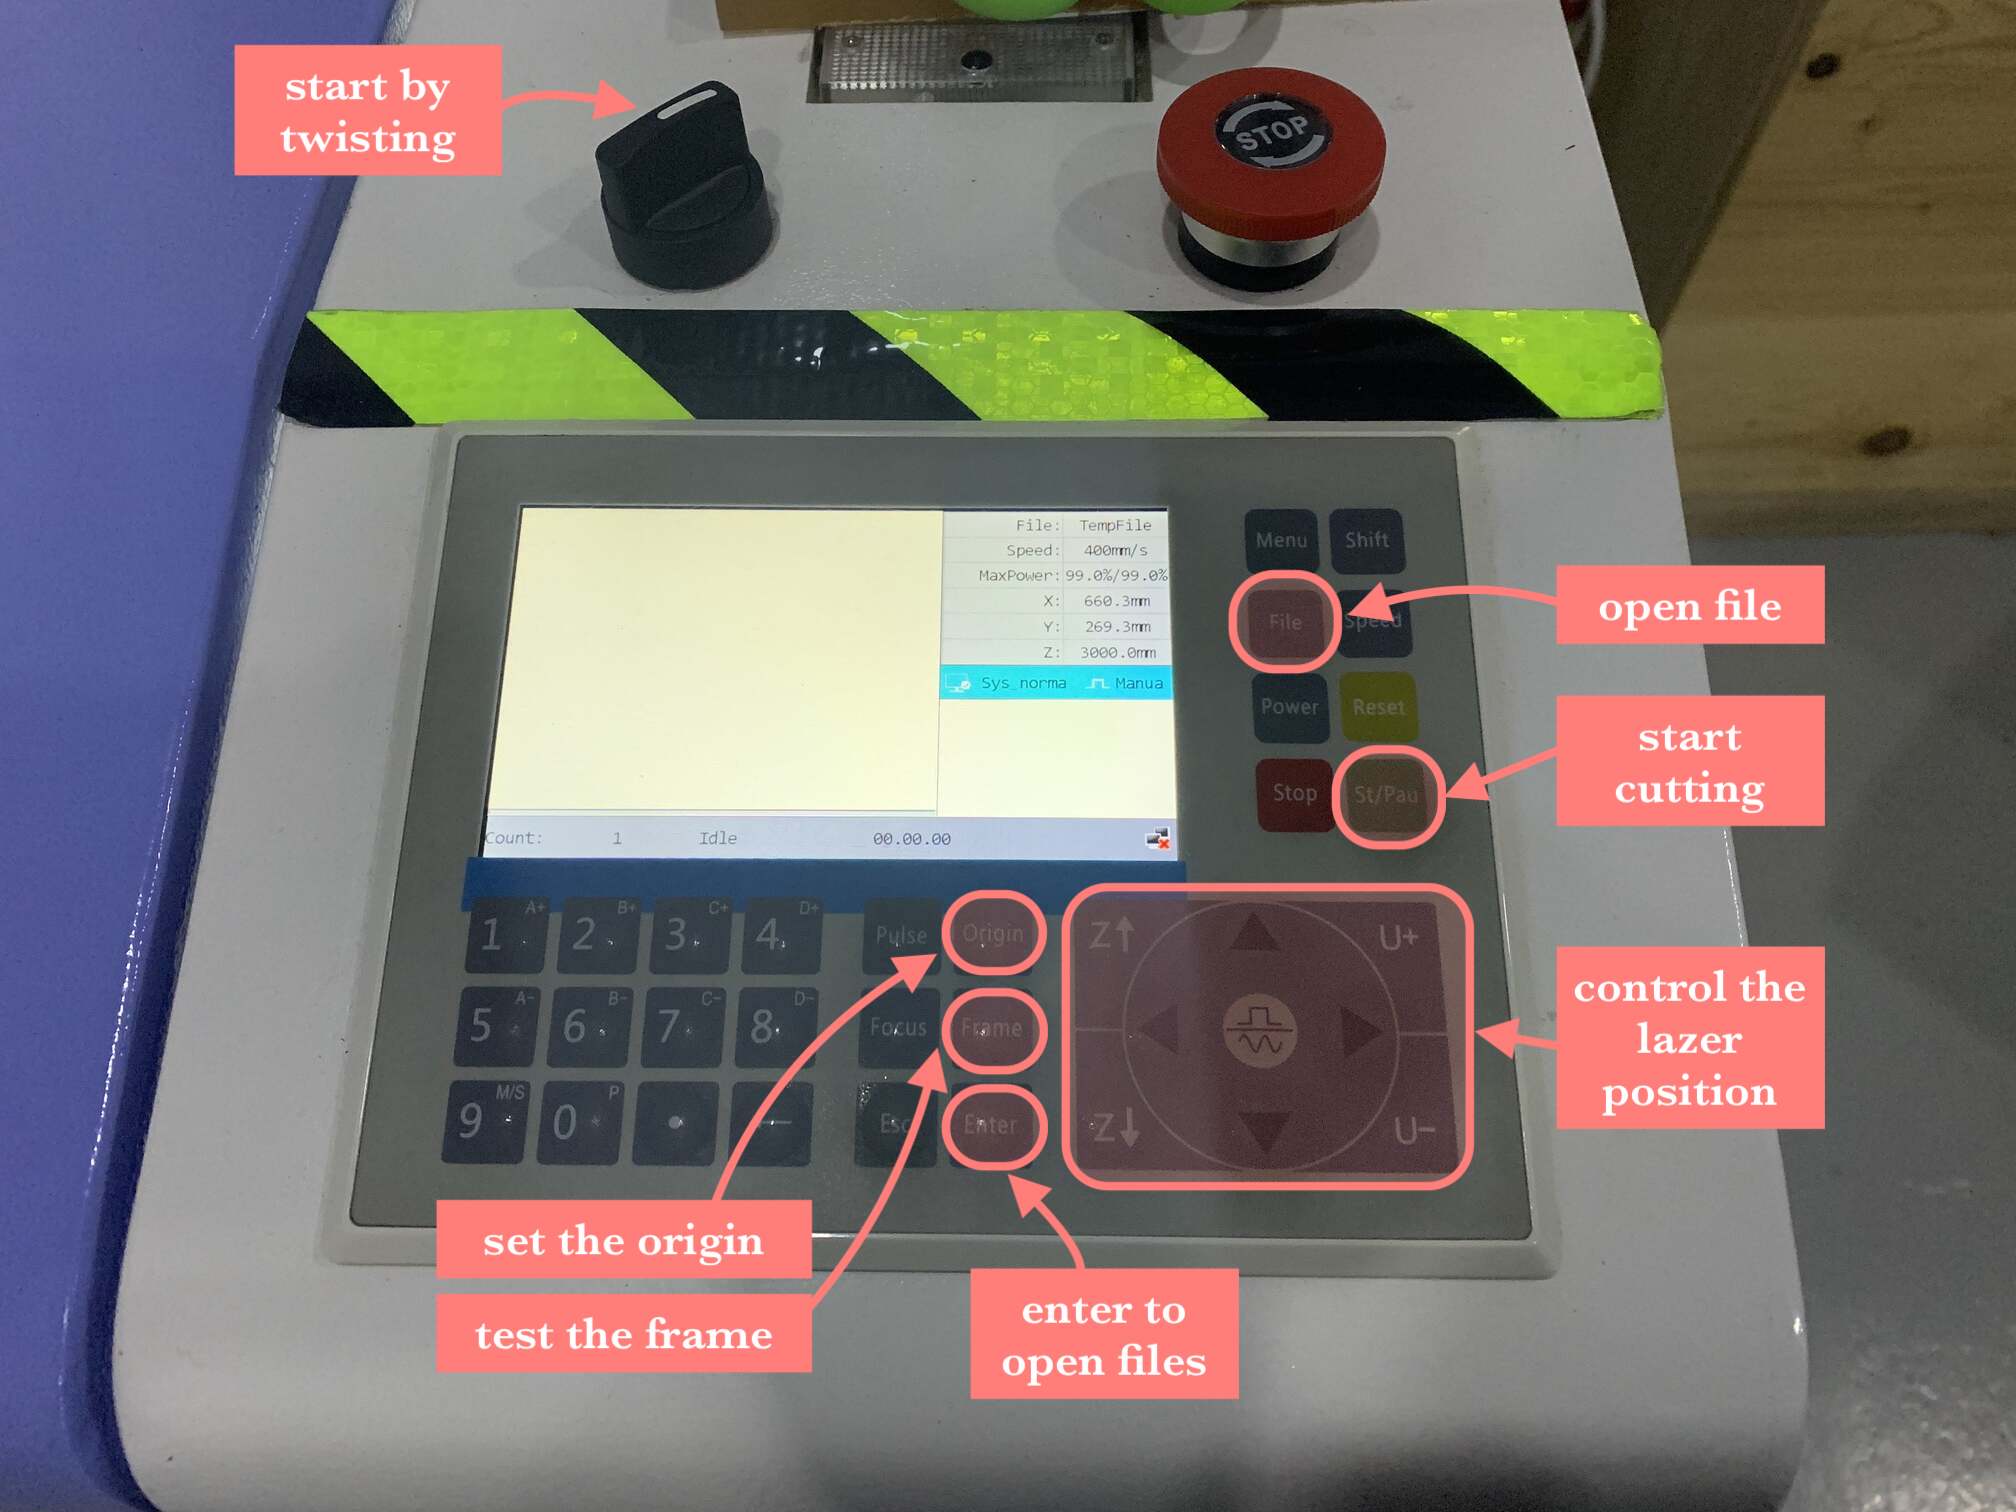
9. Step 9, now on the lazer cutting machine
- I opened the file, using file and enter buttons.
- Next, I add the material in this case cardboard of 6mm thickness.
- Then I move the lazer to set the origin which is where I want it to start cutting.
- Also, move the lazer in the Z direaction where there is a space between the material and the lazer, this space is specified by using a lego piece, usually placed on top of the machine.
- Try to test the frame before starting to cut to make sure of the size.
- Finally click start to start cutting.

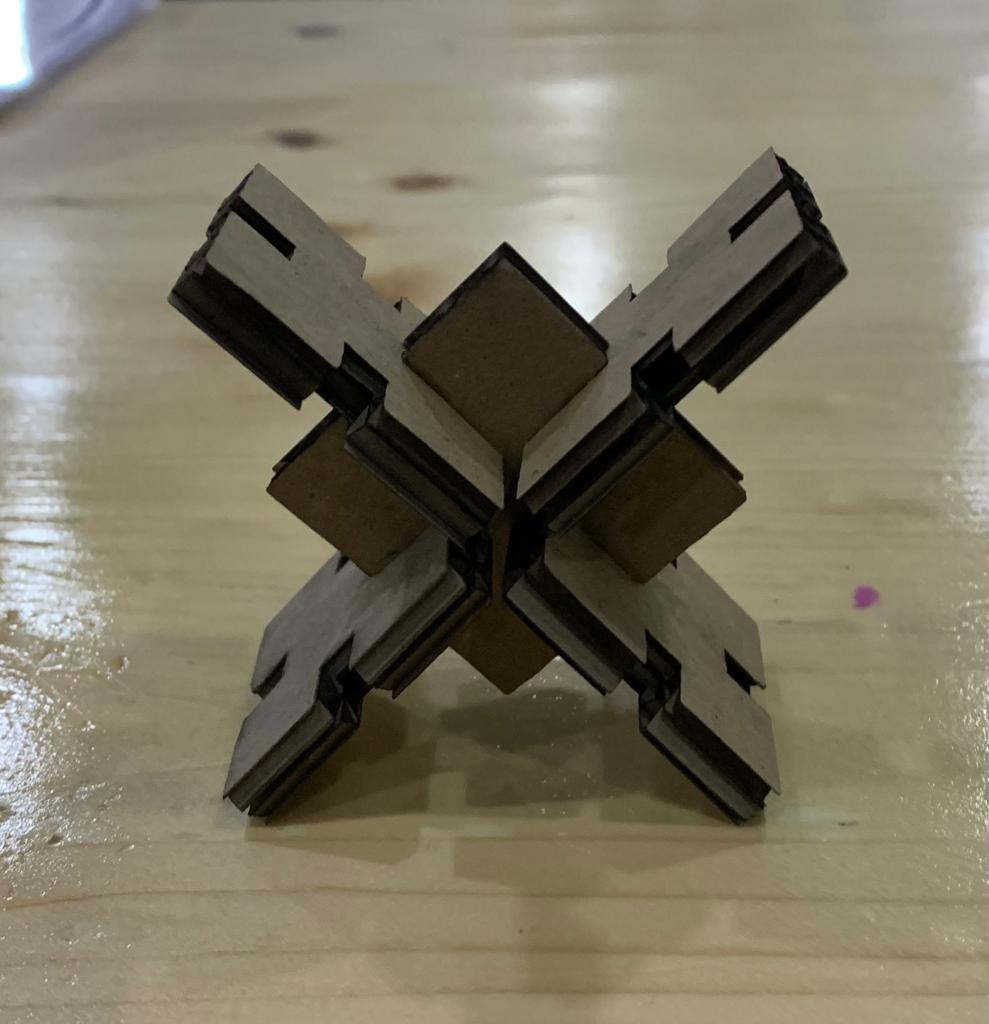
This is how the final result turned out 🧩. Note the square is so much smaller in real life, it is only 4cm in size.
This is a single square.

The final design from a side view.

The final design from a top view.
 The final design from the front.
About Vinyl Cutter Machine
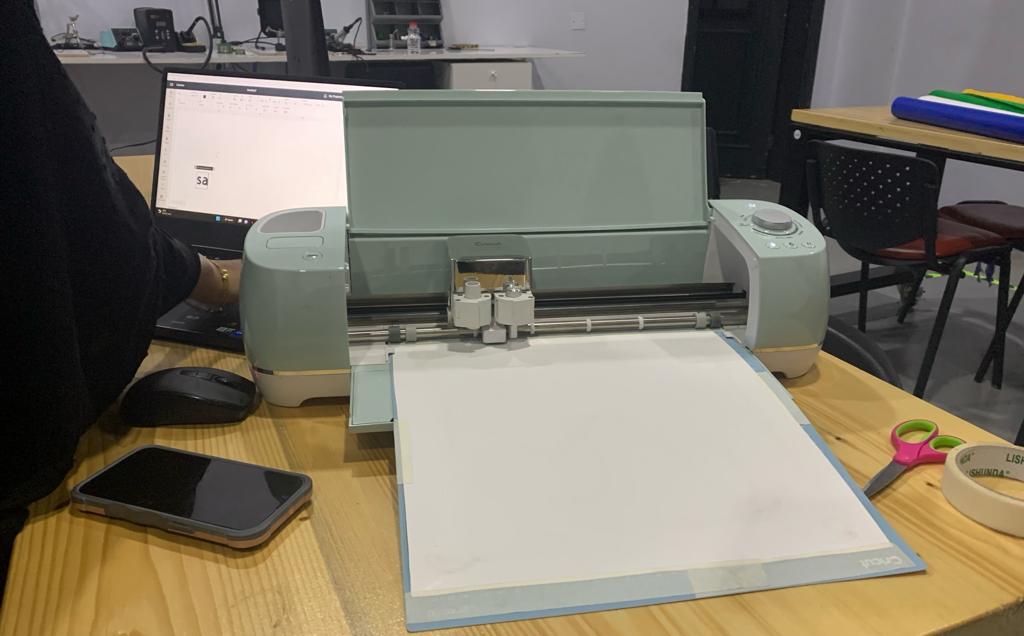
Cricut Cut Smart 2 is a digital cutting tool that can be used to cut a variety of materials for a wide range of craft projects. With the proper cutting blades, certain Cricut machines can also cut balsa wood, textiles, leather, and cork in addition to cutting materials like paper and vinyl. It is pretty easy to use.
Vinyl Cutter
This week individual assignment was to cut something pn the vinyl cutter. The vinyl cutter used was Cricut Cut Smart 2. To use it you should download Cricut Design Space, you can download it from here.
To use Cricut follow these steps:
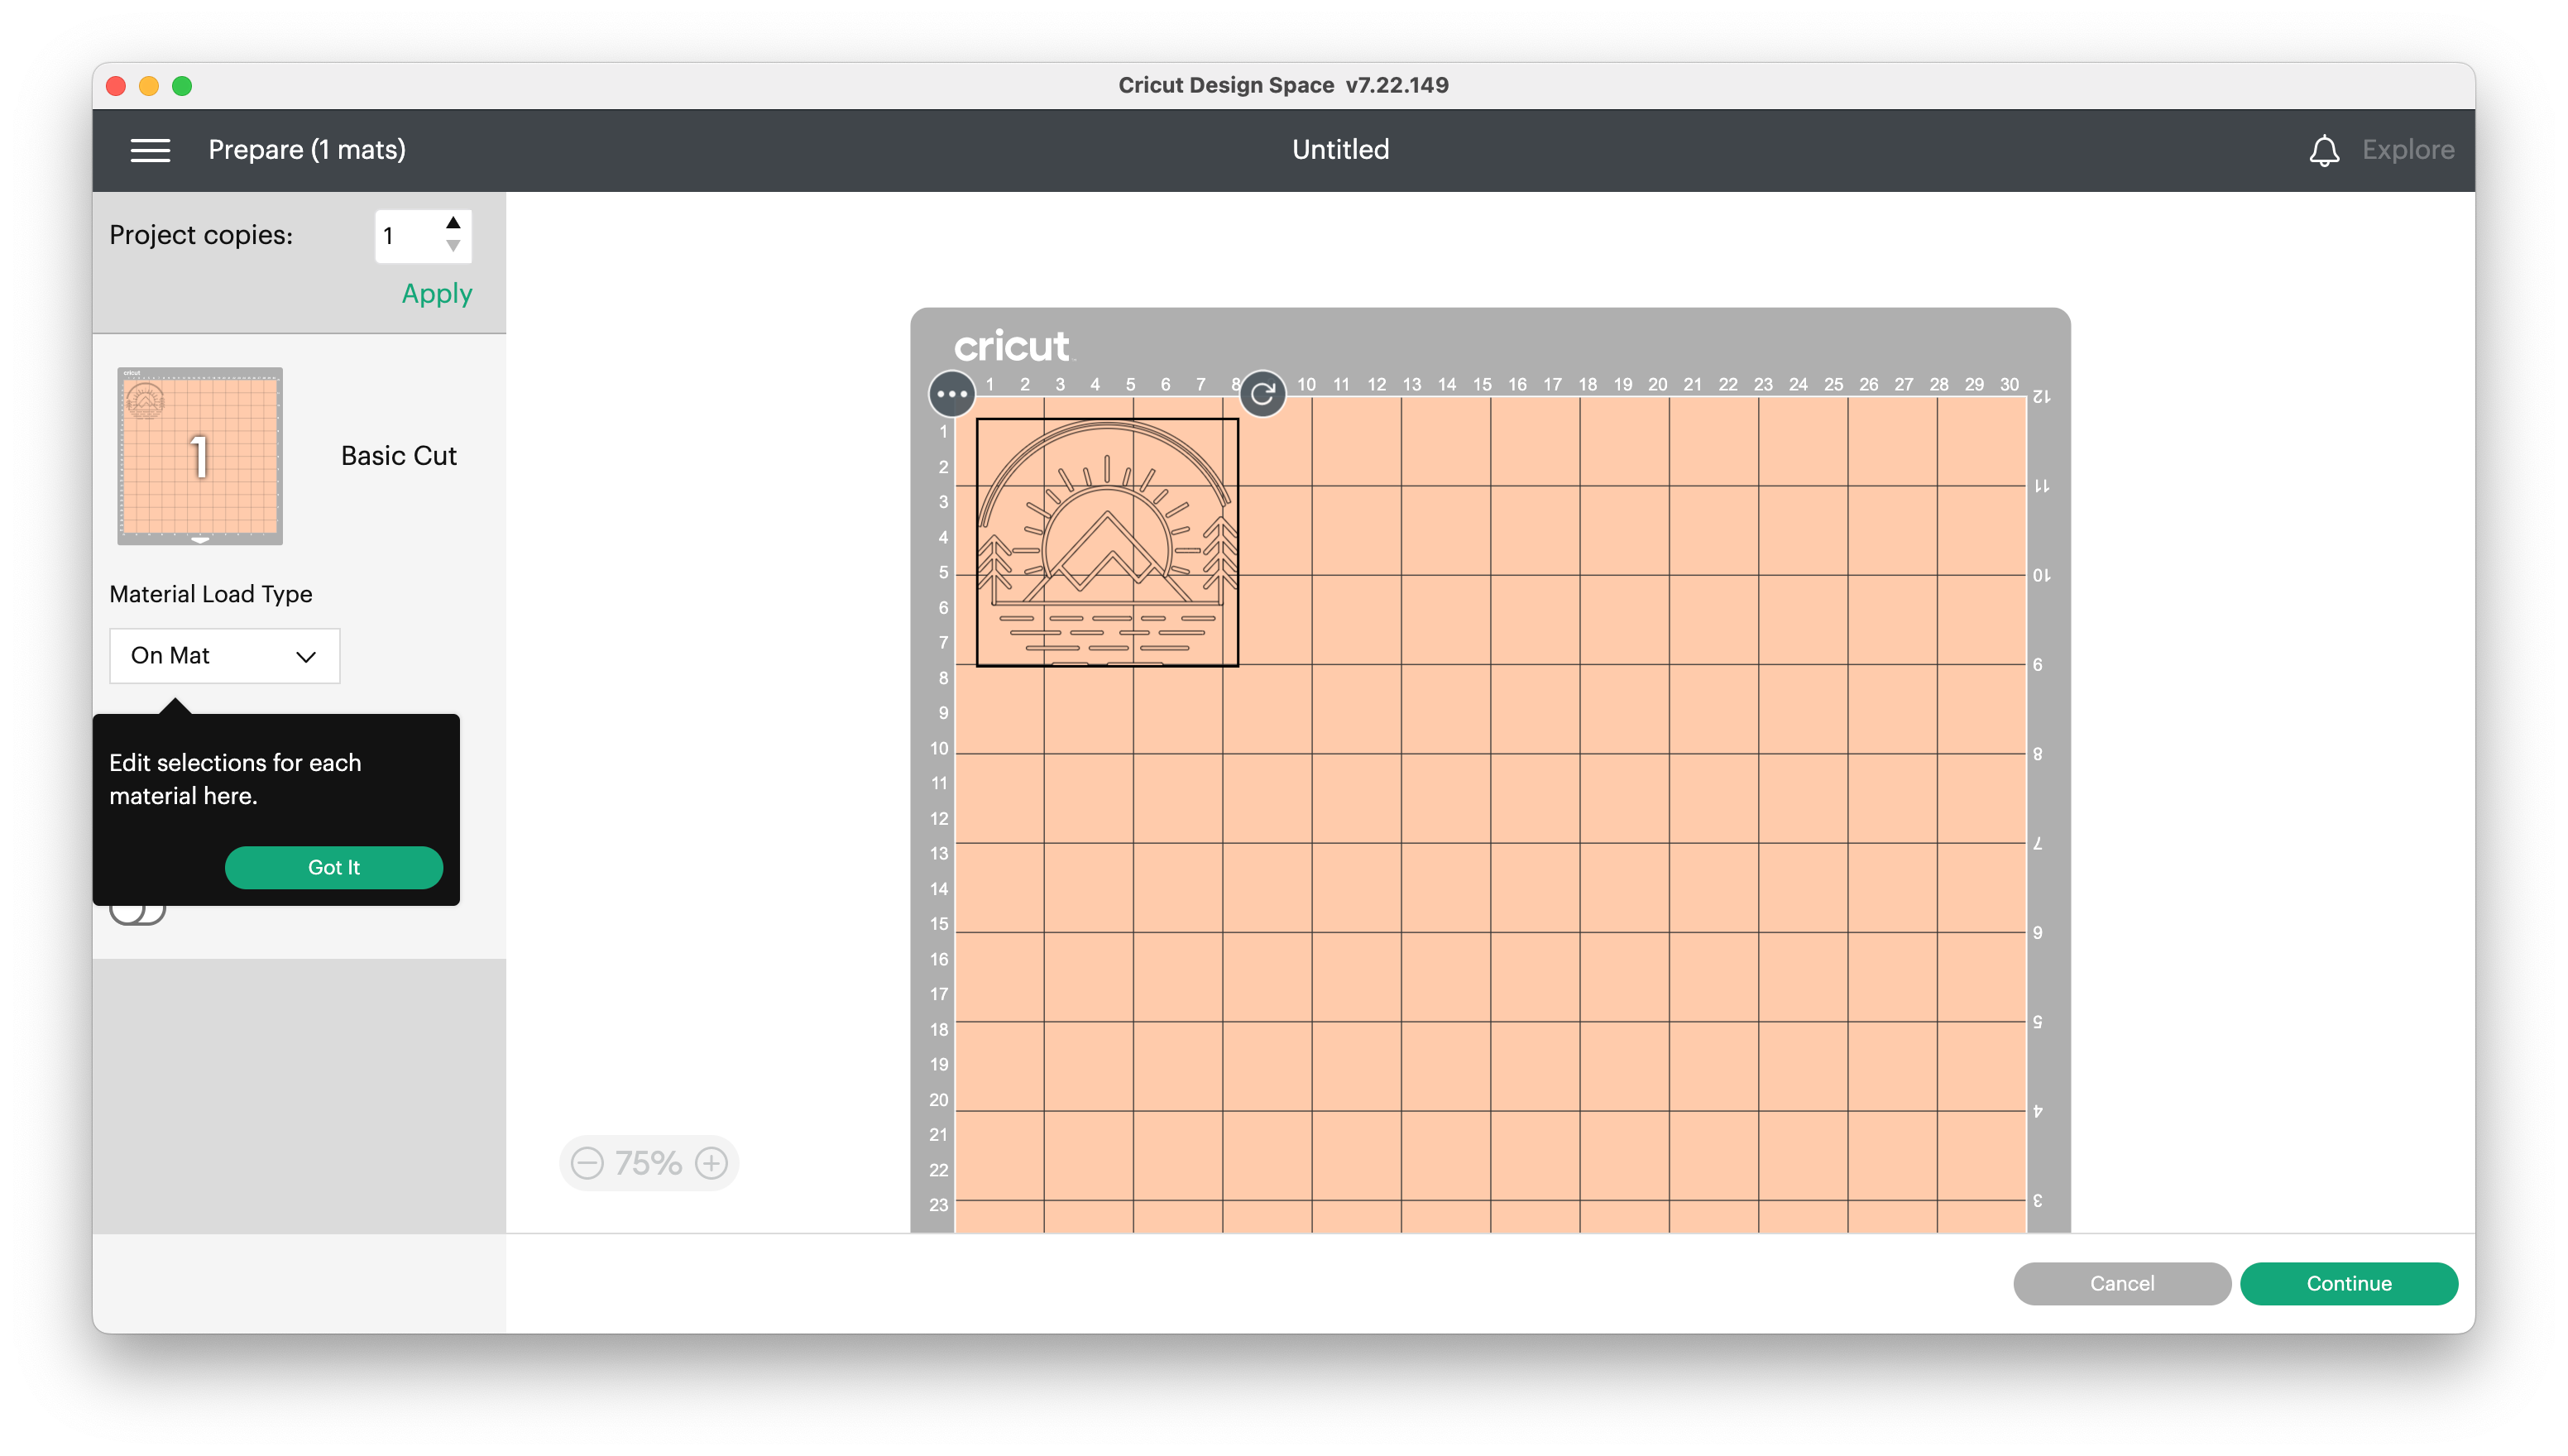
1. Step 1, your design should be saved as a picture. I personally wanted to print the logo I design last week using Inkscape.

2. Step 2, import your design in Cricut Design Space that you downloaded, choose the material, I choase printing on mat.
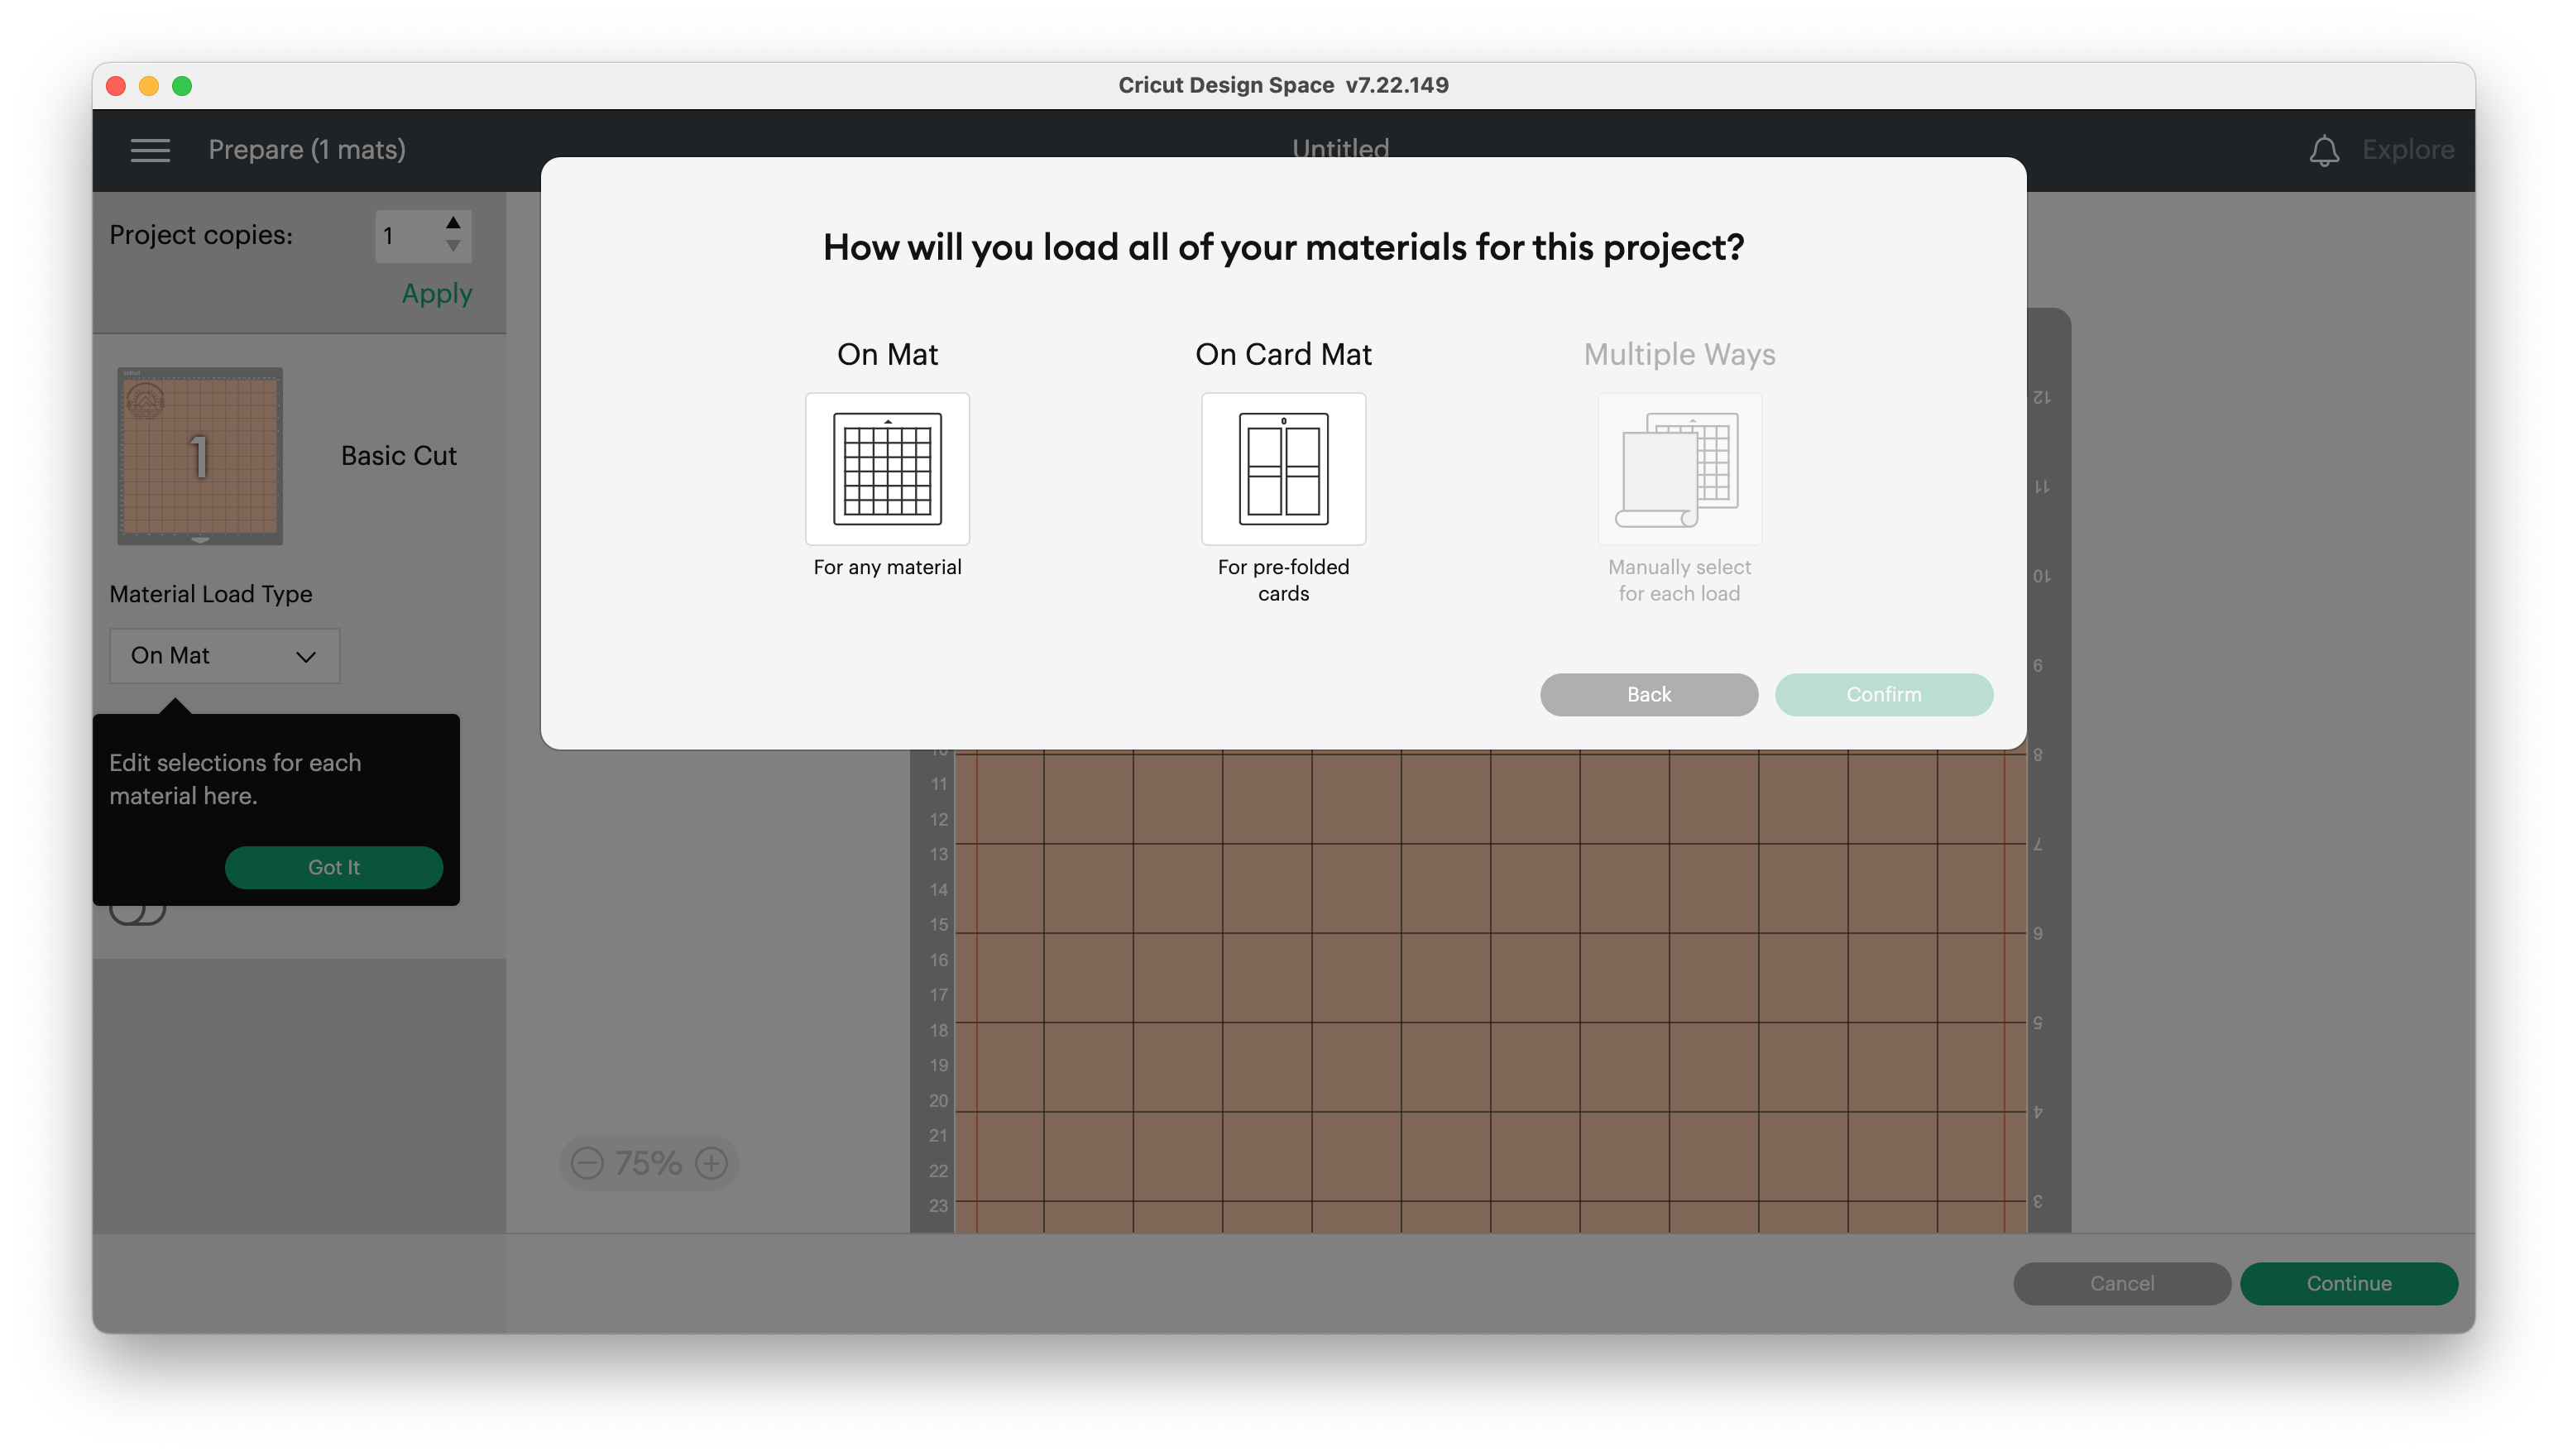
3. Step 3, place the design on the mat.
4. Step 4, prepare your mat, by cutting the sticker paper to size aand sticking it to the mat
5. Step 5, on the Cricut machine click Load then print


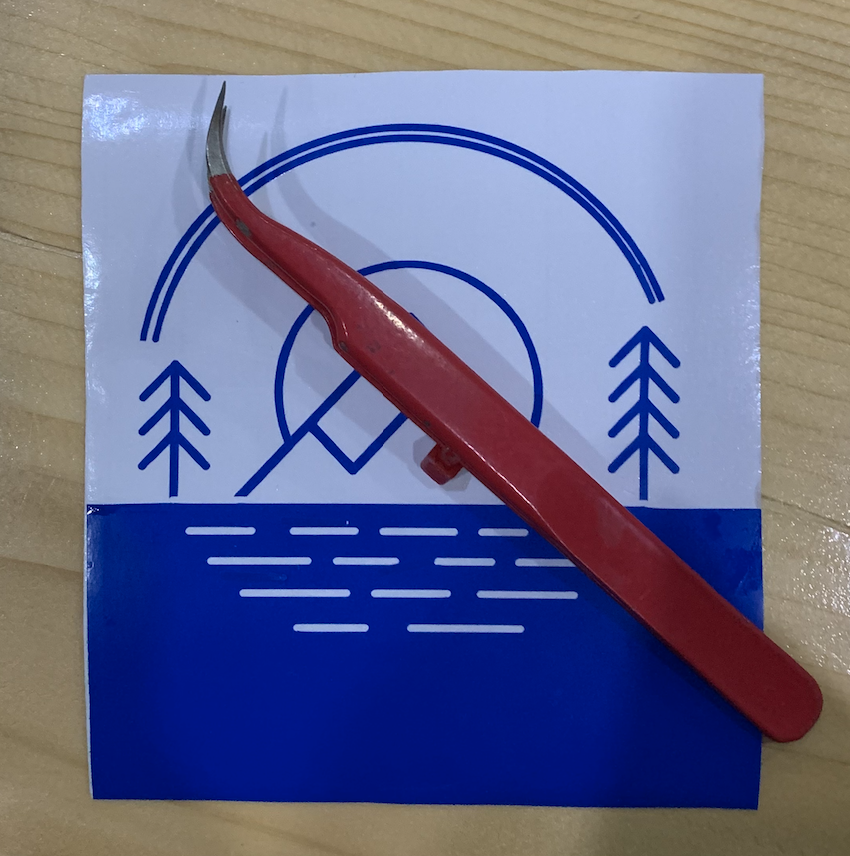
6. Step 6, using the tweezers remove the unwanted parts of your design
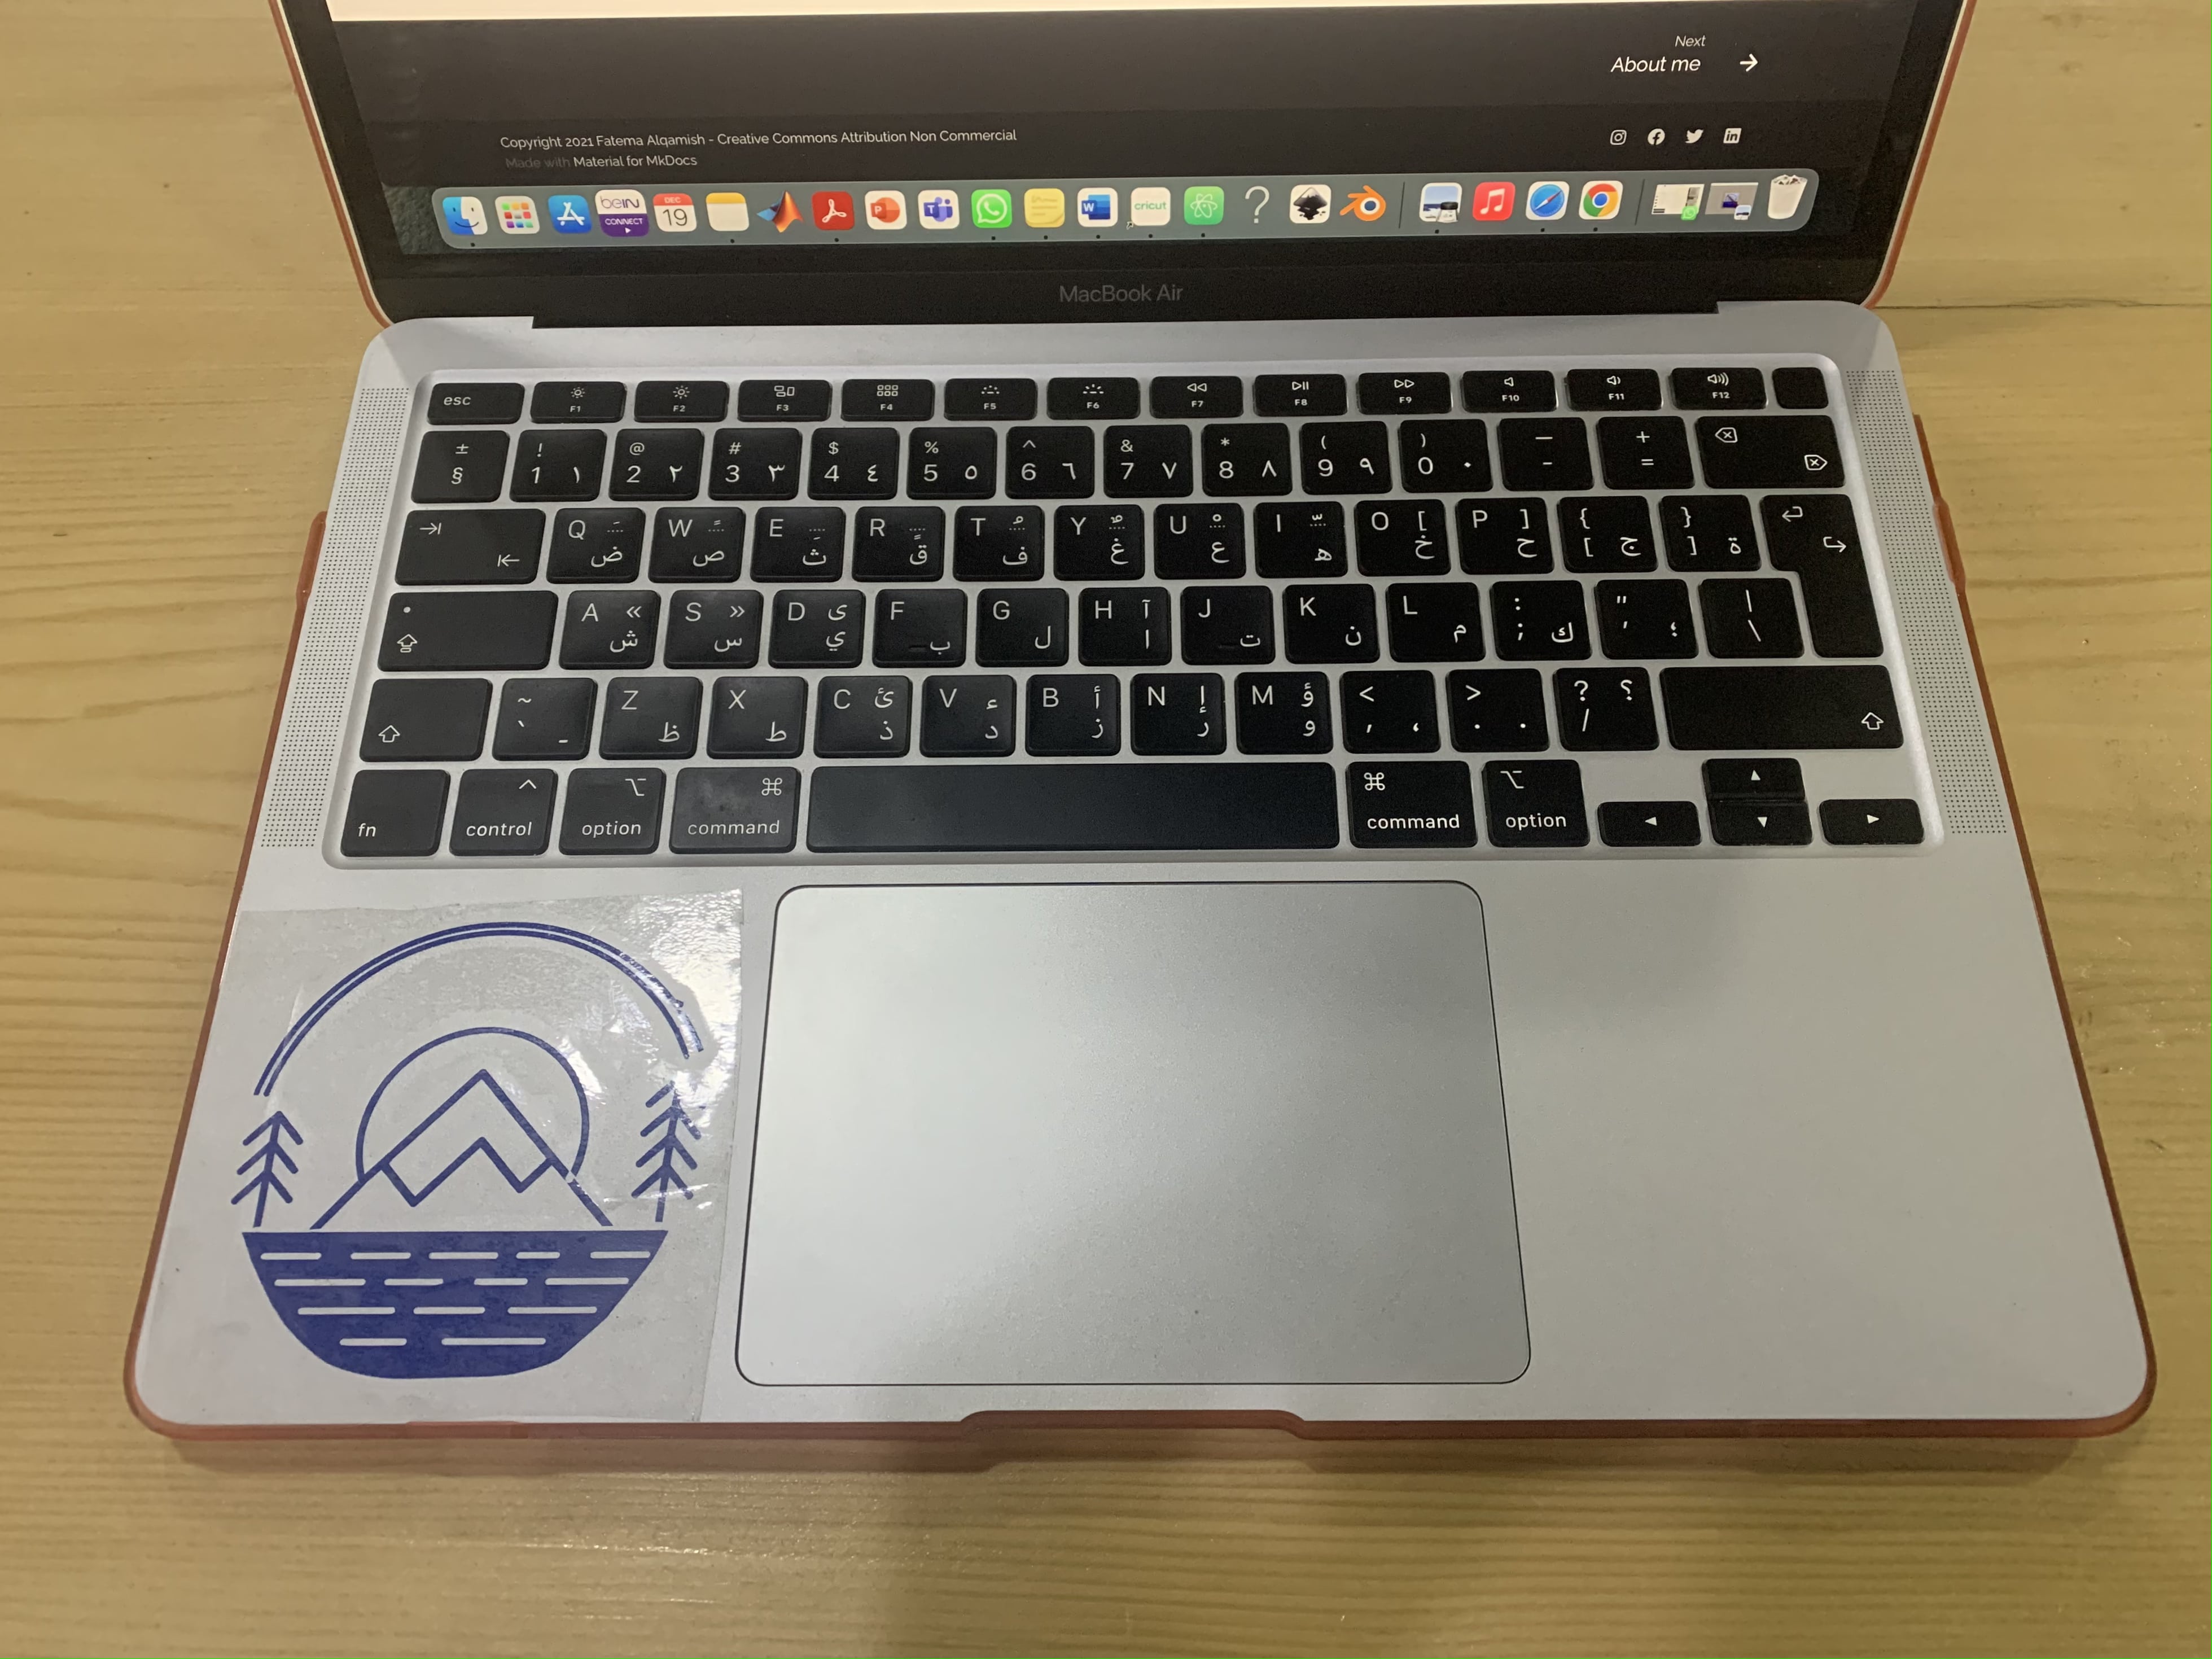
7. Step 7, to transfer your design use clear sticky paper
This is the result.
Also, we printed our names on a Tshirt 👕, it was fun.


Work Files
Here is the original design files: