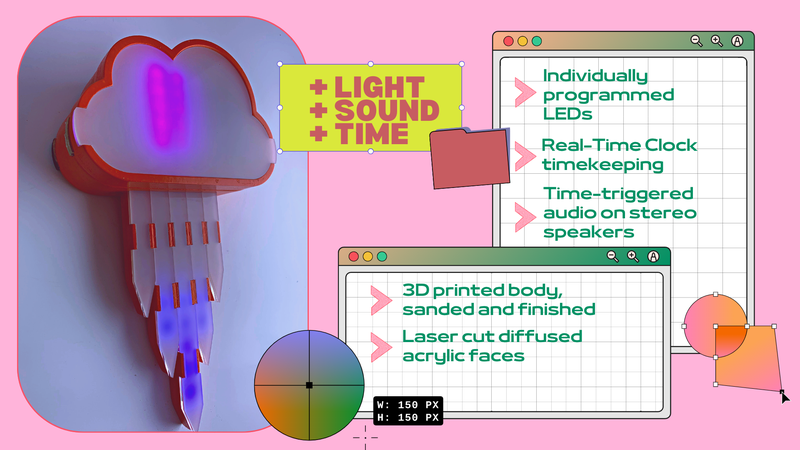
Final Project: Rain Cloud Night Light
Project Inspiration and Concept
For my final project, I was inspired to make a product that would both be functionally useful for my day-to-day life, health and well-being, while also being an abstract decorative addition to my personal space that still followed with my personal style and aesthetic.
This is where my idea was born! I knew I wanted something that would be functional for my every day (and night) life, so I immediately thought of something that already serves a purpose to me. Every night, I wind down, relax, rest and sleep to the sounds of rainfall.
Usually, the way to do this is by playing audio from audio-streaming applications, like Spotify or Apple Music, or playing video from video-streaming websites, like YouTube. This isn’t entirely inconvenient for me, because I can access these applications on my TV, as well as my mobile phone.
However, I really loved the idea of creating a permanent and stylish decorative piece using lighting and sound for my project. As well as this, when looking at other projects for inspiration, I saw a lot of beautiful creations using individually-addressable LEDs, and I thought the idea of animating the rainfall with lights would beautifully compliment the sounds of the rainfall. With this, I knew I had to do it!
To expand on this concept, I decided I wanted the functionality to be adaptive. Since I’d be listening to the rainfall at nighttime, I thought it would be perfect to be able to turn the night light on automatically during the time that I usually wind down for the night and want to go to bed and sleep. I could have it just be switched on and off, but I think we all need a reminder sometimes to stop and rest, especially if you’re a night owl like me! So having the night light turn on for when I know I should be sleeping, it can also act as a sleep-time reminder. In my opinion, being able to both see and hear a reminder works better than just getting a notification from your phone that it is time for you to wind down!
Project Design and Functionality
Sketching Out the Design Concept
Version 1: 3D Realistic Rain Cloud Light Fixture
With my initial brain-storming for the design concept, I played around with the idea of making a light fixture that would look like a real cloud! I was inspired by this after seeing a couple of cases of the same thing, including an actual product, a recreation of it by these two talented makers on YouTube, as well as a project that did the same thing from scratch!
I really wanted to make something like this work for the novelty of it actually looking like a cloud, so I attempted to sketch up a design:
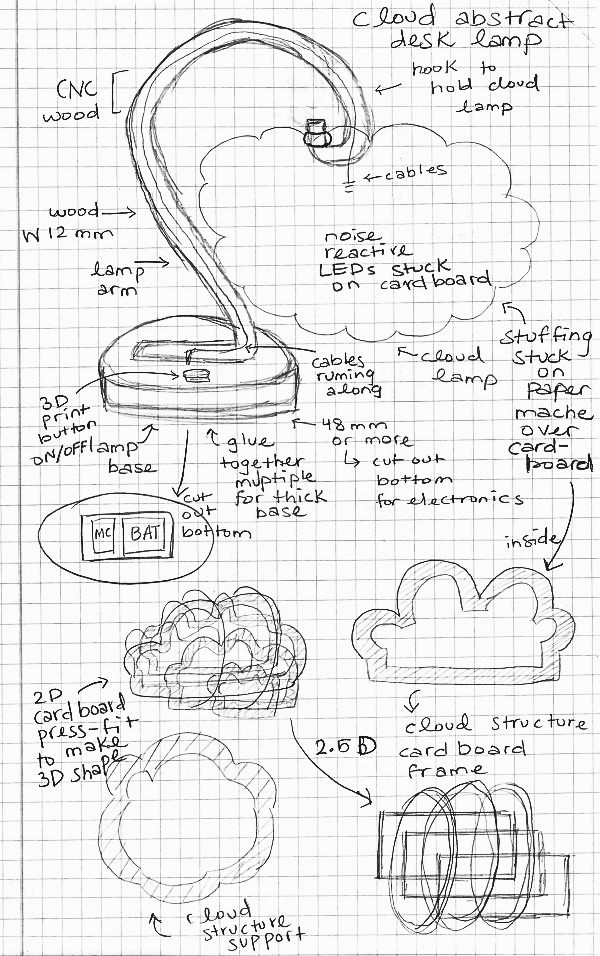
Quickly, I ran into some issues with this version of the design:
The design would have been too messy to execute.
The only way to get the poly-fil cloud-like material to stick onto the 3D structure, would be to glue it together with a hot-glue gun.
This would make it much harder to be able to change anything in the design later on. As well as this, it would be a poor choice because the poly-fil would attract dust over time and muddy-up the pure white colour of a cloud (although, I guess a rain cloud would be more gray-coloured, haha).
Suspending the light fixture would be tricky.
The market product version of the rain cloud light fixture is just a regular ceiling lamp with a lightbulb. My project relies on me being able to use RGB LEDs to animate, which would be drowned out by a lightbulb. Even if I had just the cord for only suspension purposes, it would be a redundant component that I simply do not want to include in my project.
On the other hand, I sketched a possible suspension that would make it more like a table-top or desk-top lamp. I did not prefer this idea, since I would have to scale down the cloud.
I could not figure out how to integrate the rainfall into this design.
Since the realistically fabricated cloud itself would be a whole beast of its own, I could not think of a natural way to integrate rain trailing down under the cloud with RGB LED strips, since I knew I wanted to use them. It would go against the design concept if I had a realistic cloud, but unrealistic rain.
With that being said, I decided to scrap this version and create another design.
Version 2: Neon-Sign-Inspired Rain Cloud Night Light
For my second and final version of the design concept, I decided I wanted to do something more akin to a neon sign! I really enjoyed the aesthetic nature of neon signs, and when I thought of RGB LEDs, I thought of them immediately!
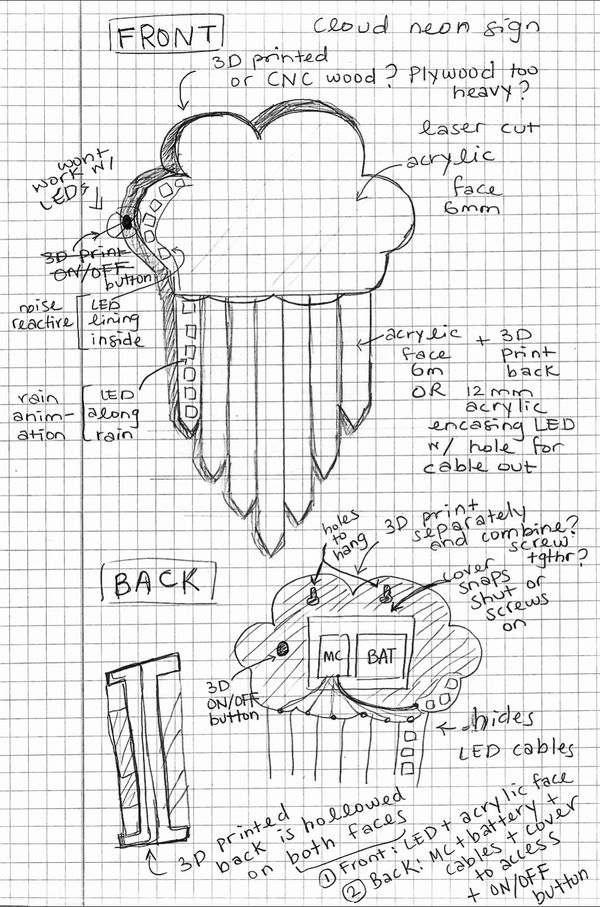
I prefered this version because it had a more artistic and abstract design, that both integrated the simple design of a neon sign, while also allowing me to have the RGB LED strips embedded in the design itself.
I also thought this design would be more sleek and presentable, which would make it the perfect decorative piece for my space. The small-scale design would allow it to be the perfect night light! Since it can be easily mounted on the wall by your bedside table.
Physical Design
Designing the Rain Cloud Night Light on Fusion 360
For my design, I decided I wanted to integrate both 3D and 2D shapes in order to practice different methods that I learned during the program, and also to be able to use different machines to print and cut out my project.
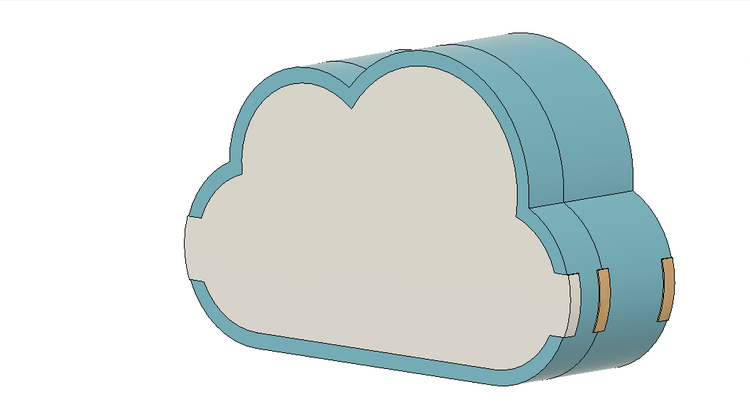
Creating the Rain Cloud
I started out by creating the rain cloud. The rain cloud itself would have two 3D pieces, and three 2D faces. The front 2D face will be made of diffused acrylic so the LED light can show through.
The reason I separated each of these was to isolate the chamber where I will assemble an RGB LED matrix out of RGB LED strips, from the chamber that will house the electronics. This way I will be able to completely hide the electronics from view, while also isolating the light from the LEDs enough to concentrate their vibrance.
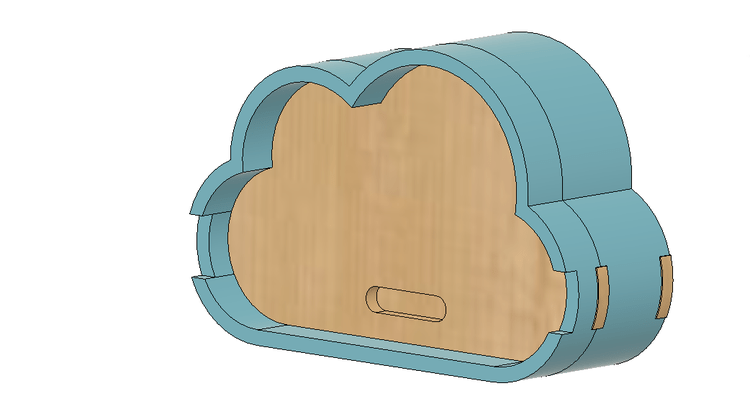
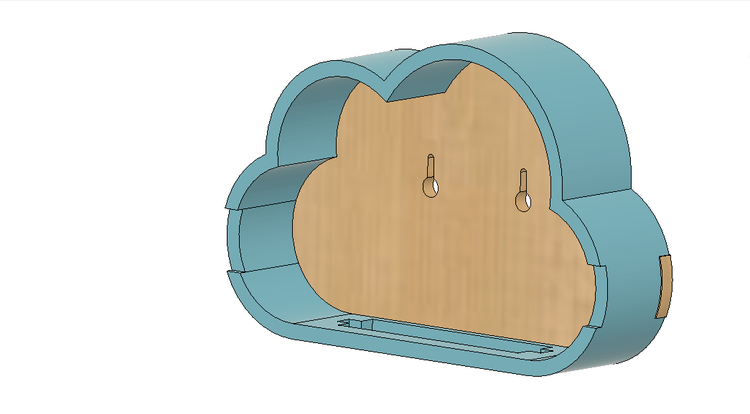
This is how the rain cloud turned out:
You can see that the 2D face that is separating the two chambers (i.e., the LED matrix chamber and the electronics housing chamber) has a slot on the bottom, which I will be using to discretely pass the LED matrix cables to the back where the electronics are.
You can also see that the back face has cutouts for mounting the night light to the wall.
Finally, I also created a cutout at the bottom of the back 3D piece for the rainfall to be inserted into.
Creating the Rainfall
I then created the rainfall, which I designed as abstract but symmetrical icicle-shaped objects.
The shapes were hollowed out, as the internal part of it will act as a channel that holds a single RGB LED strip each, so I made sure to have it be the correct width, with some allowance.
I created individual shapes instead of one singular shape because I wanted each LED strip to be isolated from the one next to it to ensure that each of them looked like individual rainfall.
I also separated the bodies that would hold the LEDs from the 2D faces of each rainfall that will be fitted on top of it. These will be diffused acrylic pieces.

The shape of the top of them press-fit together, as well as the joints, perfectly fit the cutout I made on the bottom of the back 3D cloud piece so they can be attached together.
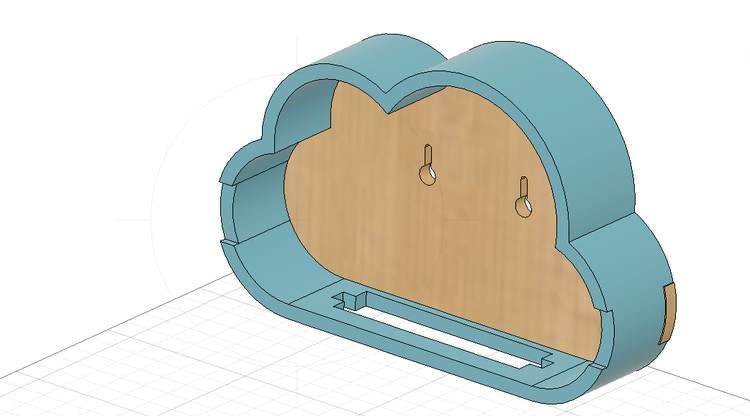
The Final Rain Cloud Night Light Design
This was the final design:
You can also download it here.
Bonus: Failed Attempts
Attempt 1: 2.5D Design
My first failed attempt was my attempt to design the structure of the Version 1 design that I did not end up finishing since I gave up on the idea. This design would have been made from laser cut cardboard to make it lightweight, then have both the LED strips and poly-fil stuck all over it with a hot-glue gun.
The next variations were my attempts at trying out different joints to piece the chambers and faces in my design together.
Attempt 2: Peg Joints
Circular Snaps to practice Attempt 2:
Electronic Functionality
For the electronics configuration and programming, I knew I needed different elements to be working together and at the same time to get what I wanted for this project.
These elements being:
- Time
- Light
- Sound
With that being said, I knew I would need to use different components and modules to be able to achieve this.
Materials List
Overall, these were the materials I needed for the project:
| Qty | Material | Function |
|---|---|---|
| 1 | DS1302 RTC Module | Keeping real time |
| 10 | NeoPixel RGB LED Strips | Light animation |
| 1 | Speaker | Sound |
| 1 | PyBadge | Microcontroller |
| 1 | 3.7V 400mAh Lithium Ion Battery | Power PyBadge |
| 1 | CR2032 3V Lithium Coin Battery | Power RTC Module |
You can refer to the sub-section on Testing the Electronics of the following section to see how I wrote and tested the codes for each functionality.
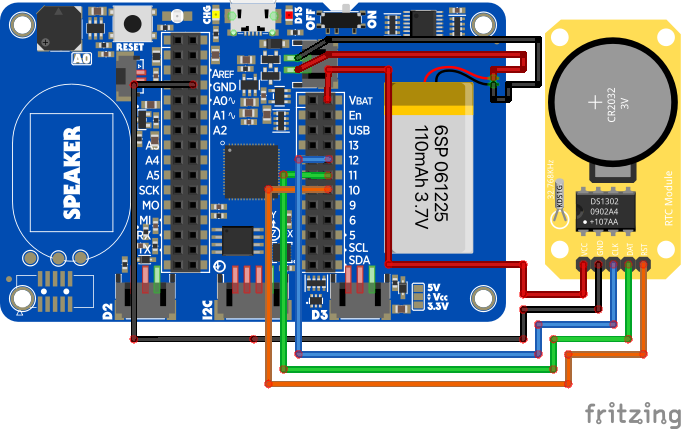
Circuit Configuration
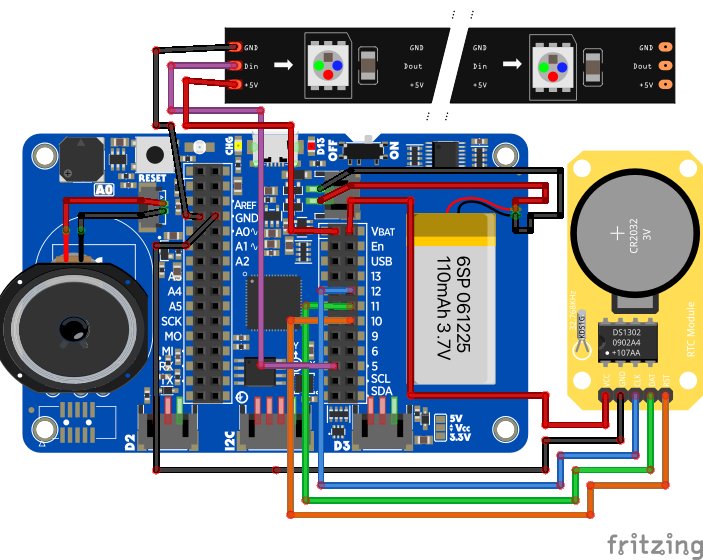
Note
The battery depicted here is a LiPoly 3.7V 110mAh battery, but I used LiPoly 3.7V 400mAh battery.
You can download the file to open in Fritzing here.
Project Code
This was the final code for the project:
import board
import time
############################ LIGHT ############################
import neopixel
from adafruit_led_animation.helper import PixelMap
from adafruit_led_animation.animation.chase import Chase
from adafruit_led_animation.animation.comet import Comet
from adafruit_led_animation.color import AMBER, AQUA, BLACK, BLUE, CYAN, GOLD, GREEN, JADE, MAGENTA, OLD_LACE, ORANGE, PINK, PURPLE, RAINBOW, RED, TEAL, WHITE, YELLOW
############################ AUDIO ############################
import audiomp3
import audioio
import digitalio
############################ TIME ############################
import rtc
import ds1302

################################################# T I M E #################################################

# Define the clock, data and enable pins
clkpin = digitalio.DigitalInOut(board.D12)
datapin = digitalio.DigitalInOut(board.D11)
cepin = digitalio.DigitalInOut(board.D10)

# Instantiate the ds1302 class
ds1302 = ds1302.DS1302(clkpin, datapin, cepin)

# Now, let us set the time
# the_time = time.struct_time((2023, 2, 1, 16, 7, 30, 1, -1, -1))
# ds1302.write_datetime(the_time)

# Redefine the RTC class to link with the ds1302
class RTC(object):
    @property
    def datetime(self):
        return ds1302.read_datetime()

# Instantiate the rtc class and set the time source
r = RTC()
rtc.set_time_source(r)

minute = time.localtime()[4]

def minutePassed(oldminute):
    currentminute = time.localtime()[4]

    if ((currentminute - oldminute) >= 1) or (oldminute == 59 and currentminute >= 0):
        return True
    else:
        return False

################################################# A U D I O #################################################

speaker_enable = digitalio.DigitalInOut(board.SPEAKER_ENABLE)
speaker_enable.switch_to_output(value=True)

rain = open("rain-low.mp3", "rb")
mp3_rain = audiomp3.MP3Decoder(rain)

birds = open("bird-sounds.mp3", "rb")
mp3_birds = audiomp3.MP3Decoder(birds)

a = audioio.AudioOut(board.A0)

################################################# L I G H T #################################################

pixel_pin = board.D5
pixel_num = 62
pixels = neopixel.NeoPixel(pixel_pin, pixel_num, brightness=0.1, auto_write=False)

pixel_rain_horizontal = PixelMap(pixels, [[3, 4, 11, 21, 31],
                                          [2, 5, 12, 22, 30],
                                          [1, 6, 13, 23, 29],
                                          [0, 7, 14, 24, 28],
                                          [8, 15, 25],
                                          [9, 16, 26],
                                          [10, 17, 27],
                                          [18, 19, 20]], individual_pixels=True)


pixel_matrix_vertical = PixelMap(pixels, [[32, 43, 44, 55, 56],
                                          [33, 42, 45, 54, 57],
                                          [34, 41, 46, 53, 58],
                                          [35, 40, 47, 52, 59],
                                          [36, 39, 48, 51, 60],
                                          [37, 38, 49, 50, 61]], individual_pixels=True)   # short left

## neutral ##
neutral_comet_matrix = Comet(pixel_matrix_vertical, speed=0.1, color=OLD_LACE, tail_length=3, bounce=True)

## morning ##
morning_comet = Comet(pixel_rain_horizontal, speed=0.3, color=ORANGE, tail_length=4, bounce=False)
morning_comet_matrix = Comet(pixel_matrix_vertical, speed=0.1, color=AMBER, tail_length=3, bounce=True)

## night ##
night_comet = Comet(pixel_rain_horizontal, speed=0.3, color=BLUE, tail_length=4, bounce=False)
night_comet_matrix = Comet(pixel_matrix_vertical, speed=0.1, color=PURPLE, tail_length=3, bounce=True)

################################################# L O O P #################################################

while True:
    neutral_comet_matrix.animate()
    start_minute = time.localtime()[4]
    t_end = time.time() + 10

    while time.time() < t_end:
        # DAY - REDS + BIRDS
        # SOUNDS
        print("birds playing")
        a.play(mp3_birds)
        while a.playing:
            # RAIN
            morning_comet.animate()
            # MATRIX
            morning_comet_matrix.animate()
        print("birds stopped")

    if minutePassed(start_minute) is True:
        t_end = time.time() + 10
        while time.time() < t_end:
            # NIGHT - BLUES + RAIN
            # SOUNDS
            print("rain playing")
            a.play(mp3_rain)
            while a.playing:
                # RAIN
                night_comet.animate()
                # MATRIX
                night_comet_matrix.animate()
            print("rain stopped")
You can download this code here.
Note
The RTC Module code that I wrote for this project isn’t the final desired functionality that I wanted for it to be able to play the nighttime and dayttime sounds. This code was used for demonstration purposes so I could show it cycling between the day and night.
For the actual use, I set the night and day times as specific times that can be compared to the real time for it to turn on only when the time matches. It will turn off all other functionalities otherwise. Also the loops for day and night time are different, with the night being longer than the day.
Project Execution Journey
Covering the Basics: Testing and Prototyping
Prototyping the Physical Design
3D Printing
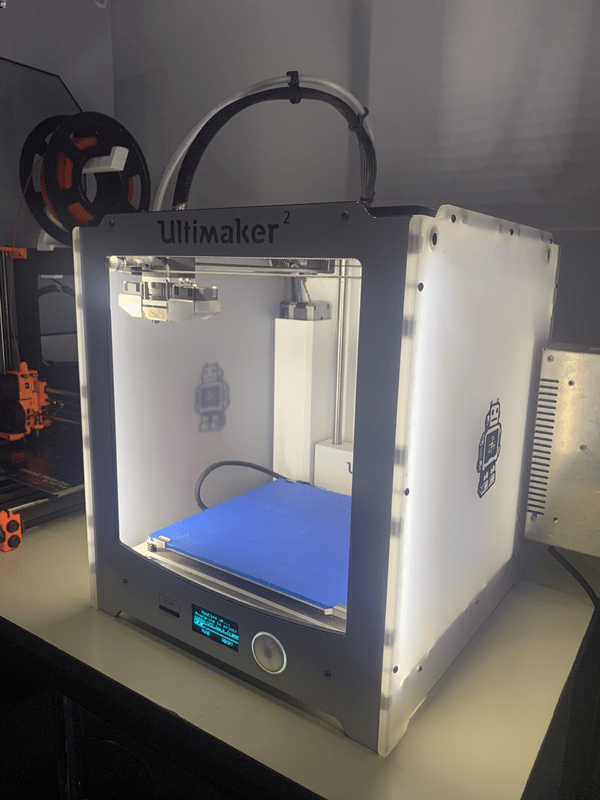
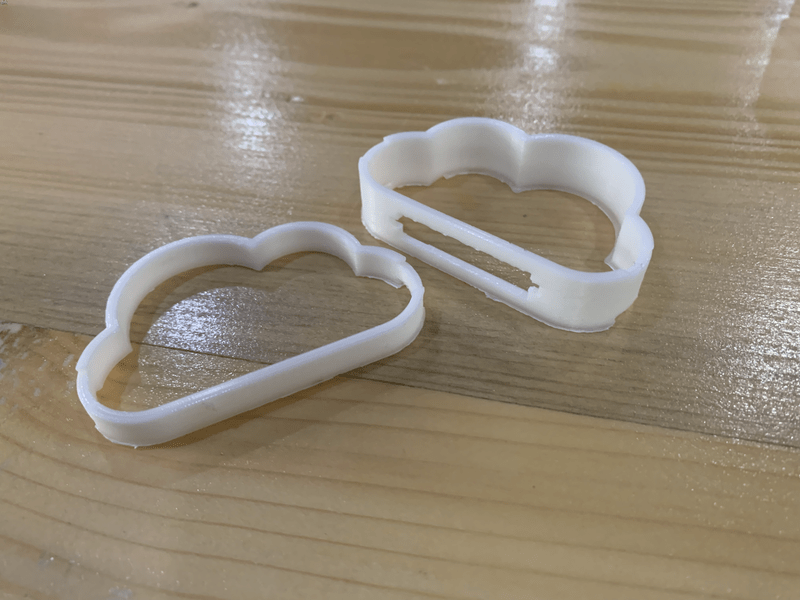
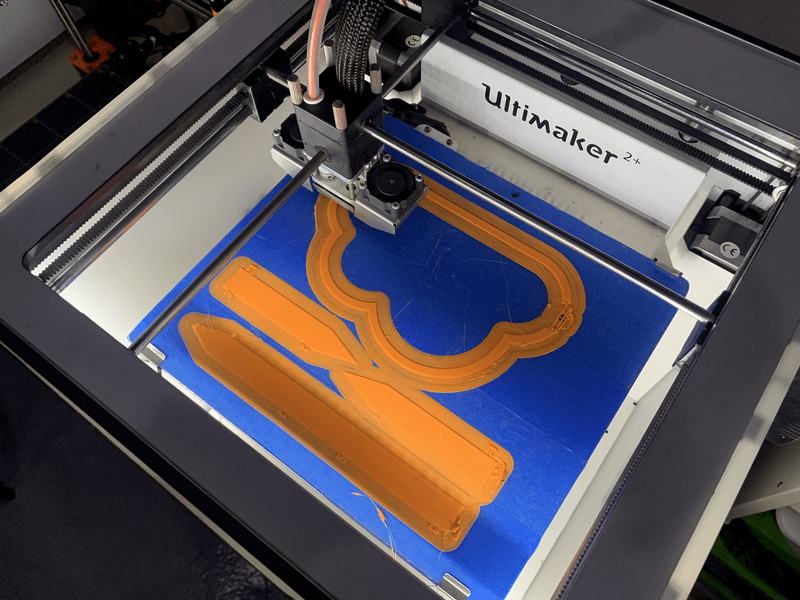
I 3D printed a small-scale version of my design to test the finish and the fit of the pieces. I printed my prototype pieces with the UltiMaker 2+ using white-coloured PLA filament.
Here was the printing process for my cloud prototypes:
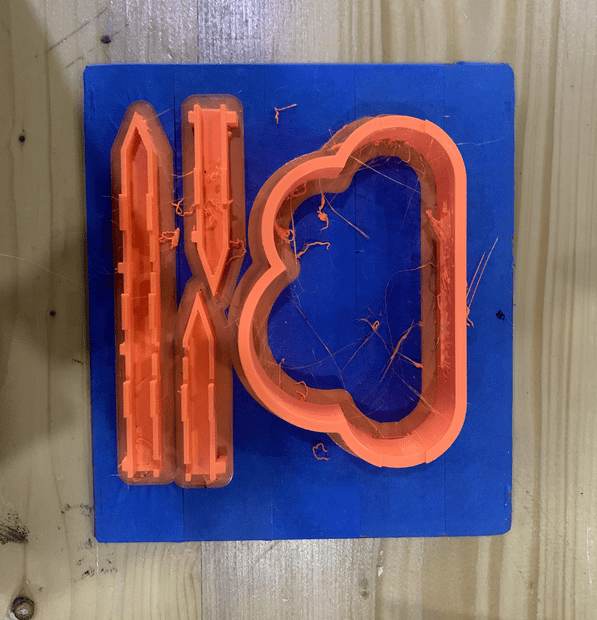
Here is how they came out:
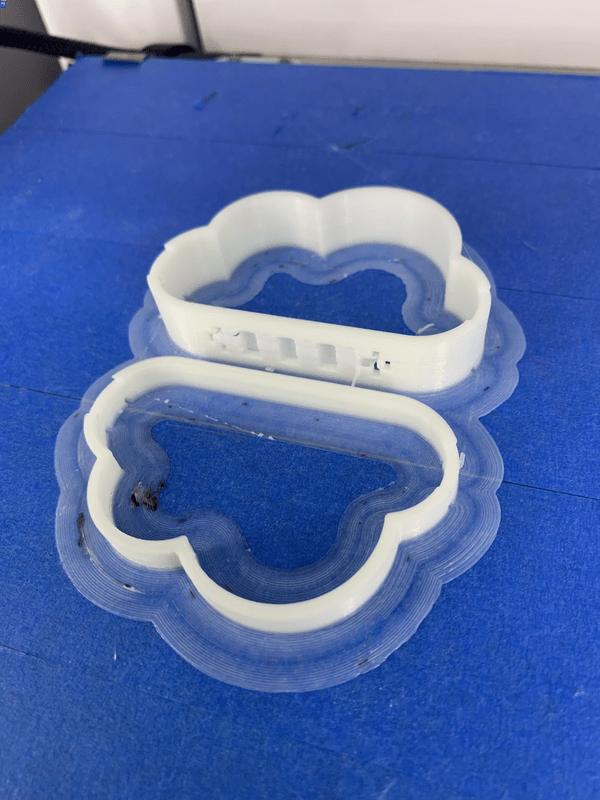
It ended up being way too small to actually test the fit, but I was satisfied enough with the print of the UltiMaker 2+ 3D printer that I used it again for the final print.
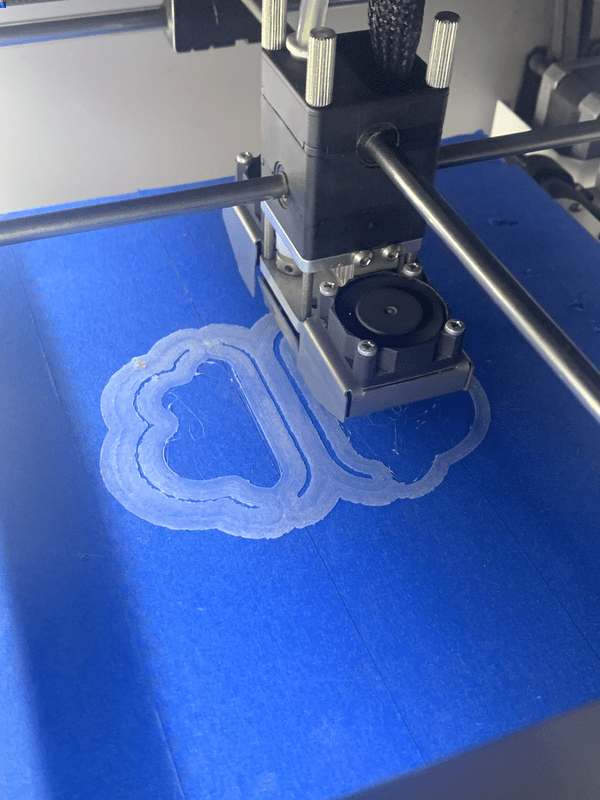
I also 3D printed prototypes of the rainfall of the same scale, but they were also way too small to test the fit.
Here was the printing process for my rainfall prototypes:
It did, however, help me decide that I did not want to use PLA filament, as it was too flexible and not rigid and durable enough for what I wanted for a stable mounted light fixture.
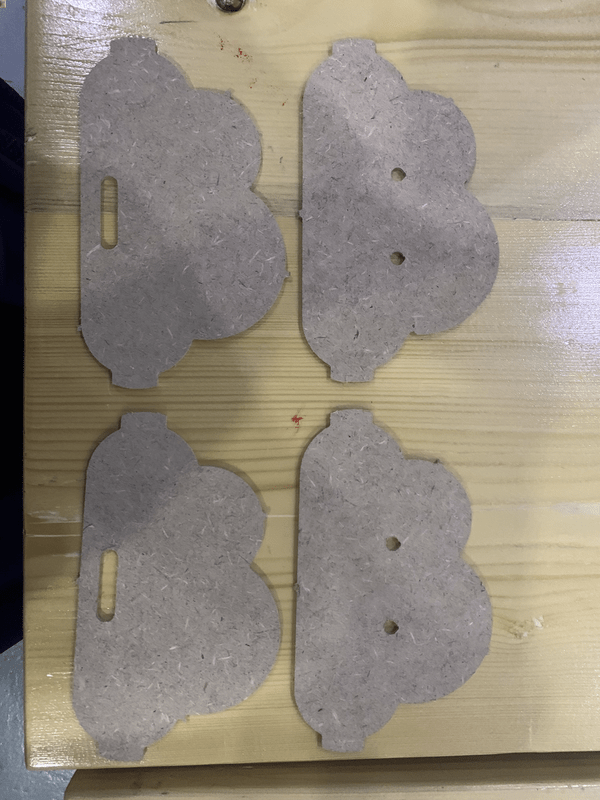
CNC Cutting
I CNC cut the middle piece and the back piece out of 6 mm MDF, because I knew it would be lightweight enough, while also not being a very visible element in the design.
However, the pieces were not correctly cut on the CNC machine, and the pieces did not fit my final 3D printed pieces, so I did not use them.
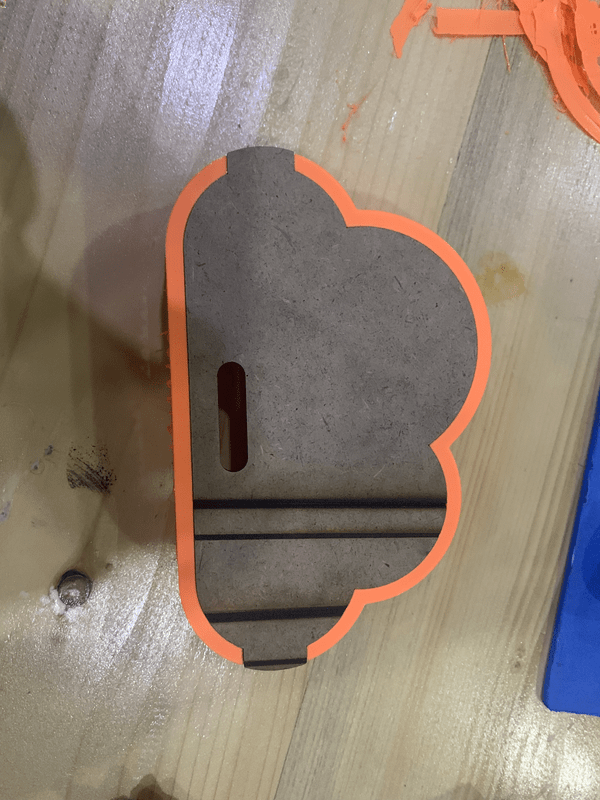
Laser Cutting
Since my attempt at CNC cutting the MDF did not go as planned, I instead decided to laser cut it, as I knew the black-coloured burnt edges would look better with the orange PETG filament I printed my 3D pieces with, and also because I knew from a test piece that it would fit better.
Here is the initial test piece I laser cut using scrap MDF to test the fit:
Here is me testing the fit, finding that it fits perfectly:
Testing the Electronics
Keeping Time with a Real-Time Clock
Info
What is a Real Time Clock (RTC) Module?
It is a dedicated module thats only function is to keep real-time. Real-time depends on the exact time you set for it in the first run of your code. In the second run, you must comment out or remove the line where you set the time in order to check if it is keeping time. It should be able to do this indefinitely as long as it has a power supply in the form of a coin battery as a back-up in case it loses power.
Circuit Configuration
Note
The battery depicted here is a LiPoly 3.7V 110mAh battery, but I used LiPoly 3.7V 400mAh battery.
You can download the file to open in Fritzing here.
Info
I downloaded and imported the DS1302 RTC Module part for Fritzing from here.
RTC Code
For the RTC code, I used a custom library I got from GitHub.
Note
The first code was not written by me, all credit goes to this user. I wrote the second code.
This was the code for this library, that was basically an RTC class that I could refer to in my main program code:
#DS1302 Library for CircuitPython
#based on https://github.com/sourceperl/rpi.rtc

import time
import digitalio


class DS1302:
    CLK_DELAY = 5E-6

    #Trying a constructor where parameters are passed and not hardcoded
    def __init__(self, clk_pin, data_pin, ce_pin):
        self._clk_pin = clk_pin
        self._data_pin = data_pin
        self._ce_pin = ce_pin
        self._clk_pin.direction = digitalio.Direction.OUTPUT
        self._ce_pin.direction = digitalio.Direction.OUTPUT
        #Turning off write protection
        self._start_tx()
        self._w_byte(0x8e)
        self._w_byte(0x00)
        self._end_tx()
        #Disabling charge mode
        self._start_tx()
        self._w_byte(0x90)
        self._w_byte(0x00)
        self._end_tx()

    def _start_tx(self):
        #Setting pins for start of transmission
        self._clk_pin.value = False
        self._ce_pin.value = True

    def _end_tx(self):
        #Closing transmission
        self._data_pin.direction = digitalio.Direction.INPUT
        self._clk_pin.value = False
        self._ce_pin.value = False

    def _r_byte(self):
        #Reading a byte from the module
        self._data_pin.direction = digitalio.Direction.INPUT
        byte = 0
        for i in range(8):
            #High pulse on CLK pin
            self._clk_pin.value = True
            time.sleep(self.CLK_DELAY)
            self._clk_pin.value = False
            time.sleep(self.CLK_DELAY)
            bit = self._data_pin.value
            byte |= ((2 ** i) * bit)
        return byte

    def _w_byte(self, byte):
        self._data_pin.direction = digitalio.Direction.OUTPUT
        for _ in range(8):
            self._clk_pin.value = False
            time.sleep(self.CLK_DELAY)
            self._data_pin.value = byte & 0x01
            byte >>= 1
            self._clk_pin.value = True
            time.sleep(self.CLK_DELAY)

    def read_ram(self):
        # Not yet implemented
        pass

    def write_ram(self):
        # Not yet implemented
        pass


    def read_datetime(self):
        self._start_tx()
        self._w_byte(0xbf)
        byte_l = []
        for _ in range(7):
            byte_l.append(self._r_byte())
        self._end_tx()
        second = ((byte_l[0] & 0x70) >> 4) * 10 + (byte_l[0] & 0x0f)
        minute = ((byte_l[1] & 0x70) >> 4) * 10 + (byte_l[1] & 0x0f)
        hour = ((byte_l[2] & 0x30) >> 4) * 10 + (byte_l[2] & 0x0f)
        day = ((byte_l[3] & 0x30) >> 4) * 10 + (byte_l[3] & 0x0f)
        month = ((byte_l[4] & 0x10) >> 4) * 10 + (byte_l[4] & 0x0f)
        year = ((byte_l[6] & 0xf0) >> 4) * 10 + (byte_l[6] & 0x0f) + 2000
        return time.struct_time((year, month, day, hour, minute, second, 0, -1, -1))

    def write_datetime(self, dt):
        byte_l = [0] * 9
        byte_l[0] = (dt.tm_sec // 10) << 4 | dt.tm_sec % 10
        byte_l[1] = (dt.tm_min // 10) << 4 | dt.tm_min % 10
        byte_l[2] = (dt.tm_hour // 10) << 4 | dt.tm_hour % 10
        byte_l[3] = (dt.tm_mday // 10) << 4 | dt.tm_mday % 10
        byte_l[4] = (dt.tm_mon // 10) << 4 | dt.tm_mon % 10
        byte_l[5] = 0
        byte_l[6] = ((dt.tm_year-2000 // 10) << 4) | (dt.tm_year-2000) % 10
        self._start_tx()
        self._w_byte(0xbe)
        for byte in byte_l:
            self._w_byte(byte)
        self._end_tx()
You can download this code here. You need it to be able to run the second code.
import time
import board
import digitalio
import rtc
import ds1302

# Define the clock, data and enable pins
clkpin = digitalio.DigitalInOut(board.D12)
datapin = digitalio.DigitalInOut(board.D11)
cepin = digitalio.DigitalInOut(board.D10)

# Instantiate the ds1302 class
ds1302 = ds1302.DS1302(clkpin, datapin, cepin)

# Now, let us set the time
# the_time = time.struct_time((2023, 2, 1, 7, 20, 10, 1, -1, -1))
# UNCOMMENT THE FOLLOWING LINE IN THE FIRST RUN, THEN COMMENT IT OUT IN ALL NEXT RUNS
# ds1302.write_datetime(the_time)

# Redefine the RTC class to link with the ds1302
class RTC(object):
    @property
    def datetime(self):
        return ds1302.read_datetime()

# Instantiate the rtc class and set the time source
r = RTC()
rtc.set_time_source(r)

# With this in place, you can now call the following to get the time!
year = time.localtime()[0]
month = time.localtime()[1]

print(year)
print(month)

print(time.localtime())
You can download this code here.
After running the code for the first time, we can see that it displays the time that we set for it. Then, we can comment out the line that I wrote to set the time, and run it again:
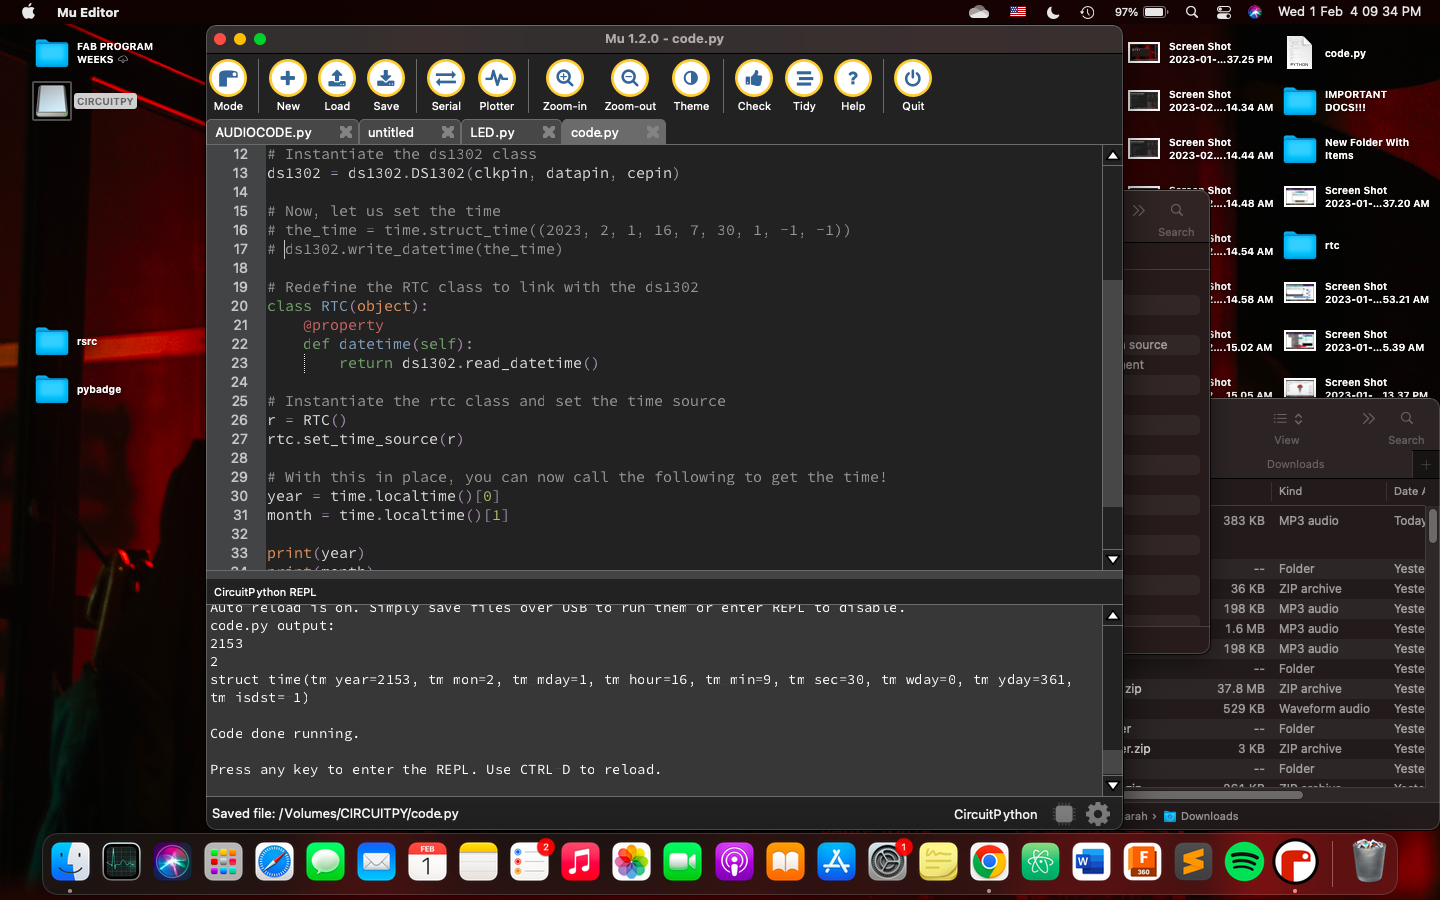
We can see that it is actively keeping time since the time has updated automatically without being manually set! On the top right corner of my screen, you can see the time in hours, minutes and seconds as shown on my device and compare it to the output.
Tasting the Rainbow with NeoPixel RGB LED Strips
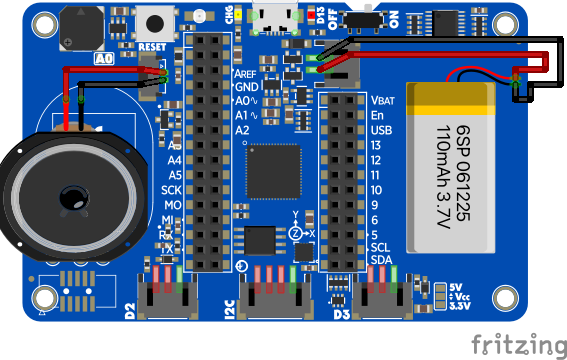
Circuit Configuration
You can download the file to open in Fritzing here.
LED Animations Code
import board
import time
import neopixel
from adafruit_led_animation.animation.solid import Solid
from adafruit_led_animation.color import PINK

from adafruit_led_animation.animation.blink import Blink
from adafruit_led_animation.color import JADE

from adafruit_led_animation.animation.colorcycle import ColorCycle
from adafruit_led_animation.color import MAGENTA, ORANGE, TEAL

from adafruit_led_animation.animation.chase import Chase
from adafruit_led_animation.color import WHITE

from adafruit_led_animation.animation.comet import Comet
from adafruit_led_animation.color import PURPLE
from adafruit_led_animation.color import BLUE

from adafruit_led_animation.animation.pulse import Pulse
from adafruit_led_animation.color import AMBER


pixel_pin = board.A1
pixel_num = 8

pixels = neopixel.NeoPixel(pixel_pin, pixel_num, brightness=0.1, auto_write=False)

solid = Solid(pixels, color=PINK)

blink = Blink(pixels, speed=0.7, color=JADE)

colorcycle = ColorCycle(pixels, 0.5, colors=[MAGENTA, ORANGE, TEAL])

chase = Chase(pixels, speed=0.3, color=WHITE, size=3, spacing=6)

comet = Comet(pixels, speed=0.1, color=PURPLE, tail_length=10, bounce=True)

pulse = Pulse(pixels, speed=0.1, color=AMBER, period=3)

while True:
    # UNCOMMENT AND COMMENT OUT TO TEST THE ANIMATION FOR EACH FUNCTION
    # solid.animate()  # one color no change
    #  blink.animate()  # turn on and off
    #  colorcycle.animate()  # switch btwn colors
    #  chase.animate()  # leds "falling", size is how many leds are lit and moving
    #  comet.animate()  # moves and fades one direction then the next
    pulse.animate()  # switching diff colors slowly fading in out
You can download this code here.
Here you can see a video of the animations running on an LED strip I used for testing:
Relaxing on a Rainy Day with Audio Speakers
For this part, I wanted to play the sounds of rainfall during the nighttime, and sounds of birds singing during the daytime.
To do this, I used the audiomp3 library to play MP3 files. I got the MP3 files from this website, since it had a lot of short free, small-size audio files.
This is the only code I tested directly on the Adafruit PyBadge, since the RTC and LED codes can be run on the Adafruit Feather, but I wanted to use the speaker that came with the PyBadge to be able to play sounds.
Circuit Configuration
You can download the file to open in Fritzing here.
Playing Sounds Code
import board
import audiomp3
import audioio
import digitalio
import time

speaker_enable = digitalio.DigitalInOut(board.SPEAKER_ENABLE)
speaker_enable.switch_to_output(value=True)

rain = open("rain-low.mp3", "rb")
mp3_rain = audiomp3.MP3Decoder(rain)

birds = open("bird-sounds.mp3", "rb")
mp3_birds = audiomp3.MP3Decoder(birds)

a = audioio.AudioOut(board.A0)

while True:
    print("rain playing")
    a.play(mp3_rain)
    while a.playing:
      pass
    print("rain stopped")
    time.sleep(1)
    print("birds playing")
    a.play(mp3_birds)
    while a.playing:
      pass
    print("birds stopped")
You can download this code here. As well as the MP3 files for the bird song sounds and the rainfall sounds.
Here you can hear the sounds of the birds and rainfall playing in a loop:
Note
I did not have the video of the first test for sound, but this is a later one where everything was working together and you can hear the speakers.
Making Commitments: Final Execution of the Project
Printing, Cutting and Painting the Final Project Design
3D Printing the Main Body Pieces
I decided to print my final pieces in PETG instead of PLA, since I knew PETG was a stronger and more durable filament. We also happened to have a very bright orange-coloured PETG filament in the lab, which I thought would be fun to use for my design!
Here was the final 3D printing process:
Printing the first batch of parts:
Printing the second batch of parts:
Re-printing pieces that were not correctly printed:
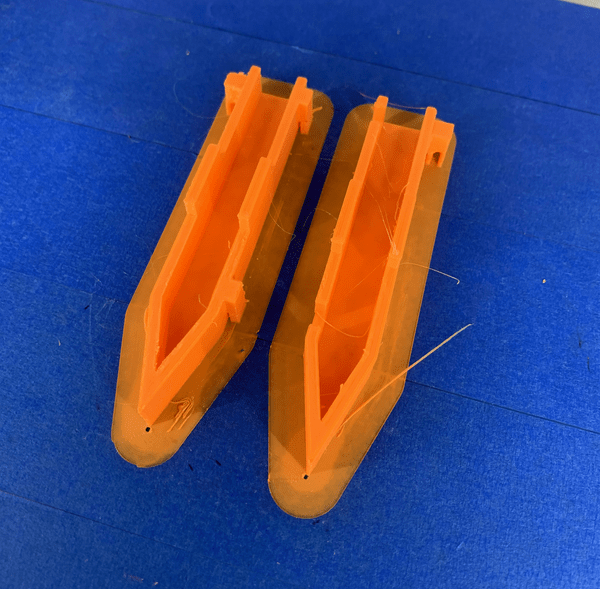
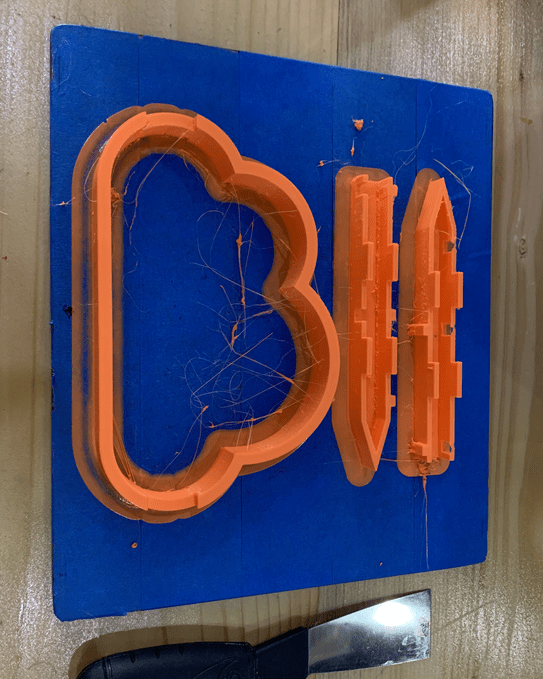
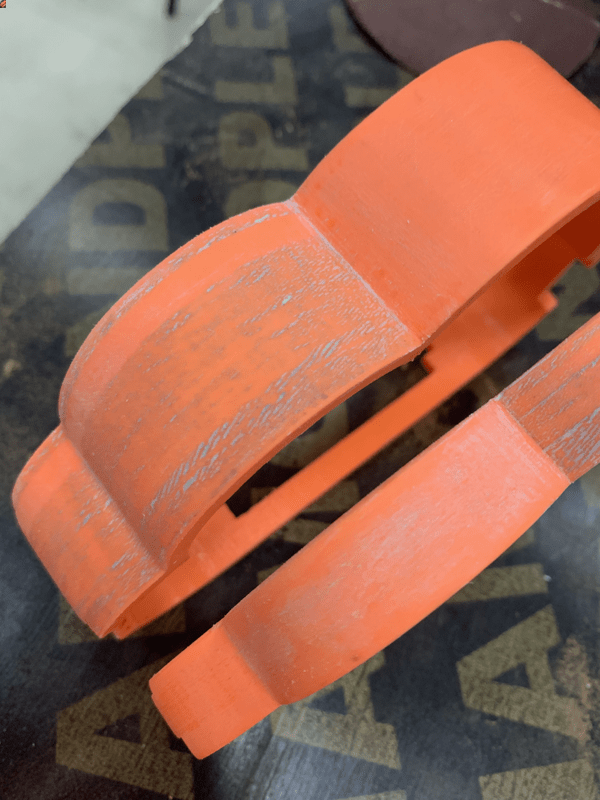
I needed to remove the supports and stringy filament to clean up each piece. After this I decided I wanted to smooth out the surface of the acrylic, at least on the main rain cloud body to give it a more finished surface. To do this, I sanded each of the pieces. I started out with slightly rougher grits from 120-220, then slowly moved up to finer grits of 600-1200, while keeping the surface wet to polish it.
Tip
This tutorial by Proto3000 was very helpful with learning how to sand 3D printed pieces.
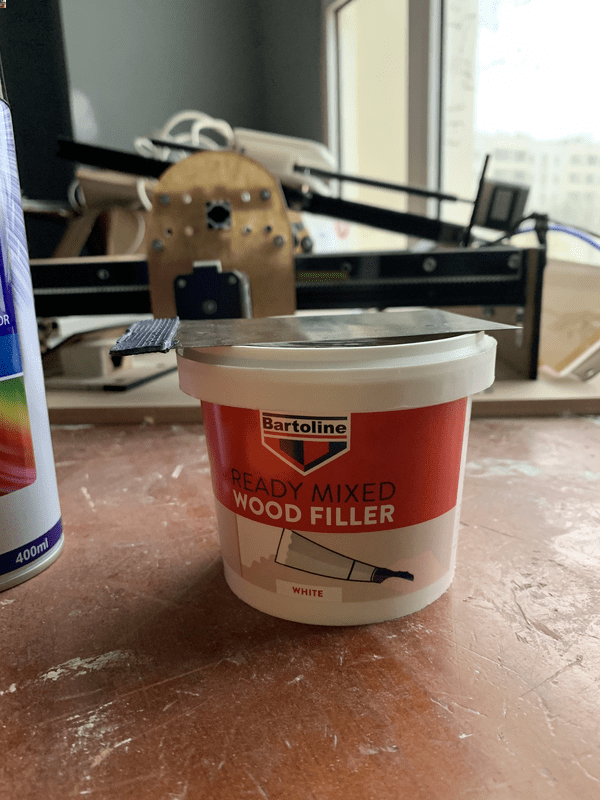
Once I was done sanding, I used wood filler to fill any unwanted holes in the pieces, then allowed it to set and lightly sanded it again.
The wood filler used:
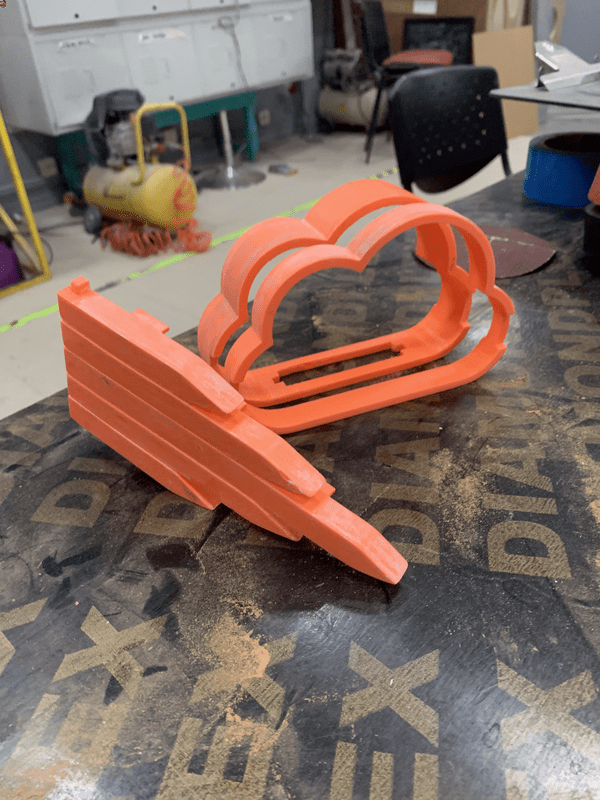
After sanding all the 3D printed pieces:
Up-close view of the filled material:
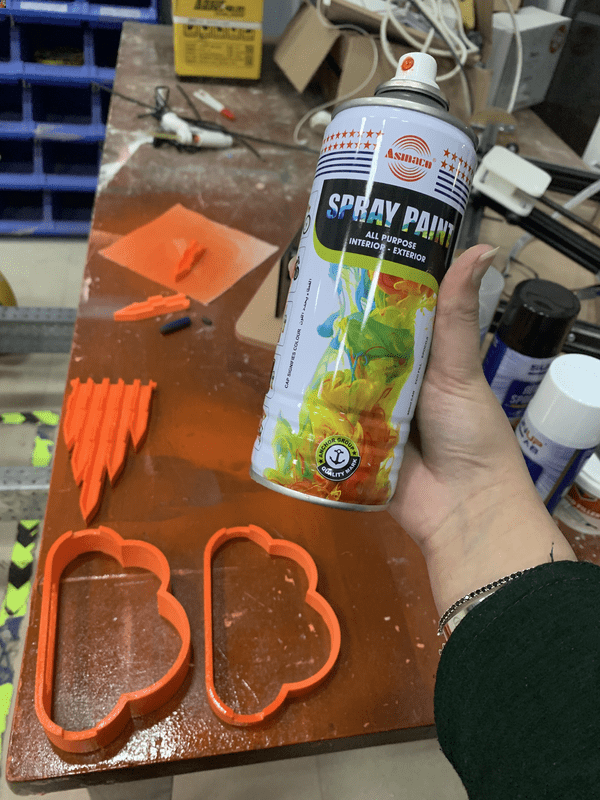
Now it is ready to be painted! I initially wanted to spray-paint it white to give me a blank canvas that I can then paint on with acrylic paint by hand to create a unique texture and design that is fully my own.
Tip
This tutorial by Proto3000 was very helpful with learning how to paint 3D printed pieces.
Since I did not have time to do this, and I wasn’t ready to let go of the bright orange colour, I decided to spray-paint it a deeper orange colour that came out very nice!
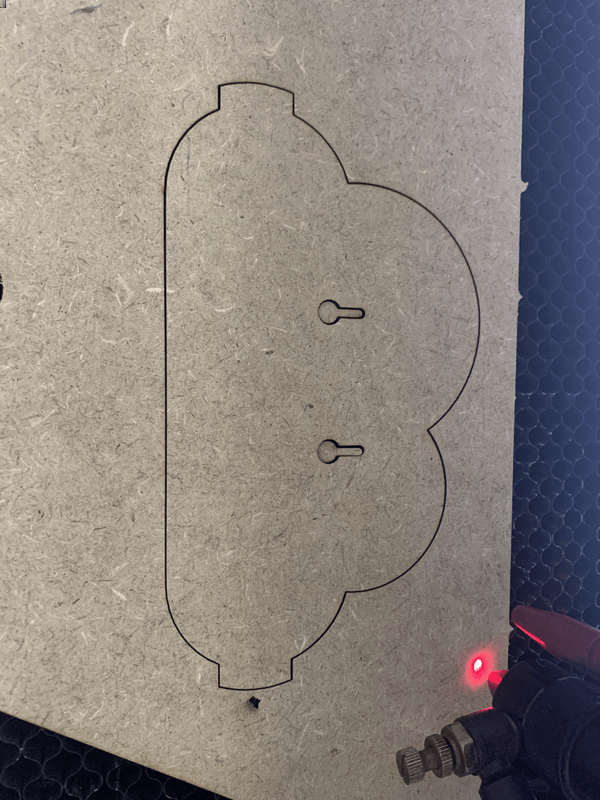
Laser Cutting the MDF Middle and Back Faces
Since during my testing phase, I decided that laser-cutting these pieces was better than CNC cutting them, I laser-cut my final pieces for the 2D faces in my design. You can see that the back face with the cutouts for mounted were actually cut properly this time!
Laser Cutting the Acrylic Front Faces
Finally, I was able to laser cut my acrylic front faces. I initially laser cut 6 mm clear acrylic and was going to sand it down to make it look more diffused, but I liked the look of ready diffused acrylic more.
The issue was that we only had 3 mm clear and diffused acrylic in the lab. To remedy this issue, I cut out my pieces on both the clear and diffused acrylic, then I planned to stack them on top of each other. This way, I can have the beautiful appearance of the clear acyrlic on the side, but a diffused finish on the front face.
Here is the laser cutting process on acrylic:
Programming the Final Project Functionality
Assembling the Electronics
Since a created a chamber in the back specifically to have my electronics be placed here, I was able to fit the PyBadge along with the connections and the RTC module. The speaker and battery were small and already attached to the PyBadge.
For the RGB LED strips that make up the matrix and the rainfall pieces, I had soldered them specifically to be able to hide the cables and route them in ways where it would not obstruct the light or potentially show through.
Soldering the matrix was straight-forward, I first measured how long each of the strips that I can fit on the middle face (I used the test laser cut piece of this since it was just scrap material). Once I knew the maximum length and number of strips I could have, I cut each of them from a roll of LED strips.
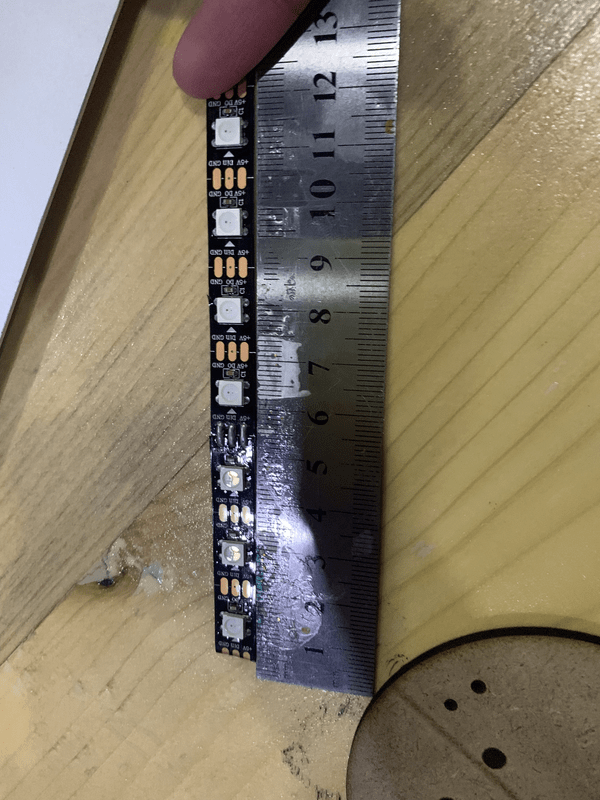
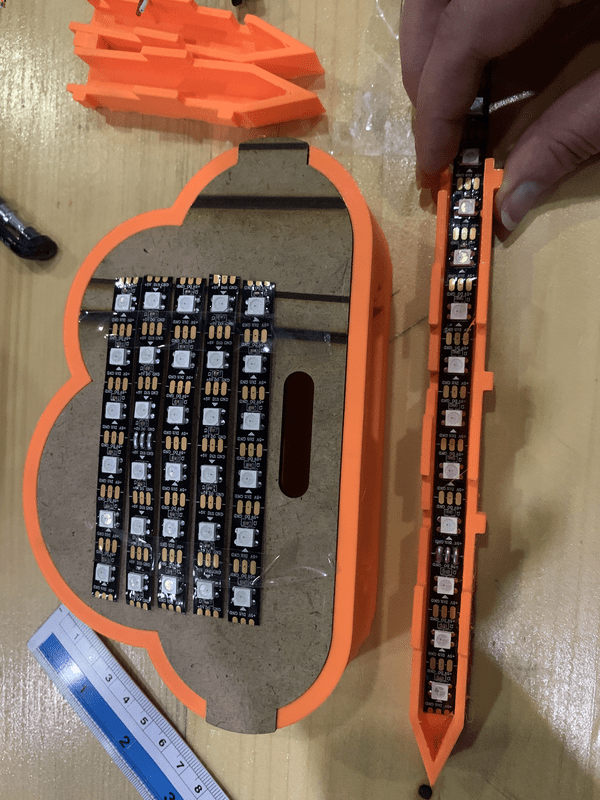
The LED strips for each of the rainfall pieces would be tricky. I knew I needed five strips in total, since that was the number of individual channels I had made, but each of them would be different lengths. I measured out each strip length according to each piece to cut them.
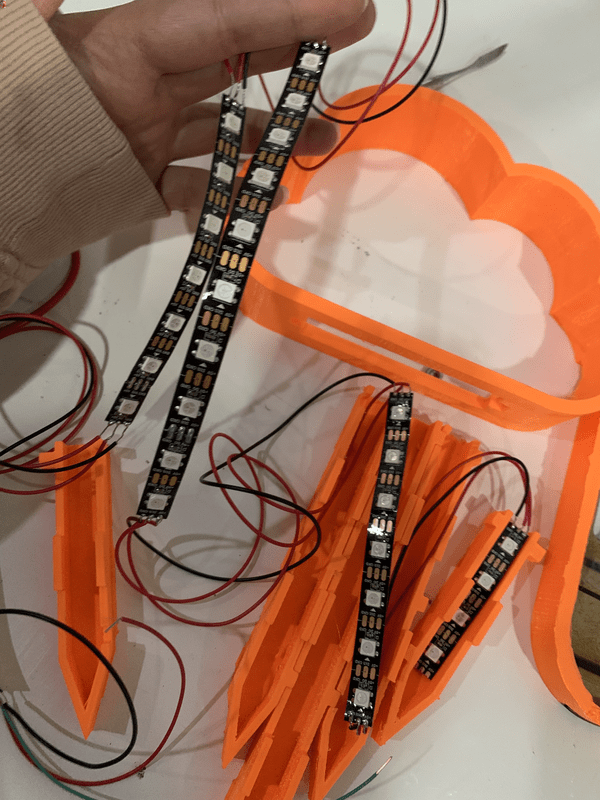
For actually soldering them, I wanted them to be connected to the LED matrix because I would be able to use only one data pin to address and control each and all of the NeoPixels in my project. To make this possible, I would have to solder wires that connect them all together. I first started out by soldering the LED matrix together since that was straightforward, but then I made the last three cables (each for ground, power and data) longer to be able to connect and solder it to the first rainfall LED strip. I then soldered the connections to go between each strip, then on the final strip, I stripped the end of three male-to-male cables and soldered the stripped ends to the output of the last rainfall LED strip.
Note
The male-to-male cables would make it easy to connect to the Adafruit Feather! Which is what I thought I would be using with the PyBadge, but I wasn’t able to make them work together, so I ended up needing to use female-to-male cables to connect it to the PyBadge!
Here is a reminder to not overthink your mistakes, because anything can be fixed!
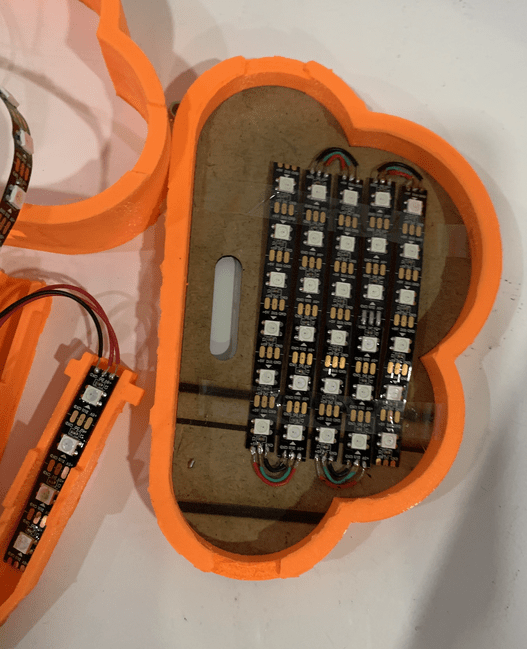
This is what the LEDs looked like when I had them fully assembled into my design:
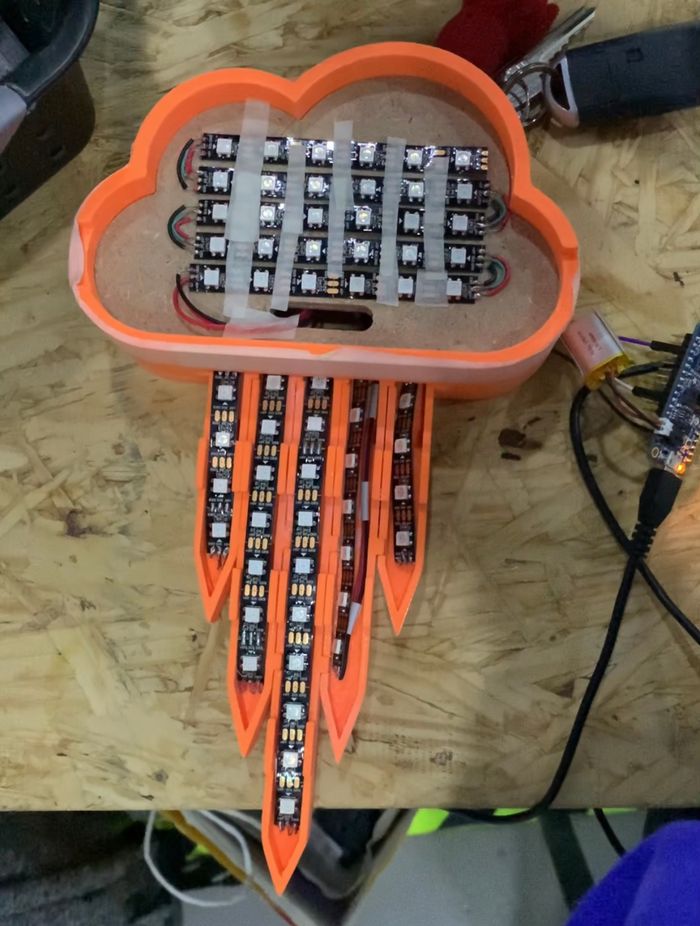
Note
The cables for the rainfall LED strips are routed underneath the strips and any excess length from the connections in between them are hidden inside the electronics chamber!
I could not get the LED strips to stick down because of the cables routed underneath them, so I ended up needing to use a hot-glue gun to stick them down. This photo was taken before I stuck them down.
Running the Final Code
For the LEDs, I used the same library as I did in the LED Animations Code from my testing phase, and chose my favourite animations and the appropriate colour schemes for nighttime (cool-toned colours, like blue and purple) and daytime (warm-toned colours, like red and orange) to illustrate the difference between night and day.
import board
import time
import neopixel
from adafruit_led_animation.color import RED, BLUE, BLACK

pixel_pin = board.D5
pixel_num = 62

pixels = neopixel.NeoPixel(pixel_pin, pixel_num, brightness=0.1, auto_write=False)

# function for addressing a range of pixels

def one_at_a_time(first_pixel, last_pixel, color, reverse):

    if reverse is True:
        for i in reversed(range(first_pixel, last_pixel)):
            pixels[i] = color
            pixels.show()
            time.sleep(0.05)
            pixels[i] = color
            pixels.show()
            time.sleep(0.05)

    else:
        for i in range(first_pixel, last_pixel):
            pixels[i] = color
            pixels.show()
            time.sleep(0.05)
            pixels[i] = color
            pixels.show()
            time.sleep(0.05)

while True:

    # RAIN
    one_at_a_time(0, 4, BLUE, reverse=True)
    one_at_a_time(4, 11, RED, reverse=False)
    one_at_a_time(11, 21, BLUE, reverse=False)
    one_at_a_time(21, 28, RED, reverse=False)
    one_at_a_time(28, 32, BLUE, reverse=True)

    # MATRIX
    one_at_a_time(32, 38, RED, reverse=True)
    one_at_a_time(38, 44, BLUE, reverse=True)
    one_at_a_time(44, 50, RED, reverse=True)
    one_at_a_time(50, 56, BLUE, reverse=True)
    one_at_a_time(56, 62, RED, reverse=True)

    # RAIN
    one_at_a_time(0, 4, BLACK, reverse=True)
    one_at_a_time(4, 11, BLACK, reverse=False)
    one_at_a_time(11, 21, BLACK, reverse=False)
    one_at_a_time(21, 28, BLACK, reverse=False)
    one_at_a_time(28, 32, BLACK, reverse=True)

    # MATRIX
    one_at_a_time(32, 38, BLACK, reverse=True)
    one_at_a_time(38, 44, BLACK, reverse=True)
    one_at_a_time(44, 50, BLACK, reverse=True)
    one_at_a_time(50, 56, BLACK, reverse=True)
    one_at_a_time(56, 62, BLACK, reverse=True)
You can download this code here.
Note
I ended up coding a simpler way to addressing ranges of LEDs in my final program code, that you can see in the next section. So I did not end up using the function I wrote in this code.
For the RTC for keeping time and the speakers for playing the sounds of birds singing and rainfall, I used the same codes as I did in Playing Sounds Code and RTC Code.
This is what it looked like with this other LED animation code:
Then I wrote the actual final code I needed for the project, which is what I used to demonstrate it in the presentation:
import board
import time
############################ LIGHT ############################
import neopixel
from adafruit_led_animation.helper import PixelMap
from adafruit_led_animation.animation.chase import Chase
from adafruit_led_animation.animation.comet import Comet
from adafruit_led_animation.color import AMBER, AQUA, BLACK, BLUE, CYAN, GOLD, GREEN, JADE, MAGENTA, OLD_LACE, ORANGE, PINK, PURPLE, RAINBOW, RED, TEAL, WHITE, YELLOW
############################ AUDIO ############################
import audiomp3
import audioio
import digitalio
############################ TIME ############################
import rtc
import ds1302

################################################# T I M E #################################################

# Define the clock, data and enable pins
clkpin = digitalio.DigitalInOut(board.D12)
datapin = digitalio.DigitalInOut(board.D11)
cepin = digitalio.DigitalInOut(board.D10)

# Instantiate the ds1302 class
ds1302 = ds1302.DS1302(clkpin, datapin, cepin)

# Now, let us set the time
# the_time = time.struct_time((2023, 2, 1, 16, 7, 30, 1, -1, -1))
# ds1302.write_datetime(the_time)

# Redefine the RTC class to link with the ds1302
class RTC(object):
    @property
    def datetime(self):
        return ds1302.read_datetime()

# Instantiate the rtc class and set the time source
r = RTC()
rtc.set_time_source(r)

minute = time.localtime()[4]

def minutePassed(oldminute):
    currentminute = time.localtime()[4]

    if ((currentminute - oldminute) >= 1) or (oldminute == 59 and currentminute >= 0):
        return True
    else:
        return False

################################################# A U D I O #################################################

speaker_enable = digitalio.DigitalInOut(board.SPEAKER_ENABLE)
speaker_enable.switch_to_output(value=True)

rain = open("rain-low.mp3", "rb")
mp3_rain = audiomp3.MP3Decoder(rain)

birds = open("bird-sounds.mp3", "rb")
mp3_birds = audiomp3.MP3Decoder(birds)

a = audioio.AudioOut(board.A0)

################################################# L I G H T #################################################

pixel_pin = board.D5
pixel_num = 62
pixels = neopixel.NeoPixel(pixel_pin, pixel_num, brightness=0.1, auto_write=False)

pixel_rain_horizontal = PixelMap(pixels, [[3, 4, 11, 21, 31],
                                          [2, 5, 12, 22, 30],
                                          [1, 6, 13, 23, 29],
                                          [0, 7, 14, 24, 28],
                                          [8, 15, 25],
                                          [9, 16, 26],
                                          [10, 17, 27],
                                          [18, 19, 20]], individual_pixels=True)


pixel_matrix_vertical = PixelMap(pixels, [[32, 43, 44, 55, 56],
                                          [33, 42, 45, 54, 57],
                                          [34, 41, 46, 53, 58],
                                          [35, 40, 47, 52, 59],
                                          [36, 39, 48, 51, 60],
                                          [37, 38, 49, 50, 61]], individual_pixels=True)   # short left

## neutral ##
neutral_comet_matrix = Comet(pixel_matrix_vertical, speed=0.1, color=OLD_LACE, tail_length=3, bounce=True)

## morning ##
morning_comet = Comet(pixel_rain_horizontal, speed=0.3, color=ORANGE, tail_length=4, bounce=False)
morning_comet_matrix = Comet(pixel_matrix_vertical, speed=0.1, color=AMBER, tail_length=3, bounce=True)

## night ##
night_comet = Comet(pixel_rain_horizontal, speed=0.3, color=BLUE, tail_length=4, bounce=False)
night_comet_matrix = Comet(pixel_matrix_vertical, speed=0.1, color=PURPLE, tail_length=3, bounce=True)

################################################# L O O P #################################################

while True:
    neutral_comet_matrix.animate()
    start_minute = time.localtime()[4]
    t_end = time.time() + 10

    while time.time() < t_end:
        # DAY - REDS + BIRDS
        # SOUNDS
        print("birds playing")
        a.play(mp3_birds)
        while a.playing:
            # RAIN
            morning_comet.animate()
            # MATRIX
            morning_comet_matrix.animate()
        print("birds stopped")

    if minutePassed(start_minute) is True:
        t_end = time.time() + 10
        while time.time() < t_end:
            # NIGHT - BLUES + RAIN
            # SOUNDS
            print("rain playing")
            a.play(mp3_rain)
            while a.playing:
                # RAIN
                night_comet.animate()
                # MATRIX
                night_comet_matrix.animate()
            print("rain stopped")
You can download this code here.
Note
This is the same code that I already added in the Project Code section. I added this here just to fully document the end of the journey of the project.
This is what it looked like when I tested the entire code and functionality of my project:
Presenting a Masterpiece: Completed Final Project
Finally, I had my project fully complete!!!
I present to you: My Rain Cloud Night Light
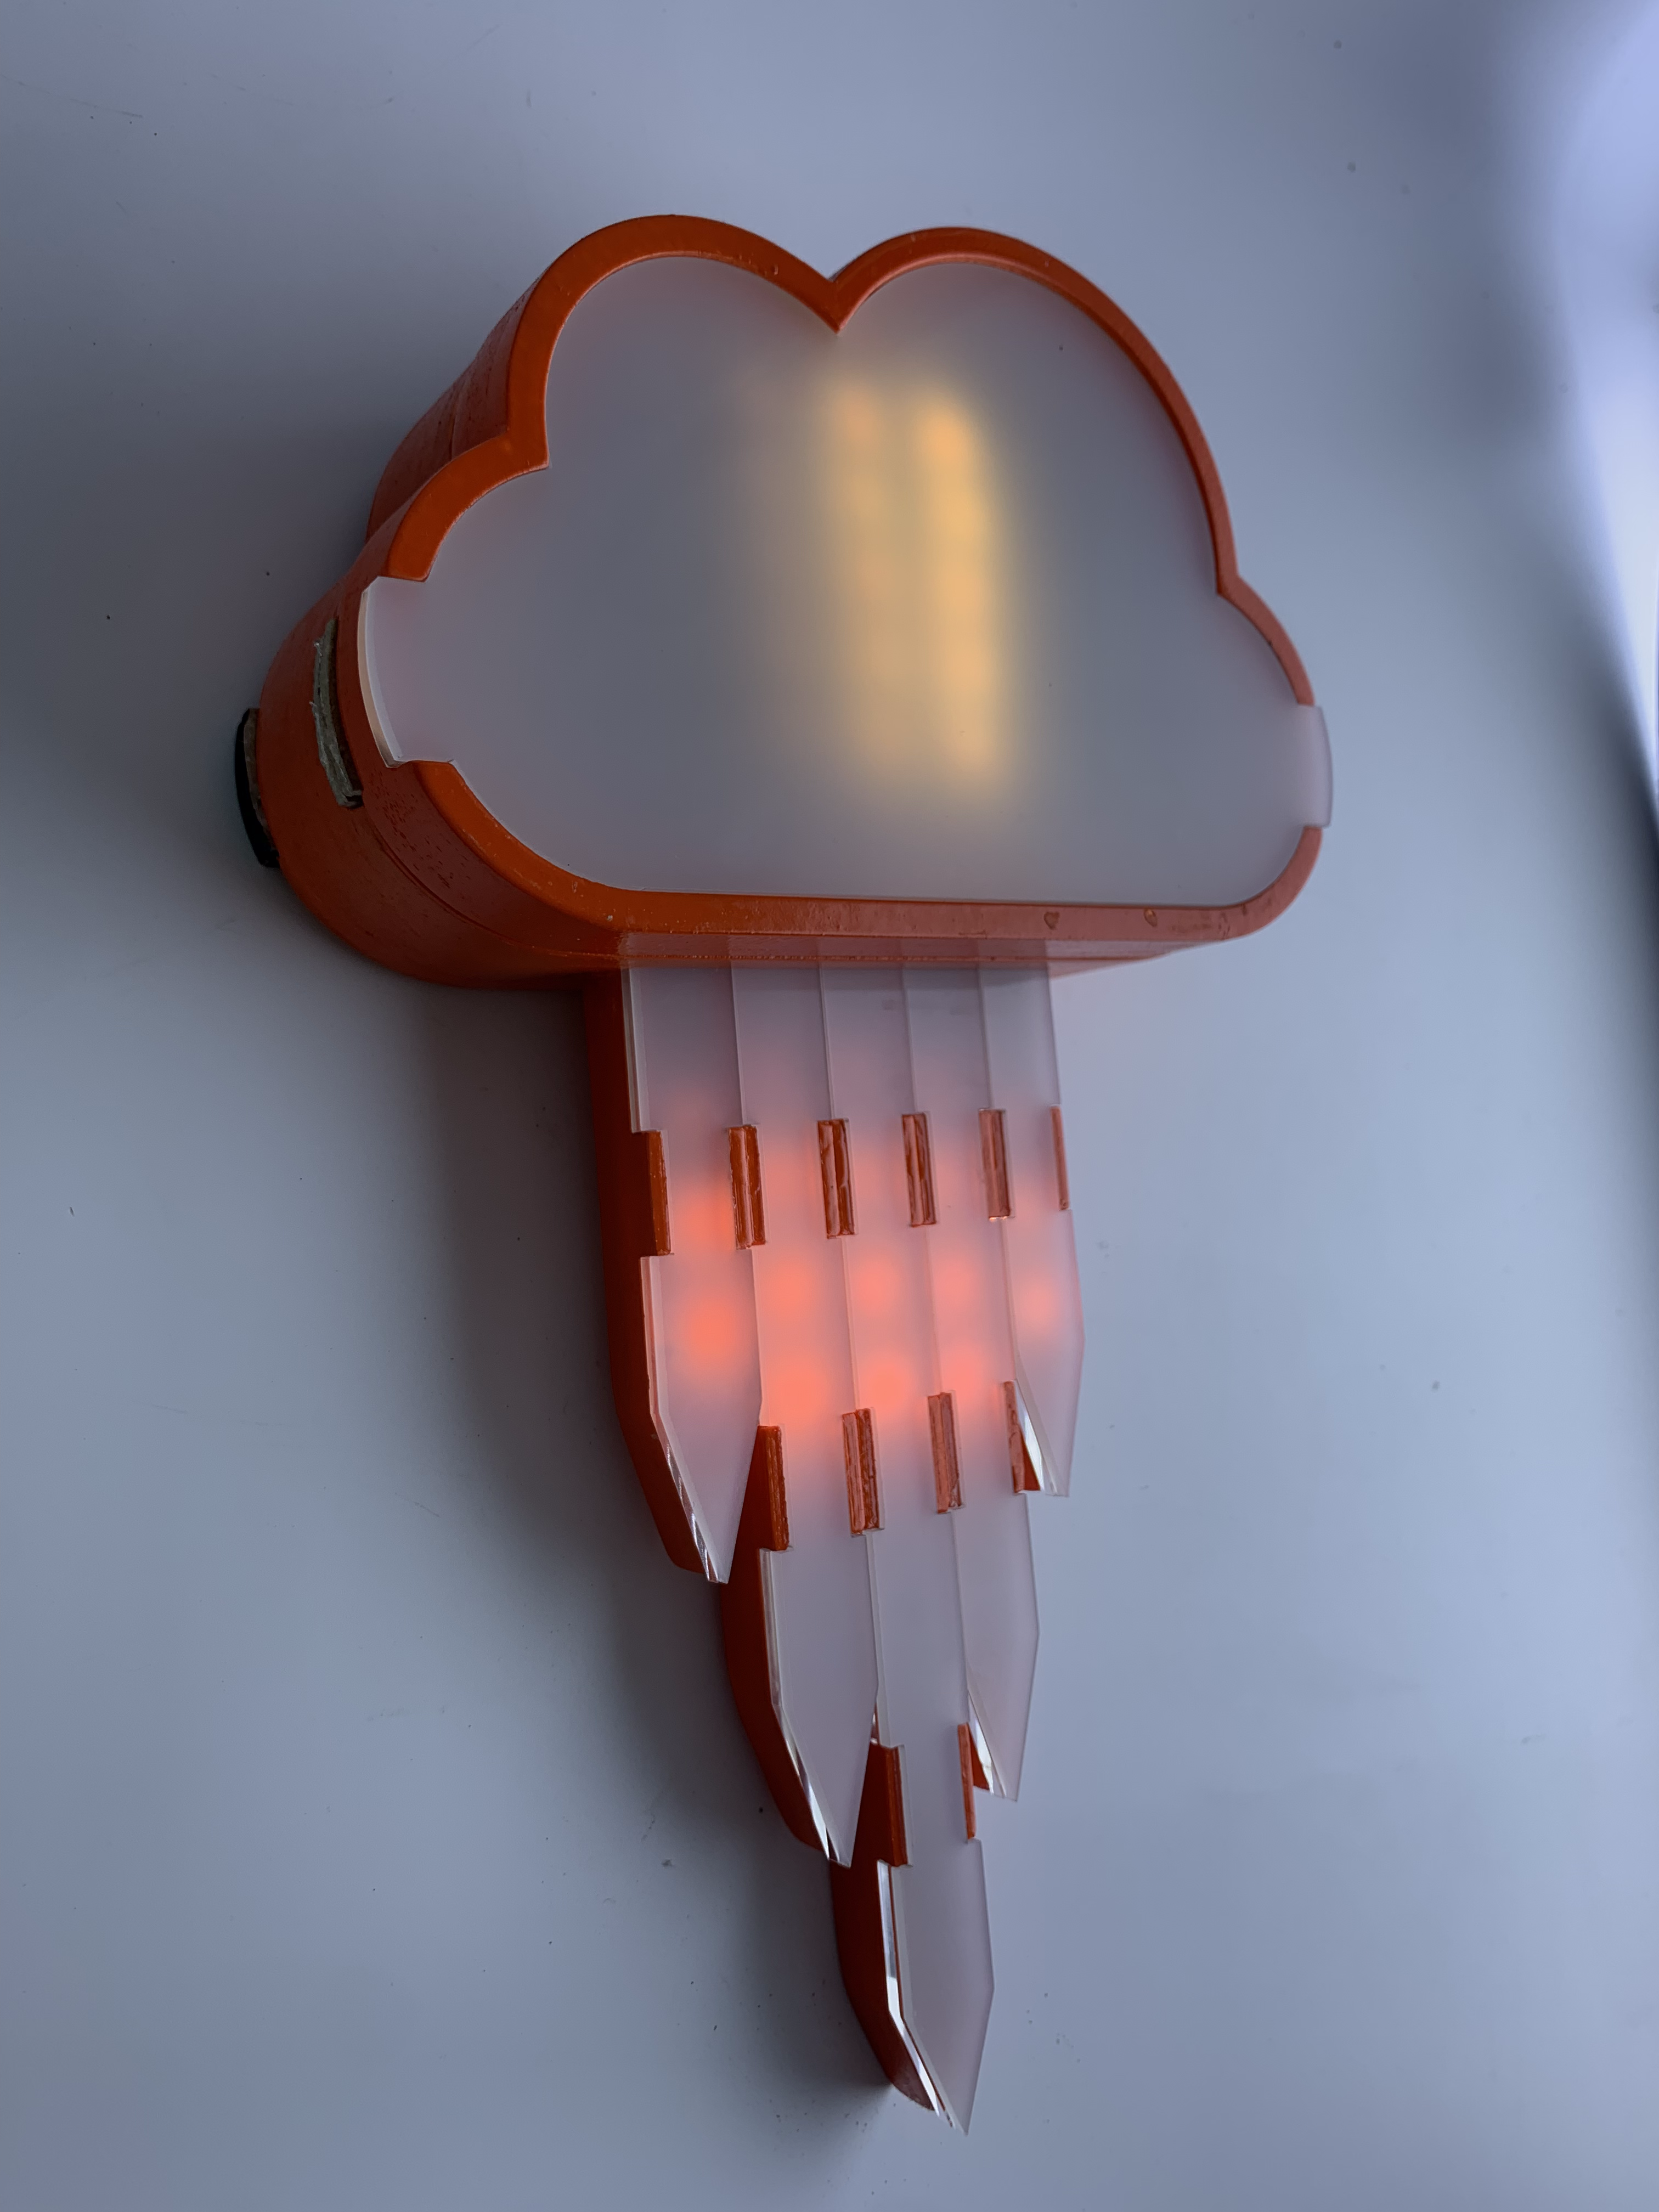
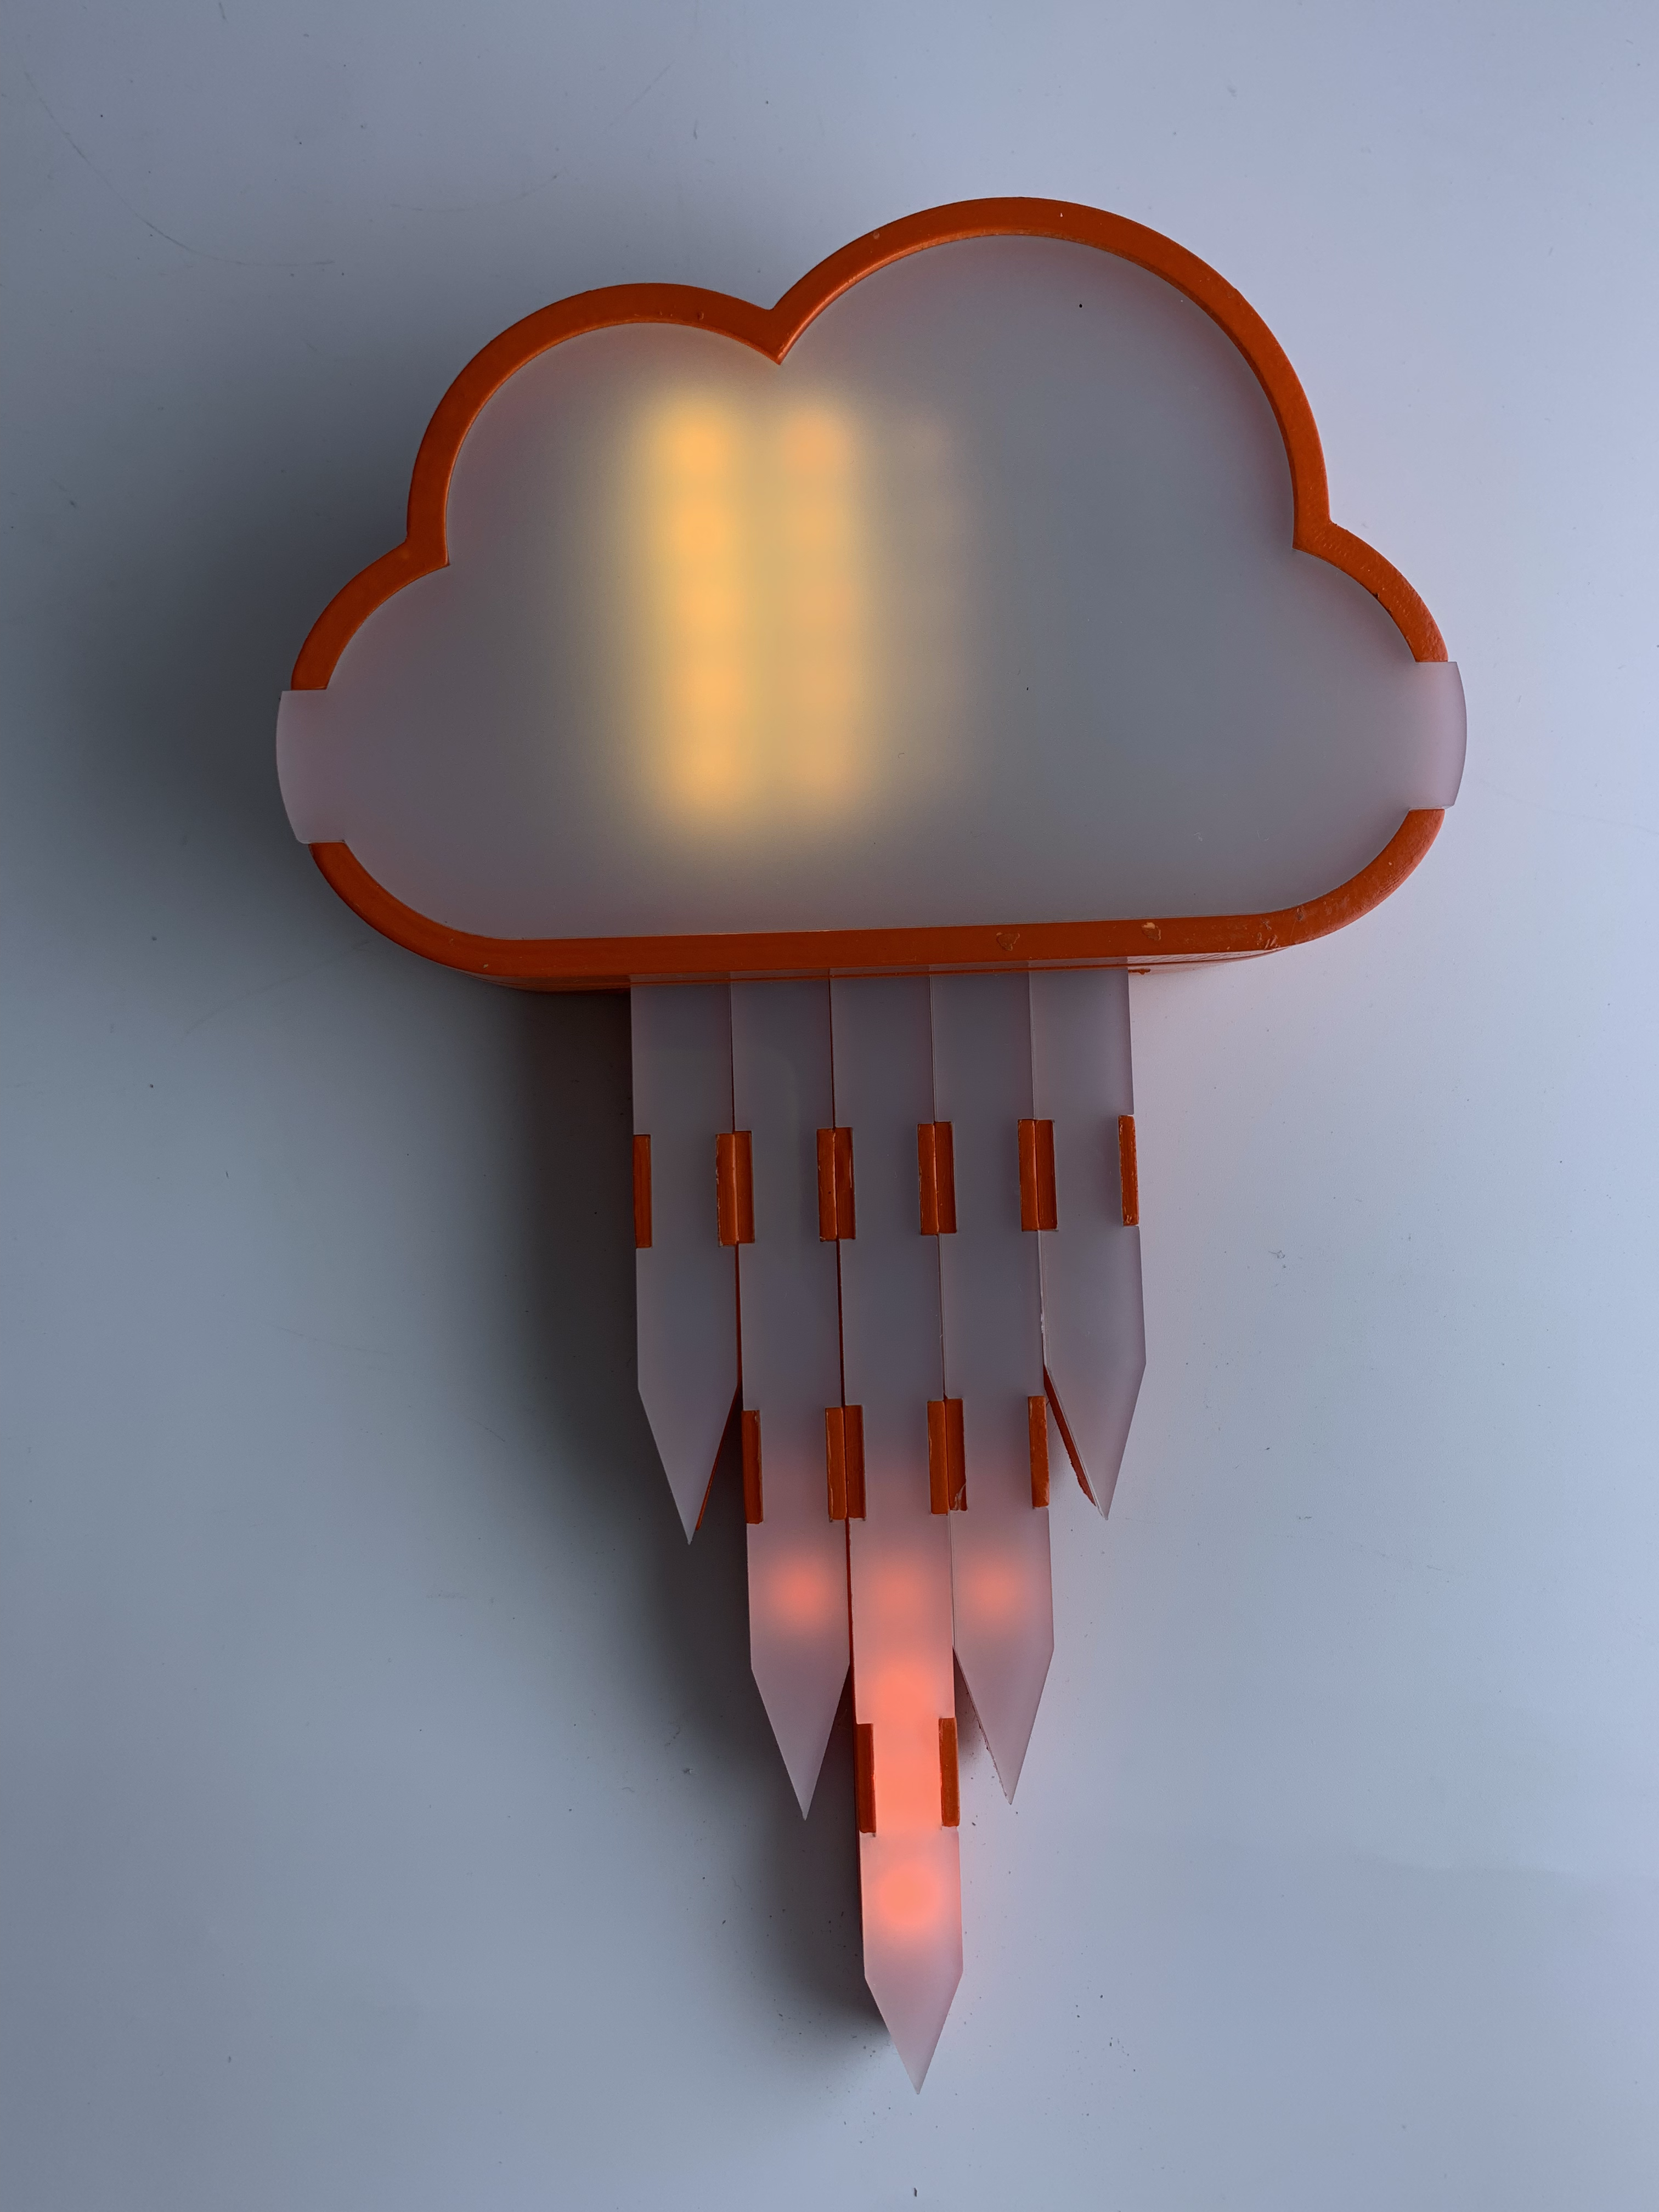
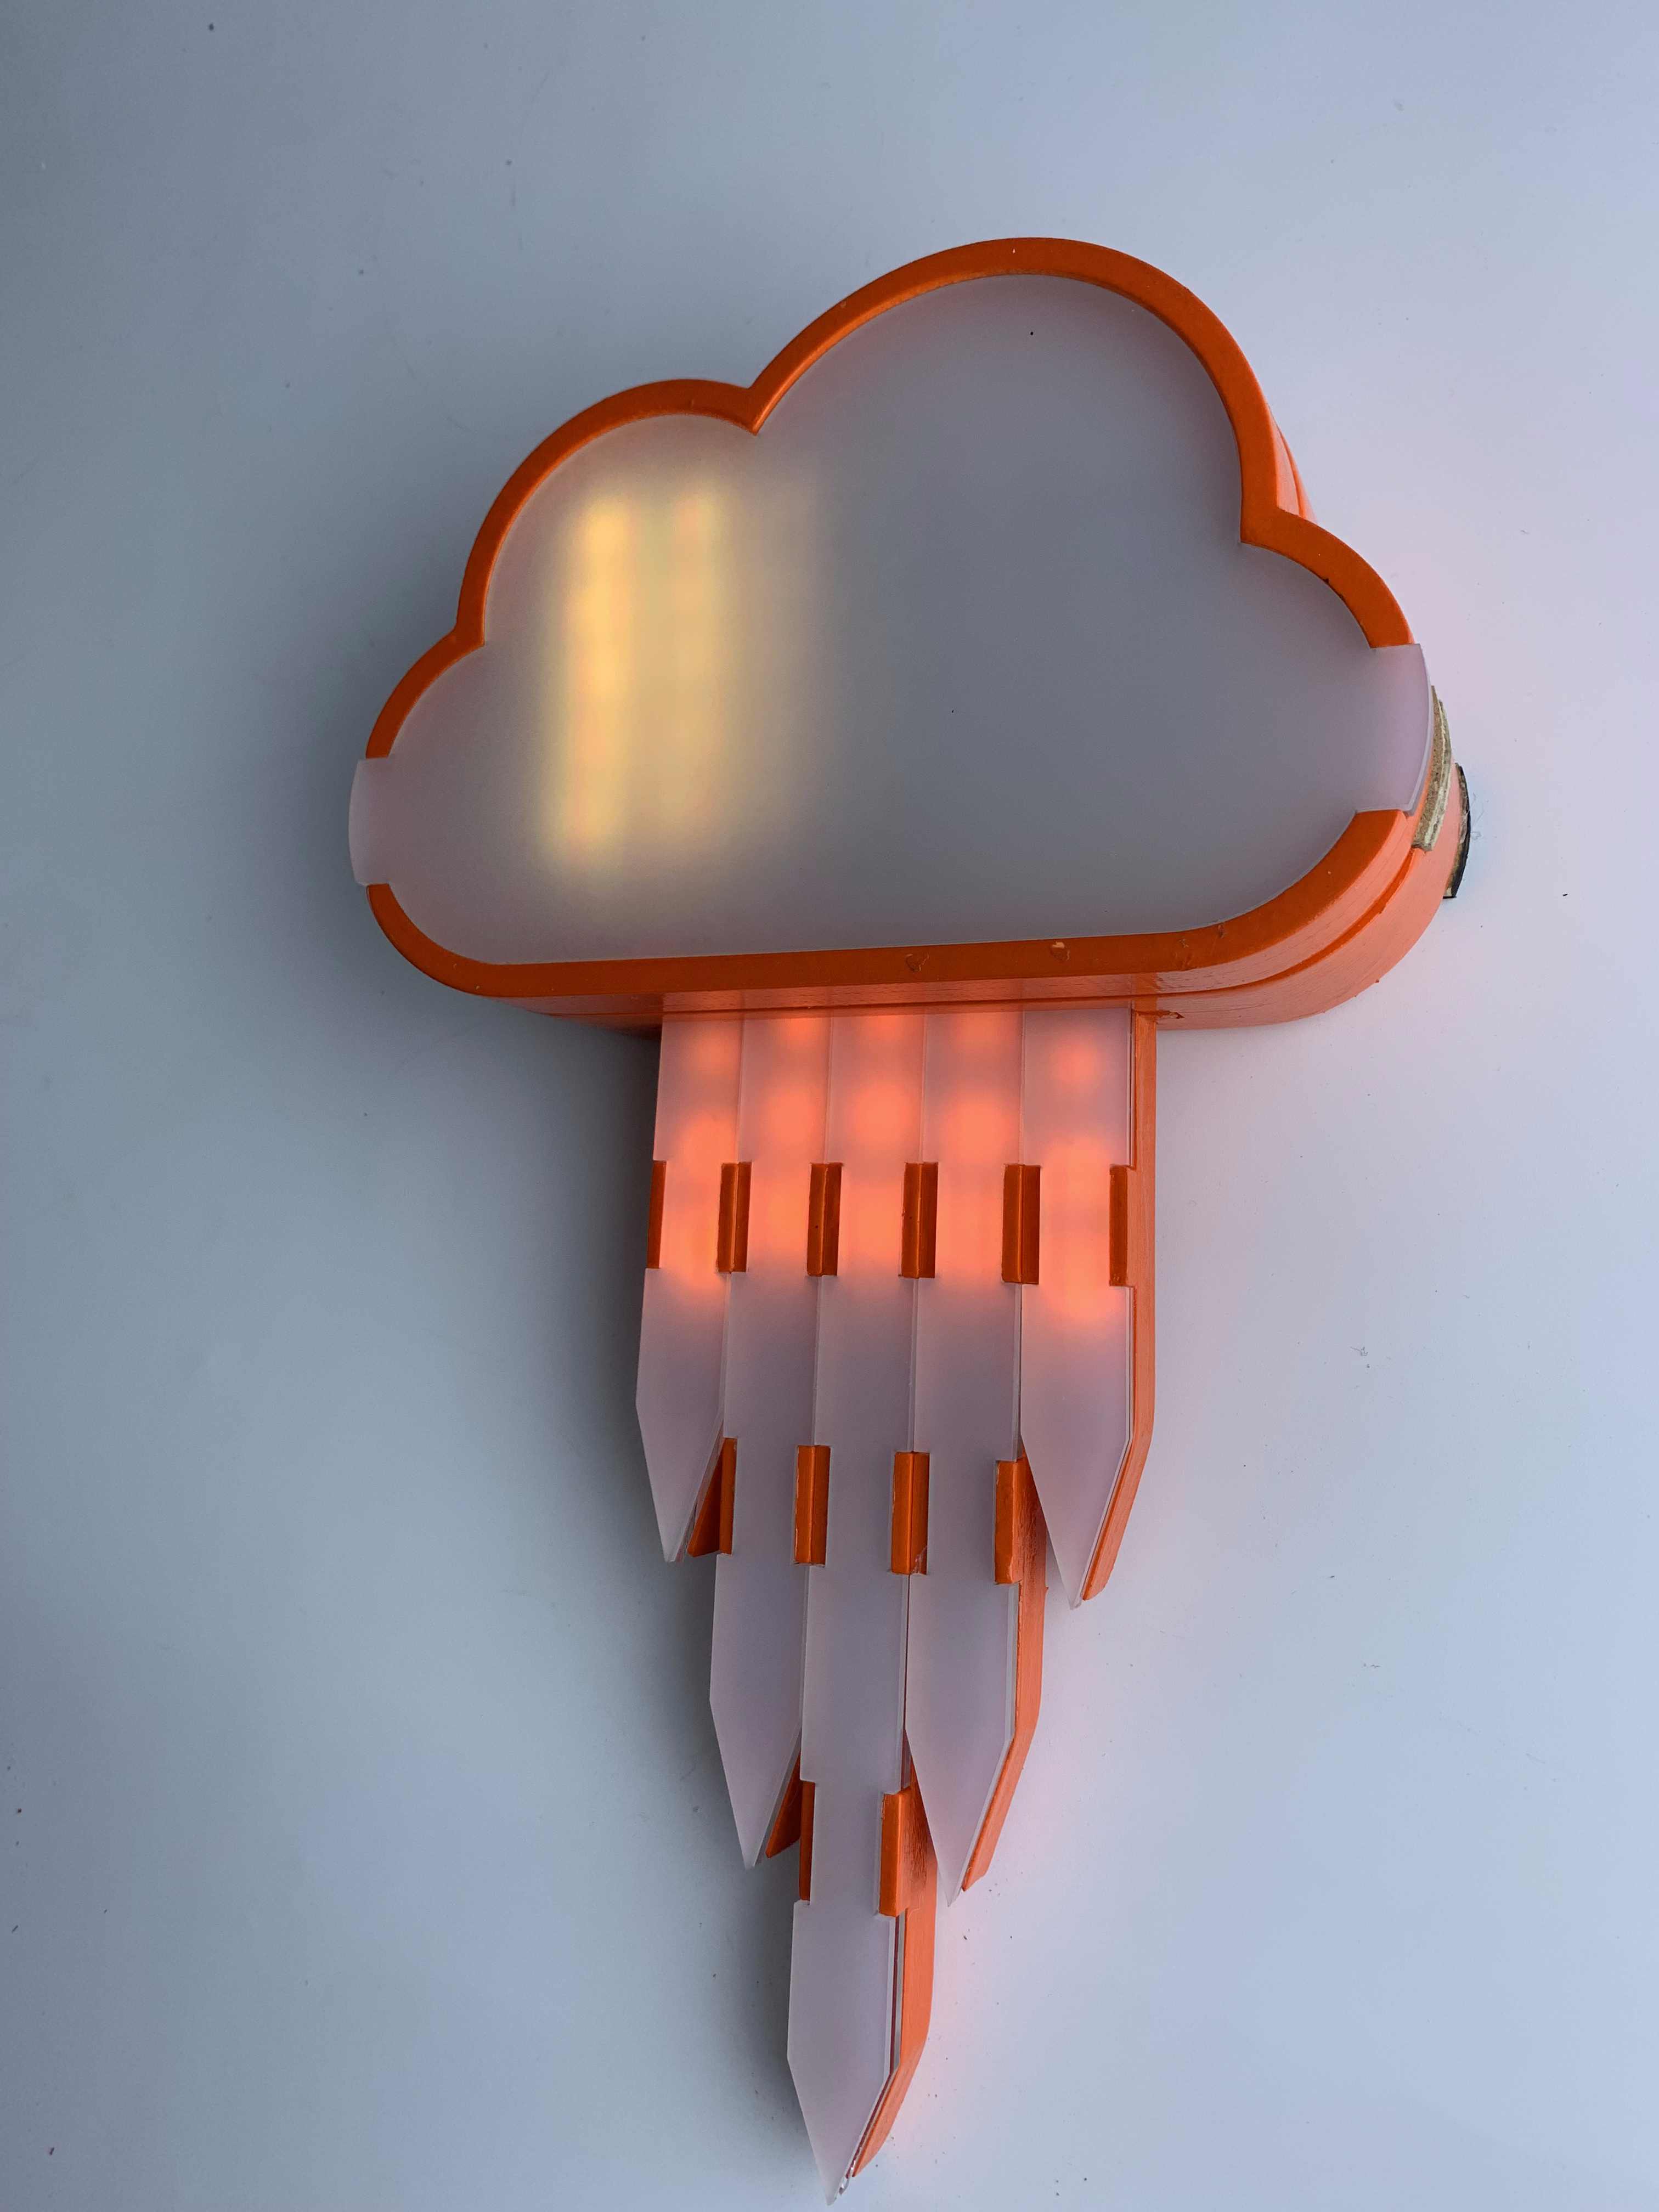
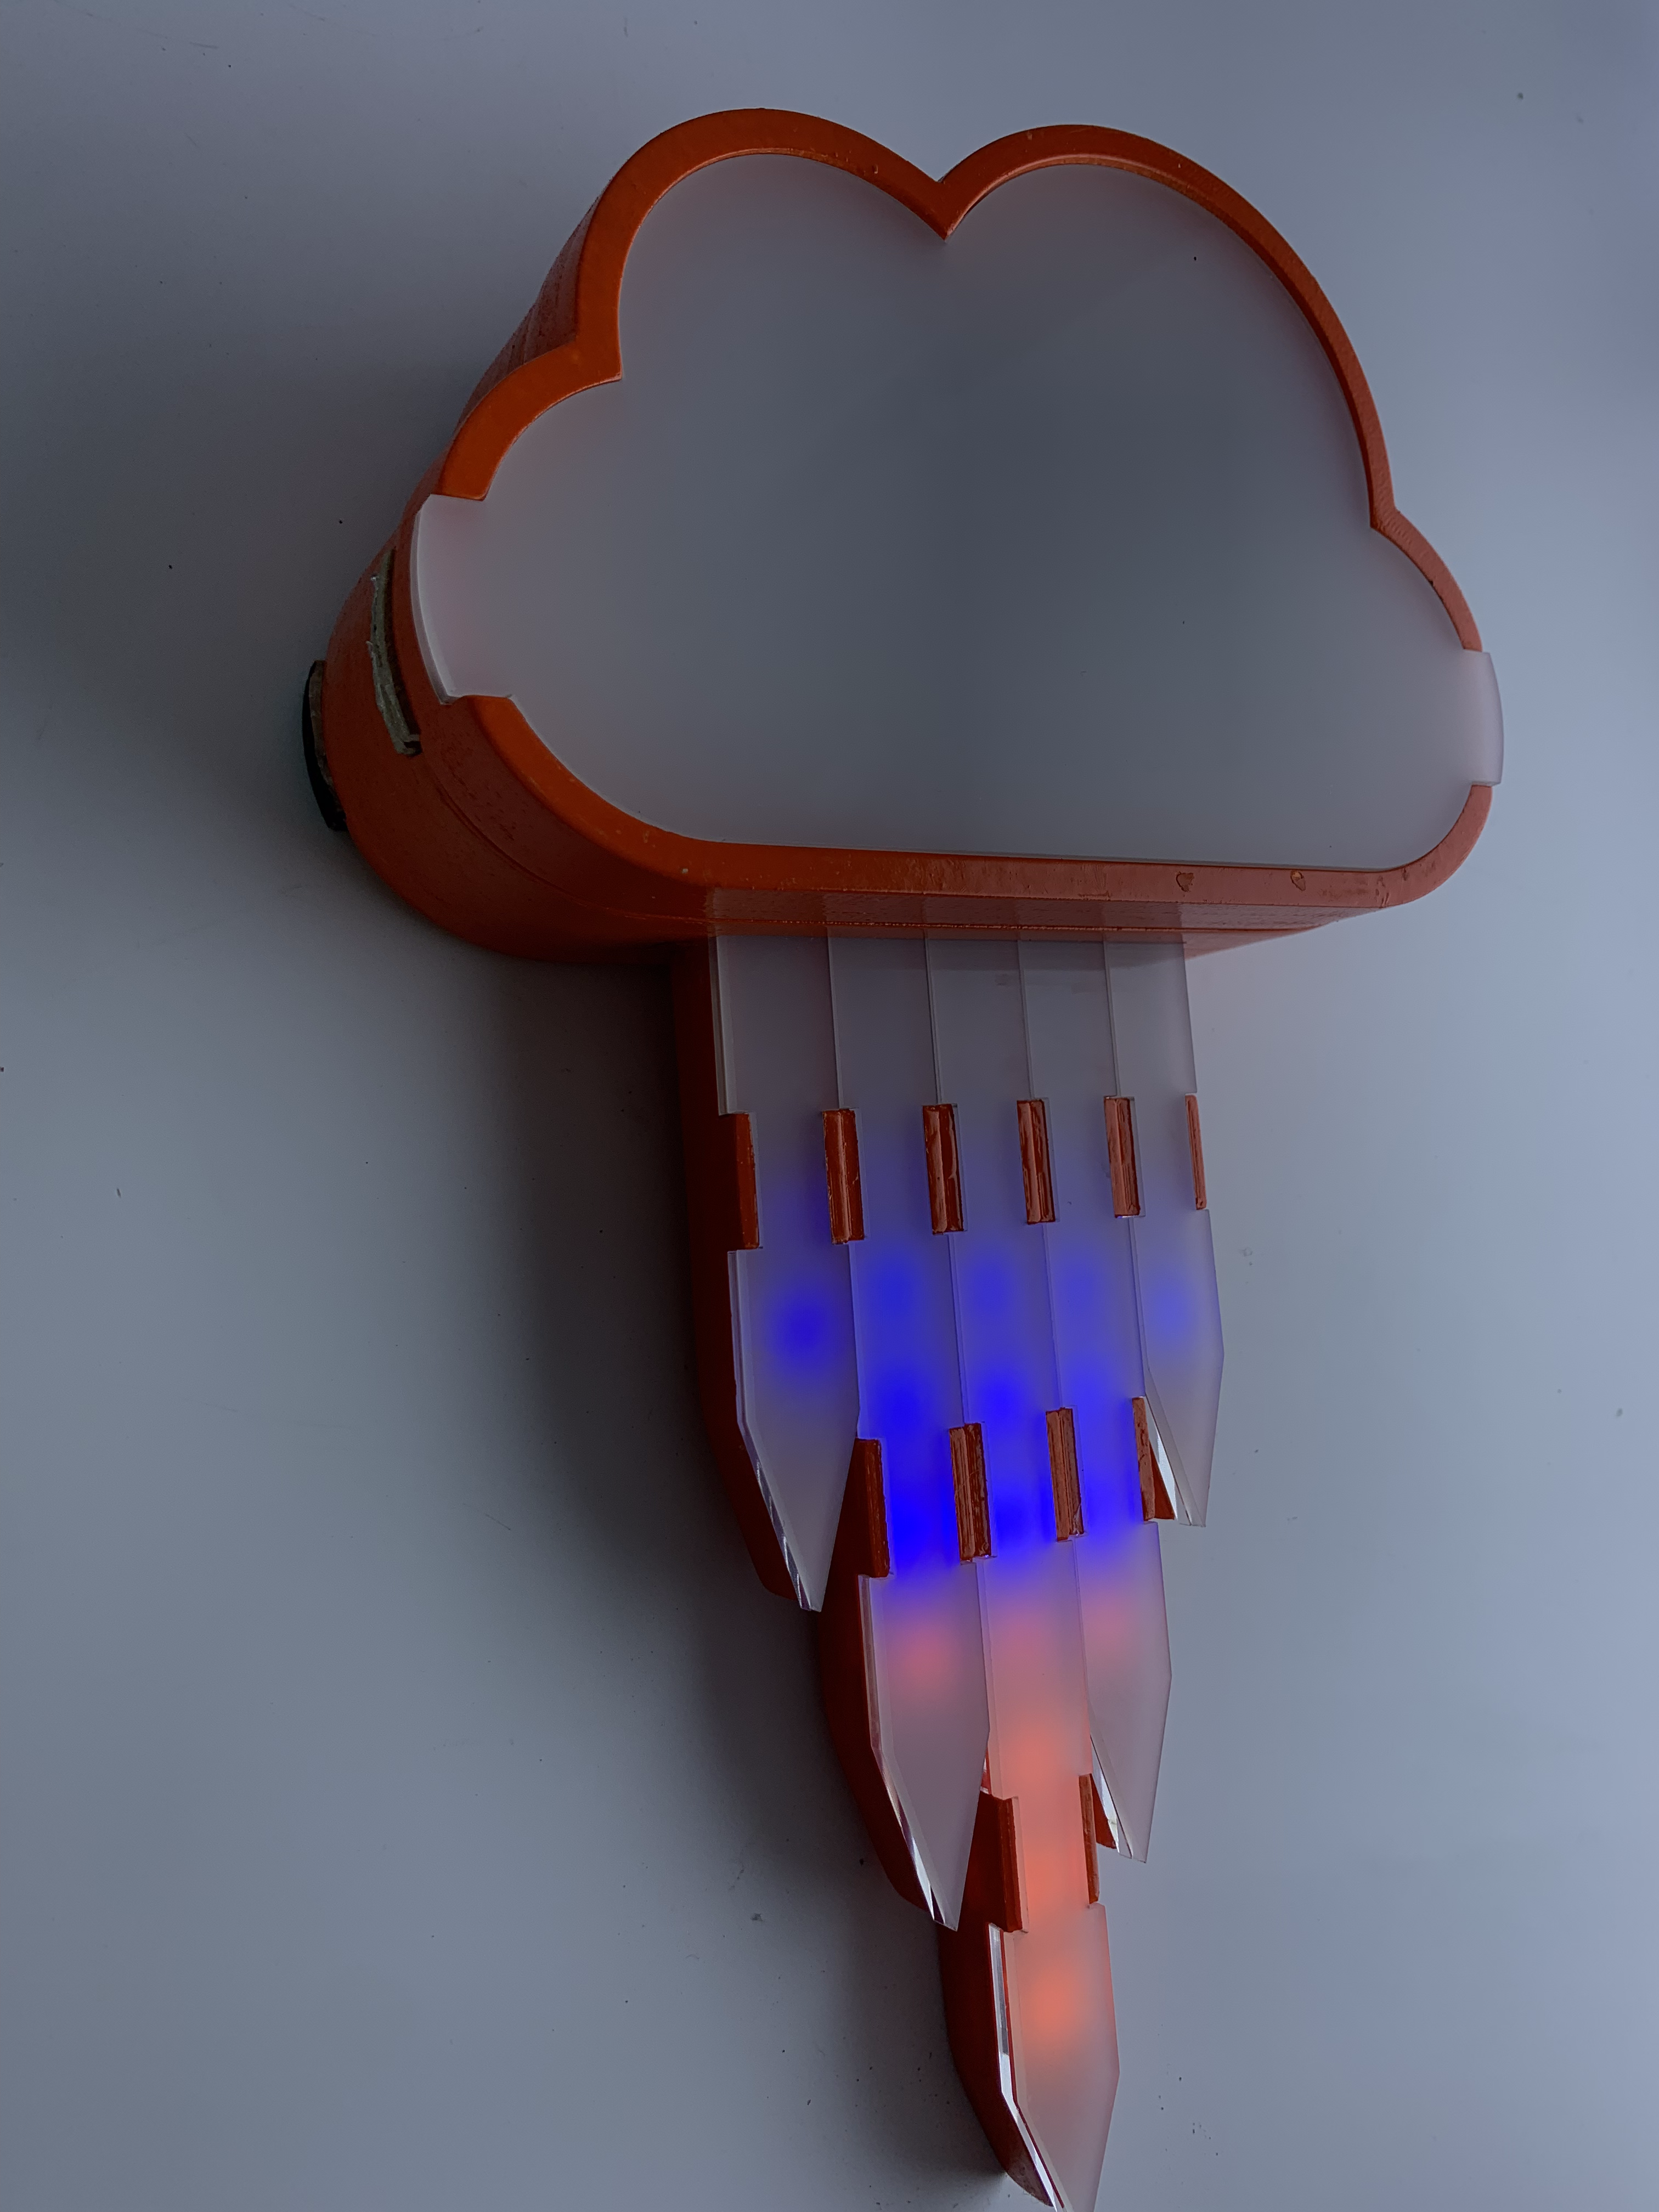

Here is my beautiful creation in action! Notice the switch between day and night is both audio and visual, which is exactly what I was aiming for!
Day Mode
Here is it what it looked like playing the daytime sequence, playing the sounds of birds singing, which is the perfect, most peaceful sound to wake up to in the morning!
The LEDs lighting up in warm hues makes me think of the warmth and coziness of the sun! If I ever wanted to expand on this project, I would loved to animate a sun icon on the cloud LED matrix.
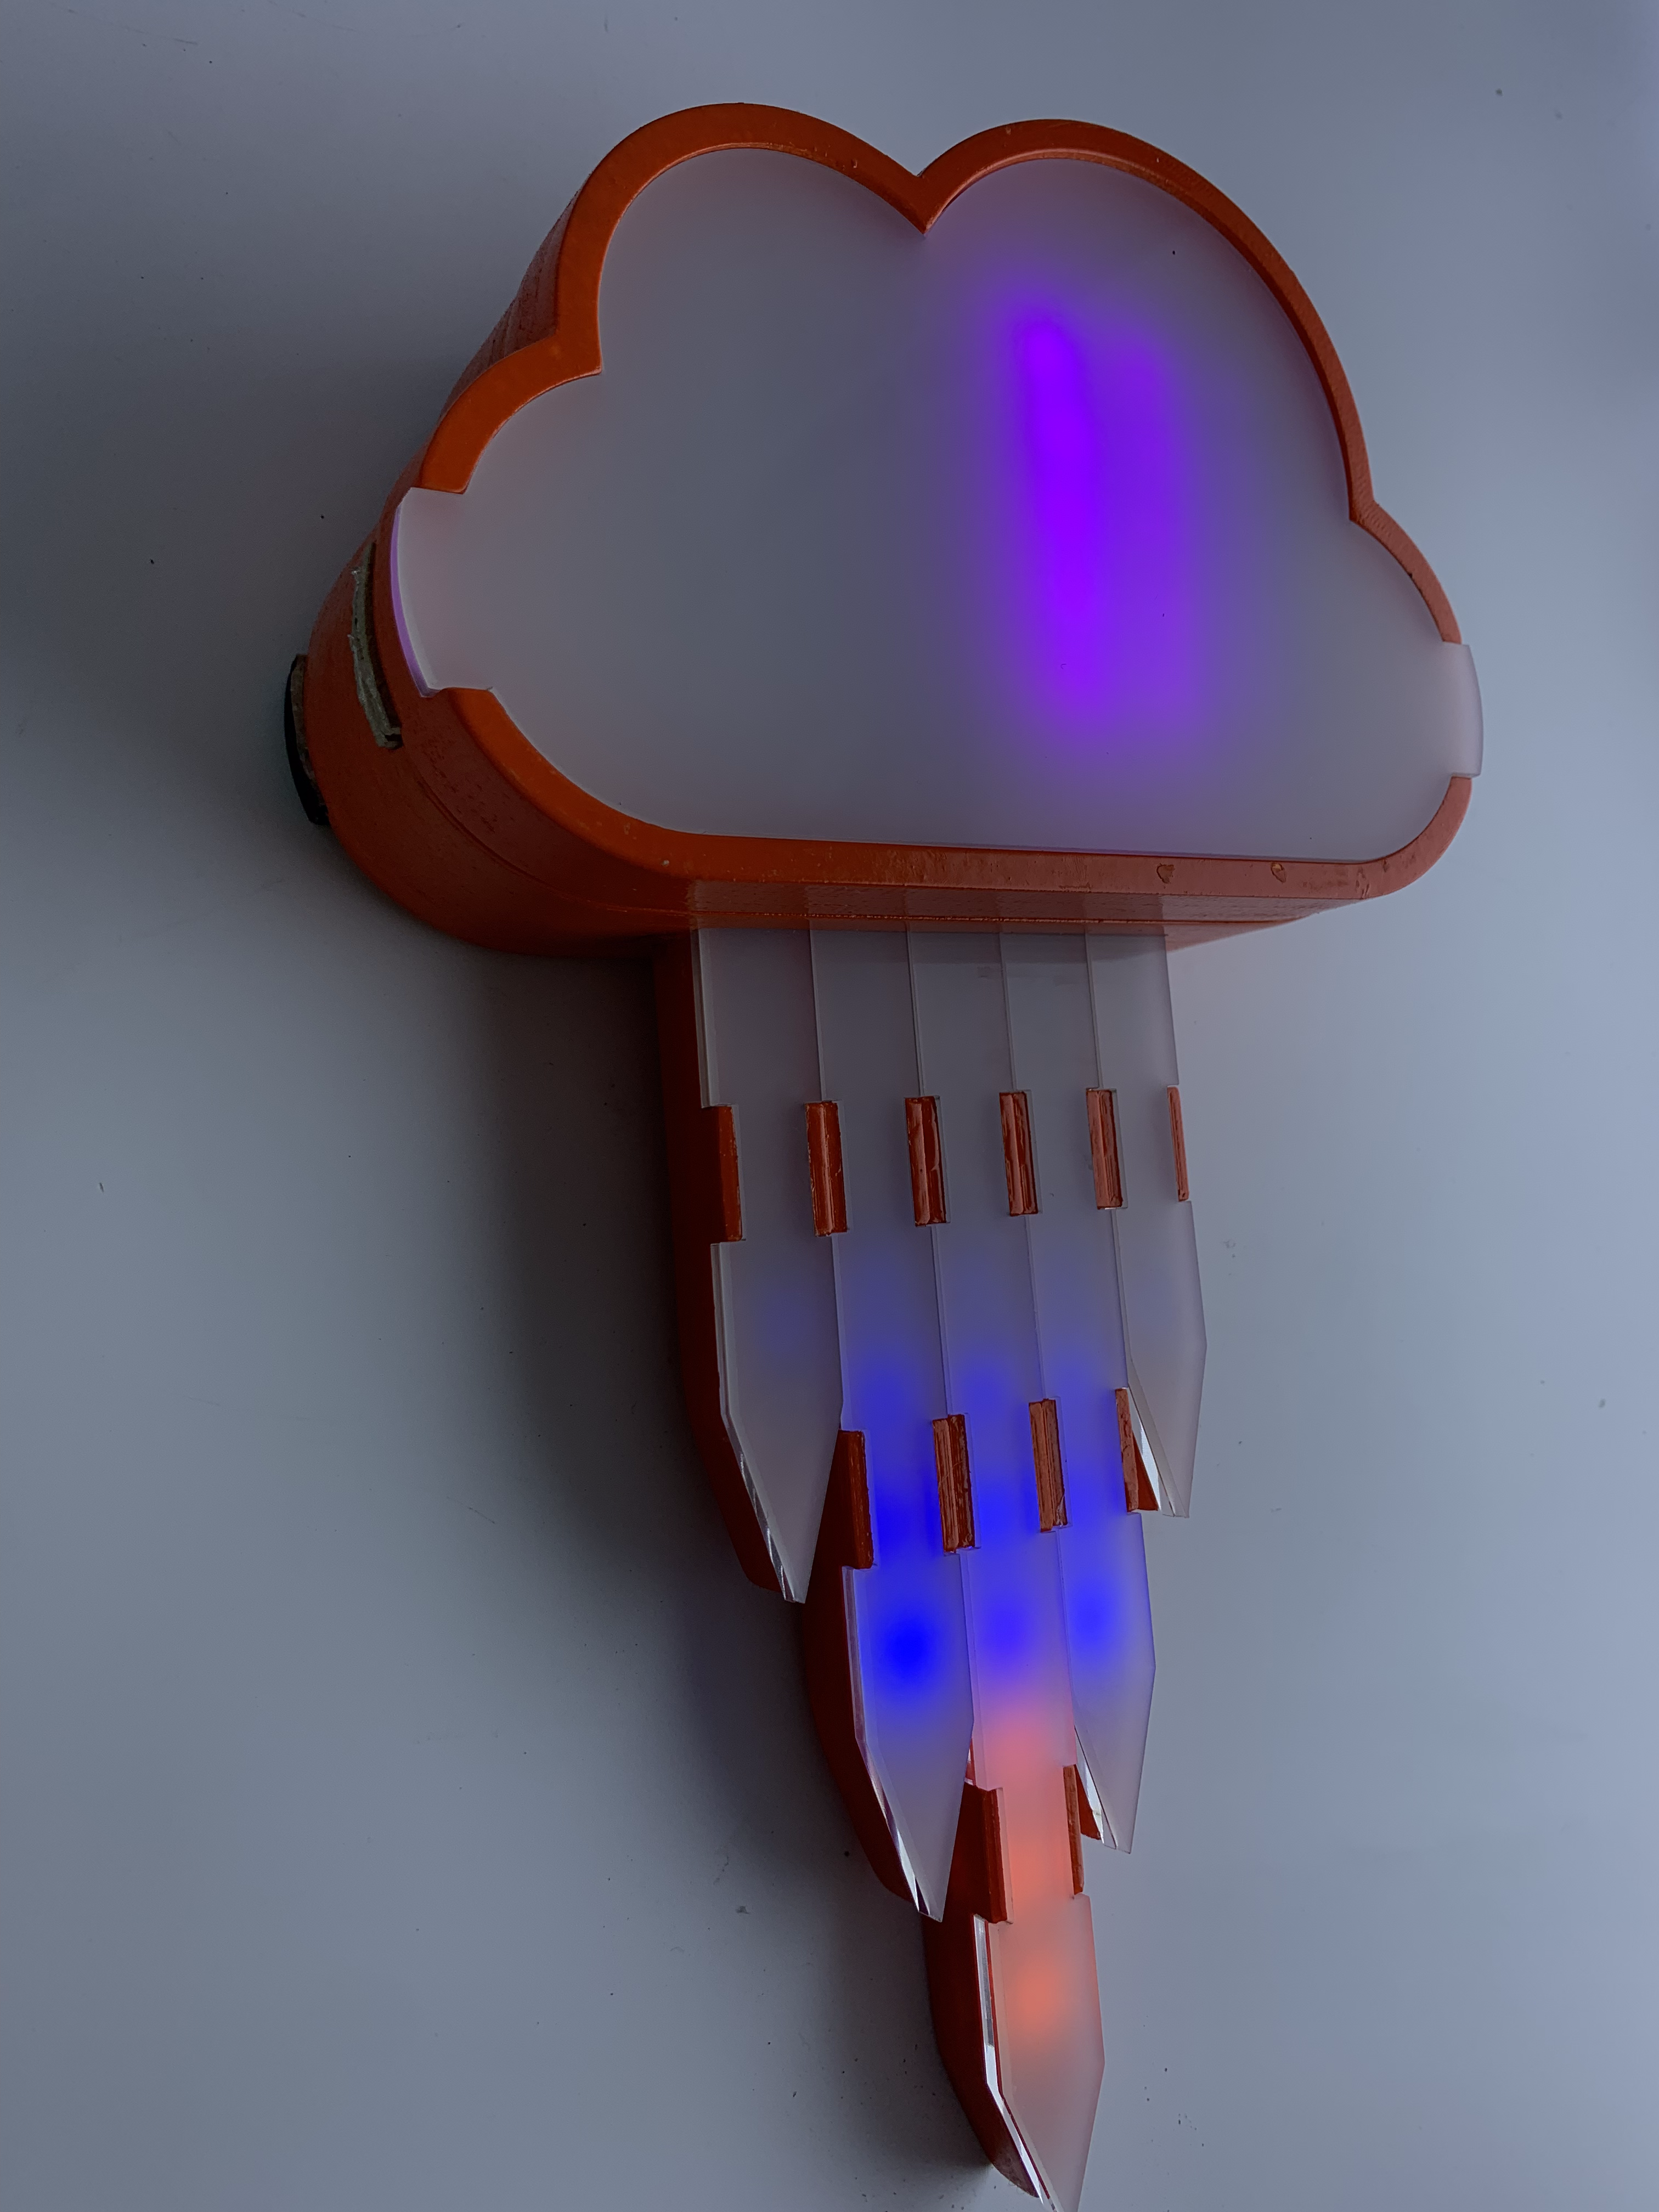
Night Mode
Here is it what it looked like playing the nighttime sequence, playing the sounds of rain falling, which is the perfect, most peaceful sound to wake up to in the morning!
Again, the LEDs are the star of the show, and I enjoy how the cooler hues remind me of how cold I like it when I am about to sleep! The deep blues and purples remind me of the night sky in a colder climate.
As well as this, I would love to animate a crescent moon icon on the LED matrix, but I do enjoy how the rain animation really illuminates beautifully with the combination of clear and diffused acrylic.
Vibing in the Dark
My favourite part about testing out my final project was when I got to see it in action during the night. In the dark, the mood and lighting really shines through.
I wish this video could really capture what my naked eyes could see, but my phone camera can’t stay focused well enough with the high contrast of the bright LEDs.
Future Projects and Growth: A Step Forward
Throughout my many weeks of learning, failing and succeeding at Fab Academy, I have grown a seedling of passion and curiosity for creating that I did not know I had. With this comes my great gratitude, but also a massive itch to explore and create more projects!
With that said, I am very proud of what I was able to achieve with my final project. I believe that I put all my effort into this, to the point of breaking down, but also to the point of doubt that I’d be able to fully deliver. It might not be everything I planned for it to be, but it’s a beautiful start and it has made me feel confident enough to want to do it again. Bigger and better.
If I were to redo this exact project, I’d love to figure out a way to CNC the entire body instead of 3D printing it. The fact that it was 3D printed gave me the opportunity to familiarize myself more with that practice, like the fact that I never knew I would be able to actually sand it down so smoothly, and painting it was pretty fun (and way too messy… please don’t do what I did and actually paint it outdoors, haha)! However, 3D printing it meant that I had limited the maximum size of each part that I could have printed, so it was smaller than I would have liked as a decorative piece (even though night lights are usually quite small). I think using a natural wood, CNC cutting it, and sanding it would have given the overall product a more refined aesthetic than the fun and artsy vibe I ended up choosing.
Additionally, repeating this project on a larger scale would allow me to create a bigger LED matrix on the cloud face, which would have allowed me more freedom and space to create animations, like the sun and moon that I mentioned, but other things as well would be good. However, I would also add an additional LED strip around the inside parameter of the cloud to illuminate it more evenly, since the light from the matrix did not reach the sides as well as I would have wanted.
Lastly, I would also have liked to integrate the programming for this project with the Bluefruit Connect application, since that is an advantage with Adafruit BLE-enabled microcontrollers. This was my original plan to add a level of user customisation and personalisation to the product, since it would allow them to control the LEDs and/or the sounds from the application. The reason I was not able to do this was because the Adafruit PyBadge is not BLE-enabled, and so does not have the bluetooth capabilities to communicate with the application. My plan was to mount the Adafruit Feather nRF52840 Express onto the Adafruit PyBadge and program them to communicate together. This would work by assigning a specific pin to send dedicated signals from the Feather to the PyBadge, which then would trigger the appropriate operation to the PyBadge. This would have been tricky to do, especially to allow more user control of the product, but not impossible. I did not have enough time to do this, however, I would have instead preferred to use a different controller, such as the Adafruit Circuit Playground Bluefruit, or used the Music Maker FeatherWing with stereo speakers with the Feather.
Resource Links
Audio
- Audiomp3 doc: https://docs.circuitpython.org/en/latest/shared-bindings/audiomp3/index.html#module-audiomp3
- Learned audio from here: https://hackaday.io/project/183342-daft-punk-word-clock/details
- Site for mp3: https://pixabay.com/sound-effects/rain-on-a-car-roof-nature-sounds-8448/
- Attempt to convert audio here: https://www.aconvert.com/audio/
- Audiomixer doc: https://docs.circuitpython.org/en/latest/shared-bindings/audiomixer/index.html
- Adafruit tutorial: https://learn.adafruit.com/circuitpython-essentials/circuitpython-audio-out
LED
- Learned about LED anime: https://www.digikey.com/en/maker/projects/circuitpython-led-animations/d15c769c6f6d411297657c35f0166958
- Colors RGB values: https://www.rapidtables.com/web/color/RGB_Color.html
- LED animation library: https://docs.circuitpython.org/_/downloads/led-animation/en/2.3.3/pdf/
RTC
- RTC code: https://github.com/odeevee/DS1302_CircuitPython/blob/master/main.py
- GitHub: https://github.com/odeevee/DS1302_CircuitPython
- User: https://github.com/odeevee
BLE (not used)
- Bluefruit app: https://learn.adafruit.com/adafruit-circuit-playground-bluefruit/bluefruit-le-connect
Circuits
- Fritzing Adafruit parts: https://github.com/adafruit/Fritzing-Library/tree/master/parts
Inspiration
- Real weather cloud project: https://learn.adafruit.com/circuitpython-connected-weather-cloud?view=all
- Neon sign: https://www.google.com/url?sa=i&url=https%3A%2F%2Fwww.shutterstock.com%2Fsearch%2Fneon-cloud-rain&psig=AOvVaw1v8r2A3QCpQyECx9PAL1Va&ust=1677009442973000&source=images&cd=vfe&ved=0CBEQjhxqFwoTCKjcppXxpP0CFQAAAAAdAAAAABAE
Material
- Speaker: https://www.adafruit.com/product/3923
- PyBadge: https://www.adafruit.com/product/4200
- Feather: https://www.adafruit.com/product/4062
- Led Strip: https://www.adafruit.com/product/1461?length=1
- 3.7V battery: https://www.adafruit.com/product/3898
- Coin battery: https://www.adafruit.com/product/654
- RTC: https://www.amazon.com/DS1302-Clock-Module-Real-Time-Arduino/dp/B07Y64VW8X
3D Print Finishing
- Sanding tutorial on YT by Proto3000: https://www.youtube.com/watch?v=NLoB52nPuao
- Painting tutorial: https://www.youtube.com/watch?v=ulAe0nQE0I8